Introduction
Motorcycle fairings are a crucial blend of form and function, providing aerodynamics and visual appeal. For business owners in the motorcycle repair and customization industry, mastering fiberglass repair techniques can unlock significant value by offering cost-effective, durable restoration services. This guide breaks down the process of repairing motorcycle fairings with fiberglass into clear, actionable phases. First, the importance of meticulous cleaning, surface preparation, and sanding is explored as the foundational step for successful repairs. Next, the article delves into the precise application of fiberglass cloth and resin, emphasizing materials and methods that ensure strong adhesion and reinforcement. Finally, curing, sanding, and finishing techniques are detailed to restore the fairing’s structural integrity and visual perfection. Each chapter builds on the previous, giving business owners an integrated understanding of how to deliver professional-grade repairs that enhance customer satisfaction and business reputation.
Tables of Contents
Chapter 1: Mastering Cleaning, Surface Preparation, and Sanding for Fiberglass Motorcycle Fairing Repairs
- Essential Cleaning Techniques and Precise Sanding Practices for Durable Fiberglass Fairing Repairs
- Mastering Surface Preparation: The Key to Strong and Seamless Fiberglass Repairs on Motorcycle Fairings
- Mastering Sanding Techniques and Tool Choices for Optimized Motorcycle Fairing Repairs
- Essential Safety Practices During Cleaning, Surface Preparation, and Sanding in Motorcycle Fairing Fiberglass Repairs
- Mastering Surface Readiness: The Crucial Role of Cleaning and Sanding in Fiberglass Fairing Repairs
Chapter 2: Applying Fiberglass Cloth and Resin in How to Repair Motorcycle Fairings with Fiberglass
- Essential Surface Preparation for Optimal Fiberglass Cloth and Resin Bonding
- Mastering the Art of Cutting and Layering Fiberglass Cloth for Durable Fairing Repairs
- Expert Techniques for Mixing and Applying Resin to Reinforce Motorcycle Fairings with Fiberglass
- Mastering Curing, Sanding, and Finishing to Perfect Fiberglass Repairs on Motorcycle Fairings
- Practical Tips, Common Pitfalls, and Cost-Effective Benefits of Applying Fiberglass Cloth and Resin for Motorcycle Fairing Restoration
Chapter 3: Mastering the Critical Curing, Sanding, and Finishing Steps in Motorcycle Fairing Fiberglass Repair
- Unlocking the Science of Fiberglass Curing: Ensuring Durable Repairs and Superior Bonding in Motorcycle Fairings
- Achieving Smooth, Invisible Repair Edges: Mastering Progressive Sanding Techniques for Fiberglass Motorcycle Fairings
- Achieving a Flawless Finish: Mastering the Curing, Sanding, Priming, and Painting Process for Fiberglass Motorcycle Fairings
- Essential Tools and Materials for Mastering Curing, Sanding, and Finishing in Fiberglass Fairing Repairs
- Ensuring Safety and Environmental Care During Fiberglass Fairing Repairs: Best Practices for Curing, Sanding, and Finishing
Chapter 1: Mastering Cleaning, Surface Preparation, and Sanding for Fiberglass Motorcycle Fairing Repairs
1. Essential Cleaning Techniques and Precise Sanding Practices for Durable Fiberglass Fairing Repairs
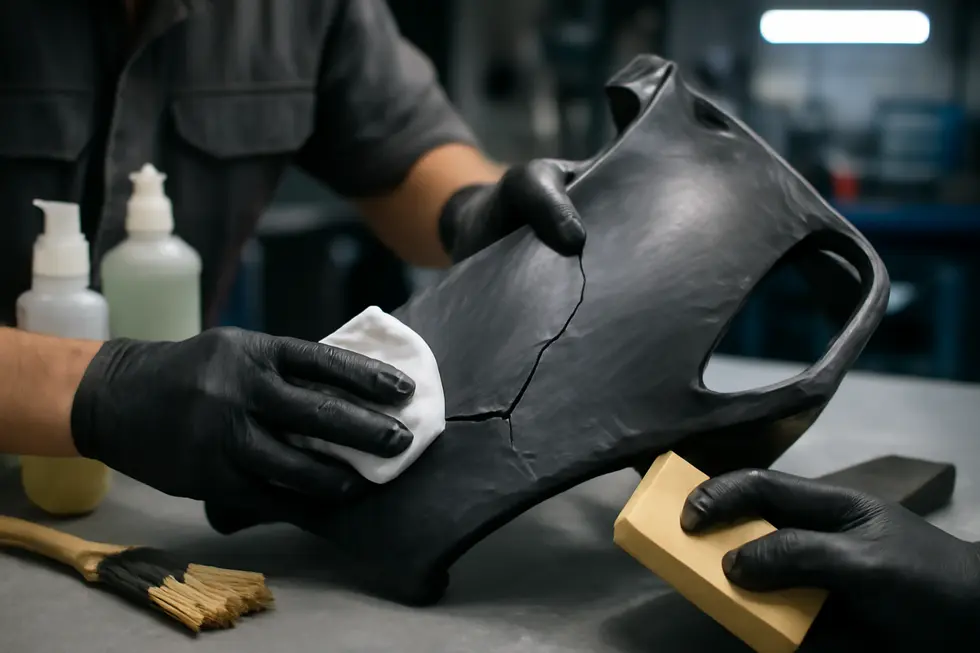
Achieving a strong, lasting repair on motorcycle fairings with fiberglass starts with meticulous cleaning and sanding techniques that prepare the surface for optimal adhesion and finish. Begin by thoroughly washing the damaged fairing area with a pH-neutral motorcycle shampoo and soft microfiber cloth. This approach ensures removal of dirt, grease, and oils without introducing residues or harsh chemicals that may compromise the fiberglass resin’s bonding capability. Allow the surface to dry fully before proceeding to sanding.
Sanding is pivotal in removing the glossy gelcoat and any weak, damaged fiberglass fibers from the repair zone. Employing progressively finer grits—from coarse grades like 32-grit to smoother grades—roughens the surface to create a “key” for the resin to adhere firmly. Throughout sanding, it’s crucial to work carefully to avoid over-sanding or creating uneven surfaces which could weaken the repair or complicate the finish. Feathering the edges of cracks and abrasions smooths transitions with the surrounding fairing, making the final repaired area less noticeable.
After sanding, all dust and debris must be removed completely by vacuuming or blowing off with compressed air. This prevents contamination that could weaken resin adhesion or mar the finish. Always wear protective gear such as a respirator to avoid inhaling fiberglass dust, which poses health risks.
These combined steps—cleaning with gentle but effective agents, precise sanding to prepare the surface, and thorough dust removal—establish the foundation for a durable and professional-quality fiberglass repair. For visual learners, detailed tutorial videos like “How Do You Repair Fiberglass On A Motorcycle?” on YouTube offer valuable insight into these essential preparatory stages.
For additional guidance and resources on motorcycle fairing care and repair, visit Explore the Best Motorcycle Fairings at Summit Fairings.
2. Mastering Surface Preparation: The Key to Strong and Seamless Fiberglass Repairs on Motorcycle Fairings
A successful fiberglass repair on motorcycle fairings begins with meticulous surface preparation, crucial for ensuring a strong, lasting bond between the repair materials and the existing fairing. The process starts with comprehensive cleaning to eliminate dirt, grease, and oils, which interfere with resin adhesion. Using a mild detergent or specialized solvent, the damaged area must be cleaned thoroughly and dried completely to prevent moisture from weakening the bonding process.
Following cleaning, sanding the fairing is essential to dull the glossy surface and remove loose or weakened fragments. Coarse sandpaper, such as 32-grit, effectively roughens the surface, creating an abrasive texture for enhanced mechanical adhesion of the fiberglass and resin. Careful sanding avoids enlarging the damage while preparing an ideal surface for resin application. After sanding, every trace of dust and debris must be removed with a vacuum or tack cloth to prevent contamination beneath the fiberglass layers.
Preparing the surface to be clean, dry, and abraded to a non-glossy finish ensures the fiberglass cloth bonds properly when impregnated with epoxy or polyester resin. Applying multiple fiberglass layers with fibers oriented in alternating directions builds the repair’s strength and flexibility uniformly. Complete resin saturation of the fiberglass cloth is vital for structural integrity.
Once cured, the layered composite requires final sanding with progressively finer grits to blend the repair smoothly into the original fairing. This attention to thorough preparation and finishing not only reinforces the fairing but ensures a visually seamless restore, making the repaired area barely distinguishable.
For further insights into surface preparation and fairing repair, visit this detailed guide on sanding methods and surface readiness: https://www.longezpush.com/chapter-9-main-gear-landing-brake/. Additionally, exploring the selection of quality motorcycle fairings can complement your repair projects at Summit Fairings.
3. Mastering Sanding Techniques and Tool Choices for Optimized Motorcycle Fairing Repairs
Sanding procedures and equipment selection form the backbone of effective surface preparation when repairing motorcycle fairings with fiberglass. The process begins with thoroughly cleaning the damaged area to remove oils, dust, and contaminants that could undermine resin adhesion. Following this, initial sanding with coarser grits, typically between 32 and 80, is employed to dull glossy finishes, eliminate old coatings, and eliminate surface imperfections. This step is crucial to create a roughened surface that allows resin and fiberglass cloth to bond effectively.
Using a sanding block or sandpaper by hand provides control and ensures even pressure, especially on curved or delicate fairing surfaces. For larger, flat areas, orbital or rotary sanders can accelerate the work but demand careful handling to prevent gouging the fiberglass. After the coarse sanding, progressively finer grits should be used—culminating in very fine wet sanding around 2000 grit—to smooth the repair area and eliminate scratches from earlier sanding. This refinement is essential before applying primer or paint to ensure a flawless finish.
Dust generated during sanding must be meticulously removed through vacuuming or compressed air to avoid contamination of the repair and finishing layers. Wearing protective gear like respirators is vital to safeguard from fiberglass dust and resin fumes throughout the sanding and cleaning process. Once sanding is complete, polishing tools such as foam or wool pads combined with appropriate compounds can restore surface gloss and prepare the area for final treatment.
Mastering these sanding techniques—combined with appropriate equipment choices—ensures the fiberglass repair is structurally sound and visually seamless. For further insights on surface preparation methods tailored to fiberglass parts, the detailed guidance in the Eastwood auto paint guide proves highly valuable. Explore more about motorcycle fairings and surface prep techniques at the Summit Fairings blog.
Reference: https://www.eastwood.com/paints/how-to-paint-a-car-at-home-easy-steps.html
4. Essential Safety Practices During Cleaning, Surface Preparation, and Sanding in Motorcycle Fairing Fiberglass Repairs
When repairing motorcycle fairings with fiberglass, prioritizing safety during cleaning, surface preparation, and sanding is vital to protect your health and achieve quality results. The repair process generates fiberglass dust and involves chemicals that can irritate the skin, eyes, and respiratory system. Wearing personal protective equipment (PPE) is essential: a high-quality dust mask or respirator guards against inhaling fine fiberglass particles and sanding debris, while chemical-resistant gloves shield hands from solvents and resins that may cause skin irritation or burns. Protective eyewear such as safety goggles is equally important to prevent eye injury from airborne dust or accidental splashes.
Performing these tasks in a well-ventilated space or outdoors reduces exposure to harmful fumes emitted by cleaning agents, resin, and paint materials. Using the appropriate sandpaper grit minimizes excessive dust production and surface damage, which further contributes to safer and more effective preparation. Avoid abrasive tools that may not only harm the fairing but also increase airborne particles, creating unnecessary health risks.
By attentively combining these safety measures, you reduce the risks of respiratory complications, chemical exposure, and physical injury while optimizing the surface for a strong bonding of the fiberglass repair. Ensuring a safe workspace complements the technical steps, supporting a successful and enduring restoration of your motorcycle fairing’s form and function.
For visual guidance on protection and techniques, you might find helpful resources such as the video “How Do You Repair Fiberglass On A Motorcycle?” on YouTube that illustrate safe handling and sanding practices during the process.
5. Mastering Surface Readiness: The Crucial Role of Cleaning and Sanding in Fiberglass Fairing Repairs
Achieving a durable and seamless fiberglass repair on motorcycle fairings begins with mastering surface readiness through thorough cleaning and precise sanding. This integrated process is critical because every contaminant—be it dirt, grease, or residual oils—can compromise how well the resin bonds to the surface, weakening the repair’s structural integrity over time. Starting with a suitable solvent or degreaser designed specifically for plastics ensures complete removal of these contaminants without damaging the fairing material.
Once clean, sanding the affected area with medium grit sandpaper (typically between 120 and 220) roughens the inherently smooth plastic surface. This abrasion creates a mechanical grip, or ‘tooth,’ that allows the fiberglass resin to adhere more effectively. Sanding must extend slightly beyond the damaged zone to ensure a well-blended repair and stronger edge-to-fiber integration. After sanding, meticulous removal of all dust and debris—ideally through vacuuming or wiping with a tack cloth—is essential because leftover particles act as barriers that reduce resin penetration.
The synergy of cleaning and sanding prepares the fairing surface to receive the fiberglass cloth and resin, maximizing wetting and fiber impregnation for superior reinforcement. This attention to detail in surface preparation not only enhances the repair’s longevity but also supports achieving a smooth, professional finish once sanding and painting are complete. These preparation techniques are widely recognized, even paralleling those in high-performance composite repairs such as in aerospace, underscoring their importance.
For a step-by-step visual walkthrough, viewers can consult detailed tutorials like How Do You Repair Fiberglass On A Motorcycle? on YouTube, which demonstrate the nuances of cleaning, sanding, and resin application.
Explore additional tips and insights on preparing your motorcycle fairings at your ultimate source for affordable motorcycle fairings.
Chapter 2: Applying Fiberglass Cloth and Resin in How to Repair Motorcycle Fairings with Fiberglass
1. Essential Surface Preparation for Optimal Fiberglass Cloth and Resin Bonding
A strong, lasting repair of motorcycle fairings using fiberglass cloth and resin starts with meticulous surface preparation. The foundation of this process is a thoroughly cleaned damaged area. Removing all grease, dirt, wax, and contaminants ensures that the resin will adhere properly. Commonly, isopropyl alcohol or a degreaser is used to achieve this level of cleanliness without leaving residues. Once clean, sanding the area with medium-grit sandpaper (typically 80-120 grit) roughens the surface to create an ideal mechanical grip for the resin. This “tooth” is crucial, as smooth or glossy surfaces repel resin, resulting in weak bonding.
Before sanding, any loose or cracked fragments around the damage should be carefully removed to prevent future failures. For cracks or holes, beveling the edges slightly enhances resin penetration and bonding by exposing more surface area. After sanding, clearing away all dust and debris with a tack cloth or compressed air is necessary to maintain a pristine workspace.
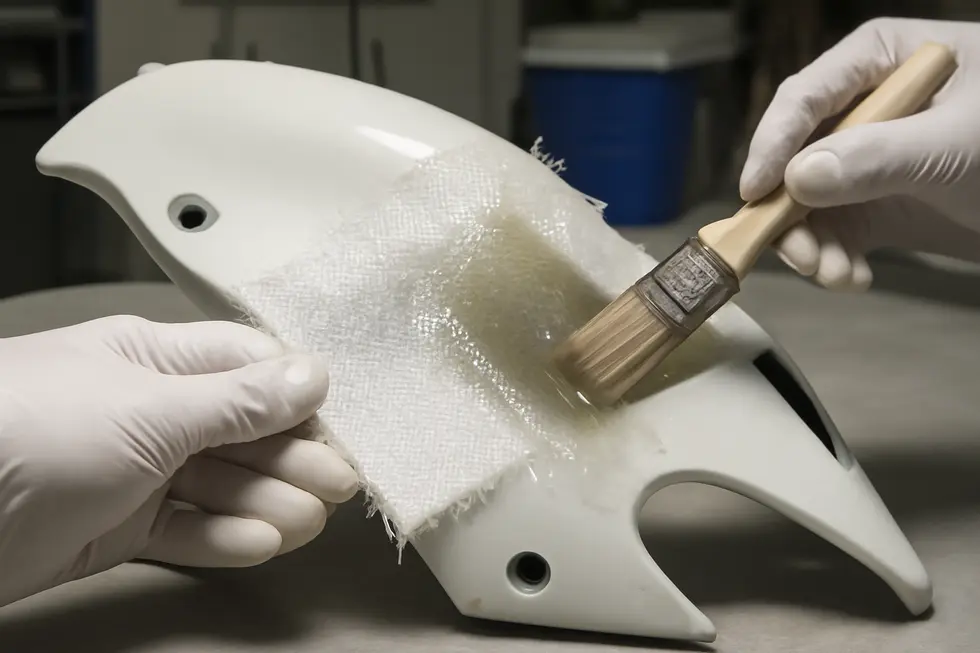
Only with this prepped surface can you confidently apply fiberglass cloth. Saturating the cloth with resin and smoothing it with a brush ensures full impregnation and avoids air pockets, which could compromise strength. The resin-soaked cloth then bonds effectively to the roughened area, creating a reinforced patch that restores structural integrity. This preparation step directly influences the durability and smooth finish of the final repair.
For a deeper dive into repair steps and techniques, explore detailed video tutorials like “How Do You Repair Fiberglass On A Motorcycle?” available on YouTube, which visually demonstrate surface prep and resin application.
For quality replacement parts to complement your repair, visit Explore the Best Motorcycle Fairings at Summit Fairings.
2. Mastering the Art of Cutting and Layering Fiberglass Cloth for Durable Fairing Repairs
An essential step in repairing motorcycle fairings with fiberglass involves accurately cutting and layering the fiberglass cloth to rebuild structure and achieve a seamless finish. Begin by carefully assessing the damaged area and cutting fiberglass cloth pieces that extend beyond the compromised section. These pieces should be sized progressively smaller with each subsequent layer to create a smooth taper between the repair patch and the surrounding fairing surface, which helps maintain the fairing’s aerodynamic shape and visual consistency.
Once the fairing surface is thoroughly cleaned and sanded for optimal resin adhesion, apply a generous coat of resin before placing the first layer of fiberglass cloth. It’s vital to saturate the cloth completely with resin using a brush or roller as this ensures the fibers bind tightly to the substrate, preventing weak spots or delamination. Each additional layer should be applied similarly, with resin applied before and after laying the cloth, building strength and thickness gradually.
Allowing the resin to cure properly between layers, depending on the environmental conditions and resin type, enhances the repair’s durability. After all layers are applied and fully cured, sanding the area smooth will blend the repair with the original fairing surface. Finally, primer and paint can be applied to restore color uniformity and protect the repair.
This layering technique is critical to avoid brittle patches and creates a repair that is both structurally sound and aesthetically pleasing. For a step-by-step visual guide, detailed videos such as “How Do You Repair Fiberglass On A Motorcycle?” provide invaluable insights into sanding, layering, and resin application techniques.
For more tips on motorcycle bodywork preparation and repairs, visit Explore the Best Motorcycle Fairings at Summit Fairings.
3. Expert Techniques for Mixing and Applying Resin to Reinforce Motorcycle Fairings with Fiberglass
Repairing motorcycle fairings with fiberglass demands careful attention to the mixing and application of resin to ensure a durable, long-lasting fix. After thoroughly preparing the damaged area by sanding away loose fragments and cleaning the surface, the next step is mixing the resin with its hardener in an exact ratio specified by the manufacturer. Accuracy here is critical since improper proportions can affect curing time and the final strength of the repair. Mixing should be done in small, manageable batches as the resin begins to harden quickly, reducing workability.
Once mixed, a thin, even coat of resin is applied to the prepared area. The fiberglass cloth must then be laid carefully over this wet resin, ensuring it conforms smoothly to the contours without trapping air bubbles or wrinkles. Immediately saturating the cloth with additional resin—applied gently using a brush or small roller—is essential to impregnate the fibers fully. This combination creates the composite patch that restores the fairing’s structural integrity.
Allowing the resin and fiberglass layers to cure completely before proceeding is vital; curing times vary with resin type and ambient temperature. For more extensive damage, multiple layers of cloth and resin can be applied, each fully cured before adding the next. Overlapping cloth edges will also improve overall strength. Once cured, the repair area is sanded smooth and finished with primer and paint to match the original appearance.
Adhering to safety precautions like wearing gloves and a mask and working in well-ventilated spaces is important throughout. For hands-on visual guidance, tutorial videos such as “How Do You Repair Fiberglass On A Motorcycle?” on YouTube offer valuable, step-by-step instructions that enhance the learning process.
For additional tips on selecting quality fairings and related repair guidance, explore affordable motorcycle fairings and maintenance advice.
(External tutorial resource: https://www.youtube.com/watch?v=QWQoPIXYt4k)
4. Mastering Curing, Sanding, and Finishing to Perfect Fiberglass Repairs on Motorcycle Fairings
A critical phase after applying resin-saturated fiberglass cloth to damaged motorcycle fairings is the curing process. The resin must fully harden to achieve maximum structural integrity, which varies depending on the resin type and ambient conditions. For instance, polyester and epoxy resins each have different curing times, typically requiring the surface to become tack-free before the next step. Rushing this phase risks weakening the repair and undermining durability.
Once cured, careful sanding smooths the repair, blending it seamlessly with the fairing’s original contours. The goal is to remove excess resin and uneven surfaces without damaging the fiberglass cloth underneath. Using appropriate grit sandpaper or grinding tools, the repair is leveled and perfected to prepare it for finishing.
The finishing step involves applying a resin or gelcoat layer that cures into a hard, smooth surface ideal for painting. This layer not only enhances the aesthetic by matching the fairing’s original texture but also provides additional protection against wear and environmental exposure. Allowing proper cure time for this finishing coat is essential before any further cosmetic steps.
Following these steps meticulously ensures a repair that restores both strength and appearance to the fairing, making the damage virtually undetectable. For a visual guide of these techniques in action, detailed demonstrations can be found, showcasing effective sanding and finishing workflows for professional-quality fiberglass repairs.
For more insights into maintaining motorcycle bodywork and related repair techniques, visit Explore the Best Motorcycle Fairings at Summit Fairings.
Additionally, practical examples of the curing, grinding, and finishing process can be viewed in depth here: YouTube Repair Demo.
5. Practical Tips, Common Pitfalls, and Cost-Effective Benefits of Applying Fiberglass Cloth and Resin for Motorcycle Fairing Restoration
Successfully repairing motorcycle fairings with fiberglass cloth and resin hinges on mastering key practical tips and avoiding common mistakes that can undermine durability and finish quality. First, meticulous preparation of the damaged area by thorough cleaning and sanding ensures optimal adhesion. Cutting fiberglass patches slightly larger than the damage guarantees full reinforcement beyond the weakened zone. When applying resin, even, thin coats are paramount to prevent runs and weak spots; saturate each layer of cloth carefully to eliminate air bubbles, which if trapped, should be gently pricked to release air before curing. Multiple layers enhance strength but require adequate curing time in-between, as rushing this process can lead to brittleness or poor bonding. Equally important is maintaining correct resin and hardener ratios—improper mixing disrupts curing, risking weak, crumbly repairs. Beyond technical execution, the economic advantages of fiberglass repairs stand out. Compared to replacing entire fairing panels or sourcing costly OEM parts, using fiberglass cloth and resin is both budget-friendly and accessible. DIY application notably cuts labor expenses, making it an attractive method for enthusiasts seeking durable, lightweight repairs without professional service fees. The materials themselves are affordable, widely available, and often packaged in beginner-friendly kits tailored for motorcycle needs. After repair and proper finishing with sanding, primer, and paint, fiberglass patches blend seamlessly, restoring both strength and aesthetics. For a comprehensive visual guide on these techniques and troubleshooting, consider following detailed videos such as “How Do You Repair Fiberglass On A Motorcycle?” available externally, which demonstrate step-by-step methods to perfect this skill. Additionally, exploring resources like affordable motorcycle fairings offers insight into balancing quality and cost in overall motorcycle bodywork upkeep.
Chapter 3: Mastering the Critical Curing, Sanding, and Finishing Steps in Motorcycle Fairing Fiberglass Repair
1. Unlocking the Science of Fiberglass Curing: Ensuring Durable Repairs and Superior Bonding in Motorcycle Fairings
The curing process is a pivotal phase in repairing motorcycle fairings with fiberglass, transforming the applied resin from a malleable state into a hardened, durable structure. This chemical hardening imparts essential strength and impact resistance to the repaired area while ensuring a seamless bond between the fiberglass layers and the original fairing surface. Achieving this transformation depends heavily on precise mixing ratios and thorough blending of resin and hardener. For instance, an equal 1:1 volume ratio is common, often indicated by color change during proper blending, signaling readiness for application and guaranteeing consistent curing.
Once mixed and applied, the resin undergoes an exothermic reaction, generating heat as it hardens over time. This cure time varies with product formulation and ambient conditions such as temperature and humidity. Maintaining an environment conducive to curing is vital; too cold or damp conditions can slow or inhibit the chemical reaction, risking weak adhesion or incomplete hardening. Additionally, the resin’s sag resistance plays a crucial role, especially on vertical surfaces typical of motorcycle fairings, ensuring the compound stays in place without dripping or warping during cure.
After full curing, the repair surface becomes firm yet not brittle, permitting controlled sanding to smooth imperfections and blend the patch with surrounding areas. This sanding lays the foundation for effective finishing coats, like primers and paints, which restore the fairing’s appearance and offer protection against UV exposure and moisture intrusion.
Understanding the curing process is essential to secure mechanical strength and longevity of the repair, allowing the fairing to withstand stress and environmental challenges. This knowledge forms the basis for following meticulous sanding and finishing, leading to professional-quality results that maintain both safety and aesthetic appeal. For a deeper dive into advanced composite materials and their curing principles, technical insights from composite manufacturers illustrate the critical role of precise curing beyond motorcycle applications.
For additional insights into motorcycle fairings and repair techniques, visit Explore the best motorcycle fairings at Summit Fairings.
2. Achieving Smooth, Invisible Repair Edges: Mastering Progressive Sanding Techniques for Fiberglass Motorcycle Fairings
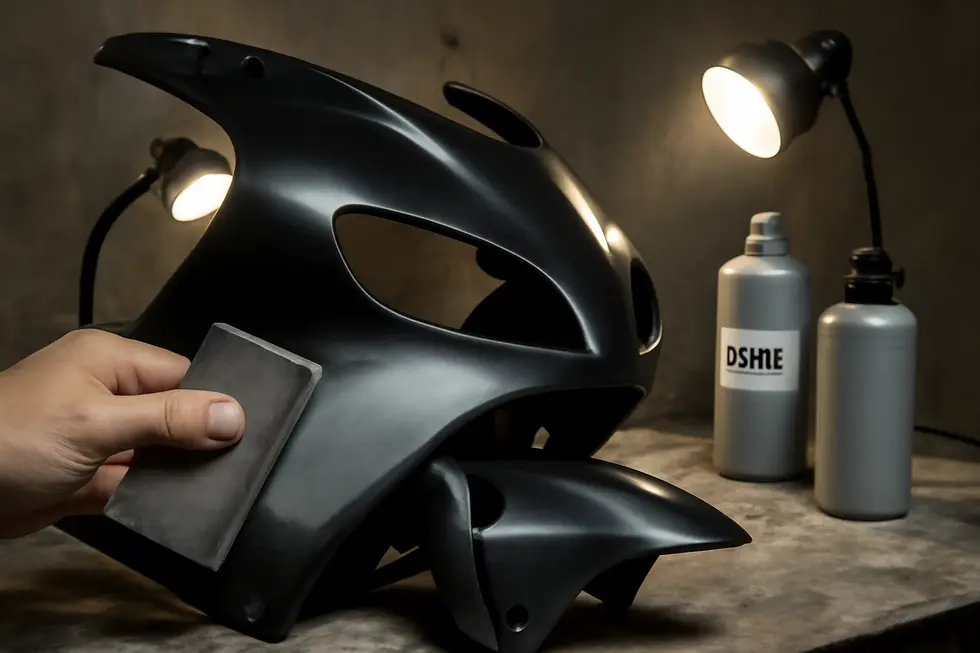
Mastering the art of sanding is essential when repairing motorcycle fairings with fiberglass, as it directly affects both durability and appearance. The process begins with coarse sandpaper, typically around 32-grit, which removes excess resin and high spots from the fiberglass patch. This initial rough shaping defines the repair’s form but requires patience since the uneven surfaces and hard resin areas demand careful attention to avoid gouging the fairing.
Following this, sanding progresses to medium grits in the range of 80 to 120. In this phase, the focus shifts to blending the repair edges seamlessly into the original fairing surface. Feathering these transitions eliminates visible ridges or abrupt changes in thickness that would otherwise become apparent after painting.
The final sanding stages employ fine grits—typically from 320 to 600—often using wet sanding techniques. Wet sanding lubricates the surface, reducing dust and producing a smoother finish ready for primer application. Using sanding blocks or flexible pads ensures even pressure and conformity to the fairing’s curved shapes, preventing flat spots or unevenness.
Comprehensive dust removal after each sanding stage is critical, as residual fiberglass particles can hinder adhesion and surface smoothness. For repairs requiring body filler, this sanding progression is vital to feather filler edges into the repair. Ultimately, this systematic transition from rough to fine grits guarantees an invisible repair line, maintaining the fairing’s aesthetic integrity.
For further insights on maintaining high-quality finishes, explore detailed techniques at your ultimate source for affordable motorcycle fairings. Additional step-by-step visual guidance is available in comprehensive tutorial videos such as “How Do You Repair Fiberglass On A Motorcycle?” on YouTube, providing clarity on sanding and finishing nuances.
3. Achieving a Flawless Finish: Mastering the Curing, Sanding, Priming, and Painting Process for Fiberglass Motorcycle Fairings
Achieving a strong, professional finish on repaired motorcycle fairings demands meticulous attention to curing, sanding, priming, and painting. Once the fiberglass resin and cloth patch have been applied, allowing sufficient time for full curing is crucial. This hardening ensures the repair attains maximum strength and stability. The curing duration may vary depending on resin type and ambient temperature but must never be rushed, as premature sanding or painting can compromise adhesion and durability.
After curing, sanding transforms the rigid patch into a smooth, seamless part of the fairing. Begin with a coarse grit (around 80–120) to level uneven areas and remove excess resin. Progressively switch to finer grits (400 to 600) to refine the surface, preparing it for primer. Wet sanding between grit transitions helps prevent scratches and avoids damaging the fiberglass layer beneath.
Priming is the next critical stage. Using a primer formulated for plastic or fiberglass, apply an even coat that both bonds to the underlying surface and fills minor imperfections. This step lays the foundation for paint adhesion, ensuring a durable and uniform finish.
When painting, automotive-grade paints applied in thin, controlled layers yield the best results. Spraying via an HVLP gun delivers consistent coverage without drips. Allow adequate drying time between coats to build color depth and durability.
Finally, polishing after clear coat application restores a deep, glossy shine. Employ polishing compounds with foam or wool pads at moderate speeds (1,000-1,500 RPM), carefully removing fine imperfections and achieving a mirror-like surface that rivals factory finishes.
By adhering to these carefully timed and executed steps, your motorcycle fairing repairs will blend structurally and aesthetically into the original bodywork. For visual guidance and additional tips, the tutorial “How Do You Repair Fiberglass On A Motorcycle?” offers an excellent step-by-step demonstration.
For more insights on motorcycle fairings and maintenance, explore the resources at Summit Fairings’ blog.
4. Essential Tools and Materials for Mastering Curing, Sanding, and Finishing in Fiberglass Fairing Repairs
Achieving a durable and aesthetically pleasing repair on motorcycle fairings with fiberglass relies heavily on using the right tools and materials throughout curing, sanding, and finishing stages. The foundation lies in quality epoxy resins paired with carefully selected fiberglass cloth, often combining unidirectional and bidirectional weaves. This layering strategy maximizes tensile strength and structural reinforcement. Applying the resin requires a smooth and controlled technique, removing excess with a squeegee to promote thorough fiber impregnation and a strong bond.
Sanding presents a critical, yet meticulous step in the process. Starting with coarse grit sanding blocks, typically around 32-grit, technicians dull glossy surfaces and remove imperfections or residual resin. Protecting respiratory health is essential when working with fiberglass dust, and using dust collection tools such as vacuums between sanding phases helps maintain cleanliness and prepares the area for subsequent layers or finishing.
To address gaps and shape inconsistencies, lightweight two-part epoxy putties provide excellent sag resistance and can be applied precisely for surface fairing. During curing, mounting parts securely often requires drywall screws alongside quick-setting epoxy to stabilize assemblies. Once fully cured, progressive sanding with finer grits refines the surface to a smooth texture, readying it for polishing or final paint application.
The cohesive use of these materials and tools, combined with disciplined techniques, ensures optimized repair efficiency and a restoration that closely matches the original fairing’s strength and surface quality. For a detailed example of this approach in action, reference Long EZ Push Project Documentation. This careful orchestration of materials and practices is key to mastering fiberglass repairs on motorcycle fairings, further detailed in guides like the comprehensive posts found at Summit Fairings Blog.
5. Ensuring Safety and Environmental Care During Fiberglass Fairing Repairs: Best Practices for Curing, Sanding, and Finishing
Repairing motorcycle fairings with fiberglass involves chemical and physical processes that demand careful attention to environmental and health safety. The curing stage releases volatile organic compounds (VOCs) and hazardous fumes as the resin hardens. To minimize inhalation risks, work must be performed in well-ventilated spaces or with local exhaust ventilation systems. Personal protective equipment (PPE) such as respirators rated for organic vapors, gloves, and eye protection is essential to shield from skin contact and airborne toxins.
Sanding fiberglass generates fine dust particles that irritate the respiratory tract and skin. Wearing dust masks or respirators, safety glasses, and long sleeves significantly reduces exposure. Employing wet sanding techniques also helps suppress airborne dust by keeping particles damp, enhancing safety.
During the finishing phase, solvents in primers, paints, and clear coats emit additional VOCs and chemicals. Maintaining proper ventilation remains critical, alongside consistent use of respirators and gloves. Waste materials like solvent-soaked rags and sanding dust require disposal according to hazardous waste regulations to prevent environmental contamination.
Overall, controlling ventilation, using adequate PPE, adopting wet sanding, and proper hazardous waste disposal form the backbone of safe and environmentally responsible fiberglass repairs. Awareness of fire hazards associated with flammable resins and solvents is also crucial. These practices mitigate health risks like respiratory irritation and long-term chemical exposure, preserving both personal well-being and environmental integrity.
For more on motorcycle fairings and repair considerations, exploring affordable motorcycle fairings options can provide additional insights. Detailed industry safety guidance on composite materials can be found through resources such as Rock West Composites, which emphasize maintaining controlled environments to manage health and ecological impacts.
Final thoughts
Repairing motorcycle fairings with fiberglass presents a valuable opportunity for business owners to expand their service offerings with durable, cost-effective repairs that maintain both structural integrity and aesthetics. The process begins with thorough cleaning and surface preparation, which lays the foundation for resin adhesion and long-lasting results. Applying fiberglass cloth and resin then reinforces the damaged area, restoring the fairing’s strength. Finally, curing, sanding, and finishing techniques ensure a smooth, visually appealing repair indistinguishable from the original surface. Mastery of these steps empowers businesses to deliver quality repairs that satisfy customers, reduce replacement costs, and enhance reputation. By integrating these tried-and-true methods, business owners can confidently capitalize on the growing demand for motorcycle fairing restoration services.
Ready to elevate your ride? Summit Fairings delivers premium, custom-fit fairings that blend style and durability. Whether you’re chasing speed or turning heads, we’ve got your bike covered. Don’t wait—transform your machine today. Click, customize, and ride with confidence. Your perfect fairing is just a few clicks away. Act now!
About us
undefined