Introduction
Motorcycle fairings serve as the bike’s protective armor, blending form and function to enhance aerodynamics and aesthetics. Over time, cracks and damage to these fairings not only diminish the motorcycle’s appearance but can also compromise structural integrity and safety. For business owners in the motorcycle repair, customization, or restoration industry, mastering the art and science of repairing cracked fairings is essential to delivering quality service and building client trust. This guide presents a thorough exploration of materials and repair methods tailored to fiberglass and plastic fairings, the step-by-step processes involved, and advanced techniques such as plastic welding and adhesive reinforcement. Additionally, it highlights essential tools, specialized repair kits, and strategies to prevent future stress during reinstallation. Finally, the article points to valuable educational resources and video tutorials that can sharpen your team’s skills and optimize repair efficiency. By integrating these insights, business owners can not only extend the life of damaged fairings but also elevate their service offerings with precision and professionalism.
Tables of Contents
Chapter 1: Materials and Methods in Cracked Motorcycle Fairing Repair: Fiberglass Versus Plastic
- Understanding Material Characteristics and Tailored Repair Approaches for Fiberglass and Plastic Fairings
- Balancing Durability and Ease: Structural Strength and Finish in Fiberglass and Plastic Fairing Repairs
Chapter 2: Step-by-Step Process for Fiberglass Cracked Motorcycle Fairing Repair
- Mastering Surface Preparation: Cleaning, Sanding, and Inspecting Cracked Fiberglass Motorcycle Fairings
- Strengthening and Refinishing: Mastering Fiberglass Cloth, Resin Application, and Surface Restoration
Chapter 3: Advanced Techniques for Plastic Cracked Motorcycle Fairing Repair Including Plastic Welding and Adhesive Use
- Plastic Welding: A Durable Solution for Cracked Motorcycle Fairings
- Mastering Surface Preparation and Adhesive Integration for Durable Plastic Fairing Repairs
Chapter 4: Tools, Materials, and Specialized Kits for Efficient Cracked Motorcycle Fairing Repair
- Essential Tools and Materials: Building a Complete Kit for Effective Fairing Crack Restoration
- Harnessing Specialized Kits and Materials for Durable Motorcycle Fairing Crack Repairs
Chapter 5: Stress Prevention and Reinstallation Tips in Cracked Motorcycle Fairing Repair
- Practical Stress Management for Durable Cracked Motorcycle Fairing Repairs
- Mastering Reinstallation: Essential Tips to Prevent Stress and Protect Your Repaired Motorcycle Fairing
Chapter 6: Educational Resources and Video Tutorials Supporting Effective Cracked Motorcycle Fairing Repair
- Mastering Surface Prep, Reinforcement, and Finishing: Essential Video Guidance for Motorcycle Fairing Repairs
- Mastering Practical Repair Skills: Handling, Alignment, and Fastening Techniques for Cracked Motorcycle Fairings
Chapter 1: Materials and Methods in Cracked Motorcycle Fairing Repair: Fiberglass Versus Plastic
1. Understanding Material Characteristics and Tailored Repair Approaches for Fiberglass and Plastic Fairings
Cracked motorcycle fairings require repair approaches that closely align with their distinct material properties. Fiberglass fairings consist of woven glass fibers embedded in a polyester or epoxy resin matrix. This composite structure provides notable strength and rigidity, yet it tends to be brittle under severe impact. Repairing fiberglass involves careful surface preparation, which includes cleaning and sanding to remove weakened fibers and create a textured surface for better adhesion. Resin mixed with fiberglass cloth or mat is applied over the crack—often from the inside—to restore structural integrity. After curing, the surface is sanded smooth and repainted, resulting in a repair that balances both strength and visual restoration.
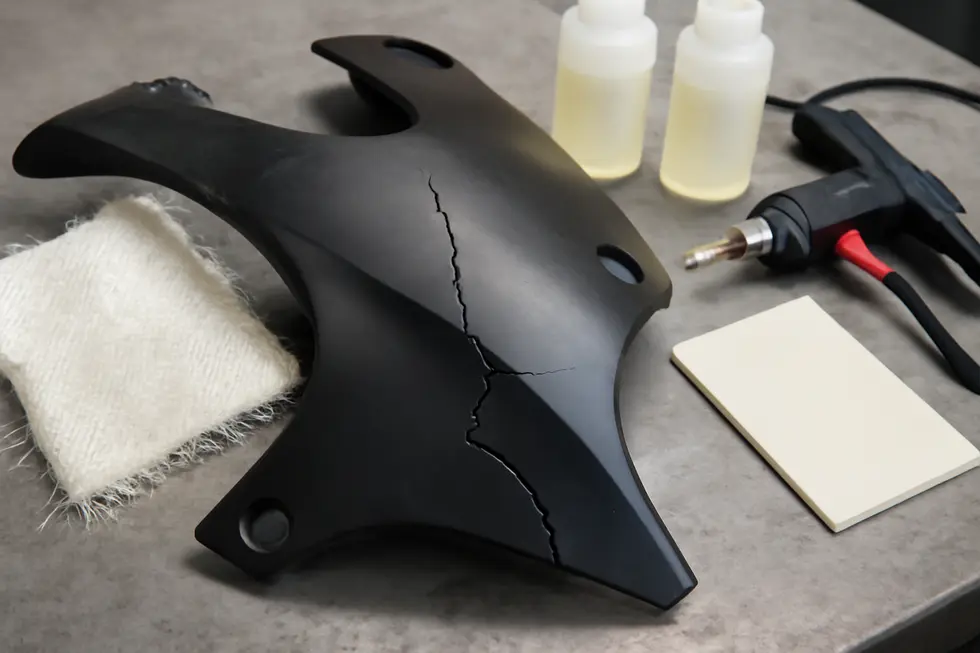
Plastic fairings, typically made of thermoplastics like ABS or polypropylene, possess greater flexibility but lower innate strength compared to fiberglass. Their cracks often manifest as deformation rather than clean breaks. Plastic repair relies on techniques that re-bond the material nearly at a molecular level. Plastic welding uses heat to melt and fuse the cracked components, regaining strength close to original parts. Alternatively, strong adhesives formulated for plastic, sometimes reinforced with mesh or fiberglass embedded in epoxy, are effective for smaller cracks. Surface cleaning and cautious sanding enhance adhesion, although treatments differ from fiberglass resins. Reinforcements such as rubber grommets can also relieve stress on repaired parts.
While both materials demand thorough surface preparation and cleaning before repair, fiberglass responds best to resin and cloth layering, whereas plastics require heat welding or specialized adhesives. This nuanced understanding of material behavior guides the choice of repair methods, ensuring durable and visually seamless restoration of motorcycle fairings. For further details on selecting and applying repair techniques suited to each material, explore our comprehensive insights on motorcycle fairings and their care.
External detailed guidance on fiberglass repair can be found here: YouTube – How Do You Repair Fiberglass On A Motorcycle?
2. Balancing Durability and Ease: Structural Strength and Finish in Fiberglass and Plastic Fairing Repairs
When addressing cracked motorcycle fairings, selecting the appropriate repair method hinges largely on the fairing material, with fiberglass generally providing superior structural restoration compared to plastic. Fiberglass repairs involve meticulously cleaning and sanding the damaged area to eliminate weakened fibers and create an ideal bonding surface. Layers of fiberglass cloth or mat are then embedded with resin—usually polyester or epoxy—applied from the inside of the fairing. This method not only rebuilds strength but also enables a smooth, paint-ready finish that matches the original appearance. The stiffness and weight of fiberglass contribute to a highly durable repair, especially vital for load-bearing or aerodynamic surfaces.
Plastic fairings, commonly manufactured from ABS or similar materials, offer more flexibility but present challenges in regaining original strength after cracking. Repair techniques here predominantly include plastic welding or using strong adhesives complemented by reinforcement elements, such as fillers or supportive washers. While these methods can effectively seal cracks and restore functionality, the repaired area may remain more prone to future stress fractures without careful reinforcement. Additionally, achieving a flawless finish on plastic repairs demands precise refinishing efforts since the surface can be less receptive to smooth painting.
Fiberglass repairs, although more time-consuming and requiring additional materials, yield a stiffer and sturdier outcome, well-suited for riders prioritizing longevity and resilience. Conversely, plastic repair methods excel in speed and simplicity, making them ideal for minor cosmetic fixes or budget-conscious riders. Both repair styles support painting to seamlessly blend with the bike’s aesthetics, but fiberglass kits often include polyester priming to enhance finish quality further.
Ultimately, balancing strength, durability, and ease of repair guides the choice between these materials. For detailed, professional guidance on fiberglass and plastic repair techniques, practical tutorials offer comprehensive step-by-step instructions.
For extended insights into professional fiberglass finishes, consult specialized resources on polyester-primed repairs here.
Chapter 2: Step-by-Step Process for Fiberglass Cracked Motorcycle Fairing Repair
1. Mastering Surface Preparation: Cleaning, Sanding, and Inspecting Cracked Fiberglass Motorcycle Fairings
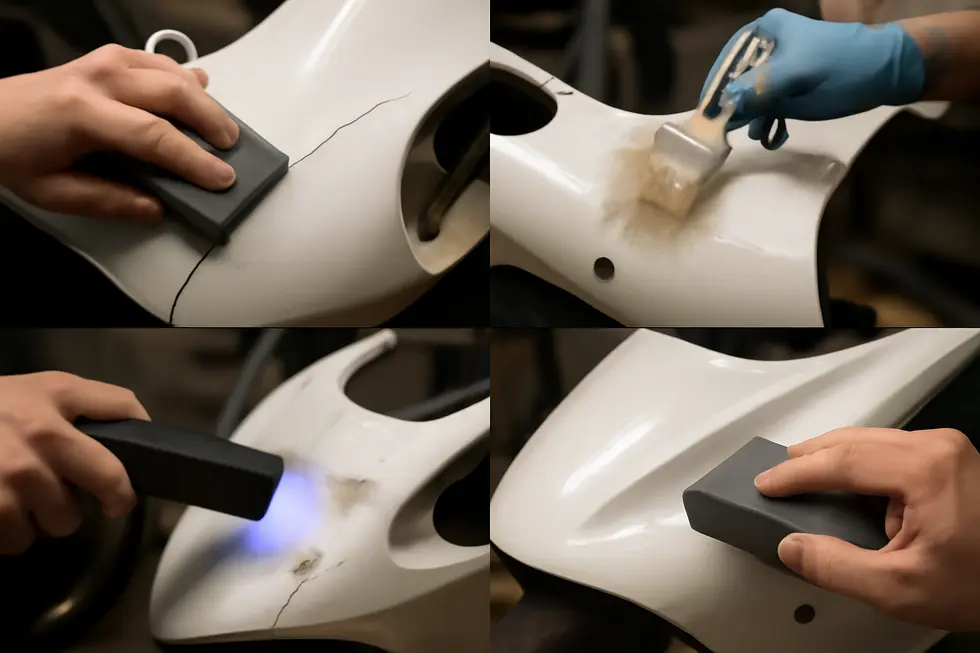
Surface preparation is the foundational step in repairing cracked fiberglass motorcycle fairings, directly influencing the repair’s durability and finish quality. Before applying any resin or fiberglass layers, the damaged area must be meticulously cleaned to remove dirt, grease, and loose fragments that could prevent proper adhesion. Using a mild soap solution paired with a soft cloth or sponge ensures the surface is free of contaminants without causing additional scratches or damage to the fairing.
Following cleaning, sanding plays an essential role in preparing the surface. Employing fine-grit sandpaper between 400 and 600 grit creates a rough texture that enhances resin bonding. It is important to sand not just the crack itself but extend slightly beyond its edges, eliminating any weakened or friable fiberglass fibers. This step removes compromised material and provides a solid base for the repair layers, ensuring structural integrity.
Inspection immediately after cleaning and sanding is crucial to confirm all damage is identified and addressed. This involves a careful examination for hidden cracks, holes, or surface imperfections that, if overlooked, could compromise the repair. Identifying weak spots early allows for proper removal or reinforcement with fiberglass cloth or mat layers, making the repair comprehensive.
Together, these preparation techniques—cleaning, sanding, and inspection—create the ideal surface conditions for resin and fiberglass to bond cohesively. This careful setup results in a repair that restores both the structural strength and visual appeal of the motorcycle fairing, allowing it to withstand road stresses effectively.
For more insights on addressing motorcycle fairing needs beyond repair, explore affordable solutions and custom styles available at Summit Fairings.
Additionally, a practical visual guide can be found in the YouTube video “How Do You Repair Fiberglass On A Motorcycle?” Watch Here.
2. Strengthening and Refinishing: Mastering Fiberglass Cloth, Resin Application, and Surface Restoration
Repairing a cracked fiberglass motorcycle fairing requires meticulous reinforcement and careful finishing to restore both its durability and appearance. The process begins with thorough cleaning of the damaged area to eliminate dirt, grease, and loose fibers that could jeopardize adhesion. Light sanding is then performed to roughen the surface, ensuring the resin bonds effectively to the fairing.
Next comes the critical stage of reinforcement. Fiberglass cloth or mat is cut slightly larger than the crack to provide ample coverage. A layer of resin—either polyester or epoxy—is applied to the prepped surface, onto which the fiberglass cloth is carefully laid. Saturating the cloth with additional resin fully impregnates the fibers, creating a strong composite once cured. Ideally, reinforcement is applied from the inside of the fairing when accessible, offering structural support where it’s needed most. Applying multiple resin-soaked layers builds up strength incrementally, with each layer fully curing before the next is added.
After curing, the repair transitions into finishing. The surface is sanded smooth to blend the repair seamlessly into the surrounding fairing. To restore the original texture and shine, a gel coat or finishing resin is applied. This final layer can be sanded and polished until the fairing achieves a uniform, glossy finish, perfectly prepared for painting if desired. This detailed process not only strengthens the repair but also revives the fairing’s sleek aesthetics, extending its life and enhancing the motorcycle’s overall appearance.
For a practical walk-through of these techniques, watch the tutorial “How Do You Repair Fiberglass On A Motorcycle?” which visually demonstrates each step from cleaning to finishing.
Learn more about high-quality motorcycle fairings and related care at Explore the Best Motorcycle Fairings at Summit Fairings.
Source: https://www.youtube.com/watch?v=pwe0hqwAosM
Chapter 3: Advanced Techniques for Plastic Cracked Motorcycle Fairing Repair Including Plastic Welding and Adhesive Use
1. Plastic Welding: A Durable Solution for Cracked Motorcycle Fairings
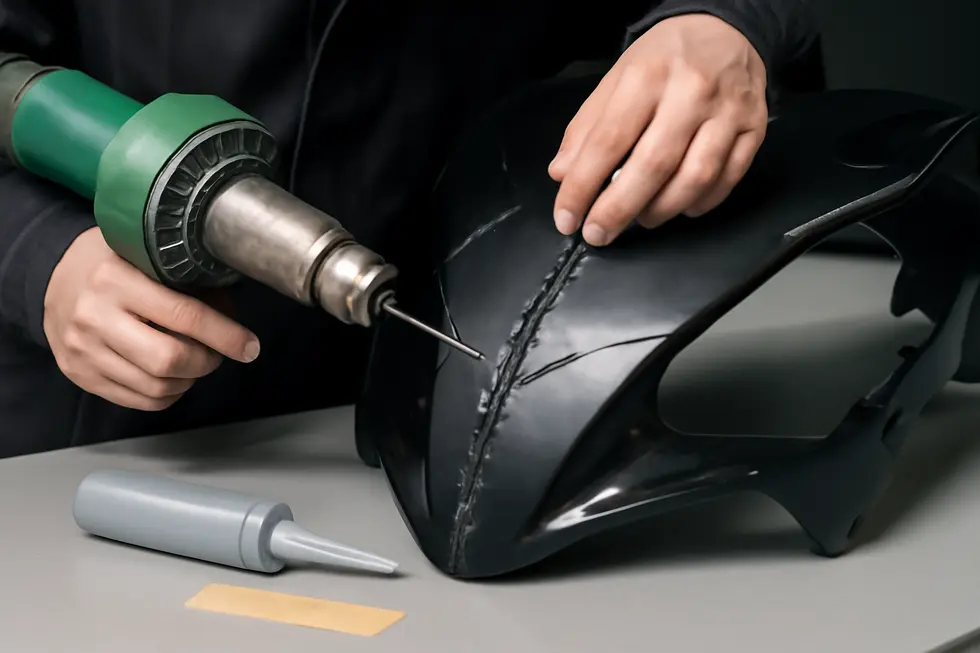
Plastic welding stands out as a highly effective method for repairing cracked motorcycle fairings made of plastic. It involves melting the fractured edges of the fairing along with a compatible plastic welding rod, fusing the parts at a molecular level. This process restores the fairing’s original structural strength far better than adhesives alone, as it physically re-bonds the plastic material, making the repair both durable and reliable under riding stresses.
Among the various plastic welding techniques, hot air welding is the most frequently used for motorcycle repairs. It utilizes a heat gun to soften the crack edges and the welding rod—usually ABS or polypropylene to match the fairing’s material. As the plastic cools and solidifies, it forms a strong, cohesive bond. Other methods like ultrasonic welding, spin welding, or extrusion welding tend to require specialized equipment or are less practical for typical motorcycle fairings.
While plastic welding re-establishes mechanical strength, adhesives still play a complementary role. Two-part epoxies and plastic-specific cyanoacrylates can fill minor cracks or reinforce welded joints. Specialized plastic welding adhesives provide additional sealing or smoothing, especially for surface finishing.
A typical repair starts with thorough cleaning and sanding of cracked areas to optimize bonding. The parts are then aligned and clamped firmly before applying heat and welding rods. After welding, the repair is sanded smooth and may be further enhanced with fillers or primers before repainting to restore the original appearance.
This combined approach ensures the repaired fairing maintains its integrity and visual continuity. For more detailed techniques on plastic welding and adhesive use in motorcycle fairing repair, consult comprehensive guides such as those found at Plastic Repair Centre. Additionally, reliable replacement fairings and parts can be explored at Summit Fairings’ blog to support continued maintenance and customization.
2. Mastering Surface Preparation and Adhesive Integration for Durable Plastic Fairing Repairs
Achieving a strong and lasting repair on cracked plastic motorcycle fairings hinges on meticulous surface preparation paired with the strategic application of adhesives, often alongside plastic welding. The initial step demands thorough cleaning to eliminate all dirt, grease, and loose fragments from the damaged area. Using a degreaser or isopropyl alcohol ensures no contaminants compromise the subsequent bonding processes. Once clean, light sanding with fine-grit paper roughens the surface microscopically, dramatically improving the mechanical grip for both plastic welding rods and adhesives. Removing any weakened or flaking plastic surrounding the crack is vital to create a solid foundation for the repair.
For significant internal cracks, reinforcing the inside surface with patches of fiberglass cloth or similar materials can markedly improve durability, especially when accessible from within the fairing. Plastic welding, a technique that fuses heated thermoplastic rods into cracks, reinstates the fairing’s structural integrity by melding materials on a molecular level. To enhance this repair, applying an industrial-grade epoxy adhesive after the weld cools seals micro-gaps and boosts the joint’s strength. Epoxy adhesives formulated for plastics provide superior bonding and long-term durability compared to quick-setting options like cyanoacrylate, which may suit only non-load-bearing small cracks.
Following manufacturers’ guidance for adhesive curing time and environmental conditions ensures optimal results. This combination of mechanical and chemical bonding transforms a fragile crack into a robust, cohesive repair that withstands the stresses of riding and restores the fairing’s appearance. For deeper insights into sourcing quality fairings and accessories, consider exploring comprehensive resources like the Explore the Best Motorcycle Fairings at Summit Fairings blog.
Additional technical details on plastic welding fundamentals and adhesive compatibility can be found through specialized external resources focusing on thermoplastic repair methods.
Chapter 4: Tools, Materials, and Specialized Kits for Efficient Cracked Motorcycle Fairing Repair
1. Essential Tools and Materials: Building a Complete Kit for Effective Fairing Crack Restoration
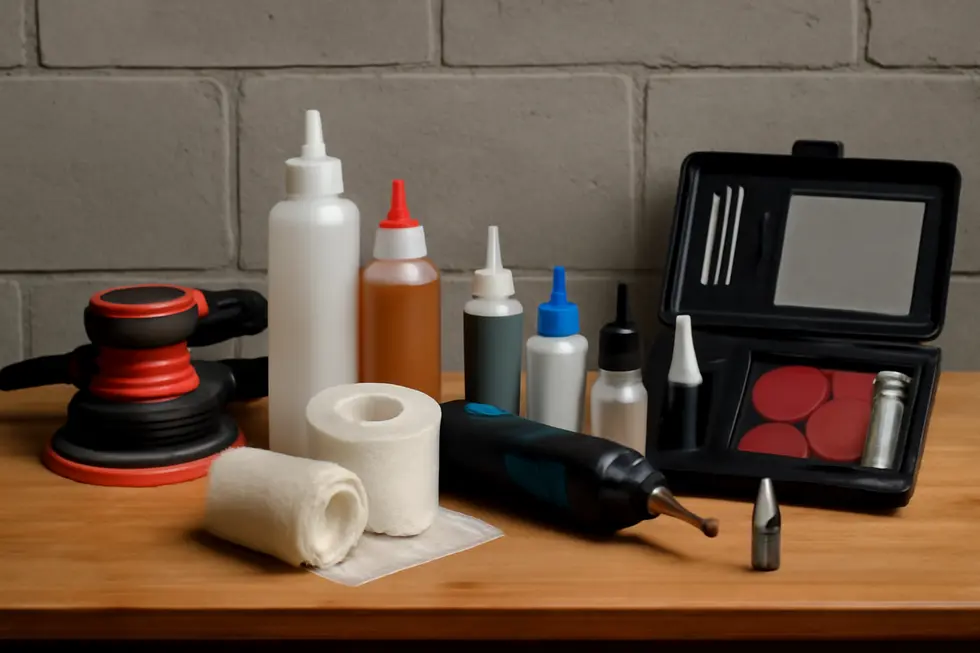
Successfully repairing a cracked motorcycle fairing hinges on having the right tools and materials well-organized and ready. At the foundation lies a set of basic hand tools, such as Phillips and flathead screwdrivers in common sizes, hex or Allen keys typically ranging from 4mm to 5mm, plus socket wrenches and pliers. These enable efficient fairing removal and reinstallation while handling various fasteners securely. Beyond general mechanical equipment, specialized plastic repair kits are indispensable when addressing cracks, particularly in plastic fairings. These kits typically include plastic welding tools that use heat to fuse broken parts faithfully, alongside epoxy-based adhesives designed to restore strong, lasting bonds. Fillers included in the kits help to smooth out uneven surfaces after structural repairs, ensuring the fairing regains its original contours. For those working on more severe damage or enhancing the fairing’s longevity, comprehensive repair kits add sanding implements in multiple grits, primers to prepare the surface for finishing, and plastic welding rods as reinforcement. Temporary repair materials such as electrical tape, cable ties, or safety wire also have their place, particularly during disassembly or as provisional stabilizers. An organized tool kit designed for roadside or workshop use can streamline the entire repair by consolidating these essentials—screwdrivers, wrenches, socket sets, and pliers—into a portable unit, saving time and frustration. When combined with the right adhesives and fillers from repair kits, this toolkit forms the backbone of a durable and visually pleasing fairing restoration. Ultimately, a thoughtfully assembled kit bridges the gap between mechanical disassembly and material restoration, enabling both the strength and sleek look that a motorcyclist expects from their fairing. For more insights into fairing maintenance and care, visit Explore the Best Motorcycle Fairings at Summit Fairings.
Reference for Tool Kit: https://www.cyclegear.com/accessories/stockton-roadside-tool-kit
2. Harnessing Specialized Kits and Materials for Durable Motorcycle Fairing Crack Repairs
Repairing cracked motorcycle fairings efficiently depends heavily on the use of specialized materials and repair kits tailored to the fairing’s composition. For plastic fairings, particularly those made from ABS, plastic welding kits offer a powerful solution. These kits come equipped with tools and filaments that melt the plastic edges, fusing them back together at a molecular level to restore strength and flexibility akin to the original. Alternatively, epoxy resin repair kits are versatile options for both plastic and fiberglass repairs, containing resin and hardeners designed to seal cracks and rebuild compromised structures effectively.
Fiberglass repair kits specifically provide the necessary resin, hardener, and reinforcing fiberglass cloth to restore integrity to damaged areas. This combination not only rebuilds the structural strength but also prepares the surface for finishing. After structural repair, plastic filler compounds or body fillers smooth out imperfections and restore the original contour, ensuring seamless aesthetic restoration.
Surface preparation and finishing require quality sandpapers and polishing kits, which help blend the repaired areas flawlessly with the existing fairing. Specialized tools such as heat guns facilitate plastic welding and reshaping, while spreaders and clamps ensure fillers and resins are applied evenly and held securely during curing.
It’s crucial to recognize that while standard motorcycle tool kits contain essential mechanical tools for disassembly and reassembly, they lack these specialized materials necessary for fairing repairs. Choosing the right repair materials depends on understanding the fairing’s material type and damage severity; small cracks often respond well to repair kits, while extensive damage might necessitate full fairing replacements.
For those seeking further guidance on motorcycle fairings and repairs, exploring detailed resources like the Summit Fairings blog can provide valuable insights and expanded knowledge.
For essential mechanical tools helpful in the disassembly process, kits like the Stockton Roadside Tool Kit complement repair materials but do not replace them (https://www.cyclegear.com/accessories/stockton-roadside-tool-kit).
Chapter 5: Stress Prevention and Reinstallation Tips in Cracked Motorcycle Fairing Repair
1. Practical Stress Management for Durable Cracked Motorcycle Fairing Repairs
Effective stress prevention techniques are essential to prolong the lifespan of repaired motorcycle fairings and prevent recurring cracks. One key approach involves minimizing stress concentrators around the repaired area. This means avoiding the creation of new holes or sharp edges near the crack, which can focus mechanical forces and cause further damage. Careful drilling or avoiding holes entirely near the repair zone is critical to maintain structural integrity.
Selecting compatible adhesives or fillers with the fairing’s plastic material—commonly ABS or polycarbonate—ensures chemical stability and prevents weakening effects like crazing or new cracking. Reinforcement methods such as integrating fiberglass patches or plastic welding evenly distribute stress across the repair, drastically reducing the risk of failure when the bike is in motion.
Attention to curing and finishing is equally important; fully hardened adhesives and smooth, polished surfaces reduce localized stress points that otherwise could act as break initiation sites. When it comes to reinstallation, properly torquing screws and bolts to manufacturer specifications avoids over-tightening, which commonly causes new stress cracks around mounting points.
Incorporating vibration-damping elements like rubber grommets or washers under fasteners further protects the fairing by absorbing movement and reducing cyclic stress. Additionally, staying clear of harsh chemical cleaners near repaired sections is necessary, as some solvents can degrade plastics and accelerate crack formation.
Overall, combining mindful mechanical handling, chemical compatibility, and smart reinforcement techniques delivers repairs that stand up to the rigors of riding. For more insights on maintaining exterior fairing durability, consider exploring resources such as Explore the Best Motorcycle Fairings at Summit Fairings.
Reference: Bennetts Motorcycle Maintenance and Servicing
2. Mastering Reinstallation: Essential Tips to Prevent Stress and Protect Your Repaired Motorcycle Fairing
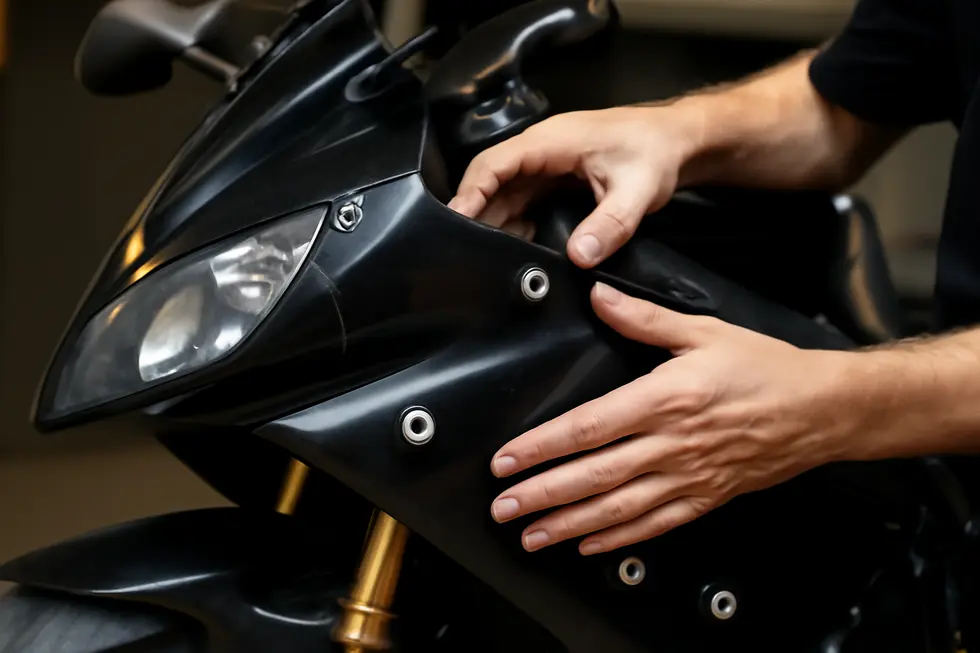
Reinstalling a repaired motorcycle fairing demands careful attention to avoid introducing new stresses that could cause further cracking. Start by loosely securing all brackets and fasteners. This approach allows you to make fine alignment adjustments before fully tightening, preventing any forced fitting that might strain the fairing. Incorporating washers or rubber grommets at each mounting point effectively cushions the fairing, helping to distribute pressure evenly. These small additions play a vital role in absorbing vibration and protecting the fairing from stress fractures during operation.
Proper alignment is critical; look closely for grooves or slots engineered to fit precisely with the motorcycle frame. Adjust each bracket and panel so the fairing sits snugly without bending or forcing it into position. When tightening fasteners, avoid overtightening by gradually and evenly applying torque, ideally adhering to manufacturer specifications. Overzealous tightening can create stress concentrations that weaken the repair and surrounding material.
Before reassembly, inspect all mounting hardware such as brackets, rubber isolators, and connectors for wear or brittleness. Replacing any compromised parts ensures a more secure and tension-free mounting. Additionally, reinstall components like mirrors, air ducts, and headlights with care to prevent them from pressing unevenly against the fairing or causing localized stress.
After securing the fairing, perform a thorough final inspection to verify the panel is stable, does not impede steering or controls, and that all fasteners are tightened just enough for security without risking damage. Utilizing appropriate tools—such as screwdrivers, hex keys, and wrenches—and exercising patience during this process significantly reduces the chance of inadvertent harm.
By following these detailed reinstallation strategies, you enhance the longevity and durability of the repaired fairing, maintaining both safety and aesthetics. For a visual walkthrough demonstrating these techniques, refer to this comprehensive motorcycle fairing installation tutorial. Additionally, for insights into sourcing quality replacement and repair components, explore resources on affordable motorcycle fairings.
Chapter 6: Educational Resources and Video Tutorials Supporting Effective Cracked Motorcycle Fairing Repair
1. Mastering Surface Prep, Reinforcement, and Finishing: Essential Video Guidance for Motorcycle Fairing Repairs
Successfully repairing a cracked motorcycle fairing hinges on a careful sequence of surface preparation, reinforcement, and finishing techniques, all of which are vividly demonstrated in specialized educational videos. The process begins with the safe removal of the fairing, employing the right tools to avoid added damage. Tutorials such as the Yamaha YZF-R6 fairing removal offer clear demonstrations on this critical first step. Once detached, the cracked area is meticulously cleaned to eliminate grease, dirt, and old paint, followed by gentle sanding to roughen the edges, promoting optimal adhesion for repair materials.
For reinforcement, the approach varies based on the fairing material. Fiberglass repairs typically call for layering fiberglass cloth saturated with resin on the underside of the crack. Plastic fairings benefit from plastic welding or appropriate adhesives formulated for ABS or polycarbonate, sometimes enhanced with reinforcing elements. Videos carefully illustrate how applying multiple cure-ready layers builds durable strength, ensuring the repair can withstand riding stress.
Finishing requires smoothing the cured repair with progressively finer sandpaper and filling any unevenness with plastic or body fillers. Once perfectly contoured, applying a plastic-compatible primer paves the way for paint that matches the original color, with optional clear coats enhancing protection and shine. Detailed finishing tutorials, such as those found in Honda Click 160 guides, reinforce these crucial steps.
These resources collectively ensure enthusiasts can confidently restore both the appearance and structural integrity of their motorcycle fairings. For a practical demonstration of reinstallation techniques following repair, the Ride or Die Motorcycles video is an excellent reference. For additional comprehensive insights into fairing repair and replacement, exploring Summit Fairings’ expert blog provides valuable complementary guidance.
External reference: https://www.youtube.com/watch?v=3YTuEWH770U
2. Mastering Practical Repair Skills: Handling, Alignment, and Fastening Techniques for Cracked Motorcycle Fairings
Effective cracked motorcycle fairing repair relies heavily on practical guidance for handling, alignment, and fastening, all of which are expertly covered in various educational resources and video tutorials. These demonstrations begin with careful removal techniques, emphasizing the importance of using proper tools such as screwdrivers and Allen wrenches to avoid causing additional damage. Tutorials stress gentle disconnection of any electrical connectors and patience with clips to prevent breakage, setting a solid foundation for successful repairs.
Once the fairing is removed, many resources offer detailed fiberglass repair instructions, showcasing how to assess damage, prepare the surface by sanding and cleaning, and apply fiberglass cloth embedded with resin. After curing, sanding and finishing steps are demonstrated to restore both the strength and smooth appearance of the fairing. For plastic fairings, specialized videos often reveal methods like plastic welding or adhesive reinforcement paired with suitable materials to achieve a durable repair.
Crucial to restoring structural integrity is the reinstallation process. Guides focus on proper alignment of fairing panels and secure fastening using correct mounting brackets and quality fasteners. Proper alignment prevents aerodynamically harmful stress points and potential future cracks. Post-installation, tutorials recommend thorough stability checks, adjusting fasteners or brackets where necessary to eliminate rattling or misalignment.
Additional practical advice includes photographing components during disassembly to streamline reassembly and adhering to torque specifications from service manuals to avoid overtightening or damage. Quality replacement clips and fasteners are encouraged to enhance long-term durability.
These hands-on demonstrations provide a comprehensive approach that bridges theoretical repair knowledge with real-world application, ensuring both an aesthetically pleasing and resilient finish. For deeper insight into assembling and fastening strategies, the video at https://www.youtube.com/watch?v=3YTuEWH770U offers an excellent reference. For further reading on complementary aspects, explore the explore Summit Fairings, your go-to destination for motorcycle fairings.
Final thoughts
Effective repair of cracked motorcycle fairings is a critical service that directly impacts motorcycle safety, aesthetics, and customer satisfaction. Understanding the distinct materials—fiberglass and plastic—and adopting tailored repair methods ensures durable and visually appealing results. From surface preparation and resin application in fiberglass repairs to precise plastic welding and adhesive techniques, mastery of these processes enhances repair quality and business credibility. Employing the right tools and specialized kits streamlines the repair workflow while thoughtful reinstallation prevents recurrent damage and extends fairing lifespan. Accessing curated educational resources and video tutorials equips business owners and technicians with the knowledge needed to refine skills and maintain high standards in repairs. Integrating these insights positions your business as a reliable expert in fairing restoration, fostering trust and repeat clientele in a competitive marketplace.
Ready to elevate your ride? Summit Fairings delivers premium, custom-fit fairings that blend style and durability. Whether you’re chasing speed or turning heads, we’ve got your bike covered. Don’t wait—transform your machine today. Click, customize, and ride with confidence. Your perfect fairing is just a few clicks away. Act now!
About us
undefined