Introduction
Motorcycle fairing painting is a specialized craft that, when executed well, significantly enhances motorcycle aesthetics and market value. For business owners in motorcycle repair, customization, or retail, mastering a reliable DIY paint process for fairings not only cuts costs but also boosts customer satisfaction through quality control. This comprehensive guide unfolds the essential steps—from meticulous surface preparation, through precise primer and paint application, to finishing touches and maintenance advice. Furthermore, it highlights the crucial tools and tutorial resources necessary for consistent, professional-grade results that stand out in today’s competitive marketplace. Each chapter builds a cohesive framework tailored to business owners aiming to efficiently integrate DIY fairing painting into their workflow.
Tables of Contents
Chapter 1: Mastering Surface Preparation for DIY Painted Motorcycle Fairings
- Essential Cleaning and Surface Conditioning for Durable Motorcycle Fairing Paintwork
- Mastering Sanding and Repair Techniques for Flawless Motorcycle Fairing Finishes
Chapter 2: Applying Primers and Paints for DIY Paint Motorcycle Fairings: Techniques and Materials
- Essential Surface Preparation for Flawless Primer and Paint Application on Motorcycle Fairings
- Mastering Primer and Paint Application: Achieving a Professional Finish on Motorcycle Fairings
Chapter 3: Finishing and Protecting Your Work in DIY Paint Motorcycle Fairings: Clear Coats and Maintenance
- Mastering Clear Coats: The Essential Finish to Protect and Enhance Your DIY Painted Motorcycle Fairings
- Mastering Clear Coat Application and Long-Term Care for Durable, Glossy Motorcycle Fairings
Chapter 4: Tools, Techniques, and Tutorials for Successful DIY Paint Motorcycle Fairings
- Mastering the Essentials: The Key Tools and Materials for DIY Motorcycle Fairing Paintwork
- Mastering Essential Painting Techniques: Step-by-Step Guidance for Flawless Motorcycle Fairings
Chapter 1: Mastering Surface Preparation for DIY Painted Motorcycle Fairings
1. Essential Cleaning and Surface Conditioning for Durable Motorcycle Fairing Paintwork
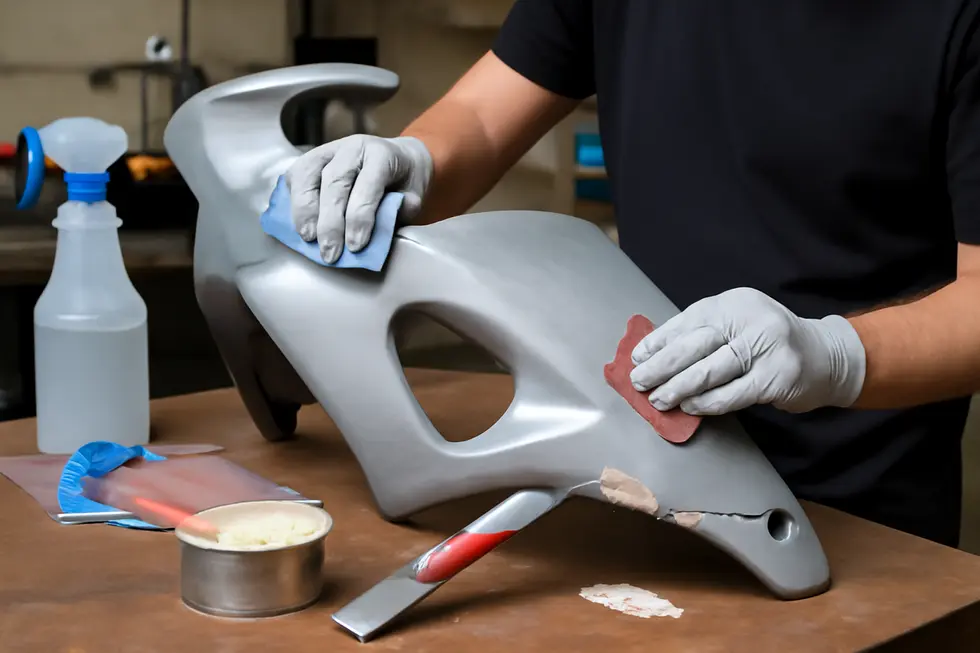
Proper surface preparation is the cornerstone of any successful DIY painting project for motorcycle fairings. Achieving a lasting and professional finish begins with meticulously removing all contaminants to ensure the paint adheres effectively. Initially, thorough cleaning is crucial. Use a motorcycle or automotive-specific cleaner alongside a soft plastic brush to gently lift dirt, grease, and any residues without scratching the surface. Avoid abrasive tools like sponges that can grind particles into the plastic, potentially damaging it. After cleaning, drying with microfiber towels helps prevent water spots and prepares the fairing for the next step.
Once clean, the fairing surfaces require sanding to not only smooth imperfections but also to create a slightly rough texture that enhances paint bonding. Start sanding with a coarser grit such as 80 to reveal flaws or low spots, especially important for identifying areas needing repair. This sanding also helps feather damaged edges, preventing visible sharp transitions after painting. Progressively refine the surface using increasingly finer grit sandpapers, wet sanding materials around 2000 grit or higher is preferably used for a glassy smooth base. Wet sanding reduces dust and heat buildup, allowing for better control and consistency, which results in a flawless final texture.
Surface repairs form an equally vital part of the preparation. For fairings made of fiberglass, cracks or holes must be addressed with layered resin and fiberglass cloth patches, applied carefully to maintain proportional thickness and structural integrity. Each resin application needs complete curing before sanding, ensuring a smooth transition between the repair and original surface. Minor blemishes or pinholes can be corrected with a thin application of body filler or glazing putty, which, once hardened, should be finely sanded flush with the rest of the panel. These steps result in a uniform surface that prevents flaws from showing through the paint layers.
Before moving to priming and painting, ensure all surfaces are free from dust and oils by wiping them with a tack cloth or appropriate solvent. This attention to detail in cleaning, sanding, and repair sets the foundation for paint adhesion, color vibrancy, and long-term durability. The careful layering and gradual refinement of the surface help avoid common issues such as peeling, bubbling, or uneven gloss.
For those seeking further guidance on advanced cleaning techniques and maintaining the integrity of motorcycle surfaces, exploring in-depth resources such as comprehensive motorcycle surface cleaning tips can provide valuable insights. Additionally, practical demonstrations on performing wet sanding and polishing can be found through detailed tutorials like this wet sanding video guide, which complements the steps outlined here.
By combining meticulous cleaning with careful surface conditioning and repairs, you lay a solid groundwork that ensures your painted motorcycle fairings will look stunning and perform well over time.
2. Mastering Sanding and Repair Techniques for Flawless Motorcycle Fairing Finishes
Achieving a professional-looking paint finish on motorcycle fairings starts with mastering the critical steps of sanding and repairs. Once the surface is thoroughly cleaned, attention must shift toward refining the fairings to create an ideal canvas for paint adhesion and durability. This preparation involves systematically progressing through sanding stages and addressing any cracks or imperfections to ensure the surface is flawlessly smooth.
Initially, sanding employs coarser grit sandpapers, typically between 80 and 150 grit, to strip away old paint and smooth uneven spots. Using a cross-hatch motion evenly abrades the surface without creating low or high points, which is vital for avoiding irregular paint coverage. For curved or contoured areas characteristic of motorcycle fairings, applying sandpaper with a flexible sanding block or foam pad maintains consistent pressure and helps prevent gouging the plastic or fiberglass.
Following the initial abrasion, progressively finer grits in the 400 to 600 range refine the surface further, feathering edges of old paint or repaired sections to blend seamlessly. The final smoothing step involves wet sanding with very fine grits—anywhere from 1000 to 3000 grit—to produce a glossy, paint-ready finish. Wet sanding lubricates the surface, lessening dust and minimizing scratch marks, important for high-quality results.
Simultaneously, repairs must address any cracks, holes, or deformations. For fiberglass fairings, layered applications of fiberglass cloth saturated with resin restore structural integrity. Beginning with small overlapped patches and gradually expanding outward preserves the fairing’s original thickness and shape. Once cured, these layers are sanded flush to the surrounding surface.
Minor surface blemishes or pinholes are filled with body filler or glazing putty. Carefully applied in thin coats, these compounds harden and are then sanded smooth, creating a uniform surface free of imperfections. It’s crucial all repairs are completely cured and thoroughly sanded before applying primer to avoid paint defects or adhesion problems.
When reinstalling repaired fairings, consider mounting hardware such as washers or rubber grommets to reduce stress points and prevent cracking during use. Patience in sanding progression—moving deliberately from coarse to ultra-fine grits—is essential for avoiding damage and achieving a professional finish.
For enthusiasts seeking more detailed demonstrations, an excellent resource on fiberglass repair and sanding can be found in this fiberglass repair and sanding tutorial. Additionally, for techniques on perfecting the final wet sanding stage before painting, the wet sanding custom motorcycle paint tutorial provides valuable visual guidance.
By combining meticulous sanding and expert repairs, motorcycle fairings can be transformed into a smooth, durable surface perfectly suited for custom paint jobs. For further inspiration and resources on selecting quality motorcycle fairings prepped for painting, explore the discover affordable motorcycle fairings at Summit Fairings to complement your DIY refinishing project.
Chapter 2: Applying Primers and Paints for DIY Paint Motorcycle Fairings: Techniques and Materials
1. Essential Surface Preparation for Flawless Primer and Paint Application on Motorcycle Fairings
Achieving a durable, professional paint finish on motorcycle fairings begins with meticulous surface preparation. This critical phase sets the foundation for primer and paint adhesion, impacting the longevity and appearance of your DIY paint job. Start by carefully masking all surrounding areas with high-quality painter’s tape and plastic sheeting. This prevents overspray from contaminating sensitive components like the engine, handlebars, or frame, preserving the bike’s integrity while you work on the fairings.
Next, thorough cleaning and degreasing of the fairing surface are indispensable. Dirt, oils, and residual contaminants act as barriers that impede primer and paint bonding. Use appropriate cleaners designed for plastic surfaces to ensure every inch is spotless without harming the fairing material. Once clean, the surface needs to be sanded to create the optimal texture for primer adherence. For plastic fairings, begin with medium-grit sandpaper (around 400-600 grit) or sanding pads made specifically for plastics, which scuff the surface gently without causing damage.
For fairings that already have a painted finish, wet sanding is an effective method—starting at coarser grits like 1000 and progressively moving to finer grits up to 3000 helps remove gloss and minor imperfections, enhancing paint bonding and preparing the surface for the eventual clear coat.
Applying the correct primer is the next vital step. Plastic adhesion primers or etch primers are designed to bond effectively with ABS and similar plastics used in fairings. These primers should be applied in multiple thin, even coats using spray equipment to avoid uneven coverage or runs. Let the primer become tacky between coats, and if you use high-build primers, lightly sanding them smooth helps eliminate surface flaws for a flawless finish.
Multiple thin coats of primer and paint, rather than thick applications, ensure even coverage and prevent drips. Allow sufficient drying and curing time between coats, as rushed layering can compromise adhesion and durability. When working with plastic parts, flexible, UV-resistant paints are recommended to withstand environmental stressors without cracking or peeling.
This carefully orchestrated process combines cleaning, masking, sanding with appropriate materials, priming, and controlled painting to guarantee a smooth, resilient finish on your motorcycle fairings. For additional insights and demonstrations on sanding plastics and fairing surface preparation, resources such as detailed tutorials by custom paint professionals offer valuable guidance. A practical reference includes techniques detailed at PaintForMotorcycles.com, which emphasizes proper masking, sanding, and priming tailored for motorcycle surfaces.
To explore further the options for motorcycle fairings suited to your DIY painting projects, you can visit Summit Fairings’ blog, offering detailed advice on selecting suitable fairings for custom finishes.
2. Mastering Primer and Paint Application: Achieving a Professional Finish on Motorcycle Fairings
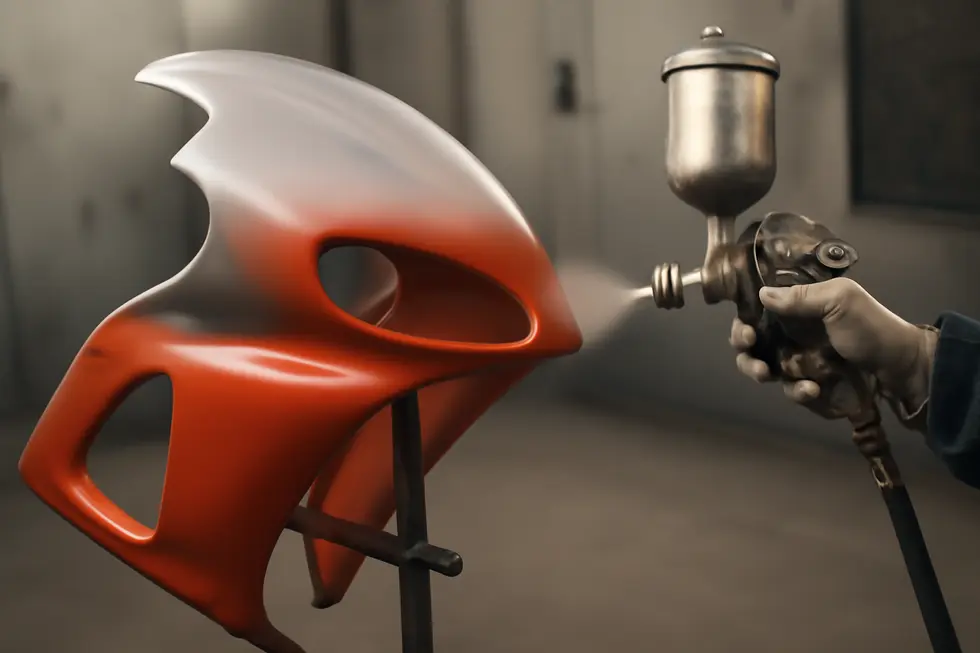
Achieving a professional and lasting finish on motorcycle fairings demands a carefully controlled application of primers, paints, and finishing materials. After thorough surface cleaning and sanding, the next critical phase is selecting and applying the correct primers tailored for plastic fairings, commonly made from ABS or similar materials. Unlike metal surfaces, plastic fairings require specialized adhesion promoters or plastic primers that create a durable base for subsequent paint layers. Applying these primers in multiple thin, even coats ensures proper bonding and prevents peeling or flaking, which can compromise the finish over time. It is essential to maintain a dust-free environment during this step and mask off any areas that should remain unpainted to avoid unsightly overspray.
When moving to paint application, automotive-grade basecoat paints designed for plastics provide the best results. Employing an HVLP spray gun or high-quality spray cans allows for controlled, even coverage, which is crucial to avoiding runs or uneven textures. Rather than applying thick coats, several thin layers should be sprayed with adequate drying periods, known as flash-off time, in between. This technique not only improves adhesion but also enhances the clarity and depth of the color. If you intend to incorporate custom designs or multi-color schemes, using high-quality masking tape and planning the layering process carefully can produce precise, crisp lines. Some advanced DIYers opt to paint logos beneath a clear coat layer, achieving a subtle embossed effect that elevates the finish’s sophistication.
The finishing step involves applying automotive clear coats that protect against UV rays, scratches, and weathering while adding desired sheen—be it glossy or matte. Clear coats enhance the paint’s durability, ensuring it stands up well to daily wear and environmental exposure. Multiple thin clear coats, similarly applied with attention to layering and drying time, form a resilient protective film. After curing, performing wet sanding followed by polishing can refine the surface to a mirror-like gloss, removing minor imperfections and leveling the finish.
Throughout the entire process, using the recommended materials—such as 600-800 grit sanding pads for plastics, plastic-specific primers, automotive basecoat paints, and compatible clear coats—greatly influences the final result. Adequate ventilation, personal protective equipment, and patience during drying times further contribute to safety and quality. By mastering these application techniques and material choices, DIY enthusiasts can achieve professional-grade finishes that enhance both the aesthetic appeal and longevity of their motorcycle fairings.
For additional guidance and visual demonstrations, explore detailed resources at Summit Fairings blog.
Chapter 3: Finishing and Protecting Your Work in DIY Paint Motorcycle Fairings: Clear Coats and Maintenance
1. Mastering Clear Coats: The Essential Finish to Protect and Enhance Your DIY Painted Motorcycle Fairings
Applying a clear coat is the pivotal final step in achieving a durable and visually striking finish on DIY-painted motorcycle fairings. This transparent protective layer acts as a shield, guarding the base paint against the relentless effects of sun exposure, environmental debris, and physical abrasion. For fairings typically made of ABS plastic, the clear coat locks in color vibrancy while preventing premature fading and chipping. Without this step, even the most carefully applied paint can quickly dull or suffer surface damage.
The protective nature of the clear coat goes beyond simple aesthetics—it forms a tough barrier that minimizes the risk of scratches and chips from road debris or routine handling. It safeguards against UV radiation, which can otherwise break down pigments and cause discoloration. Additionally, clear coats help repel dirt and grime, making cleaning easier and preserving the finish’s fresh appearance. This results in less frequent touch-ups or repainting, ultimately saving time and cost.
Achieving a flawless clear coat finish requires proper surface preparation and meticulous application techniques. After your base color has fully dried, ensure the fairing surface is clean and free of oils or dust. A light sanding just before spraying helps promote adhesion and smooths out any imperfections. Whether using spray cans or an HVLP spray gun, it’s important to apply multiple thin, even layers rather than rushing with thick coats that may cause runs or uneven gloss. Allowing adequate drying time between coats ensures a hard, resilient finish. Depending on your preference, clear coats can add a high-gloss shine for a showroom-quality look or a satin/matte finish for a subtler effect.
Maintaining the clarity and protection of your clear coat is equally crucial. Avoid prolonged exposure to harsh sunlight, which gradually breaks down the finish’s protective elements. Use gentle, non-abrasive soaps and soft cloths for cleaning to prevent scratches, and regularly apply a motorcycle-specific wax to reinforce the clear coat’s barrier. Such simple maintenance extends the life of your paint job and keeps your motorcycle’s fairings looking their best for years to come.
For comprehensive advice and further insights on finishing techniques and maintaining your motorcycle fairings, exploring detailed guides and resources like Summit Fairings’ blog can be invaluable. This resource offers expert tips tailored to motorcycle enthusiasts committed to DIY restoration and customization.
In sum, clear coats are not merely a cosmetic finishing touch but a fundamental component of any successful motorcycle fairing paint job. They protect, enhance, and preserve your work, ensuring that the fresh look of your DIY project endures on every ride.
For further technical insights on clear coats and their vital role in durability and shine, refer to this informative external resource: https://www.ftpaints.co.uk/blog/ft-paints-insights-2
2. Mastering Clear Coat Application and Long-Term Care for Durable, Glossy Motorcycle Fairings
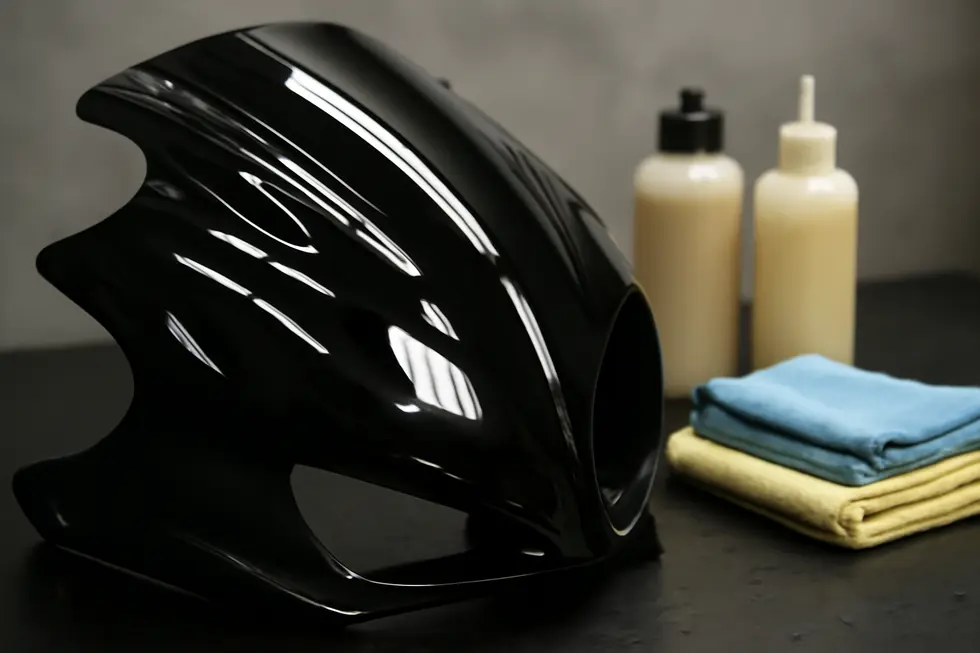
Achieving a professional, durable finish on your DIY-painted motorcycle fairings hinges on carefully applying clear coats and adopting ongoing maintenance routines that preserve both appearance and protection. The clear coat is essential not just for enhancing gloss but also for shielding the paint from scratches, UV rays, and environmental contaminants.
Start by applying multiple thin layers of clear coat—typically four to five—evenly sprayed over the base paint. Rather than rushing with thick coats that risk runs or drips, patience is vital; allow about 10 minutes between each coat to ensure proper drying and curing. Avoid sanding the surface before clear coat application, as any scratch marks may become visible beneath the glossy layer. This stage restores depth and vibrancy to the colors while locking in the paint’s integrity.
Once the final clear coat has been applied, give the fairings ample curing time. This usually takes several days to reach full hardness and maximum gloss potential. After curing, gently polishing the surface with a fine polishing compound can elevate the shine without damaging the clear coat. Polishing refines the finish, smoothing out minor imperfections and delivering that showroom-quality gloss.
Maintaining the finish involves regular waxing or sealing using products safe for motorcycle plastics and paints. This extra barrier reinforces UV protection and preserves the finish against gradual environmental wear. Maintaining waxed fairings not only enhances visual appeal but also slows fading and maintains surface resilience.
Cleaning is a delicate balance—always use mild soaps combined with soft cloths or microfiber towels to prevent scratching or dulling. Harsh chemicals and automatic car washes can prematurely degrade the finish, so washing should be gentle and infrequent during the initial two weeks after painting. Promptly removing contaminants like bird droppings and road grime helps avoid paint etching or damage.
Parking the motorcycle in shaded areas or covering it with UV-protective covers significantly reduces color fading from sun exposure. These simple protective steps extend the vibrant life of your paint job and reduce the need for early touch-ups.
Consistent care, combined with a meticulously applied clear coat, ensures your DIY-painted motorcycle fairings retain their fresh, glossy look while standing up to daily wear and the elements. For enthusiasts seeking further guidance and visuals on mastering these steps, refer to the detailed DIY Motorcycle Painting & Clear Coating Guide, which offers clear instructions on spraying techniques and maintenance.
To explore more about high-quality motorcycle fairings and other helpful tips, visit Summit Fairings blog.
Chapter 4: Tools, Techniques, and Tutorials for Successful DIY Paint Motorcycle Fairings

1. Mastering the Essentials: The Key Tools and Materials for DIY Motorcycle Fairing Paintwork
Achieving a professional finish when painting motorcycle fairings begins long before the first spray of paint. Success hinges on selecting the right tools and materials that suit the unique demands of motorcycle plastics, typically ABS. The foundation lies in thorough surface preparation and precise application, making quality equipment indispensable.
A comprehensive DIY setup starts with sanding supplies designed to smooth and prepare surfaces. Various grit sandpapers—from coarse 80-grit to ultra-fine 800-grit—allow gradual refinement, ensuring paint adheres and looks flawless. Sanding blocks help evenly distribute pressure, while electric or pneumatic sanders speed up the process for larger jobs.
Cleaning complements sanding by removing dirt, grease, and residues that compromise adhesion. Using degreasers, mild soaps, and lint-free cloths followed by tack cloths guarantees a contaminant-free surface, critical for primer and paint performance. Masking materials such as painter’s tape and protective films safeguard areas that should remain paint-free, supporting sharp, clean designs.
The heart of the painting process is the choice of primer, basecoat paint, and clear coat. Primers engineered for plastic ensure paints bond well and resist peeling. Basecoat paints, preferably automotive-grade with plastic compatibility, deliver vibrant color and durability. For enhanced protection and gloss, automotive clear coats seal the finish. When using two-component (2K) products, adequate ventilation and protective gear are essential due to chemical fumes.
Tools for paint application significantly affect quality. HVLP spray guns coupled with an air compressor offer fine atomization and controlled coverage, minimizing overspray and runs. For simpler or touch-up projects, premium spray cans designed for plastics work effectively. Mixing cups and sticks are vital for measuring and blending paints and primers uniformly.
Speeding drying times without damaging finishes is possible with a heat gun or hair dryer, applied cautiously to avoid heat damage. Additionally, body filler and putty help repair scratches or dents, ensuring a smooth base that lends itself to an impeccable paint job. Adhesion promoters serve as a bridge between plastic fairings and paint layers, crucial for long-lasting results.
Safety cannot be overlooked. Respirators, gloves, and eye protection shield against the hazardous chemicals in primers, paints, and clear coats.
By assembling and understanding these tools and materials, enthusiasts lay the groundwork for craftsmanship that rivals professional shops. For further inspiration and techniques, visit the Summit Fairings blog, a valuable resource honed for DIY motorcycle fairing projects.
For a visual, step-by-step approach and deeper insights into this process, details can be found at Kings Motorcycle Fairings tutorials.
2. Mastering Essential Painting Techniques: Step-by-Step Guidance for Flawless Motorcycle Fairings
Achieving a professional-looking paint finish on motorcycle fairings hinges on mastering a sequence of essential techniques, each carefully performed from start to finish. The journey begins with thorough preparation: after the fairings have been cleaned to remove any dirt, grease, or old paint, sanding with fine-grit paper refines the surface. This creates the ideal texture for paint adhesion and exposes any flaws that must be addressed. Repairing cracks or dents with plastic filler is critical, ensuring a smooth and uniform canvas before applying any paint. Once repaired, the application of a plastic adhesion promoter primes the surface and fosters a strong bond between the plastic and subsequent paint layers.
Priming itself demands precision. Multiple, light coats of a high-quality primer suited for plastics are evenly sprayed to build a durable base without masking fine details. After each coat dries, a gentle sanding with very fine grit paper smooths imperfections and prepares the primer for the paint layer. Skipping this step risks a rough or uneven finish that will mar the final appearance.
When painting, thin, consistent coats are vital. Using automotive-grade spray paints or urethane-based options designed for plastics ensures resilience and UV protection. Applying several light layers, rather than rushing heavy sprays, helps avoid runs, drips, and an uneven texture. Whether using spray cans, HVLP spray guns, or airbrushes, practicing on scrap material beforehand sharpens control and spray technique. For those wanting customized designs or logos, masking tape and stencils offer precision control—advanced painters sometimes incorporate logos beneath a clear coat for a sophisticated embossed effect.
Finishing with clear coats seals and protects the paint layers. Like the primer and paint, multiple thin coats are sprayed and allowed to cure fully, which could take hours or days depending on environmental factors. Proper curing time is paramount before the fairings are handled or reinstalled, preventing premature damage. After curing, light polishing and buffing elevate the gloss and smoothness of the surface, lending a professional touch.
Several additional tactics improve the overall outcome. Working in a clean, dust-free environment minimizes contaminants. Wearing safety gear such as respirators and gloves protects health when handling chemicals and sprays. Maintaining ideal temperature and humidity conditions influences drying behavior and final appearance.
Learning through detailed tutorials and videos can greatly enhance understanding and confidence. For comprehensive, step-by-step visual guidance on painting motorcycle parts, an external YouTube tutorial provides practical insights into layering, spraying, and preparation techniques tailored for motorcycle components, making it an excellent resource for DIY enthusiasts.
To explore further details on selecting, preparing, and painting motorcycle fairings, discover expert advice and tips at Summit Fairings’ blog.
External reference for step-by-step painting tutorial:
https://www.youtube.com/watch?v=DI94L8WIqss
Final thoughts
Successfully DIY painting motorcycle fairings requires a disciplined approach—from surface preparation and primer application to painting technique and long-term maintenance. For business owners, mastering these steps enables higher-quality work with reduced overheads, strengthening competitive advantage and customer loyalty. Consistently applying thin, even coats with appropriate materials and protecting finishes with clear coats safeguards durability and aesthetic appeal. Coupled with the right tools and learning resources, this approach empowers businesses to provide custom, professional finishes without relying solely on costly external services. By integrating these practical methods and insights, your operation can confidently deliver standout motorcycle fairings that align with both stylistic goals and customer expectations.
Ready to elevate your ride? Summit Fairings delivers premium, custom-fit fairings that blend style and durability. Whether you’re chasing speed or turning heads, we’ve got your bike covered. Don’t wait—transform your machine today. Click, customize, and ride with confidence. Your perfect fairing is just a few clicks away. Act now!
About us
undefined