Introduction
Installing a fairing on a motorcycle is a critical upgrade that enhances both the bike’s aerodynamics and its visual appeal. For business owners managing motorcycle customization or repair services, understanding the installation process in detail helps ensure high-quality results that satisfy customers and protect your reputation. This guide breaks down the installation into key phases: preparing the motorcycle by carefully removing old components, setting up mounting brackets and frame adaptations, gathering the necessary tools and materials, following precise attachment techniques, and finally verifying the fairing’s proper fitment and alignment. Each chapter supports a comprehensive understanding, highlighting practical steps that streamline the workflow and avoid costly errors, ultimately improving operational efficiency and customer trust.
Tables of Contents
Chapter 1: Preparing Your Motorcycle for How to Install a Fairing on a Motorcycle
- Careful Removal and Thorough Cleaning: Laying the Foundation for Your Fairing Installation
- Thorough Inspection and Careful Modification of Mounting Points for a Flawless Fairing Fit
- Mastering the Installation of Mounting Brackets for a Stable and Perfectly Aligned Fairing
Chapter 2: Mounting Brackets and Frame Preparations for How to Install a Fairing on a Motorcycle
- Thoroughly Clearing and Preparing Your Motorcycle Frame for Fairing Brackets Installation
- Mastering Drilling and Mounting Brackets for a Secure Motorcycle Fairing Installation
- Precision Fabrication and Hardware Choices: Ensuring a Secure and Vibration-Free Fairing Installation
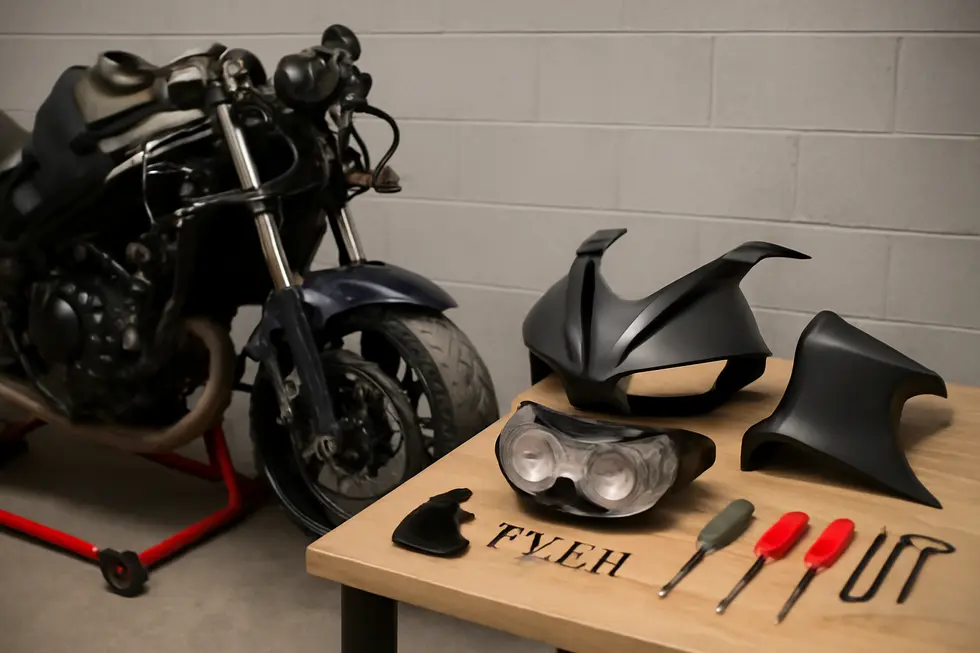
Chapter 3: Mastering the Essential Tools and Hardware for Motorcycle Fairing Installation
- Key Tools and Hardware Essentials for a Smooth Motorcycle Fairing Installation
- Thorough Preparation and Safety Measures for a Smooth Fairing Installation
- Critical Supplementary Materials and Optional Gear for a Seamless Fairing Installation
Chapter 4: Step-by-Step Attachment Techniques for How to Install a Fairing on a Motorcycle
- Preparing Your Motorcycle: Careful Removal of Existing Parts and Initial Setup for Fairing Installation
- Mastering the Art of Mounting Brackets and Precision Fairing Alignment
- Mastering Final Assembly: Securely Attaching Your Motorcycle Fairing for Performance and Precision
Chapter 5: Ensuring Proper Fitment and Alignment in How to Install a Fairing on a Motorcycle
- Critical Preparations to Achieve Flawless Fitment and Alignment for Motorcycle Fairing Installation
- Mastering Precise Fitment and Alignment Techniques for Motorcycle Fairing Installation
- Essential Tools and Installation Techniques for Precise Fairing Fitment and Alignment
Chapter 1: Preparing Your Motorcycle for How to Install a Fairing on a Motorcycle
1. Careful Removal and Thorough Cleaning: Laying the Foundation for Your Fairing Installation
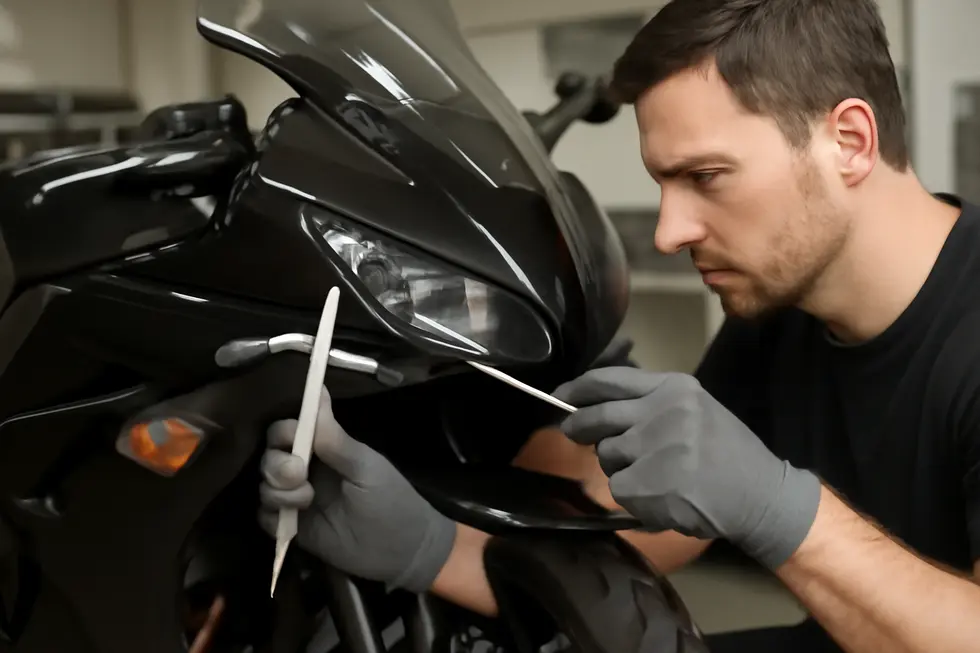
Preparing your motorcycle for fairing installation begins with the careful removal of existing components to ensure a clean, damage-free base. Start by detaching parts such as the seat, saddlebags, and any stock support bars using appropriate tools like Torx or socket wrenches. This clears space and facilitates access to mounting points. Next, remove any original fairings or windshields with caution, paying close attention to the electrical connections for headlights, turn signals, and wiring. Temporary disconnection or relocation of these elements may be necessary to accommodate new brackets or panels. Handling these with care prevents damage and preserves electrical integrity.
After removal, thoroughly clean all mounting points and adjacent surfaces. Dirt, grease, or debris could compromise fastener grip or adhesive performance, so a clean frame ensures a firm, secure fit for the new fairing. Avoid overtightening bolts during reassembly to minimize risk of cracking delicate fairing materials like plastic or fiberglass. This preparation stage is vital to achieving correct alignment and safeguarding your bike’s components, setting the stage for a smooth installation.
For a step-by-step visual walkthrough on removing fairings and preparing your motorcycle, see the detailed video tutorials by The Racing Xpert at this link. More insights on choosing and fitting fairings can be found in the Explore the Best Motorcycle Fairings at Summit Fairings blog.
2. Thorough Inspection and Careful Modification of Mounting Points for a Flawless Fairing Fit
Before attaching a new fairing, meticulous attention to the motorcycle’s mounting points is essential. Begin by carefully removing any remaining components such as old fairings, headlights, and hardware, keeping them safely on a soft surface to avoid scratches or damage. Next, closely examine existing mounting points on the frame; many fairing kits rely on these pre-drilled holes to secure brackets. If no suitable points exist, precise drilling will be necessary. To protect the bike’s finish and prevent metal shavings from causing harm, place a magnet wrapped in cloth underneath the drill site. Proper alignment during drilling is crucial to avoid misfits or stress on the new fairing. After establishing or modifying mounting points, install the supplied brackets firmly on strong frame areas like the neck. These brackets must sit flush and be securely fastened using durable bolts designed for motorcycles to ensure lasting stability. Throughout the process, stabilize the bike on a stand and disconnect the battery to guarantee safety. Taking photos during disassembly can be invaluable for reassembly. Avoid forcing any clips or bolts to maintain paintwork and fastener integrity. These careful preparations create a solid foundation for a secure and visually appealing fairing installation. For a step-by-step visual guide, see the detailed tutorial “How Do You Install Motorcycle Fairings? – The Racing Xpert.” For more insights on selecting and preparing your motorcycle components, explore comprehensive resources at Summit Fairings blog.
3. Mastering the Installation of Mounting Brackets for a Stable and Perfectly Aligned Fairing
Ensuring a stable foundation for your new fairing starts with properly installing the mounting brackets. Begin by parking your motorcycle on a flat, sturdy surface and securing it with a stand to prevent any movement during work. After safely removing pre-existing fairings, headlights, or trim, carefully inspect the frame for existing mounting points. These points often enable straightforward bracket attachment without modifications. Where none exist, drilling new holes might be necessary—take precautions such as placing a magnet wrapped in cloth beneath the drilling area to capture metal shavings and protect your bike’s finish.
Once mounting points are identified or created, align the supplied or custom-fabricated brackets precisely on the motorcycle’s frame or neck. Secure them tightly using the recommended bolts, washers, and lock washers to minimize vibration loosening during rides. Before final tightening, loosely fasten the fairing to the brackets to verify alignment and ensure it sits flush without restricting controls or cables. Make any needed adjustments at this stage for optimal positioning.
When you confirm perfect fitment, torque all fasteners to the manufacturer’s specifications using a torque wrench. Reinstall any removed components such as headlights and route wiring carefully through dedicated holes to avoid damage. This methodical approach to bracket installation ensures a secure, clean fit that enhances your motorcycle’s appearance and aerodynamics. For visual guidance, consult detailed tutorials like the one offered by The Racing Xpert, which walks through these steps comprehensively.
For more insights on choosing fairings and accessories, visit our explore the best motorcycle fairings at Summit Fairings.
Chapter 2: Mounting Brackets and Frame Preparations for How to Install a Fairing on a Motorcycle
1. Thoroughly Clearing and Preparing Your Motorcycle Frame for Fairing Brackets Installation
Removing existing components carefully starts the process of preparing your motorcycle frame for fairing bracket installation. Begin by disassembling current fairings and related parts, using the correct screwdrivers or hex keys to remove bolts, typically M5 screws securing panels and cowling. It is important to note any rubber spacers or grommets as they cushion and protect the components; these should be set aside for reuse if possible. Also, disconnect all electrical connectors such as those for the headlight and turn signals to prevent damage during removal. After detaching these components, thoroughly clean the mounting surfaces on the frame to eliminate dirt and debris that could affect the bracket fit or cause alignment issues. Inspect the existing bolt holes or mounting points carefully for signs of wear or incompatibility with the new bracket system. If holes are intact and fitting, proceed to prepare the frame; if not, consider drilling new holes, keeping in mind methods to minimize metal shavings underneath the drilling area. When installing the mounting brackets, use rubber grommets within bolt holes to evenly distribute pressure and protect fairing materials from stress or cracking. Bolts should be finger-tightened initially to allow for alignment adjustments and avoid damage before final tightening. This meticulous removal and preparation ensure the motorcycle frame is ready to securely support the mounting brackets, leading to a safe and precise fairing installation. For visual guidance through these steps, detailed video tutorials such as “How Do You Install Motorcycle Fairings?” by The Racing Xpert provide comprehensive overviews. For additional insight on fairing selections and compatibility, explore discover affordable motorcycle fairings.
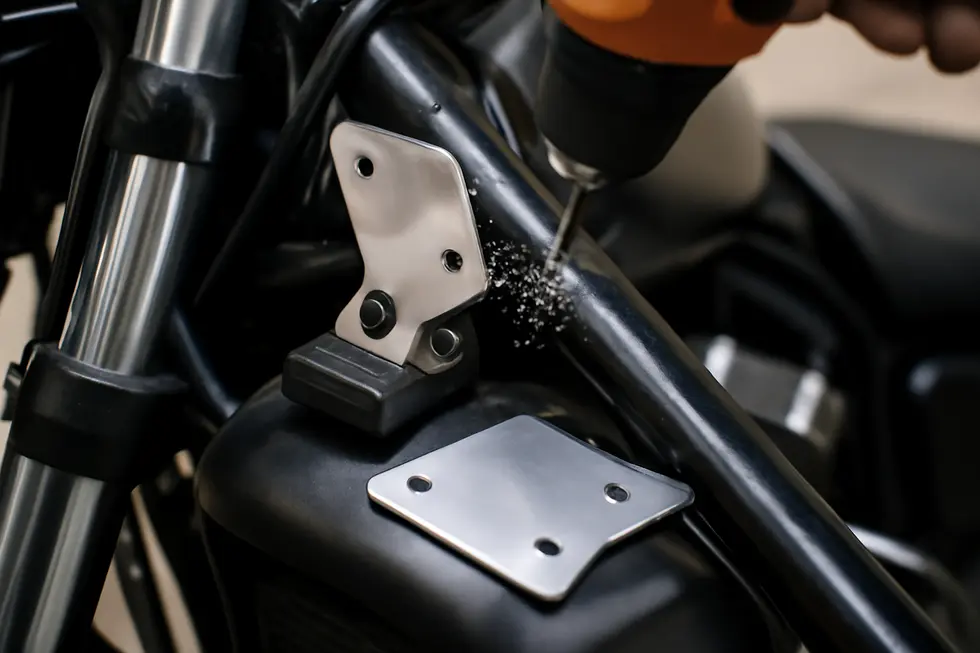
2. Mastering Drilling and Mounting Brackets for a Secure Motorcycle Fairing Installation
Installing sturdy mounting brackets on your motorcycle frame is essential for a safe and lasting fairing setup. Start by carefully inspecting the frame for existing mounting points that match the fairing kit’s specifications. If no suitable holes are found, drilling becomes necessary. Use a drill bit around 5mm to match typical fairing bolt sizes, and place a magnet wrapped in cloth beneath the drilling area to catch metal shavings and protect the frame’s finish.
Whether you use supplied brackets or fabricate your own from aluminum or stainless steel rods, cleanliness is key—thoroughly clean the frame surfaces before attaching brackets. Secure the brackets firmly to strong frame sections, often around the neck, using bolts with washers and lock nuts to resist vibration loosening.
After the brackets are mounted, align the fairing carefully, marking any additional holes needed for attachment, then drill precisely. Fasten the fairing with appropriate screws, ensuring firm but stress-free fitting. Throughout the process, a stable motorcycle stand helps maintain safety and accuracy.
This step-by-step method provides a dependable foundation that suits most aftermarket fairing kits, but always tailor adjustments based on your motorcycle’s frame design and the fairing’s requirements. For a more practical example of bracket fabrication and drilling, consider visiting this detailed Ducati GT1000 fairing installation guide.
For more insights on choosing quality fairings, explore trusted resources like this ultimate source for affordable motorcycle fairings.
3. Precision Fabrication and Hardware Choices: Ensuring a Secure and Vibration-Free Fairing Installation
Installing a motorcycle fairing demands careful attention to custom fabrication and hardware selection to guarantee a secure, stable fit that withstands riding vibrations. While many fairing kits align with existing factory frame holes—often near the neck or main tubes—it’s common to encounter misalignments requiring custom modifications. Drilling new mounting points is sometimes necessary but must be executed with protection in place, such as using a magnet beneath to catch metal shavings and prevent frame damage.
Selecting the right hardware is equally important. Bolts should fit precisely, complemented by lock and flat washers to resist loosening from vibration. Inserting rubber grommets or spacers between metal brackets and fairing panels reduces stress on the fairing and dampens vibrations. Prior to bracket installation, thorough cleaning of the frame removes contaminants that might hinder a flush fit. Inspecting for corrosion or wear avoids compromising mounting strength.
Custom fabrication often entails bending, cutting, or even welding metal brackets to match unique frame geometries or non-standard fairing designs. During assembly, bolts are initially finger-tightened to allow fine-tuning of alignment before securely tightening, preventing misfits or undue stress. This blend of precision hardware choice and tailored fabrication is key to achieving a professional, durable fairing installation that improves both aesthetics and performance.
For greater insights on protective drilling methods and hardware use, consult detailed guides such as this drilling new mounting holes with protective measures. For additional tips on fairing options, explore comprehensive motorcycle fairing selections.
Chapter 3: Mastering the Essential Tools and Hardware for Motorcycle Fairing Installation
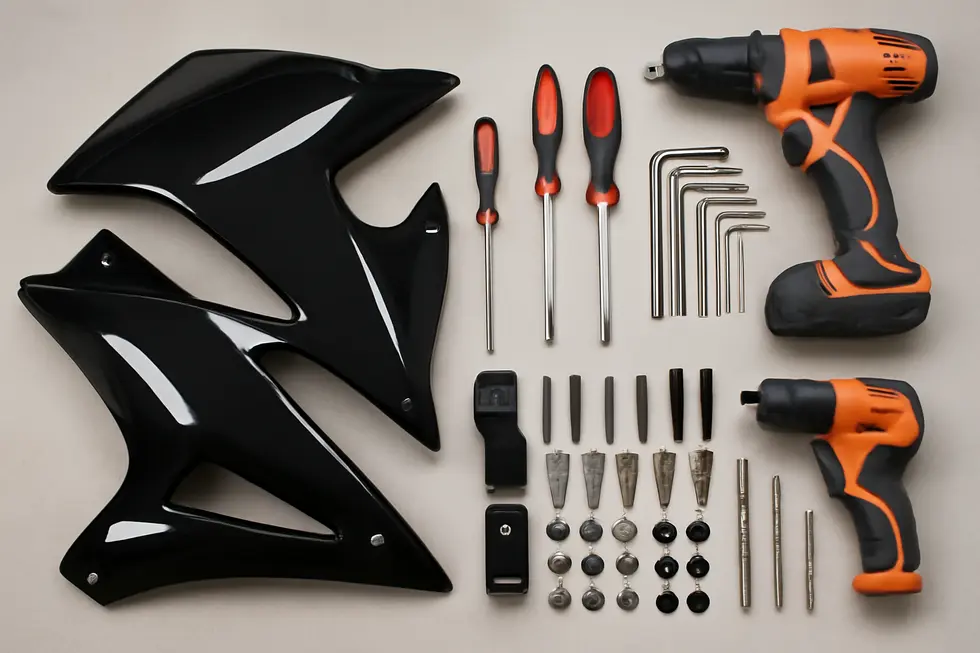
1. Key Tools and Hardware Essentials for a Smooth Motorcycle Fairing Installation
Installing a fairing on a motorcycle demands a carefully selected set of tools and hardware to ensure the process is efficient and damage-free. Fundamental hand tools like flathead and Phillips screwdrivers are vital for removing and securing screws on the fairing panels. Allen keys or hex bits are particularly important since most fairing bolts require these for proper fitting. A ratchet set with appropriate sockets enables you to tighten nuts tightly, ensuring the fairing is safely mounted to the bike’s frame.
Protection for the motorcycle’s painted surfaces is a often overlooked but necessary precaution; soft cloths or towels prevent scratches during handling and assembly. Some installers may choose specialized quick-release fasteners—they are corrosion-resistant and allow speedy removal, which is ideal for maintenance or racing setups.
Additionally, many fairing kits include model-specific bracket kits that come with tailored mounting hardware. These brackets simplify installation by providing secure attachment points, crucial especially when the original frame lacks suitable mounts. While basic mechanical knowledge helps, having these well-matched tools and hardware ensures the entire process is smoother and the final fit is precise.
For further insights on selecting compatible and quality fairings, consider exploring affordable motorcycle fairings available at Summit Fairings.
Detailed visual instructions such as those found in video tutorials enhance understanding and complement tool readiness, reinforcing the importance of patience and careful alignment during installation.
2. Thorough Preparation and Safety Measures for a Smooth Fairing Installation
Proper preparation is the backbone of a successful motorcycle fairing installation. Start by assembling essential tools such as screwdrivers, hex keys, wrenches, and a drill if new mounting holes are required. Carefully remove any old fairings or hardware, placing removed parts on a soft surface like carpet to avoid scratches. Inspect your bike’s frame for existing mounting points; many fairing kits utilize these, but some installations require drilling. When drilling, place a magnet wrapped in cloth beneath the area to catch metal shavings and protect the bike’s finish.
Safety cannot be overstated—wear gloves and eye protection to guard against sharp edges and flying debris. Avoid altering structural components unless explicitly permitted by manufacturer instructions. Secure loose wiring with zip ties or clips to prevent damage from vibration or snagging. Clean all attachment points beforehand to ensure a snug fit.
Using supplied mounting brackets correctly is crucial. Align components patiently and tighten all fasteners firmly but without over-torquing to maintain stability and safety during rides. This careful preparation and adherence to safety guidelines paves the way for a secure and lasting fairing installation.
For a detailed visual guide, see How Do You Install Motorcycle Fairings? by The Racing Xpert.
Explore more tips on fitting and selecting fairings at the Summit Fairings blog.
3. Critical Supplementary Materials and Optional Gear for a Seamless Fairing Installation
Achieving a secure, streamlined fairing installation requires more than just basic hand tools. Supplementary materials such as specialized fasteners—including corrosion-resistant bolts, nuts, speed nuts, well nuts, and push pin rivets—play a vital role in ensuring both durability and a clean appearance. These components often come anodized or made from stainless steel to resist wear and weathering. Additionally, anti-scratch washers and lubricants protect the fairing’s finish during tightening and facilitate easier future removal, preventing damage to delicate surfaces. The included Allen keys or hex wrenches are tailored to match the fastening hardware, allowing precise torque and minimizing stripping risk.
Beyond essentials, optional equipment can significantly enhance installation efficiency. Quick-release fasteners, favored by riders who frequently access internal components, allow rapid panel changes without compromising stability. Certain aftermarket fairings call for model-specific mounting kits or accessories like extension blocks or relocation brackets to maintain proper alignment and function of headlights and indicators. Employing protective mats or soft surfaces during disassembly keeps panels free of scratches or impact marks. Depending on your motorcycle and fairing type, common hand tools such as torque wrenches, pliers, and a quality screwdriver set may also be indispensable.
Ensuring you have these supplementary materials and optional tools at hand will streamline the installation, protect your investment, and simplify future maintenance. For a broad perspective on assembling quality fairings and related materials, visit Explore the Best Motorcycle Fairings at Summit Fairings.
For detailed visual guidance, tutorials like “How Do You Install Motorcycle Fairings?” offer step-by-step support through every phase of the process.
Chapter 4: Step-by-Step Attachment Techniques for How to Install a Fairing on a Motorcycle
1. Preparing Your Motorcycle: Careful Removal of Existing Parts and Initial Setup for Fairing Installation
The first critical phase of installing a fairing on a motorcycle is the careful removal of existing components and preparing the bike for the new assembly. Start by detaching any old fairings, headlights, air ducts, and related hardware using appropriate tools such as screwdrivers or Torx drivers. It’s important to place removed parts on a soft surface to prevent scratches and keep them organized, as some pieces might be reused or serve as installation references.
Once cleared, perform a thorough inspection of the motorcycle’s frame and mounting points. Many fairing kits are designed to utilize pre-existing holes; if these are insufficient or absent, drilling carefully is required. When drilling, use precautions like setting a magnet beneath the frame to capture metal shavings and avoid internal damage. Clean the frame to ensure a dirt- and debris-free surface, which promotes a secure fit.
Following this, install the supplied mounting brackets loosely to the frame or neck area. This loose installation allows fine-tuning during alignment. Position the new fairing on these brackets, using built-in grooves or slots as guides. Adjust bracket placement as needed to align the fairing precisely with the bike’s contours without interfering with operational controls or lighting.
Finally, secure all fasteners tightly once alignment is confirmed, employing washers or rubber grommets to protect the fairing from vibration stress and prevent cracking. This meticulous preparation guarantees a solid, durable attachment, readying the motorcycle for the next installation stages.
For visual guidance, detailed tutorials like “How Do You Install Motorcycle Fairings?” by The Racing Xpert clarify these steps effectively, enhancing understanding and confidence during the process.
Learn more about securing your fairing investment with tips from Explore the Best Motorcycle Fairings at Summit Fairings.
2. Mastering the Art of Mounting Brackets and Precision Fairing Alignment
Installing a motorcycle fairing begins with securely fastening the mounting brackets to the frame, a crucial step that ensures stability and proper fit. Start by carefully inspecting existing mounting points on your motorcycle’s frame; many fairing kits are designed to utilize these holes, avoiding unnecessary modifications. If no suitable points exist, carefully drill new holes while protecting the bike’s finish by placing a cloth-wrapped magnet beneath to catch metal shards. Attach the supplied brackets firmly using the appropriate bolts, ensuring they are aligned symmetrically and tightened to the recommended torque without overtightening.
Once brackets are securely in place, assemble any multi-piece fairing panels according to the manufacturer’s instructions before mounting. Position each panel on its corresponding bracket with care, verifying that all bolt holes line up precisely. This alignment stage is essential to avoid gaps and ensure the fairing’s aerodynamic performance. Loosenly insert fasteners at first to allow small adjustments, then tighten evenly to lock panels securely. Check that no components obstruct steering or suspension movement and confirm the fairings face forward uniformly. Proper bracket installation combined with meticulous alignment enhances both the motorcycle’s aesthetics and ride quality.
For comprehensive visual guidance and tips on securing mounts effectively, refer to detailed video tutorials such as “How Do You Install Motorcycle Fairings?” by The Racing Xpert. You can also explore additional tips on selecting and installing motorcycle fairings in our guide on explore the best motorcycle fairings.
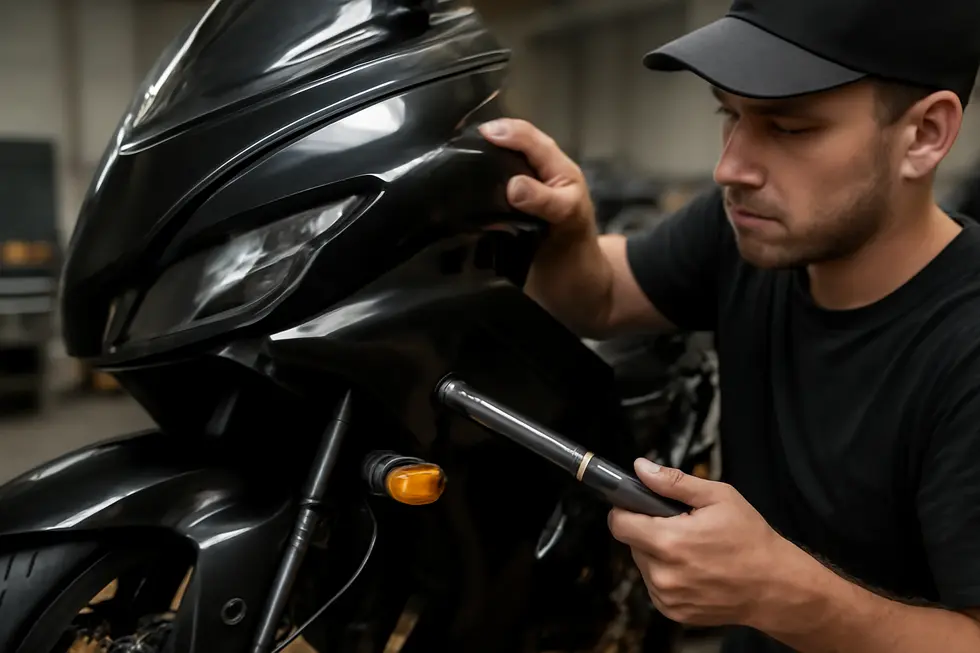
3. Mastering Final Assembly: Securely Attaching Your Motorcycle Fairing for Performance and Precision
Successfully attaching a motorcycle fairing requires thoughtful execution of the final assembly process to ensure stability, alignment, and durability. Begin by positioning your motorcycle securely on a stable surface, then carefully remove existing components like fairings, headlights, and ducts, keeping them safely aside to prevent damage. With clean mounting surfaces, inspect and align the fairing’s mounting points to your bike’s frame. Use the supplied brackets and hardware to loosely fit the fairing, allowing room for adjustments. Attention to alignment is crucial; loosely inserting screws at this stage gives flexibility to position the panels accurately. Once properly aligned, tighten all fasteners firmly but with care to avoid stressing mounts or damaging parts. If your kit includes additional elements such as windshields or lighting assemblies, pre-assemble these on the fairing panels before final attachment to streamline the process and ensure correct integration. Routing any electrical wiring through designated holes preserves system integrity and prevents interference. Conduct thorough final inspections to confirm no parts impede moving components or controls, verifying that the fairing’s fit complements your motorcycle’s handling and aesthetics. A careful test ride can further assure all attachments are secure and performance remains uncompromised. Using the right tools and exercising patience throughout prevents costly errors and enhances the longevity and effectiveness of your new fairing. For a visual step-by-step guide, consider referring to How Do You Install Motorcycle Fairings? by The Racing Xpert. For more insights on fairing options and installation guidance, explore this detailed resource on motorcycle fairings.
Chapter 5: Ensuring Proper Fitment and Alignment in How to Install a Fairing on a Motorcycle
1. Critical Preparations to Achieve Flawless Fitment and Alignment for Motorcycle Fairing Installation
Preparing your motorcycle thoroughly is essential for achieving precise fitment and alignment when installing a new fairing. Start by carefully removing existing components such as old fairings, headlights, and air ducts using the right tools, like screwdrivers and hex keys. Set these parts aside on soft surfaces to prevent scratches or damage. Ensure the bike is parked securely on a level, stable surface—using a kickstand or motorcycle stand—to avoid any movement during installation. Thoroughly clean the attachment zones on the frame, removing any dirt or grease that could interfere with mounting the new fairing. Identify existing mounting points, often bolt holes designed for fairings, or prepare to create new ones with caution, minimizing risk to the frame’s finish. Before final installation, dry-fit the fairing panels to assess alignment and make necessary adjustments to achieve a perfect fit. Installing the supplied mounting brackets firmly to strong areas of the frame, such as the neck, forms the structural foundation for the fairing’s secure attachment. For kits comprising multiple pieces, assemble them beforehand to verify correct fitting. Employ appropriate tools patiently, taking care to align every component without forcing or stressing mount points. These meticulous preparatory steps lay the groundwork for a seamless and durable fairing installation that enhances your motorcycle’s performance and appearance. For additional guidance, check out visual resources like comprehensive video tutorials on motorcycle fairing installation. You can also refer to step-by-step visual guidance from experts such as The Racing Xpert in the video “How Do You Install Motorcycle Fairings?”
2. Mastering Precise Fitment and Alignment Techniques for Motorcycle Fairing Installation
Achieving precise fitment and alignment when installing motorcycle fairings is essential for both the bike’s appearance and mechanical integrity. Start by pre-fitting the fairing shell on the motorcycle to confirm correct alignment and clearances, preventing obstructions or stress points during final installation. Thoroughly cleaning attachment areas after removing old components ensures dirt or grime won’t interfere with mounting surfaces. Carefully inspect existing mounting points and utilize them whenever possible, but if new holes are necessary, drill with caution. A useful precaution is to place a magnet wrapped in cloth beneath drilling spots to catch metal shavings and protect frame components.
Next, securely install mounting brackets, which act as the structural base for the fairing panels, making sure they align precisely with the bike’s frame or neck. For multi-piece kits, assembly should follow manufacturer guidelines to guarantee components such as windshields and headlights are accurately aligned before mounting. Use the proper tools—like screwdrivers, hex keys, and drills—to fasten parts without over-tightening, which can cause warping. Throughout the process, maintaining patience and continuously verifying alignment promotes a secure, aerodynamic fit that safeguards the motorcycle and enhances stability.
Choosing quality aftermarket kits engineered for precision fit further eases installation challenges and improves final results. For a step-by-step demonstration on achieving optimal fairing fitment and alignment, the video “How Do You Install Motorcycle Fairings?” by The Racing Xpert is recommended.
For more insights on selecting the right fairings, explore affordable and well-engineered options at Summit Fairings.
3. Essential Tools and Installation Techniques for Precise Fairing Fitment and Alignment
Achieving proper fitment and alignment when installing a motorcycle fairing depends greatly on using the right tools, hardware, and installation techniques. Fundamental hand tools such as screwdrivers, hex keys, and wrenches are vital for removing existing components and securing the new fairing. When aftermarket fairings require new mounting points, a drill with suitable bits becomes necessary, with a magnet placed underneath to catch metal shavings and protect the motorcycle’s finish. Mounting brackets supplied with the fairing kit play a critical role, providing structural support and correct alignment when firmly attached to sturdy areas like the frame’s neck.
Before final tightening, it is important to loosely assemble fairing pieces and brackets to verify alignment and ensure each part fits perfectly without forcing. The motorcycle should be stabilized on a flat surface or stand to prevent any movement during this delicate process. Cleaning mounting areas enhances contact and prevents dirt from compromising fitment. Even tightening of bolts using a torque wrench protects parts from stress and avoids damage, while threadlocker can secure metal fasteners against loosening vibrations.
Following these best practices will result in a secure installation that improves both your motorcycle’s aesthetics and aerodynamic efficiency. For a visual walkthrough of these steps, the video “How Do You Install Motorcycle Fairings?” by The Racing Xpert is a valuable resource, guiding through each phase with clear demonstrations.
For more on choosing the right fairings and accessories, explore comprehensive options at Summit Fairings.
Final thoughts
A well-installed motorcycle fairing not only enhances the bike’s aerodynamic efficiency and aesthetics but also reinforces customer confidence in your service quality. By methodically preparing the motorcycle, correctly installing mounting brackets, utilizing the right tools, following precise attachment methods, and ensuring perfect fitment and alignment, business owners and their teams can deliver consistent, professional results. This process minimizes installation errors, protects the motorcycle’s integrity, and elevates the perceived value of your custom bike services. Adopting these best practices helps build lasting client relationships and strengthens your reputation in the competitive motorcycle market.
Ready to elevate your ride? Summit Fairings delivers premium, custom-fit fairings that blend style and durability. Whether you’re chasing speed or turning heads, we’ve got your bike covered. Don’t wait—transform your machine today. Click, customize, and ride with confidence. Your perfect fairing is just a few clicks away. Act now!
About us
undefined