Introduction
Maintaining the pristine look of motorcycle fairings is crucial for business owners dealing with customization, sales, or repairs. Stickers, while often appealing individually, can impede resale value or the aesthetics of a freshly serviced bike. Removing them safely without damaging paint or plastic ensures customer satisfaction and preserves long-term value. This guide breaks down the process into four critical stages: preparing the fairing with an initial cleaning, using heat to soften adhesives, peeling stickers with care using the right tools, and removing residual adhesive followed by final cleaning. Mastering these steps equips business owners with the confidence and skills necessary to maintain flawless motorcycle surfaces and uphold a professional standard.
Tables of Contents
Chapter 1: How to Remove Stickers from Motorcycle Fairings: Preparing the Surface and Initial Cleaning
- Mastering Surface Preparation for Sticker Removal on Motorcycle Fairings: Essential Steps for a Damage-Free Start
- Effective Surface Preparation: Mastering Initial Cleaning to Protect Motorcycle Fairings Before Sticker Removal
Chapter 2: Mastering Heat Techniques for Safe Sticker Removal on Motorcycle Fairings
- Applying Controlled Heat to Soften Adhesives While Protecting Motorcycle Fairing Surfaces
- Effective Heat Techniques and Adhesive Residue Removal for Pristine Motorcycle Fairings
Chapter 3: How to Remove Stickers from Motorcycle Fairings: Safe Sticker Peeling and Use of Tools
- Mastering Gentle Sticker Removal: Expert Techniques for Preserving Motorcycle Fairings
- Harnessing Heat and Gentle Solvents for Damage-Free Sticker Removal on Motorcycle Fairings
Chapter 4: How to Remove Stickers from Motorcycle Fairings: Adhesive Residue Removal and Final Cleaning
- Mastering Heat and Patience: Safe Strategies for Peeling Stickers Off Motorcycle Fairings
- Gentle Solvent Techniques and Protective Finishes for Pristine Motorcycle Fairings After Sticker Removal
Chapter 1: How to Remove Stickers from Motorcycle Fairings: Preparing the Surface and Initial Cleaning
1. Mastering Surface Preparation for Sticker Removal on Motorcycle Fairings: Essential Steps for a Damage-Free Start
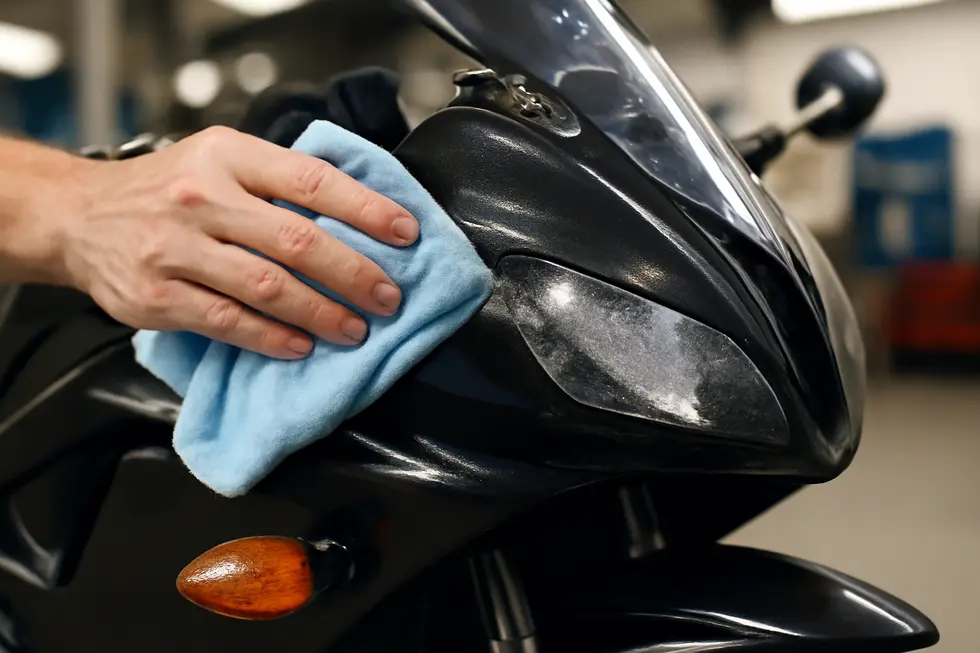
Successfully removing stickers from motorcycle fairings begins with meticulous surface preparation designed to protect the delicate paint and plastic finish. The process demands a gentle yet thorough cleaning to eliminate any dust, grime, or debris that might otherwise cause scratches during removal. Begin by washing the fairing with a mild soap and warm water, using a soft microfiber cloth to prevent abrasion. Avoid abrasive scrubbing pads or harsh chemicals, as these can dull the surface or damage the paintwork. Ensuring the surface is completely clean creates an ideal foundation for the next step by reducing hidden particles that could interfere with sticker removal.
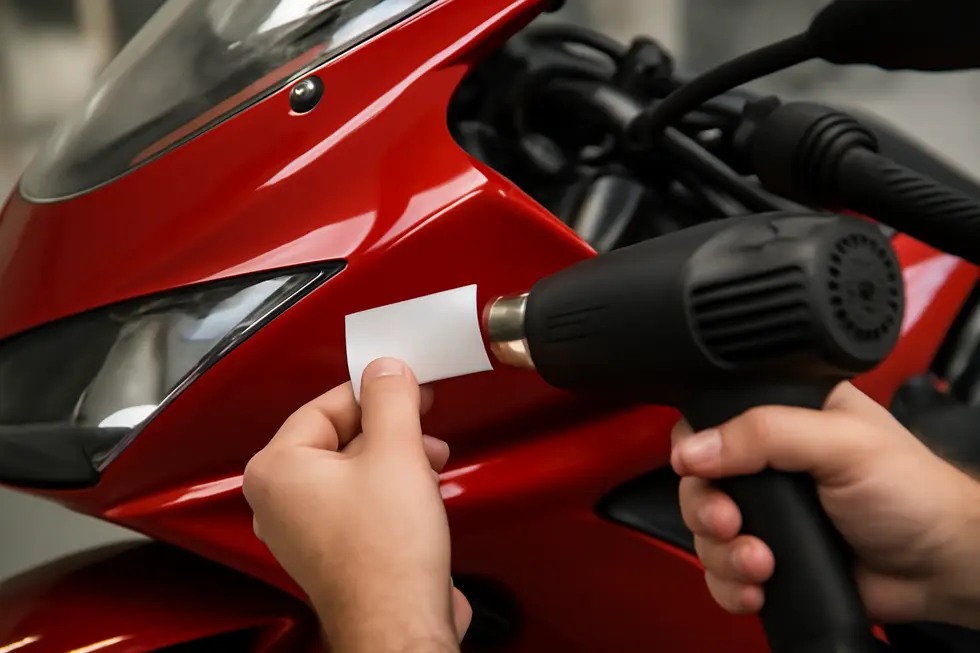
Once the surface is clean and dry, applying controlled heat softens the adhesive beneath the sticker, significantly easing its removal. Employ a hairdryer or a heat gun set to a low temperature, directing warm air evenly across the sticker. It’s crucial to keep the heat source moving to prevent localized overheating, which can warp plastic fairings or harm paint coatings. This warming process loosens the adhesive bond, allowing the sticker to peel away smoothly with minimal resistance.
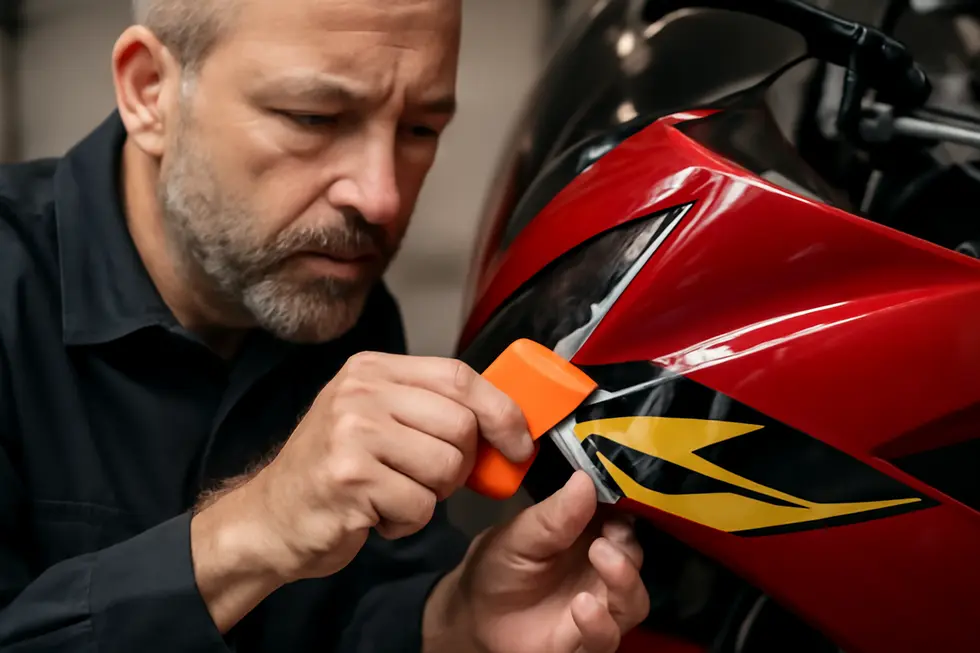
With the adhesive softened, carefully lift a corner of the sticker using a fingernail or a non-abrasive tool like an old credit card. Slowly pull the sticker back at a shallow angle, working gradually to avoid tearing it or leaving behind residue. Patience during this step protects the underlying surface from scratches or stress fractures, preserving the motorcycle’s aesthetic integrity.
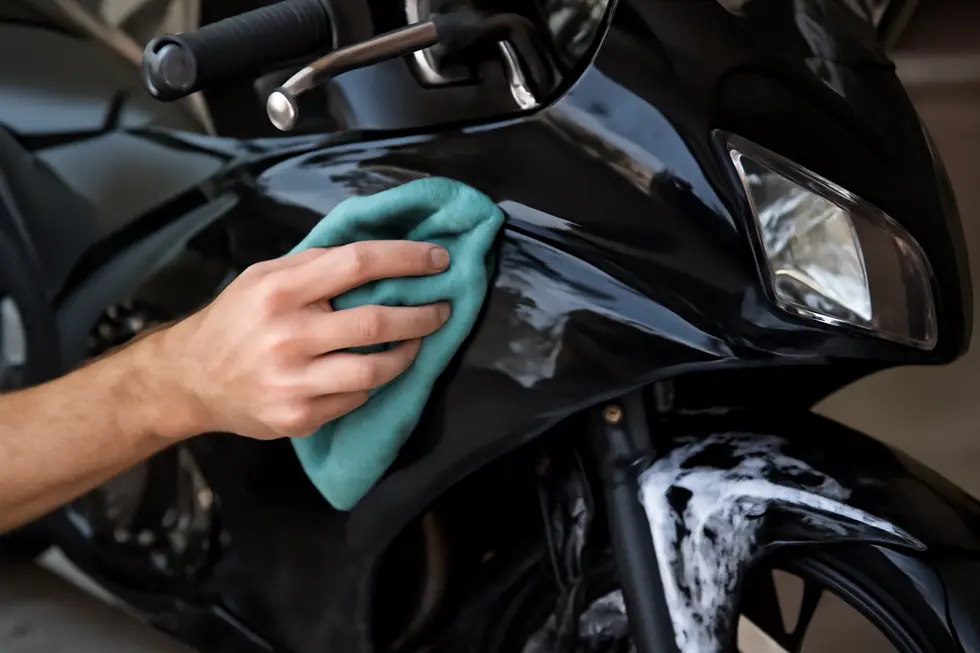
Adhesive residue that remains after the sticker is removed often requires special attention. Instead of aggressive scraping, apply gentle solvents such as rubbing alcohol or a mild soap-and-water solution onto a microfiber cloth. Using light, circular motions, rub the residue until it dissolves completely. These gentle retreatments avoid harsh chemicals that could discolor or degrade the fairing material. Once residue removal is complete, cleanse the area again with soapy water to eliminate any lingering solvent traces, then dry the surface fully with a clean, soft cloth.
Throughout this process, selecting the right tools and cleaning agents is vital. Only use soft microfiber cloths to shield paint and plastic surfaces, and steer clear of metal scrapers or abrasive implements that may cause permanent damage. Using automotive-grade adhesive removers recommended for delicate finishes can further safeguard your motorcycle’s appearance during and after cleaning.
This careful approach to surface preparation not only ensures a pristine fairing post-removal but also lays a foundation for smoother application of new decals or treatments. For additional detailed removal strategies and visual guidance, exploring dedicated resources online can be invaluable. One such resource offers comprehensive advice on clear vehicle decal removal and is a helpful complement to these preparation techniques: https://www.signs.com/clear-vehicle-decals/.
For enthusiasts interested in exploring high-quality motorcycle fairings that complement careful maintenance practices, informative insights are available at Summit Fairings’ blog, which offers expert perspectives on choosing and caring for motorcycle fairings.
2. Effective Surface Preparation: Mastering Initial Cleaning to Protect Motorcycle Fairings Before Sticker Removal
Proper preparation is the foundation for successfully removing stickers from motorcycle fairings without damaging their finish. The initial cleaning step plays a pivotal role, as stickers adhere more stubbornly to surfaces that harbor dirt, dust, or grease. Ensuring the fairing surface is impeccably clean not only facilitates easier sticker removal but also safeguards the paint and plastic underneath from accidental harm during the process.
Begin by gently wiping the motorcycle fairing with a dry microfiber cloth to remove any loose debris. This simple step minimizes the risk of scratching when liquids are introduced. Following this, use a mild soap and water solution or a vehicle-safe degreasing agent to clean the surface thoroughly. Mild cleansers effectively eliminate oils and grime without compromising the fairing’s delicate paint or plastic materials.
Choosing the right cleaning tools is equally important. Opt for soft microfiber towels rather than abrasive cloths or sponges, which can leave micro-scratches that dull the glossy finish. When applying cleaning solutions, use gentle circular motions to lift contaminants carefully. In cases where dirt or grease is more persistent, specialized glass cleaners or automotive-safe degreasers tested for painted surfaces offer a reliable alternative, ensuring the surface is pristine without harsh chemical damage.
After washing, always dry the area completely using a fresh microfiber towel. Residual moisture can interfere with subsequent steps such as heat application or the use of adhesive removers, limiting their effectiveness. By ensuring the surface is dry and spotless, you provide an ideal starting point that reduces the adhesive strength of stickers and minimizes residue retention.
Thorough initial cleaning also serves as a protective measure. Removing contaminants prevents abrasive particles from scratching the fairing during sticker peeling or scraping. Moreover, clean surfaces enable adhesive solvents and heat treatments to penetrate more evenly, reducing the time and effort needed for removal.
As you prepare for the next steps, remember to avoid harsh chemical solvents at this stage. Products containing strong acids, ammonia, or abrasive compounds can degrade the clear coat or the plastic beneath, permanently dulling or damaging your motorcycle’s fairings. This early caution translates into preserving the aesthetic appeal and the structural integrity of your bike’s exterior.
Taking the time to meticulously clean with mild agents and soft cloths not only makes sticker removal smoother but also helps maintain your motorcycle’s pristine look. For those interested in learning more about maintaining the beauty and durability of motorcycle fairings, detailed insights and guides can be found at the Summit Fairings blog.
For a comprehensive walkthrough on the entire sticker removal process, including the crucial heat application and adhesive residue treatment steps, visual aids such as video tutorials are invaluable. These resources offer practical demonstrations that complement careful surface preparation techniques, ensuring a safe and effective sticker removal experience.
Chapter 2: Mastering Heat Techniques for Safe Sticker Removal on Motorcycle Fairings
1. Applying Controlled Heat to Soften Adhesives While Protecting Motorcycle Fairing Surfaces
Effectively removing stickers from motorcycle fairings by applying heat requires a careful balance of warmth and patience to avoid damaging the underlying paint or plastic. The core principle centers on softening the adhesive bond with gentle heat so the sticker can be peeled away smoothly — without tearing, leaving residue, or causing surface harm.
Start by selecting a suitable heat source: a hairdryer on a medium setting or a heat gun with adjustable temperature controls are ideal. Always begin with the lowest effective heat level to reduce the risk of warping or discoloring the fairing’s surface. Maintain a consistent distance, typically a few inches, between the heat source and the sticker. Rather than holding the heat in one spot, move it steadily and evenly across the entire area of the sticker to ensure uniform adhesive softening. This technique prevents localized overheating, which could otherwise lead to bubbling or deformation of plastic fairings.
Work in a shaded environment or a location with moderate ambient temperatures. This condition helps maintain consistent heat application and prevents quick cooling that can cause adhesive to harden before removal is complete. After a brief warming period—generally several seconds to about a minute, depending on the sticker’s material and thickness—gently test the sticker’s edge. Use a fingernail or a plastic scraper resembling an old credit card, avoiding metal tools that risk scratching the fairing. Slowly and patiently peel the sticker back, keeping it close to the surface rather than pulling it upward, which puts less stress on the paint and plastic.
If parts of the sticker resist removal, return to applying gentle heat to those stubborn sections rather than forcing it. Should adhesive residues linger after the sticker is fully peeled, apply a gentle solvent such as rubbing alcohol, soapy water, or a light application of a safe adhesive remover on a microfiber cloth. Rub carefully until the residue dissolves. Avoid abrasive cleaners or harsh chemicals that can dull or etch delicate finishes.
To safeguard the integrity of your motorcycle fairings throughout this process, perform a preliminary test on a small, inconspicuous section. This test confirms that your chosen heat setting and solvents won’t adversely affect the paint or plastic surface. Remember that patience and controlled temperature management are your best allies when working with sensitive finishes.
This heat-softening method is an excellent alternative to aggressive mechanical scraping or chemical-heavy approaches, both of which carry a greater risk of damage. With proper heat control and gentle handling, you can preserve the aesthetic appeal of your motorcycle fairings and confidently remove stickers cleanly. For further insights into selecting the right fairings or maintaining their pristine condition, consider exploring resources such as Explore the Best Motorcycle Fairings at Summit Fairings which provides valuable information about high-quality fairing options.
For a detailed visual guide and additional tips on using heat to remove stickers safely, refer to this insightful video resource: https://www.wikihow.com/Remove-Stickers-from-Plastic
2. Effective Heat Techniques and Adhesive Residue Removal for Pristine Motorcycle Fairings
When removing stickers from motorcycle fairings, applying controlled heat plays a pivotal role not just in easing the sticker’s detachment but also in protecting the bike’s finish from damage. The key lies in gently warming the adhesive beneath the sticker to soften it, which makes peeling more effortless and reduces the risk of peeling paint or leaving stubborn residues behind.
To begin, use a heat source such as a hairdryer or a heat gun on a low setting. Deliver even, consistent warmth across the entire sticker surface without holding the heat source too close or lingering too long on one spot. This prevents damaging the fairing’s paint or plastic, which can happen if overheated. By continuously moving the heat source in small circles or back and forth, the adhesive becomes pliable. This softened state allows you to slowly lift a corner of the sticker without tearing or snapping it, facilitating a smooth and clean removal.
Once the sticker begins to peel easily, continue steadily removing it, applying additional heat as needed. Patience is crucial: rapid, forceful peeling risks scratching the surface or leaving sticky patches behind. If the sticker resists, applying more heat will usually help loosen the bond safely.
After removing the sticker, adhesive residue often remains as an unwanted sticky film. To address this, select a gentle but effective adhesive remover designed specifically for automotive surfaces or alternatives like rubbing alcohol, a mild dish soap solution, or even lubricants such as WD-40. Dampen a soft microfiber cloth with your chosen solution and work the residue in slow, circular motions. This process gradually dissolves and lifts the adhesive without harsh abrasion.
In cases where adhesive remnants prove stubborn, carefully use a plastic scraper, an old credit card, or non-acetone nail polish remover applied sparingly. Avoid metal scrapers or abrasive tools that can scratch or dull the fairing’s finish. Once the sticky residue is eliminated, washing the fairing with mild soap and water removes any leftover cleaning agents, ensuring a clean, chemical-free surface.
This combination of evenly applied heat followed by diligent, gentle adhesive cleanup maintains the aesthetic integrity of your motorcycle’s fairings. It is a widely recommended approach, balancing efficiency with the need to protect delicate paint and plastic surfaces. For those seeking additional visual guidance, accessing specialized video tutorials on advanced sticker removal techniques can be particularly helpful.
For more insights into motorcycle fairing care and products, visit this comprehensive resource: Explore the best motorcycle fairings at Summit Fairings.
Further detailed guidance on safe sticker removal methods can be found at Consumer Reports: How to remove stickers and residue, which offers practical tips applicable to vehicle surfaces.
Chapter 3: How to Remove Stickers from Motorcycle Fairings: Safe Sticker Peeling and Use of Tools
1. Mastering Gentle Sticker Removal: Expert Techniques for Preserving Motorcycle Fairings
Mastering Gentle Sticker Removal: Expert Techniques for Preserving Motorcycle Fairings
Effective removal of stickers from motorcycle fairings demands a balance between thoroughness and care. The goal is to eliminate the sticker and adhesive residue without harming the painted or plastic surface beneath. The foundation of this process lies in using controlled heat, delicate lifting methods, and appropriate solvents, all tailored to preserve the integrity of the fairing.
One of the most reliable ways to soften the adhesive is by applying gentle heat, commonly through a hair dryer or a heat gun set to a low temperature. This warming loosens the sticky bond, making it easier to peel the sticker away without leaving fragments or causing damage. It is crucial to move the heat source evenly over the sticker’s surface to avoid hotspots that can warp the fairing’s finish. Maintaining consistent warmth optimizes adhesive softening and allows for smoother removal.
When beginning to peel, patience is essential. Start at a corner using your fingernail or a plastic tool like an old credit card to carefully lift the edge. Avoid metal scrapers or razor blades unless absolutely necessary, and even then, use extreme caution to prevent scratching. Gradually pulling the sticker back at a low angle, close to the surface, reduces strain on the paint and minimizes the risk of the sticker tearing into smaller pieces. If resistance is met, a bit more heat should be applied rather than pulling harder.
Once the sticker is removed, some adhesive residue often remains. Tackling this leftover residue requires gentle solvents that are safe for painted and plastic surfaces. Isopropyl alcohol or a mild adhesive remover designed specifically for automotive use can effectively dissolve sticky remnants. Apply these substances with a soft microfiber cloth using light, circular motions. Excessive scrubbing or abrasive materials should be avoided, as they can cause micro-scratches or dull the finish.
A plastic scraper may help with stubborn adhesive spots, but it’s important to be gentle and deliberate. When using solvents, allow the product to sit briefly if safe, helping to break down the residue before wiping. Afterward, the entire area should be cleaned with soapy water to remove any solvent residue, then thoroughly dried to prevent streaks or water spots.
This meticulous approach protects the fairing’s aesthetics and durability, ensuring the surface remains smooth and glossy post-removal. Skipping these careful steps or using harsh chemicals can lead to surface damage that compromises the motorcycle’s look and potentially its resale value.
For a more visual demonstration of these methods and additional expert tips, many detailed video guides are available online that walk through the safe removal process step-by-step.
For insights into quality motorcycle fairings and related upkeep, explore this go-to destination for motorcycle fairings.
By mastering heat application, gentle peeling, and proper residue removal, you can confidently restore your motorcycle’s fairings to a pristine condition without damage or frustration.
2. Harnessing Heat and Gentle Solvents for Damage-Free Sticker Removal on Motorcycle Fairings
Removing stickers from motorcycle fairings requires not only patience but also a strategic use of heat and solvents to ensure the surface remains pristine. Applying gentle heat is the first crucial step in this process. Using a hairdryer or a heat gun set to a low temperature warms the adhesive underneath the sticker, softening it enough to allow the sticker to peel away cleanly. This gentle warming loosens the grip of the adhesive without risking warping or damaging the plastic or painted surface beneath. It’s important to focus heat evenly across the sticker area, maintaining a lukewarm temperature and avoiding prolonged exposure to prevent surface deformation.
Once the adhesive becomes pliable, begin peeling the sticker slowly from one corner. This careful approach minimizes the risk of tearing the sticker or scraping the fairing. Using a plastic scraper or an old credit card in tandem can help ease stubborn edges off without scratching the surface, especially when the adhesive still clings tightly. Speed can be tempting but moving deliberately ensures the paint finish remains unharmed, preserving the motorcycle’s aesthetic integrity.
After the sticker itself is removed, traces of adhesive residue often remain, requiring further attention. Here, mild solvents such as rubbing alcohol, diluted vinegar, or commercially available adhesive removers are highly effective, provided they are used correctly. Applying the solvent sparingly on a soft microfiber cloth and gently rubbing the residue dissolves the adhesive without compromising the underlying paint or plastic. It is essential to test any solvent first on an inconspicuous section of the fairing to detect any adverse reactions. Since some solvents emit strong odors or contain volatile compounds, performing this step in a well-ventilated area promotes safety and comfort.
Patience is key throughout, as forcing the sticker or adhesive off without proper softening can result in scratches or dull spots. Allow the solvent time to penetrate and break down the adhesive before attempting further removal efforts. Repeating the heating and solvent process if necessary can improve outcomes and reduce the risk of damage.
Once all residues are removed, a thorough cleaning with mild soap and water removes any remaining solvent traces and prepares the surface for drying. Avoid harsh chemicals or metal tools at every stage since these can easily harm the fairing’s finish. By combining controlled heat application, careful peeling techniques, the selective use of gentle solvents, and safe scraping tools, motorcycle owners achieve a clean removal of stickers without sacrificing the look or integrity of their fairings.
For detailed visual guidance on these techniques, exploring expert video tutorials can be invaluable to see these methods in action and gain confidence in execution.
To explore more about protecting and maintaining your motorcycle’s exterior, visit this comprehensive motorcycle fairings resource.
Chapter 4: How to Remove Stickers from Motorcycle Fairings: Adhesive Residue Removal and Final Cleaning
1. Mastering Heat and Patience: Safe Strategies for Peeling Stickers Off Motorcycle Fairings
Removing stickers from motorcycle fairings demands a methodical approach that balances effective removal with care for the fairing’s delicate surface. Central to this process is the controlled application of heat combined with gentle peeling techniques, which together allow stickers to come off smoothly without damaging paint or plastic. The first essential step utilizes heat to weaken the adhesive bond. A hairdryer or heat gun set on low works best, delivering steady warmth over the sticker for roughly 30 seconds. It is important to keep the heat source moving continuously rather than focusing on one spot to avoid any scorching or warping of the fairing’s material. This warms the adhesive underneath the sticker, softening its grip so the sticker can lift away more readily. Once the sticker feels pliable and slightly softened, the peeling phase begins. Start by gently lifting a corner with your fingernail or a soft, plastic scraper—such as an old credit card—to avoid scratches. Peeling back the sticker slowly at a low angle minimizes risks of tearing or leaving jagged edges. This slow, deliberate action ensures that the fairing’s finish remains intact while the sticker releases cleanly. If resistance is met, applying more heat will help gradually ease it away without forcing or damaging the surface. After the bulk of the sticker is removed, residual adhesive often remains, necessitating careful cleaning to restore a flawless appearance. Mild solvents like rubbing alcohol, a mixture of warm water and dish soap, or even a light spray of lubricant can soften sticky residues. For tougher adhesive remnants, a gentle scrub using a non-abrasive baking soda paste or non-acetone nail polish remover can be effective while preserving the finish. When using tools to lift residue, plastic scrapers are preferred to metal ones to prevent scratching. Throughout this stage, patience is crucial; aggressive rubbing or harsh chemicals can dull or mar the fairing’s surface. Finally, thoroughly washing the area with soap and water removes any leftover cleaning agents, and drying it completely prevents water spots or damage. These combined techniques—careful heat application, slow peeling, and mild residue removal—form the safest approach to sticker removal, preserving your motorcycle’s aesthetic value. For those seeking visual guidance, numerous detailed video demonstrations exist online, showing how heat softens adhesives and how to peel decals cleanly without harm. This multi-step process highlights the importance of both technique and temperament when tackling sticker removal on motorcycle fairings. For additional tips and to explore quality replacement fairings, consider visiting resources such as the Explore the Best Motorcycle Fairings at Summit Fairings. You can also refer to helpful instructional videos that illustrate these methods firsthand, providing clear, step-by-step visuals to support your efforts.
2. Gentle Solvent Techniques and Protective Finishes for Pristine Motorcycle Fairings After Sticker Removal
Removing stickers from motorcycle fairings often leaves behind stubborn adhesive residue that requires careful attention to preserve the fairing’s finish. The key to successful adhesive residue removal lies in choosing solvents and techniques that effectively dissolve sticky residues without compromising the paint or plastic surface. A preferred approach utilizes rubbing alcohol (isopropyl alcohol), diluted if needed, combined with gentle application and thorough surface restoration to leave the fairing spotless and protected.
Before diving into the removal process, conduct a patch test on a hidden area of the fairing. Lightly apply the rubbing alcohol solution—typically 70% isopropyl alcohol diluted with distilled water at a 1:3 ratio—to confirm it won’t discolor or damage paint or plastic. This precaution safeguards the fairing’s aesthetics and ensures compatibility.
When ready, moisten a soft microfiber cloth with the diluted rubbing alcohol and gently rub the adhesive residue. Resist the urge to scrub vigorously, as harsh rubbing can mar delicate surfaces. Patience plays an important role here; allowing the solvent to sit on the residue for a minute or two softens the adhesive, facilitating easier removal with minimal mechanical effort. This time investment is crucial in maintaining surface integrity.
After the adhesive has dissolved, wipe the area with a clean, damp cloth to remove all solvent traces and loosened residue. Performing this step in a well-ventilated space reduces exposure to alcohol fumes, contributing to a safer working environment.
Once adhesive residue is completely removed, attention turns to restoring and protecting the fairing’s appearance. A mild automotive cleaner specially formulated for plastics and painted surfaces helps cleanse any remaining contaminants without dulling the finish. Applying a protective wax or paint sealant afterward adds an essential barrier against environmental elements, preserving the motorcycle’s glossy luster and smooth touch.
Avoid harsh chemical alkalis or abrasive tools throughout this process, as these can chip paint, create scratches, or leave dull spots, undermining your efforts. Instead, rely on soft cloths, automotive-safe solvents, and dedicated protectants. These practices ensure the fairing maintains its factory-quality shine and resistance to future wear.
Adopting this careful, methodical approach not only removes adhesive residue effectively but also supports long-term surface preservation. It complements earlier preparation steps, combining to deliver a flawless finish after sticker removal.
For more insights on maintaining and restoring your motorcycle fairings with expert-grade products and techniques, explore this resource on affordable motorcycle fairings and care.
By embracing gentle solvents like rubbing alcohol along with thoughtful cleaning and protection, you ensure your motorcycle’s fairings look as impeccable after sticker removal as they did before, guarding your investment and pride in your ride.
Final thoughts
Effectively removing stickers from motorcycle fairings is essential for maintaining the aesthetic and professional quality of any motorcycle business. By following a systematic approach—starting with thorough surface preparation, then applying controlled heat to soften adhesives, peeling stickers gently with appropriate tools, and finally removing all adhesive residues with safe solvents and cleaners—business owners can protect the paint and plastic surfaces. This diligent method extends the life and look of motorcycle fairings, preserves resale value, and ensures customer satisfaction. Investing the time and care in mastering these techniques sets your business apart as a trusted expert in motorcycle care and customization.
Ready to elevate your ride? Summit Fairings delivers premium, custom-fit fairings that blend style and durability. Whether you’re chasing speed or turning heads, we’ve got your bike covered. Don’t wait—transform your machine today. Click, customize, and ride with confidence. Your perfect fairing is just a few clicks away. Act now!
About us
undefined