Introduction
Cracked motorcycle fairings are a common challenge faced by repair shops, affecting both the structural integrity and aesthetic appeal of motorcycles. For business owners, mastering effective repair methods is essential to provide durable solutions that build trust and repeat clientele. This guide systematically explores key techniques integral to successful fairing repairs. Starting with plastic welding, it highlights how this technique creates strong bonds restoring function and form. Next, it dives into fiberglass and resin reinforcements, ideal for larger or more compromised cracks that require additional strength. The third section emphasizes restoring mounting tabs and structural integrity, crucial for maintaining proper fit and alignment of fairings. Finally, finishing and refinishing processes are detailed to ensure repairs not only last but also restore visual appeal to near-original condition. Together, these chapters equip business owners with the knowledge to deliver professional-level repairs that enhance customer satisfaction and operational efficiency.
Tables of Contents
Chapter 1: Mastering Plastic Welding to Restore Cracked Motorcycle Fairings
- Essential Tools and Detailed Steps to Achieve Durable Plastic Welding Repairs on Motorcycle Fairings
- Maximizing Value and Longevity: The Economic and Practical Benefits of Plastic Welding for Motorcycle Fairing Repairs
Chapter 2: Reinforcing Cracks in Motorcycle Fairings: Fiberglass and Resin Methods for Repairing a Cracked Motorcycle Fairing
- Mastering Fiberglass and Resin Repair Techniques to Reinforce and Restore Cracked Motorcycle Fairings
- Mastering Fiberglass and Resin Techniques: A Detailed Guide to Reinforcing Cracked Motorcycle Fairings with Durable Composite Repairs
Chapter 3: Restoring Mounting Tabs and Structural Integrity in How to Repair a Cracked Motorcycle Fairing
- Effective Methods and Materials to Reinforce Mounting Tabs and Structural Strength in Motorcycle Fairing Repairs
- Precision Alignment and Secure Fastening Techniques to Reinforce Mounting Tabs and Maintain Fairing Stability
Chapter 4: Finishing and Refinishing Techniques for How to Repair a Cracked Motorcycle Fairing: Sanding, Painting, and Aesthetic Restoration
- Mastering Sanding and Surface Preparation for Flawless Motorcycle Fairing Repairs
- Mastering the Art of Painting and Surface Refinishing to Restore Motorcycle Fairing Aesthetics
Chapter 1: Mastering Plastic Welding to Restore Cracked Motorcycle Fairings
1. Essential Tools and Detailed Steps to Achieve Durable Plastic Welding Repairs on Motorcycle Fairings
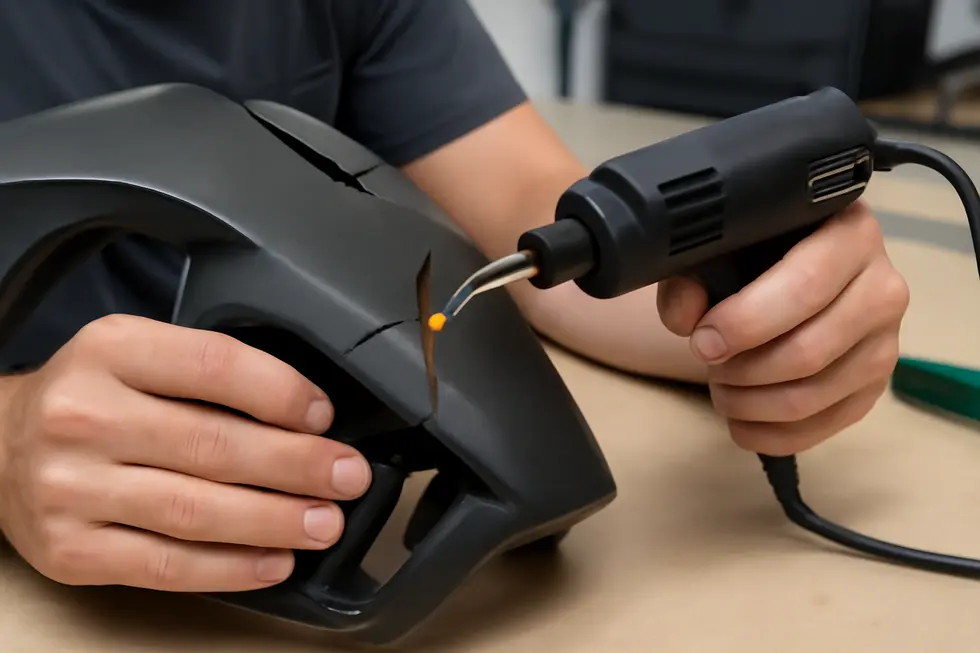
The process of repairing a cracked motorcycle fairing through plastic welding demands precision and the right equipment to restore both strength and appearance. It begins with thorough preparation, as all dirt, grease, and residue must be removed to ensure the weld bonds effectively. Cleaning the surface is essential—without it, contaminants can create weak points, compromising the repair.
Next, the fractured edges require meticulous alignment. The edges should meet precisely without gaps, maintaining the fairing’s original contour and ensuring the new bond carries the structural load as intended. Misaligned cracks, even if welded, can leave residual stress points prone to failure.
Plastic welding itself typically involves a specialized hot staple welding tool. This device heats metal staples that are then embedded from the rear side of the cracked panel. As these staples melt slightly into the plastic, they lock the broken sections into place, forming a bond almost as strong as the original material. This technique reinforces the entire seam mechanically, offering resilience against future impacts and vibrations common to motorcycles.
Once the staples have cooled and solidified, excess material protruding beyond the surface is carefully clipped away. The repair area then undergoes sanding to smooth the weld, blending it seamlessly with the surrounding fairing. This step is critical not only for aesthetics but also to prepare the surface for finishing coats like primer and paint, which protect the plastic and restore the fairing’s visual appeal.
While hot staples provide mechanical reinforcement, some professionals prefer using a plastic welding torch. This tool melts the edges of the crack directly, fusing the plastic together. Though it requires more skill to avoid overheating or burning, it allows greater control in reshaping and smoothing the joint.
In addition to welding tools, a complete repair setup includes clippers for trimming staples, various grades of sandpaper for finishing, and paint supplies to restore the original look. These materials help deliver a repair that is both robust and visually discreet.
For more stubborn cracks or structural damage, reinforcement using fiberglass resin combined with cloth can supplement the weld, adding extra durability. In contrast, repairing broken mounting tabs—a vital component ensuring proper alignment—often involves specialized adhesive systems or solvent welding using solvents tailored for ABS plastics.
Alternative chemical bonding kits designed for rigid plastics offer another route, relying on strong adhesives rather than heat. While effective, these methods typically do not match the lasting strength and appearance achievable through plastic welding.
Visual resources such as detailed video tutorials can greatly assist both novices and experienced mechanics by demonstrating each step clearly—from cleaning and alignment to welding and finishing. Such guidance ensures users employ correct techniques to avoid common pitfalls.
By integrating precise preparation, expert tool use, and proper finishing steps, plastic welding becomes a reliable method for motorcycle fairing repair, restoring structural integrity while delivering a clean, professional finish. For detailed tips on acquiring the right equipment and solutions, exploring dedicated motorcycle fairing resources can provide valuable insights and options.
2. Maximizing Value and Longevity: The Economic and Practical Benefits of Plastic Welding for Motorcycle Fairing Repairs
Repairing a cracked motorcycle fairing through plastic welding not only delivers a high-quality fix but also offers compelling economic and practical benefits that make it an optimal choice for riders and repair shops alike. When compared to the alternative of replacing the fairing or resorting to less reliable repair methods, plastic welding stands out by significantly reducing costs while enhancing the durability and appearance of the repair.
From an economic standpoint, plastic welding delivers notable savings by allowing minor to moderate cracks to be remedied without buying costly replacement parts. Motorcycle fairings, especially branded or custom models, can carry a high price tag, and purchasing new shell components often involves waiting times and shipping fees. By welding the cracked sections, riders avoid these expenses, preserving their budget without compromising functionality. Additionally, the method is time-efficient; the process requires relatively few labor hours compared to full replacement or complex body filler applications. This efficiency translates into lower labor costs for repair shops and less downtime for motorcycle owners eager to get back on the road.
Beyond cost, plastic welding excels in practicality and performance. The technique fuses the plastic at a molecular level, creating a joint that closely matches the original part’s strength. Unlike temporary fixes such as cable ties or surface adhesives, welded repairs endure the mechanical stresses and vibrations encountered during normal riding, ensuring long-lasting structural integrity. This durability is essential for preserving the fairing’s role in protecting sensitive components and maintaining aerodynamic properties.
Moreover, plastic welding preserves the fairing’s original fit and finish. Since it involves minimal material buildup, it prevents deformation or bulging that filler-heavy methods sometimes cause. This retention of the fairing’s shape keeps mounting points and alignment precise, which is critical for proper installation and the bike’s appearance. After repairing, minimal sanding and painting can seamlessly restore the fairing’s factory look, making the fix nearly invisible.
The environmental aspect also adds to the appeal of plastic welding. By repairing and extending the service life of existing fairings, this method reduces plastic waste and the ecological footprint linked with manufacturing and shipping replacement parts. For riders committed to sustainability, welding offers a means to maintain their motorcycle responsibly.
Additionally, plastic welding is especially compatible with the ABS plastics commonly used in motorcycle fairings. Its ability to precisely handle complex curves, contours, and material characteristics ensures the fairing retains essential properties like impact resistance and aerodynamic performance after repair.
In sum, plastic welding harmonizes cost savings, durability, aesthetic preservation, and sustainability, creating a comprehensive solution that benefits motorcycle owners and repair professionals. This balanced effectiveness underscores why plastic welding techniques continue to gain preference for fairing repairs, combining economic sense with practical reliability.
For riders seeking detailed insights or further guidance on fairing care and customization, exploring resources such as Explore the Best Motorcycle Fairings at Summit Fairings offers valuable information on maintaining and enhancing motorcycle appearance and function.
Chapter 2: Reinforcing Cracks in Motorcycle Fairings: Fiberglass and Resin Methods for Repairing a Cracked Motorcycle Fairing
1. Mastering Fiberglass and Resin Repair Techniques to Reinforce and Restore Cracked Motorcycle Fairings
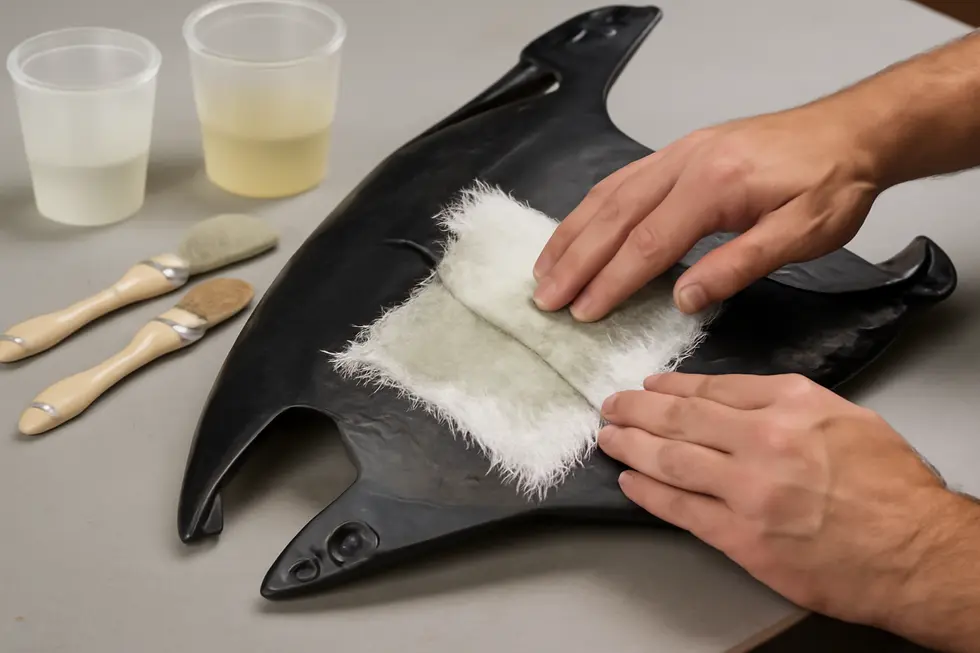
Repairing cracks in motorcycle fairings using fiberglass and resin involves a methodical balance of preparation, material application, and finishing to restore both strength and appearance. Central to this process is the use of fiberglass cloth or mat, which provides the necessary structural reinforcement over damaged areas. The fiberglass is held firmly in place and bonded by polyester or epoxy resin, a compound that hardens after mixing with a catalyst or hardener, creating a tough, flexible repair that withstands stress and vibration during riding.
To begin, the damaged section must be meticulously cleaned to remove dirt, grease, and any loose fragments. Proper surface preparation is crucial; sanding the area around the crack roughens the surface, improving resin adhesion and ensuring a more durable bond. For breaks involving multiple pieces or larger cracks, it is important to align and clamp the components securely, maintaining the fairing’s original shape before applying repair materials.
Applying fiberglass repair requires cutting cloth slightly larger than the crack to ensure full coverage and reinforcement beyond the damaged edges. After mixing resin precisely with the hardener according to product instructions, a thin layer of resin is applied to the sanded area. The fiberglass cloth is carefully laid onto this resin base, then saturated with additional resin using a brush. This saturation must be thorough to eliminate air bubbles, which can weaken the repair and compromise aesthetics. Multiple layers may be added if higher strength is needed. Each layer should partially cure before applying the next to build up thickness and resilience without trapping moisture or causing uneven curing.
Once the resin has fully cured—a process that may vary from a few hours to overnight—sanding shapes and smooths the repair so it blends seamlessly with the surrounding fairing surface. This step also prepares the area for priming and painting, which restores the fairing’s original finish and protects the repair from environmental exposure. Throughout the process, wearing protective gloves and masks is essential for safety due to the hazardous nature of resin fumes and skin irritants.
This fiberglass and resin method effectively restores the fairing’s durability, allowing it to withstand road vibrations and impacts with flexibility that plastic welding alone may not provide. For smaller cracks or before reinforcing with fiberglass, specialized plastic adhesives offer strong initial bonds and simplify the repair workflow. Additionally, when dealing with carbon fiber fairings, careful torque controls on mounting fasteners prevent new damage.
Following this comprehensive approach not only repairs the fairing structurally but also preserves the motorcycle’s aesthetics and fitment integrity. Those seeking more insights and resources on selecting and maintaining motorcycle fairings can explore comprehensive content available at the Explore the Best Motorcycle Fairings at Summit Fairings blog, which delves into quality options compatible with various repair methods.
2. Mastering Fiberglass and Resin Techniques: A Detailed Guide to Reinforcing Cracked Motorcycle Fairings with Durable Composite Repairs
Repairing cracks in motorcycle fairings with fiberglass and resin demands careful attention to detail to restore both strength and appearance. The process begins with a thorough assessment of the damage, carefully inspecting the crack and surrounding areas. It’s crucial to remove any loose fragments or degraded fiberglass to provide a solid foundation for the repair. Following this, cleaning the surface rigorously is essential—using soap and water to clear debris and then wiping with isopropyl alcohol ensures all oils and contaminants are eliminated, creating optimal adhesion conditions for the resin.
Once cleaned, gently sanding around the cracked area on both sides, if accessible, roughens the surface and improves resin bonding. Cutting fiberglass cloth or mat slightly larger than the crack prepares patches for reinforcement; working from the inside of the fairing when possible maximizes structural integrity. Selecting the right resin is critical—epoxy resin is preferred for its superior strength and durability compared to polyester in motorcycle repairs. Proper mixing according to the manufacturer’s directions guarantees a consistent cure and long-lasting bond.
Application involves layering: a thin coat of resin is first brushed over the sanded area, followed by placing the fiberglass cloth and saturating it with more resin. Multiple layers may be built up to achieve the necessary thickness and strength, allowing each layer appropriate curing time to avoid weakening the bond. Post-curing, sanding smooths rough edges and excess material so the repair blends seamlessly with the original fairing surface.
For a flawless finish, applying filler putty before a final sanding can mask imperfections, creating a surface ready to accept paint. Matching the bike’s color and sealing with a clear coat restores the fairing’s visual appeal and protection. Throughout this process, consistency in preparation, layering, and curing is paramount to ensure a durable, reliable repair that resists future cracking.
This method not only reinforces the cracked fairing structurally but also preserves the aesthetic integrity, making it a favored approach among motorcycle owners and repair professionals alike. Adhering to these best practices when working with fiberglass and resin extends the life of your fairing and maintains its custom look. For further insight, exploring detailed tutorials from Summit Fairings can provide visual guidance on tools, materials, and techniques integral to mastering these composite repairs.
Chapter 3: Restoring Mounting Tabs and Structural Integrity in How to Repair a Cracked Motorcycle Fairing
1. Effective Methods and Materials to Reinforce Mounting Tabs and Structural Strength in Motorcycle Fairing Repairs
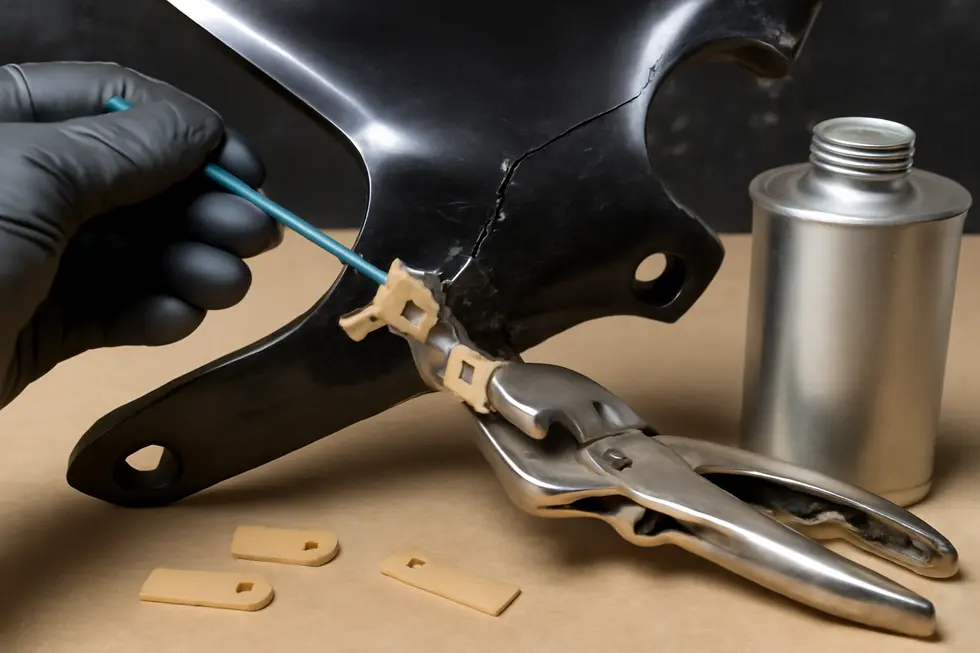
Restoring the mounting tabs and overall structural integrity of a cracked motorcycle fairing demands a blend of precise techniques and carefully chosen materials that work harmoniously to bring the fairing back to a secure, durable state. One foundational approach involves plastic welding or the application of specialized epoxy adhesives formulated for plastics. These methods are instrumental in fusing the broken or cracked segments, creating a joint that can withstand operational stresses and closely mimic the fairing’s original strength. Proper preparation, including aligning the cracked parts accurately before bonding, is crucial to avoid uneven stress distribution once the repair cures.
Beyond bonding, reinforcement plays a pivotal role in ensuring longevity. Applying fiberglass cloth combined with resin, or plastic patches on the inner surface of the fairing near the damaged mounting tabs or crack lines, significantly bolsters the structural resilience. This internal fortification helps distribute forces more effectively and reduces the chance of future damage propagating from weakened areas. Fiberglass reinforcement is particularly useful for larger cracks or sections where the fairing’s structural integrity has been compromised.
Mounting tabs, essential for proper fairing placement and alignment, often require dedicated restoration strategies. Broken or missing tabs can be remedied by attaching new plastic tabs using strong adhesives or plastic welding methods, but for enhanced durability, metal brackets or CNC-machined aluminum mounting plates serve as superior alternatives. These aftermarket solutions provide a rugged, reusable fixing point that can endure repeated assembly and disassembly without weakening. When using metal reinforcements, securing them with bolts or rivets adds to the repair’s mechanical reliability.
Equally important is the optimal distribution of stress at the mounting points during reinstallation. Washers, rubber grommets, and backing plates act as buffers that absorb vibrations and prevent concentrated stress that often leads to cracking around the fastening holes. Backing plates installed behind mounting holes supply extra rigidity and support, which is especially beneficial when using lightweight fairing plastics.
Achieving a precise fairing fit requires careful alignment before the final tightening of fasteners. Initially securing the mounting tabs or brackets loosely allows adjustments to ensure perfect positioning, thus avoiding undue tension or bending forces that could cause fresh cracks. Tools such as screwdrivers, hex keys, wrenches, and drills for any necessary hole adjustments facilitate this process, while plastic welding equipment or epoxy applicators are needed for the bonding stages.
This comprehensive approach of bonding, reinforcing, replacing, and cautiously reinstalling mounting tabs ensures the fairing regains both strength and stable mounting. By combining internal reinforcement with thoughtful hardware and thoughtful fastening techniques, the risk of recurring damage decreases substantially. For those interested in expanding their repair knowledge, valuable detailed insights are provided in resources like the comprehensive motorcycle fairing repair guide that cover mounting solutions and structural restoration strategies in depth.
Overall, meticulous attention to material choice, repair methods, and installation precision enables a cracked motorcycle fairing to be restored effectively, preserving its appearance and functionality for the road ahead.
2. Precision Alignment and Secure Fastening Techniques to Reinforce Mounting Tabs and Maintain Fairing Stability
Achieving precise bracket alignment and secure fastening stands as a cornerstone in restoring mounting tabs and ensuring the structural integrity of a cracked motorcycle fairing. The process demands more than just reattaching components—it requires meticulous adjustments and thoughtful reinforcement to preserve proper fit and prevent future damage.
Initially, all brackets should be loosely secured using bolts and nuts. This deliberate looseness grants essential flexibility, allowing the fairing to be positioned accurately against the motorcycle frame and adjacent parts. Rather than rushing to tighten fasteners, technicians should progressively adjust the alignment, taking advantage of any grooves or slots molded into the fairing as natural guides. These notches serve as reference points, enabling the installer to position panels with precision, which is critical for both aesthetic appeal and functional balance.
Once the fairing exhibits a stable and well-aligned fit, all bolts, screws, and nuts must be tightened carefully and systematically. At this stage, incorporating washers or rubber grommets can make a significant difference. These components act as buffers that reduce stress concentrations on the plastic tabs, mitigating the risk of new cracks forming under pressure or vibration. By evenly distributing load, such cushioning elements protect the integrity of the fairing’s delicate mounting points.
Beyond basic fastening, adding supplementary support elements such as backing plates or pop rivets elevates the durability of repaired mounting tabs. Backing plates, strategically placed behind the tabs, help spread mechanical forces over a broader area. This reinforcement is particularly important for fairings that have endured impact or for tabs that originally suffered severe damage. Pop rivets offer an alternative secure fastening method, complementing bolts and adding redundancy to hold components firmly in place during dynamic riding conditions.
It is equally important to verify that all mounting hardware matches the fairing model in both design and specification. Using incorrect screws, brackets, or clips results in improper fitment or compromised fastening strength, which can cascade into alignment issues or damage during operation. Adhering to manufacturer-recommended parts ensures compatibility and longevity of repairs.
After installation, a thorough final inspection must confirm that the fairing does not interfere with critical motorcycle functions—such as steering, suspension travel, or control movements. Testing the tightness of fasteners after initial rides helps identify potential loosening from vibrations, allowing proactive retightening to maintain secure attachment.
Following these precision alignment and fastening techniques not only restores the function of mounting tabs but also fortifies the fairing’s overall structural integrity. This careful approach prevents recurring faults and delivers a stable, professional-quality repair.
For those interested in a comprehensive visual guide through the fairing installation process—including crucial alignment and securing procedures—there is an excellent tutorial available that complements these principles effectively. Additionally, exploring resources like Explore the Best Motorcycle Fairings at Summit Fairings provides valuable insights into selecting quality fairings suited for precise repair and replacement tasks.
Chapter 4: Finishing and Refinishing Techniques for How to Repair a Cracked Motorcycle Fairing: Sanding, Painting, and Aesthetic Restoration
1. Mastering Sanding and Surface Preparation for Flawless Motorcycle Fairing Repairs
Achieving a seamless and durable repair on a cracked motorcycle fairing hinges largely on expert sanding and meticulous surface preparation. Before applying any filler or paint, the repair area must be impeccably cleaned to eliminate dirt, grease, and debris that could compromise adhesion. This initial step ensures that repair materials bond securely and that the finish will endure regular wear.
Following thorough cleaning, the crack itself often benefits from a precise V-groove cut along its length. This groove creates an ideal channel for filler to anchor deeply, reinforcing the repair and adding structural strength. Once the filler cures, the groove is gently sanded smooth, integrating the repair into the fairing’s surface without disrupting the original contours.
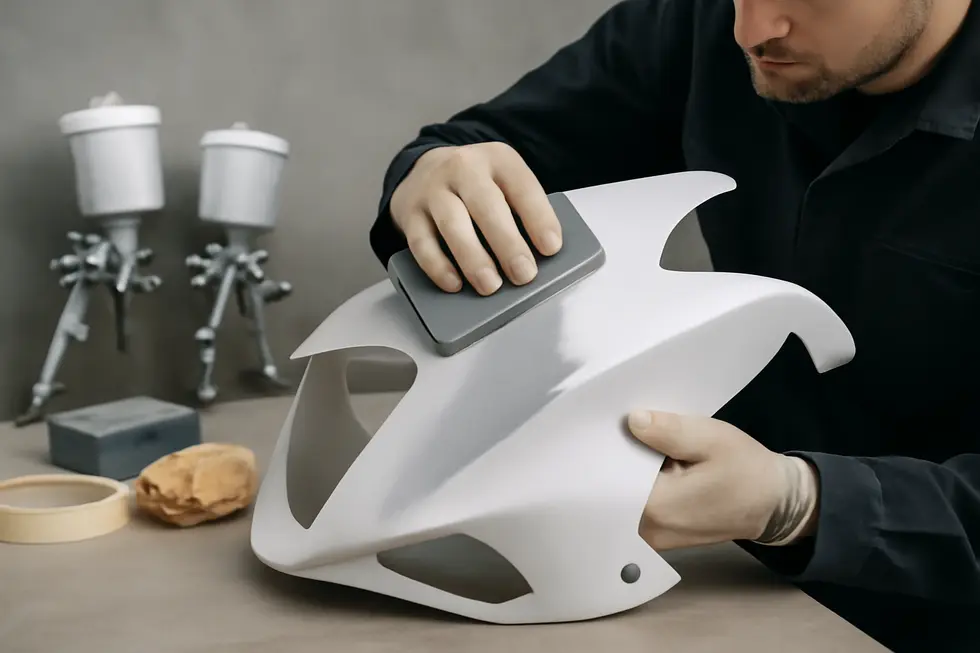
Sanding is best approached through wet sanding techniques using fine grit sandpapers, commonly P800 or P1200. Wet sanding both smooths imperfections and minimizes heat buildup, which could otherwise damage delicate plastics. The process lightly abrades the surface to promote excellent paint adhesion without weakening the repaired area or the surrounding fairing.
For surfaces with more pronounced damage or residues such as stubborn stickers trapped beneath layers of paint or clear coat, applying a quality filler is essential. This filler smooths deep imperfections and restored volume. After curing, the filler is feathered into the fairing’s surface through successive sanding passes. Each stage gradually refines the texture, preparing the panel for the final paint layers to blend naturally with the undamaged sections.
Attention to detail is critical throughout sanding and preparation; uneven sanding or improper cleaning can result in visible paint flaws or reduced durability. The objective is to leave the repaired panel perfectly smooth and uniform in texture while preserving the fairing’s original shape.
When it comes to painting, well-prepared surfaces require only light sanding with fine grit paper to enhance paint adhesion. Many motorcycle paint kits, including those offering vibrant candy finishes, emphasize this as a key step for professional results. Proper sanding ensures the finish is smooth, glossy, and visually indistinguishable from the rest of the fairing.
Together, cleaning, V-grooving, targeted filler application, and detailed wet sanding form the foundation of expert fairing repair refinishing. This approach not only revitalizes the fairing’s aesthetics but ensures the repair endures the stresses of riding.
For further insights on quality motorcycle fairings and repair components, exploring expert resources such as Summit Fairings’ comprehensive blog can provide helpful guidance on sourcing parts and enhancing repair outcomes.
2. Mastering the Art of Painting and Surface Refinishing to Restore Motorcycle Fairing Aesthetics
Mastering Painting and Surface Refinishing: Bringing Motorcycle Fairings Back to Life
Restoring a cracked motorcycle fairing extends beyond structural repair; the aesthetic finish is equally vital to reclaim the bike’s original charm. The process begins with meticulous surface preparation, essential for durable adhesion and a flawless look. After cleaning the repaired area to eliminate all dirt, grease, and dust, cracks are often V-grooved to create a recessed channel. This groove allows fillers to settle effectively and strengthens the repair, ensuring a smooth foundation.
Sanding follows, refining the surface progressively through increasingly fine grits—starting around 180 grit to flatten rough patches and leveling filler material. Subsequent sanding with 240 grit smooths transitions and prepares the primer layer, while finishing with 320 grit or finer imparts a silky texture ideal for paint bonding. This graduated sanding regime is crucial to avoid visible imperfections through the paint and to provide excellent primer adhesion.
A high-build primer is then applied in multiple thin coats. These primers not only cover minor surface irregularities but also create a uniform base that enhances topcoat vibrancy and longevity. Using a two-component (2K) primer combined with a hardener offers enhanced toughness necessary for motorcycle fairings exposed to elements and vibrations. Spraying this primer with a properly sized tip produces even, consistent coverage, critical to avoid runs or uneven thickness.
When it comes to painting, sophisticated techniques like translucent candy paints elevate the repair to a near-showroom finish. Candy paint involves layering vibrant, transparent pigments over a reflective base coat, creating an intense depth that appears to shimmer under light. This method demands precision in application and curing times to ensure smooth layers free of defects like orange peel or drips. The richness and gloss achieved through candy painting not only restore but can enhance a fairing’s appearance.
Between coats, light sanding removes dust particles and smooths imperfections, keeping each successive layer immaculate. After the final paint has cured, polishing with suitable compounds and buffing tools imparts a brilliant shine. This step blends repaired sections seamlessly with surrounding areas, disguising the repair effectively and promoting visual harmony.
The combined effect of thorough cleaning, progressive sanding, expert priming, advanced paint layering, and meticulous polishing ensures a fairing that is both structurally sound and aesthetically striking. This comprehensive finishing process is key for riders who value both function and style in maintaining their motorcycles.
For those interested in exploring quality options for replacement and refinished fairings, detailed resources on affordable motorcycle fairings at Summit Fairings provide valuable insight and products to complement expert repair efforts.
Final thoughts
Effectively repairing cracked motorcycle fairings requires a combination of precise techniques and attention to detail to ensure both durability and visual appeal. Plastic welding provides a strong and clean bonding method suited for common ABS plastics, creating a reliable structural fix. For more demanding repairs, fiberglass and resin reinforcement add essential strength and reduce future damage risks. Equally critical is restoring mounting tabs to maintain proper fitment, preventing alignment issues and further stress to repaired parts. Finally, professional finishing and refinishing work recaptures the original aesthetic, restoring customer confidence in the repaired motorcycle. By mastering and integrating these techniques, business owners can enhance their service quality, reduce rework, and position their shops as trusted destinations for motorcycle bodywork repairs. Delivering repairs that are both durable and visually seamless not only protects your reputation but also secures ongoing client loyalty.
Ready to elevate your ride? Summit Fairings delivers premium, custom-fit fairings that blend style and durability. Whether you’re chasing speed or turning heads, we’ve got your bike covered. Don’t wait—transform your machine today. Click, customize, and ride with confidence. Your perfect fairing is just a few clicks away. Act now!
About us
undefined