Introduction
Providing motorcycle wrapping services offers a unique opportunity for business owners to deliver enhanced aesthetics and protection to customers’ bikes. Wrapping motorcycle fairings demands precision, specialized knowledge, and the right tools to ensure a flawless finish. Understanding each step of the process—from preparation to final reinstallation—ensures high-quality results and customer satisfaction. This guide breaks down key phases: starting with surface preparation, moving to material selection and precise measurement, followed by the application process which includes heating and stretching the vinyl. It then covers detailing techniques like trimming and edge management to perfect the finish, and concludes with the final steps of reinstalling the fairing securely. Each chapter builds on the previous one to provide a comprehensive understanding tailored for business owners aiming to excel in motorcycle fairing wrapping.
Tables of Contents
Chapter 1: Surface Preparation in How to Wrap a Motorcycle Fairing: Cleaning and Removal Techniques
- Mastering Gentle Cleaning for Flawless Motorcycle Fairing Wraps
- Mastering Degreasing and Drying for Flawless Motorcycle Fairing Vinyl Wraps
- Mastering Surface Repair and Finishing for Optimal Motorcycle Fairing Wraps
Chapter 2: Material Selection and Measurement for How to Wrap a Motorcycle Fairing: Choosing and Cutting Vinyl
- Selecting Premium Cast Vinyl for Motorcycle Fairings: Balancing Flexibility, Durability, and Finish
- Mastering Accurate Measurement and Sizing: Ensuring Enough Vinyl for Complex Motorcycle Fairings
- Mastering Precision in Cutting and Applying Vinyl for a Flawless Motorcycle Fairing Wrap
Chapter 3: Application Process in How to Wrap a Motorcycle Fairing: Heating, Stretching, and Smoothing Vinyl
- Essential Surface Preparation: Cleaning and Prepping for a Flawless Vinyl Wrap
- Mastering Heat and Stretch Techniques for a Flawless Motorcycle Fairing Wrap
- Achieving Flawless Finishes: The Crucial Role of Post-Heating and Final Touches in Motorcycle Fairing Wraps
Chapter 4: Detailing and Finishing Techniques in How to Wrap a Motorcycle Fairing: Trimming and Edge Management
- Mastering Clean Cuts and Edge Finishing for a Flawless Motorcycle Fairing Wrap
- Mastering Heat and Edge Sealing for Flawless Motorcycle Fairing Wraps
- Mastering Surface Prep and Tool Techniques for Precise Trimming and Edge Control in Motorcycle Fairing Wraps
Chapter 5: Reinstallation and Finalization in How to Wrap a Motorcycle Fairing: Completing and Securing the Wrap
- Ensuring Stability and Precision: Expert Techniques for Reattaching Your Wrapped Motorcycle Fairing
- Mastering the Final Steps: Reinstalling and Securing Your Motorcycle Fairing Wrap for Lasting Perfection
- Careful Reinstallation and Meticulous Final Inspection to Ensure a Seamless, Durable Motorcycle Fairing Wrap
Chapter 1: Surface Preparation in How to Wrap a Motorcycle Fairing: Cleaning and Removal Techniques

1. Mastering Gentle Cleaning for Flawless Motorcycle Fairing Wraps
Achieving a smooth, durable vinyl wrap begins with meticulous cleaning that respects the integrity of the motorcycle fairing’s surface. To start, it’s essential to remove all dirt, oils, waxes, and contaminants without causing scratches or damage. Using gentle, non-abrasive automotive soaps tailored for bike finishes helps lift grime effectively while preserving the clear coat and plastic materials. Abrasive or harsh chemical cleaners are avoided, as they may dull or weaken the surface needed for optimal vinyl adhesion.
Soft microfiber cloths, wash mitts, and detailing brushes provide the careful agitation required to loosen stubborn dirt and bug splatters, particularly around complex fairing curves. Throughout the cleaning process, keeping the surface moist prevents contaminants from bonding tightly, making removal easier without aggressive scrubbing. After washing, wiping down the fairing with isopropyl alcohol or a similar solvent eliminates residual oils, waxes, and invisible residues that could disrupt the vinyl’s grip.
Documenting screw locations and wiring before removing the fairing ensures smooth disassembly and avoids damage, streamlining the wrap preparation. For professional results, some technicians also perform light paint decontamination and polishing to remove unseen particles and create an ultra-smooth finish that enhances vinyl adhesion.
This careful balance of thoroughness and gentleness in cleaning sets the foundation for a flawless vinyl wrap installation. Those interested in visual step-by-step guidance can reference comprehensive tutorials demonstrating these exact cleaning techniques with soft cloths and bike-safe products. For more insights into the importance of quality fairings and related preparation, visit Summit Fairings’ resource on exploring the best motorcycle fairings.
2. Mastering Degreasing and Drying for Flawless Motorcycle Fairing Vinyl Wraps
Effective degreasing and thorough drying form the backbone of successful surface preparation when wrapping a motorcycle fairing. Before applying vinyl wrap, every trace of dirt, grease, oils, and wax must be meticulously removed to guarantee proper adhesion and prevent imperfections like bubbles or peeling.
The degreasing process begins with a deep clean using automotive-safe detergents or specialized degreasers designed to break down grime and oil residues. This step is critical because even faint oily films can weaken the vinyl’s bond. A popular technique involves wiping down the fairing with isopropyl alcohol, which efficiently cuts through residual contaminants without leaving sticky deposits.
After the degreasing agents have done their work, rinsing with clean water ensures no remnants of cleaner remain, which could interfere with adhesion. However, this introduces moisture that must be fully removed.
Drying plays an equally vital role. Using soft, lint-free microfiber towels prevents scratches while absorbing water completely. It’s important to ensure the fairing is entirely dry, as lingering moisture may cause water spots or degrade the vinyl adhesive over time. Many installers expedite this phase by applying gentle heat with a heat gun or hair dryer. This not only accelerates drying but also warms the surface slightly, making it more receptive to vinyl application, especially on tight curves and edges.
By integrating methodical degreasing with careful drying, the fairing’s surface becomes an ideal canvas for wrapping. This preparation prevents adhesion issues and ensures a smooth, clean, and durable vinyl finish. For further insights and detailed techniques on cleaning and preparation, visit a comprehensive resource like this detailed motorcycle fairing cleaning and preparation process.
3. Mastering Surface Repair and Finishing for Optimal Motorcycle Fairing Wraps
Achieving a flawless vinyl wrap begins with addressing every detail of surface repair and preparation on the motorcycle fairing. Before application, the fairing must be meticulously cleaned to remove grease, dirt, and contaminants that impede adhesion. Selecting cleaners compatible with the fairing’s material is essential; harsh solvents such as acetone can cause damage and should generally be avoided unless manufacturer guidance permits.
When cracks, scratches, or imperfections exist, repair becomes indispensable. Techniques like V-grooving along cracks enhance filler bonding, while sanding smooths irregularities. Sanding should be done progressively with finer grits—starting around 1000 and finishing near 3000 grit—to create an even, defect-free surface without compromising the underlying layers. For painted surfaces, wetsanding proves especially effective, lubricating the surface to prevent new scratches and preserving the clear coat where possible.
After sanding, thorough decontamination eliminates microscopic residues, oils, and sanding dust, establishing a pristine foundation for the vinyl wrap to adhere securely. The fairing must then be completely dried and carefully inspected to ensure no flaws remain that could later show through or cause lifting.
Strict adherence to manufacturer instructions for cleaning agents, fillers, and adhesives is crucial to avoid compromising the fairing’s integrity or the vinyl’s longevity. Proper alignment and securing of the fairing after these steps further guarantee a tight, professional wrap application.
This measured and patient approach to surface repair and finishing distinguishes amateur attempts from professional-grade results and lays the essential groundwork for a durable, visually striking motorcycle wrap. For those seeking additional insight, exploring expert resources on fairing preparation techniques can deepen understanding and skill.
Chapter 2: Material Selection and Measurement for How to Wrap a Motorcycle Fairing: Choosing and Cutting Vinyl
1. Selecting Premium Cast Vinyl for Motorcycle Fairings: Balancing Flexibility, Durability, and Finish
Choosing the right vinyl is crucial for achieving a flawless wrap on motorcycle fairings, which feature complex curves and sharp angles. The ideal material is a premium cast vinyl film known for its superior flexibility and ability to stretch without wrinkling. This flexibility allows the vinyl to conform smoothly around intricate shapes while maintaining a tight, bubble-free finish. Cast vinyl’s medium to high elongation and excellent restretch properties ensure that once applied, it retains its form and prevents distortion over time.
Durability is another essential factor, as motorcycle fairings are exposed to harsh outdoor conditions including UV light, heat from the engine, and abrasive weather elements. High-quality cast vinyl resists fading, peeling, and cracking under these stresses, preserving the visual appeal and protective qualities of the wrap. The vinyl’s adhesive is specially formulated to bond securely with common fairing materials like ABS plastic and fiberglass, yet also allows clean removal without damaging the paint beneath.
In addition to performance, aesthetic versatility matters. Cast vinyl comes in numerous finishes such as matte, satin, gloss, metallic, and textured styles like carbon fiber. This variety enables riders to customize their bike’s look—whether seeking a subtle, refined sheen or a bold, eye-catching texture. For those prioritizing both style and protection, finishes like matte metallic offer lasting durability with elegant visual effects.
Selecting a reputable vinyl brand known for quality ensures consistent thickness, color retention, and ease of application. Proper material choice lays the foundation for a professional wrap that enhances the motorcycle’s appearance while enduring the rigors of everyday riding. For an expanded guide on fairing options and quality materials, explore a trusted resource specializing in motorcycle fairings and vinyl wraps.
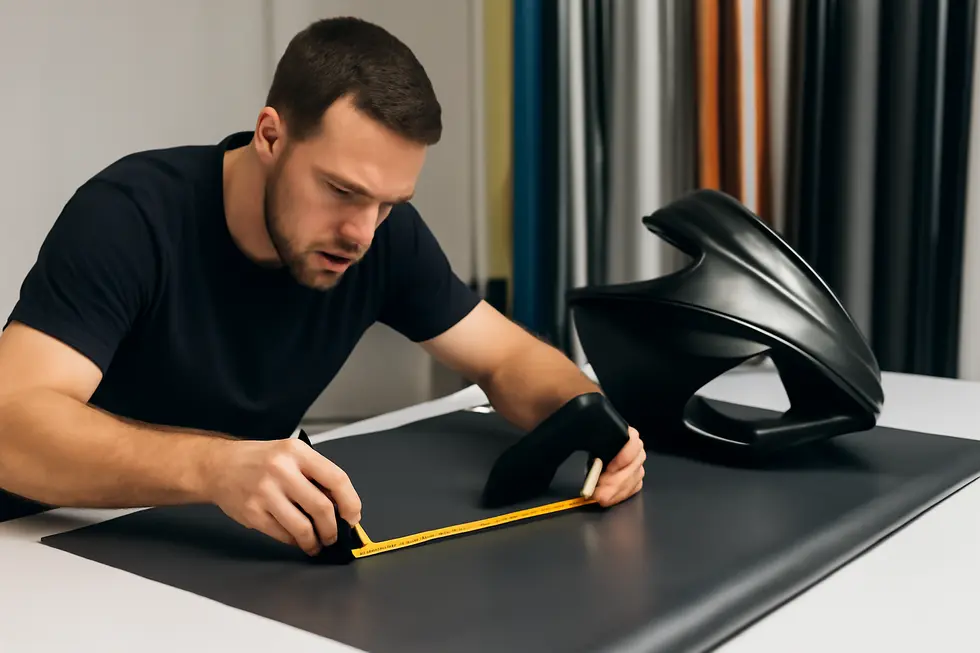
2. Mastering Accurate Measurement and Sizing: Ensuring Enough Vinyl for Complex Motorcycle Fairings
Achieving a flawless vinyl wrap on a motorcycle fairing begins with precise and thoughtful measurement techniques. Because fairings feature complex curves, sharp edges, and varied contours, a simple length and width measurement rarely suffices. Instead, using a flexible measuring tape, carefully trace the entire surface, capturing every dimension—not just flat areas but also protrusions, recessed sections, and irregular shapes. This thorough approach ensures no tricky spots are overlooked, which could cause material shortages or imperfect coverage.
Once all measurements are gathered, it is crucial to add extra vinyl to your order. Complex surfaces require additional length for stretching, folding over edges, overlaps, and for trimming errors during installation. Typically, adding between 5 and 15 feet of extra vinyl allows flexibility to accommodate these factors. For motorcycles with particularly intricate fairings, plan on the higher end of this range, as more material gives the installer room to work without risk.
When deciding on the total vinyl to purchase, round your figure up to the next available roll size. This practice prevents mid-project shortages that can jeopardize the finish and save time hunting more material. Standard motorcycle fairings generally need about 5 feet by 10 to 15 feet of vinyl, but larger or touring models with added elements may require significantly more.
Preparing the surface after measurement is equally important. A clean, dust-free fairing ensures optimal adhesion and durability of the wrap. During installation, the use of heat and careful sectional wrapping helps the vinyl conform smoothly to curves without bubbling or wrinkling. Splitting the vinyl into manageable pieces can simplify fitting complex shapes while maintaining visual continuity.
For those seeking more insight on fairing options and customization, exploring resources like the Explore the Best Motorcycle Fairings at Summit Fairings blog can be valuable.
3. Mastering Precision in Cutting and Applying Vinyl for a Flawless Motorcycle Fairing Wrap
Achieving a smooth, professional finish when wrapping a motorcycle fairing hinges on precision in cutting and expert application techniques. Begin by measuring the fairing carefully, then cut vinyl sheets larger than the surface area to allow for stretching and adjusting during installation. Using a sharp blade or precision cutting tools ensures clean edges that enhance the final look and prevent peeling.
Before cutting, keep the vinyl flat and steady to maintain accuracy. The surface must be impeccably prepared—cleaned thoroughly to remove any oils, dirt, or residues that can interfere with adhesion. Applying isopropyl alcohol is ideal for this step, guaranteeing that the vinyl will stick evenly without bubbles.
When applying the vinyl, start from the center and gently press outward with a squeegee or soft cloth to expel air pockets and prevent wrinkles. Heat is essential: carefully warming the vinyl with a heat gun makes it pliable, enabling you to mold it around difficult curves and sharp edges without overstretching, which could distort the film or cause tears. Using a vinyl glove or soft cloth while heating helps control the material and protects the surface.
Once the vinyl has conformed to all contours, trim excess film close to the edges with a sharp blade, achieving precise, crisp lines that elevate the professional quality of the wrap. Finally, reheating the edges ensures firm adhesion and seals the finish for long-lasting durability.
Choosing high-quality cast vinyl with air-release channels further simplifies installation and extends the life of your wrap, protecting your motorcycle’s bodywork against UV damage and scratches. For more detailed guidance on selecting and working with vinyl wraps, explore expert resources available through comprehensive fairing suppliers like Summit Fairings.
Chapter 3: Application Process in How to Wrap a Motorcycle Fairing: Heating, Stretching, and Smoothing Vinyl
1. Essential Surface Preparation: Cleaning and Prepping for a Flawless Vinyl Wrap
Achieving a seamless vinyl wrap on a motorcycle fairing begins long before any film touches the surface. Proper surface preparation is the foundation for a smooth, durable finish. The process starts with meticulously cleaning the fairing to remove every trace of dirt, grease, wax, and other contaminants that could interfere with vinyl adhesion. This typically involves washing the fairing thoroughly with soap and water to eliminate loose residues, followed by careful wiping with a solvent-based cleaner such as isopropyl alcohol to dissolve oils and stubborn particles. This dual-step cleaning ensures no invisible film remains beneath the vinyl, which might cause bubbling or lifting over time.
Once cleaned, the fairing must be completely dry and free from dust. Working in a temperature-controlled environment between 60 and 80°F (15-27°C) is crucial, as consistent ambient conditions prevent premature vinyl shrinking or adhesion issues. To further ease application and avoid overstretching the vinyl, removing or disassembling the fairing from the motorcycle body is highly recommended, especially for complex shapes with intricate curves and edges.
Preparing the surface with these detailed steps sets the stage for the subsequent heating and stretching techniques that form the core of the vinyl application process. With a spotless, well-prepared fairing, vinyl wrap can conform smoothly, avoiding wrinkles or bubbles while maintaining strong, lasting adhesion.
For additional insights on selecting and prepping motorcycle fairings, an excellent resource is the comprehensive exploration of motorcycle fairings at Summit Fairings, which offers guidance helpful for wrapping projects.
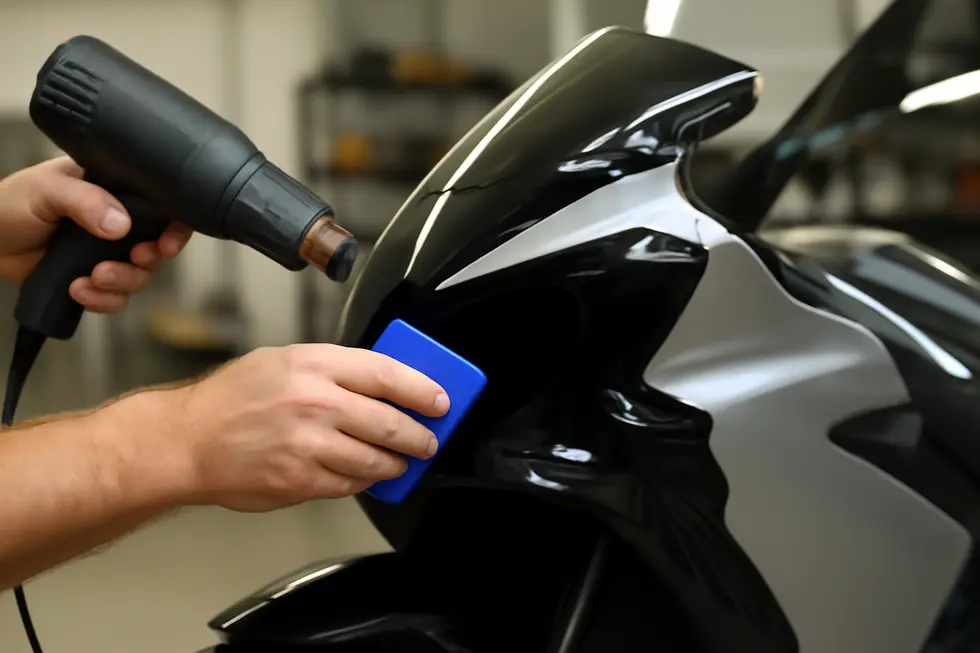
2. Mastering Heat and Stretch Techniques for a Flawless Motorcycle Fairing Wrap
Achieving a professional-looking wrap on a motorcycle fairing relies heavily on skillful control of heat and stretching when applying vinyl. The core technique begins by using a heat gun to gently warm the vinyl film. This softening makes the material pliable, allowing it to conform seamlessly to the fairing’s complex curves without tearing or creating wrinkles. Heat also activates the adhesive properties of the vinyl, helping it bond securely to the surface. Once supple, the vinyl can be stretched just enough to follow the intricate contours of the fairing. Choosing vinyl with medium stretch capability is essential, as it provides the flexibility to mold around tight corners while retaining its shape afterward for a smooth, distortion-free finish.
Careful smoothing during application is crucial. Using a squeegee or similar tool, any trapped air or minor wrinkles are pressed out progressively and methodically. Additional heat applied along the edges “sets” the wrap by fully activating the adhesive and ensuring long-term durability. However, maintaining control over the amount of heat and stretch is vital; overheating risks weakening the vinyl or adhesive, while overstretching can lead to defects or tears.
After the vinyl is positioned and tensioned gently over the fairing, a final pass with the heat gun ensures the vinyl perfectly conforms, especially around sharp edges and curves. These combined steps produce a wrap that not only enhances appearance but also provides protection to the original paintwork beneath.
For those seeking deeper insight into these processes, detailed tutorials demonstrate these heating and stretching techniques in practice, offering valuable guidance for both novices and experienced installers. Such methods are fundamental in transforming complex motorcycle fairings into striking, durable canvases.
3. Achieving Flawless Finishes: The Crucial Role of Post-Heating and Final Touches in Motorcycle Fairing Wraps
After meticulously applying and smoothing the vinyl onto the motorcycle fairing, the finishing phase, particularly post-heating, becomes essential for a durable, professional look. Post-heating involves gently warming the wrapped surface to approximately 200-250°F (93-121°C), as guided by the vinyl manufacturer’s recommendations. This carefully controlled heat activates the adhesive, improving the vinyl’s ability to conform tightly to complex curves and edges, while also stabilizing the material to prevent future lifting or peeling.
During application, slight warming of the vinyl makes it pliable, helping stretch it seamlessly over contours without causing wrinkles. Once positioned, tools like a squeegee or soft cloth are used to eliminate bubbles and smooth out imperfections before applying heat again in the post-heat step. Even heat distribution with a heat gun on low to medium setting ensures no damage occurs to the vinyl, with special attention paid to edges, seams, and sharply curved sections where adhesion challenges are most common.
The post-heating phase not only enhances adhesion but also helps the vinyl settle into its final shape, reinforcing the bond to the fairing’s surface. After allowing the vinyl to cool and set, a thorough inspection reveals any lingering imperfections. These can be addressed by carefully reheating and smoothing as needed. Excess vinyl is then trimmed using a sharp blade for clean, crisp edges that complement the fairing’s design.
This deliberate post-heating and finishing process is what transforms a wrapped fairing into a flawless protective layer that elevates a motorcycle’s appearance and longevity. For more insights on achieving expert-level wrapping results, explore detailed guidance available at Explore the Best Motorcycle Fairings at Summit Fairings.
Chapter 4: Detailing and Finishing Techniques in How to Wrap a Motorcycle Fairing: Trimming and Edge Management
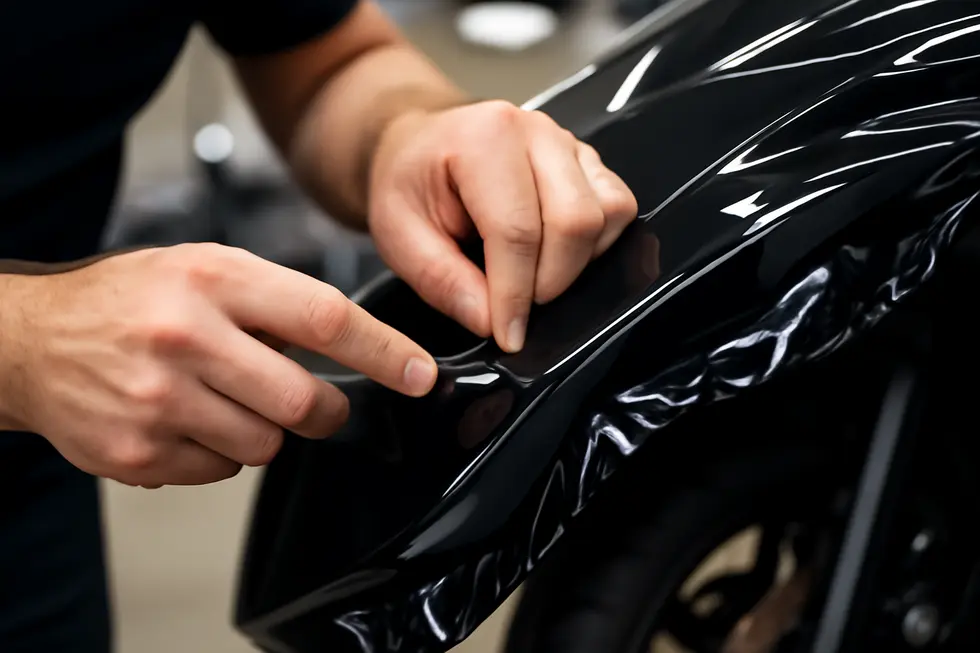
1. Mastering Clean Cuts and Edge Finishing for a Flawless Motorcycle Fairing Wrap
Achieving a pristine finish on a wrapped motorcycle fairing hinges on mastering precise trimming and expert edge management. Once the vinyl wrap is carefully applied, the excess material must be trimmed with sharp, fine blades such as precision knives or scalpels. These tools allow for clean, controlled cuts that follow the fairing’s contours closely without damaging the surface beneath. Slightly warming the vinyl with a heat gun before trimming makes it more pliable, enabling smoother cuts around curves and intricate edges where the wrap must conform perfectly.
Attention to every edge is critical for durability and aesthetic appeal. After trimming, edges should be carefully tucked under or sealed to prevent peeling and protect against dirt or moisture ingress. Using a squeegee or a soft cloth to press edges firmly enhances adhesion, creating a seamless transition between the vinyl and fairing surface. This process also helps to eliminate any trapped air, reducing the risk of lifting over time.
Managing corners and tight bends requires gentle stretching paired with controlled heat to mold the vinyl without causing wrinkles or tears. Such finesse improves both the longevity and the visual appeal of the wrap. By blending careful cutting, strategic heating, and meticulous edge sealing, installers can ensure a clean, professional look that highlights the motorcycle’s design while adding a protective layer.
For those looking to refine their skills further, exploring detailed vinyl wrapping tutorials can provide advanced insights into complex edge treatments and heat-shrinking techniques. This dedication to finishing detail is what ultimately distinguishes a basic wrap from a truly polished motorcycle makeover.
For more insights on perfecting motorcycle fairing aesthetics and trims, refer to this comprehensive guide on motorcycle fairings.
2. Mastering Heat and Edge Sealing for Flawless Motorcycle Fairing Wraps
Achieving a professional and long-lasting motorcycle fairing wrap requires precision in edge sealing combined with expert heat management. After carefully trimming the vinyl close to the fairing’s contours, the challenge lies in securing the wrap’s edges to prevent lifting or peeling over time. This is done by tucking the vinyl into natural seams or beneath trim pieces and applying pressure or specialized edge sealers designed for vinyl adhesion. Properly sealed edges act as barriers against moisture, dirt, and environmental wear, significantly enhancing the wrap’s durability.
Heat plays a pivotal role in this process. Using a heat gun, the installer gently warms the vinyl along edges and complex curves, softening the material to make it flexible enough to stretch without tearing or wrinkling. This warmed vinyl molds perfectly around tight corners and sharp edges, allowing for clean tucks and seamless adhesion. The heat also activates the vinyl’s adhesive properties, ensuring a strong bond to the fairing’s surface.
However, careful heat management is crucial: excessive heat can warp the vinyl or compromise the underlying paint finish. Advanced multi-layer cast vinyl films often require minimal heat to avoid damage while still enabling conformity to complex shapes.
Combining precise trimming with controlled heat application and diligent edge sealing provides a clean, crisp finish that enhances both aesthetic appeal and protective qualities. For those seeking visual step-by-step instruction on these techniques, many resources highlight how modern vinyls conform elegantly with minimal heat, demonstrating the importance of balance in this detailed finishing stage.
Explore further tips and detailed guides on protecting and styling your motorcycle bodywork at Summit Fairings’ blog.
3. Mastering Surface Prep and Tool Techniques for Precise Trimming and Edge Control in Motorcycle Fairing Wraps
Achieving a flawless wrap on motorcycle fairings demands rigorous surface preparation combined with expert use of specialized tools, especially when focusing on trimming and edge management. Before applying vinyl, the fairing must be spotless; any grease, dust, or residue inhibits adhesion and risks peeling. This cleaning phase typically involves mild soap and water, paired with gentle microfiber cloths to preserve the surface integrity. After degreasing, light scuffing with fine-grit sanding pads (around 600 to 800 grit) is essential, especially on painted or plastic surfaces, as it provides the vinyl a textured base to cling to without causing damage.
Once the surface is primed, the wrapping process begins with careful application aided by a heat gun. Warming the vinyl and the fairing wallows the film to become pliable, enabling it to contour snugly around curves, tight corners, and edges. During this stage, a range of tools such as squeegees and soft cloths are employed to eliminate air bubbles and wrinkles, promoting even adhesion. Precision knives are indispensable for trimming; clean, deliberate cuts along edges and seams create sharp lines that uphold the wrap’s durability.
Edge rollers complement these tools by firmly pressing the vinyl into difficult tight spots, reducing the likelihood of lifting over time. Partial disassembly of the fairing often helps expose tricky edges, allowing the installer to fold or tuck the vinyl beneath for a seamless finish. This attention to detail in both preparation and tool use ensures the vinyl wrap not only enhances aesthetics but also lasts through road conditions.
For those looking to deepen their skills, explore the best motorcycle fairings at Summit Fairings offers valuable insights and inspiration for custom wraps alongside appropriate materials.
Chapter 5: Reinstallation and Finalization in How to Wrap a Motorcycle Fairing: Completing and Securing the Wrap
1. Ensuring Stability and Precision: Expert Techniques for Reattaching Your Wrapped Motorcycle Fairing
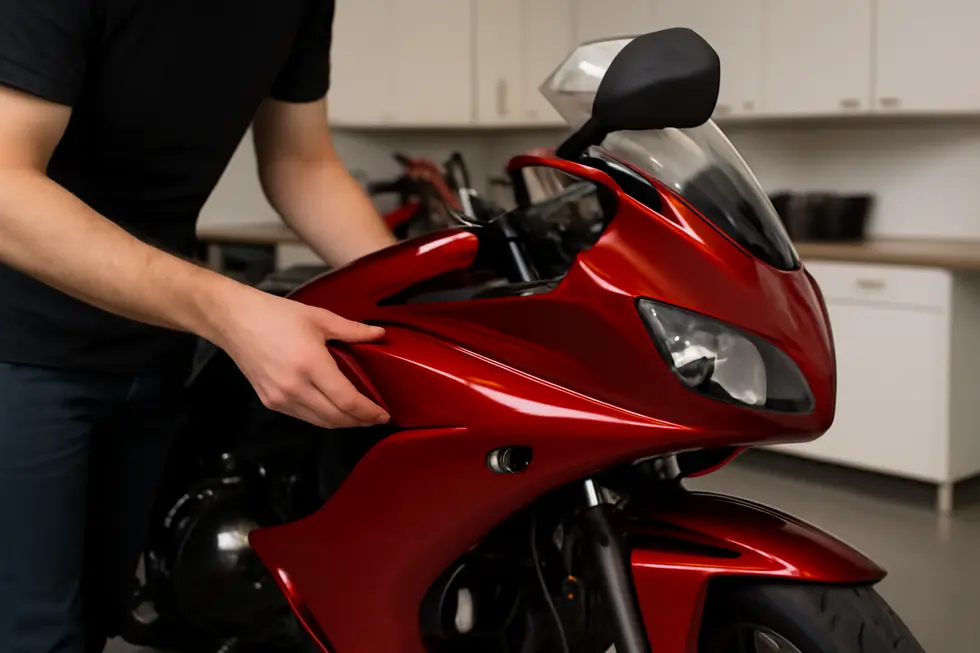
Ensuring a stable and secure reinstallation of a wrapped motorcycle fairing requires meticulous attention to alignment and fastening techniques. Once the vinyl wrap application is complete and has fully adhered, the fairing must be carefully repositioned onto the motorcycle frame. Proper alignment with the mounting points is crucial; this prevents undue stress that could warp the fairing or damage the fresh wrap. Starting by loosely fitting the fairing allows for fine adjustments before fastening permanently.
Selecting the right fasteners is essential to maintain both stability and the integrity of the fairing material—whether plastic, fiberglass, or composite. Using the original screws, bolts, or clips is ideal, but if any are worn or missing, replacements matching the exact specifications should be used to preserve fit and function. When tightening, balance is key: secure fasteners firmly without over-tightening, as excessive pressure can crack or warp delicate fairing surfaces.
In cases of aging or compromised mounting points, supplementary reinforcements such as tie straps or custom brackets can provide additional support. These enhancements stabilize the fairing against vibrations and wind forces experienced during riding, prolonging both the life of the wrap and the fairing itself.
A final inspection involves gently pressing and shaking the fairing to identify any looseness or rattling that might indicate insecure fastening. A short test ride followed by a re-check ensures the wrap remains intact and the fairing holds steady under real-world conditions. Completing this process with a thorough cleaning and inspection of any electrical connections behind the fairing guarantees a polished, professional result.
For a deeper practical guide on stabilizing and aligning motorcycle fairings effectively, this detailed resource on fixing loose fairings offers valuable visual techniques: Explore the best motorcycle fairings at Summit Fairings.
2. Mastering the Final Steps: Reinstalling and Securing Your Motorcycle Fairing Wrap for Lasting Perfection
Mastering the Final Steps: Reinstalling and Securing Your Motorcycle Fairing Wrap for Lasting Perfection
After meticulously applying vinyl to motorcycle fairings, the critical phase of reinstallation and finalization ensures both the visual appeal and longevity of the wrap. Reinstalling the fairing demands precision. Each mounting point must be carefully aligned and fastened securely to manufacturer specifications, avoiding over-tightening which risks distorting the vinyl or damaging the bodywork beneath. Proper torqueing protects the wrap from undue stress and prevents potential cracking or lifting at attachment sites.
Securing the edges of the vinyl wrap forms the backbone of a durable finish. During reinstallation, embedding wrap edges firmly into seams, crevices, and beneath trim pieces prevents peeling. Applying gentle heat with a heat gun softens the vinyl, allowing it to stretch and mold flawlessly around sharp corners and intricate curves. This heat activation helps the adhesive bond thoroughly, while smoothing with a soft cloth or squeegee eradicates any remaining wrinkles or air pockets. These carefully executed techniques shape a seamless and professional appearance.
A meticulous final inspection is paramount. Checking for trapped dust, air bubbles, or loose areas ensures the wrap meets quality standards. Minor imperfections can be corrected on the spot with gentle smoothing. For added protection, some recommend the application of a compatible sealant that enhances UV resistance and strengthens the wrap’s durability against weather and road wear.
Finally, installing protective edge guards or end caps shields vulnerable vinyl edges from abrasion and accidental damage during riding or minor tip-overs. This comprehensive approach to reinstallation and securing guarantees the wrap endures daily use, maintaining its fresh look and protective qualities for miles to come.
Learn more about choosing the right components and care in the broader process at Explore the Best Motorcycle Fairings at Summit Fairings.
3. Careful Reinstallation and Meticulous Final Inspection to Ensure a Seamless, Durable Motorcycle Fairing Wrap
After completing the precise application of vinyl to each panel, the process of reinstallation is critical to preserve the wrap’s flawless appearance and structural integrity. Reattaching the fairing panels requires a gentle yet deliberate approach to avoid stretching or damaging the vinyl. Aligning each component properly ensures there is no tension on the wrap that could cause lifting or distortion as the fairing is secured back onto the motorcycle frame. Fasteners and clips must be tightened just enough to hold the fairing firmly while respecting the delicate balance between stability and wrap protection.
Following reassembly, an exhaustive final inspection is necessary. This involves carefully tracing every edge to confirm all vinyl is cleanly tucked and sealed, a vital step for long-term durability against peeling or ingress of dirt and moisture. Any small bubbles, wrinkles, or imperfections that were unnoticed or arose during reinstallation must be addressed immediately. Using a heat gun and applying firm but gentle pressure can reactivate the adhesive, helping to smooth imperfections and resecure loose edges. Trimming with a sharp blade refines the wrap’s borders where needed to maintain a crisp, professional finish.
Beyond structural checks, providing guidance on the ongoing care of the wrap is essential. Avoiding abrasive cleaning products and using gentle washing techniques protect the wrap’s surface and coloration. Limiting extended exposure to direct sunlight significantly extends vinyl longevity and prevents fading or cracking.
This thorough process guarantees the motorcycle fairing wrap remains visually striking and resilient over time. For those seeking further guidance on high-quality fairings and expert wrapping techniques, exploring resources such as Explore the Best Motorcycle Fairings at Summit Fairings offers valuable insights and options.
Final thoughts
Successfully wrapping a motorcycle fairing involves a structured approach, beginning with meticulous surface preparation to ensure the vinyl adheres properly and lasts long. Selecting the right vinyl type and sizing it accurately prevents material waste and application challenges. The application phase, which merges skillful heating, stretching, and smoothing, is essential to conform the vinyl to complex fairing contours flawlessly. Following this, detailed trimming and edge management turn a simple wrap into a professional-grade finish. Finally, reinstallation seals the process with the wrapped fairing firmly and safely mounted back on the motorcycle. For business owners, mastering each step of fairing wrapping not only elevates your service quality but also builds reputation and trust among your clientele. Consistency, attention to detail, and quality materials transform a service into an art form that customers return to and recommend.
Ready to elevate your ride? Summit Fairings delivers premium, custom-fit fairings that blend style and durability. Whether you’re chasing speed or turning heads, we’ve got your bike covered. Don’t wait—transform your machine today. Click, customize, and ride with confidence. Your perfect fairing is just a few clicks away. Act now!
About us
undefined