Introduction
Motorcycle fairings serve not only as aerodynamic enhancers but also as critical elements of a bike’s visual identity. For business owners in the repair and customization industry, mastering the art of fixing motorcycle fairings is essential to delivering quality service that drives customer satisfaction and repeat business. The repair process involves a meticulous sequence beginning with thorough removal of the fairings to avoid damage, followed by skillful restoration of cracks and paint imperfections, and concluding with precise reinstallation and finishing techniques that ensure durability and aesthetic appeal. Each phase contributes to the overall success of the repair, impacting turnaround time, cost-efficiency, and final quality. This comprehensive approach enables shops to stand out in a competitive market by delivering professional, reliable repairs that meet the expectations of discerning motorcycle enthusiasts.
Tables of Contents
Chapter 1: Removing Fairings Thoroughly in Fixing Motorcycle Fairings
- Step-by-Step Disassembly: Mastering the Sequence of Removing Connected Components for Fairing Removal
- Systematic Disconnection of Electrical and Mechanical Components for Damage-Free Fairing Removal
- Mastering the Art of Handling Clips, Rivets, and Fragile Components for Flawless Fairing Removal
- Mastering Stepwise Unbolting and Support for Safe Motorcycle Fairing Removal
- Mastering Fairing Removal Through Visual Demonstrations and Hands-On Guidance
Chapter 2: Repairing Cracks and Paint Damage in Fixing Motorcycle Fairings
- Mastering Adhesives, Fillers, and Finishes: Effective Repair Techniques for Cracks and Paint in Motorcycle Fairings
- Essential Surface Preparation and Cleaning for Flawless Crack and Paint Repairs on Motorcycle Fairings
- Enhancing Fairing Durability: Structural Reinforcement Techniques for Crack and Paint Restoration
- Mastering Paint Restoration: From Surface Prep to Polished Finish in Motorcycle Fairing Repairs
- Achieving Seamless Strength and Visual Excellence in Crack and Paint Repairs
Chapter 3: Reinstalling and Finishing Techniques in Fixing Motorcycle Fairings
- Essential Surface Preparation Techniques for a Flawless Fairing Reinstallation and Finish
- Mastering Adhesives and Fasteners: Ensuring Durable and Precise Fairing Reinstallation
- Mastering Paint and Coating for Durable, Gorgeous Motorcycle Fairings
- Mastering Repair Challenges: Enhancing Structural Strength and Flawless Finishes During Fairing Reinstallation
- Balancing Cost Efficiency and Environmental Impact in Motorcycle Fairing Repairs
Chapter 1: Removing Fairings Thoroughly in Fixing Motorcycle Fairings
1. Step-by-Step Disassembly: Mastering the Sequence of Removing Connected Components for Fairing Removal
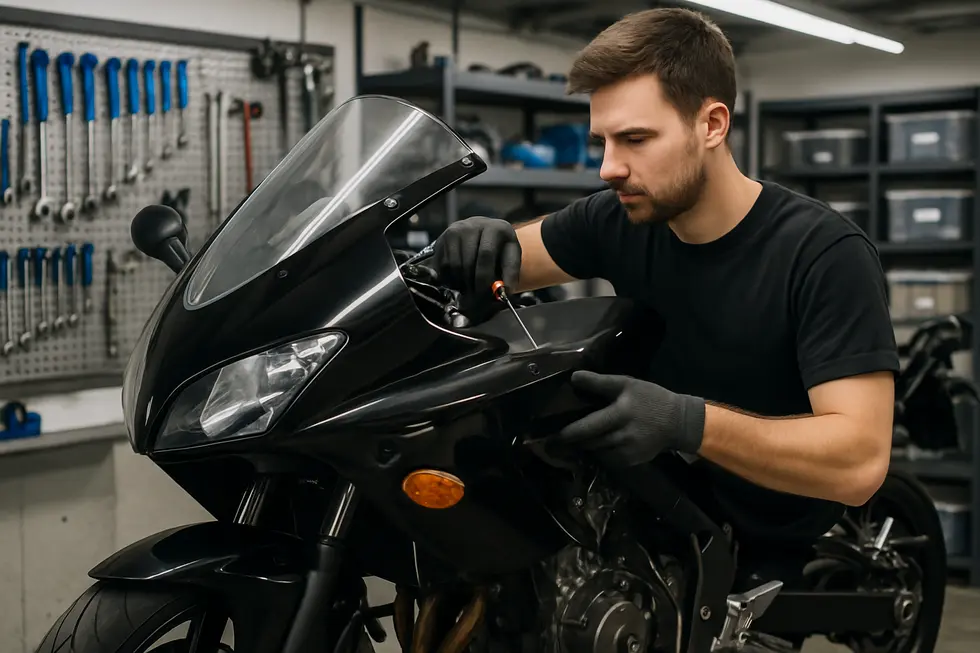
Removing motorcycle fairings demands a thoughtful, step-by-step approach to carefully detach all connected parts without causing damage. The process typically begins by loosening and removing the windshield and its mounting hardware, which are often integrated with the front fairing. This initial step exposes underlying screws and bolts securing the main panels and provides easier access to connected components. After the windshield, systematically unscrew brackets and bolts that hold the body panels in place. Some bolts might feature keepers designed to allow loosening without complete removal, ensuring parts can be separated gently without straining threads or tabs.
Next, attention turns to plastic covers such as speaker grills, which are usually fastened by clips. Releasing these clips requires patience and delicate pressure to avoid cracking brittle plastics. Once exposed, unplug electrical connectors—headlight plugs, turn signal wiring, and audio system cables—that tether the fairings to the bike’s electrical system. It is crucial to handle these connectors with care to prevent wire damage or loose contacts that can complicate reassembly.
Side panels on sportbikes like the CBR600RR involve mirrored steps on both sides, often beginning with mirror detachment before removing adjacent panels. The entire sequence prioritizes gradual progression from external to internal components, maintaining awareness of hardware locations to facilitate smooth reinstallation. Pulling large sections prematurely risks snapping plastic tabs or pulling wires taut, so adherence to the sequence ensures a thorough and damage-free removal process.
This methodical disassembly has been demonstrated effectively in tutorials covering models such as the Harley-Davidson Road Glide and CBR600RR, where methodic removal leads to a clean separation of the front assembly without stress on parts. For those seeking detailed procedures tailored to specific motorcycles, detailed guides and video demonstrations are invaluable.
For more on motorcycle fairing care and repair techniques, explore your ultimate source for affordable motorcycle fairings.
External reference for detailed removal procedures: CBR600RR fairing removal tutorial.
2. Systematic Disconnection of Electrical and Mechanical Components for Damage-Free Fairing Removal
Removing motorcycle fairings requires more than unscrewing visible bolts—it demands a careful, methodical process of detaching electrical and mechanical attachments to avoid damage and ensure smooth reassembly. Start by removing external fixtures such as windshields, speaker grills, and mounting brackets. These often require unscrewing or unclipping with precision; rushing this step risks snapping delicate plastic clips or dropping small screws that are hard to replace.
When detaching the windshield, support it firmly to prevent accidental falls while loosening its mounts. Next, address electrical connections behind the fairings. Headlight plugs, speaker wires, and wiring harnesses should be disconnected gently using a push-and-pull technique without forcing connectors apart. This preserves wiring integrity and prevents broken pins or frayed cables that impede reconnection.
Bolt removal should follow a logical sequence—starting with clearly visible fasteners and proceeding to hidden bolts that may be secured with retaining clips or thread locker compounds. These clips often prevent bolts from falling out but require careful maneuvering. Avoid pulling fairings suddenly, as adjustment cables on headlights allow limited movement; understanding these physical constraints helps expose bulbs or wiring without damage.
For example, some modern touring models require six specific screws removed before fairings can detach, plus careful unclipping of speaker grills. Recognizing the position of fuse blocks, often located under false tanks, is crucial before loosening headlamp assemblies to prevent electrical issues.
This systematic detachment approach ensures all mechanical and electrical elements remain intact for successful repairs or painting. Consistent care during these steps reduces the risk of cracks, broken clips, or wiring faults common when fairings are hastily removed.
For those seeking detailed visual guidance, a comprehensive tutorial demonstrates these techniques effectively for various models, showcasing the critical balance between thoroughness and caution. To explore more about fairing components and accessories, check out this ultimate source for affordable motorcycle fairings.
Reference tutorial: https://www.youtube.com/watch?v=H94tYKTP3tw
3. Mastering the Art of Handling Clips, Rivets, and Fragile Components for Flawless Fairing Removal
Removing motorcycle fairings demands a steady hand and precise technique, particularly when dealing with the numerous clips, rivets, and delicate parts that secure these panels. These fasteners are often constructed from brittle plastic or thin metal, making them vulnerable to cracking or deforming if mishandled. To prevent damage, it’s crucial to rely on specialized tools such as plastic trim removers and small screwdrivers, which allow for gentle prying without scratching or breaking the components. Abrupt force or hurried removal risks snapping fragile tabs or breaking mounting points, complicating repairs and reinstallation.
Keeping a methodical pace ensures each clip and rivet is loosened carefully and systematically. If rivets need removal by drilling, this must be done with precision to avoid harming the surrounding fairing material. Throughout the process, organizing and labeling all fasteners is vital—this practice prevents confusion and loss during steps that follow. Additionally, lightly cleaning surfaces before removal can minimize hairline scratches by reducing debris that might catch under prying tools.
Specialized bits and tools designed for stubborn clips or rivets save time and protect the integrity of the fairing parts. Protecting fragile tabs and thin edges while lifting panels keeps the bodywork aligned and reduces the chance of costly damage. This attention to detail, combined with patience and the right equipment, forms the foundation for a thorough, damage-free disassembly process.
For a practical example on careful handling during fairing removal, a step-by-step tutorial for the Yamaha R6 offers excellent visual guidance. Similarly, insights into Harley Davidson fairing removal emphasize preserving clips and rivets and can greatly enhance understanding of these delicate procedures. More information on the importance of using proper tools and techniques can be found by exploring expert guidance on motorcycle fairings.
4. Mastering Stepwise Unbolting and Support for Safe Motorcycle Fairing Removal
Removing motorcycle fairings demands a meticulous stepwise unbolting approach combined with careful panel support to ensure the panels and mounting points remain undamaged. Begin by parking the motorcycle on a stable surface, disconnecting the battery to prevent electrical hazards, and assembling all necessary tools, including screwdrivers, Allen keys, socket wrenches, and plastic trim tools designed to prevent scratching. Identifying and locating every fastener—bolts, screws, and clips that secure the fairings around the edges, under the seat, near the handlebars, and along the frame—is essential to plan an efficient removal.
The unbolting process should start logically from the top or front sections, moving steadily toward the bottom or rear to maintain steady support for the fairings and avoid undue stress on single attachments. Keeping track of all fasteners by organizing them in labeled containers or magnetic trays helps streamline the eventual reassembly. As bolts and screws loosen, it’s critical to support the panels firmly with your other hand or enlist a helper when handling larger or awkwardly shaped pieces to prevent bending or accidental drops.
Electrical connectors integrated within the fairings—usually for lights or indicators—must be carefully detached to avoid wiring damage. Use plastic trim tools when prying clips to prevent scratches or gouges. If you encounter resistance, pause to check for hidden or stubborn fasteners rather than forcing the panels, which risks cracking or deforming the material. After all fasteners and connectors are removed, gently pull the fairings away from the frame, then inspect the mounting points for any signs of wear or damage before proceeding with repairs or reinstallation.
This thoughtful, patient technique is supported by practical demonstrations found in detailed guides for models like the Yamaha R6 or Harley Davidson, which emphasize avoiding damage during removal. For those working with technical or composite materials, such as carbon fiber, understanding the properties of these materials is vital for safe handling and damage prevention. For an in-depth exploration of high-quality motorcycle fairings and care, consider visiting Explore the Best Motorcycle Fairings at Summit Fairings.
Additionally, many TikTok videos showcase real-world examples of preventing scratches and managing delicate parts during fairing removal, offering visual support to complement the careful unbolting and support strategies described here.
5. Mastering Fairing Removal Through Visual Demonstrations and Hands-On Guidance
Removing motorcycle fairings without causing damage demands not only patience but also clear guidance, which is why practical demonstrations and visual aids are invaluable. Video tutorials provide an exact visual roadmap—highlighting locations of screws, clips, and concealed fasteners that often cause confusion. For example, a detailed walkthrough of a Harley Davidson Road Glide fairing removal expertly demonstrates using plastic pry tools along panel gaps to gently disengage parts, ensuring the panels remain intact. The tutorial stresses continually supporting the fairing to prevent it from falling or cracking during detachment. Similarly, the Yamaha MT-09 fairing removal video offers insights into cutting factory zip ties carefully to allow cable slack, avoiding unnecessary disconnections of LED wiring or controls. These meticulous instructions help riders perform modifications or repairs confidently without risking electrical or structural damage.
Shorter formats like TikTok videos for models such as the Yamaha R6 deliver concise, stepwise visuals to remove side fairings efficiently. Such videos enhance understanding of the sequence for unscrewing and unclipping components—critical for maintenance or cosmetic fixes. Across all these resources, several consistent tips emerge: use plastic pry tools rather than metal ones to protect plastic surfaces, keep a firm hold on panels when releasing fasteners, and methodically track and organize removed screws and clips to ensure smooth reassembly.
Utilizing these visual aids not only empowers DIY enthusiasts but also reduces the risk of costly damage and saves time. They translate abstract instructions into concrete actions, making the complex task of fairing removal accessible. For riders seeking comprehensive visual guidance and expert tips on handling fairings safely, the Harley Davidson Road Glide removal tutorial stands out as a prime example of practical clarity and actionable knowledge. For further insights on choosing the right replacement panels and understanding fairing care, explore this ultimate source for affordable motorcycle fairings.
Harley Davidson Road Glide Fairing Removal tutorial: https://www.youtube.com/watch?v=JWZMBYyxMQM
Chapter 2: Repairing Cracks and Paint Damage in Fixing Motorcycle Fairings
1. Mastering Adhesives, Fillers, and Finishes: Effective Repair Techniques for Cracks and Paint in Motorcycle Fairings
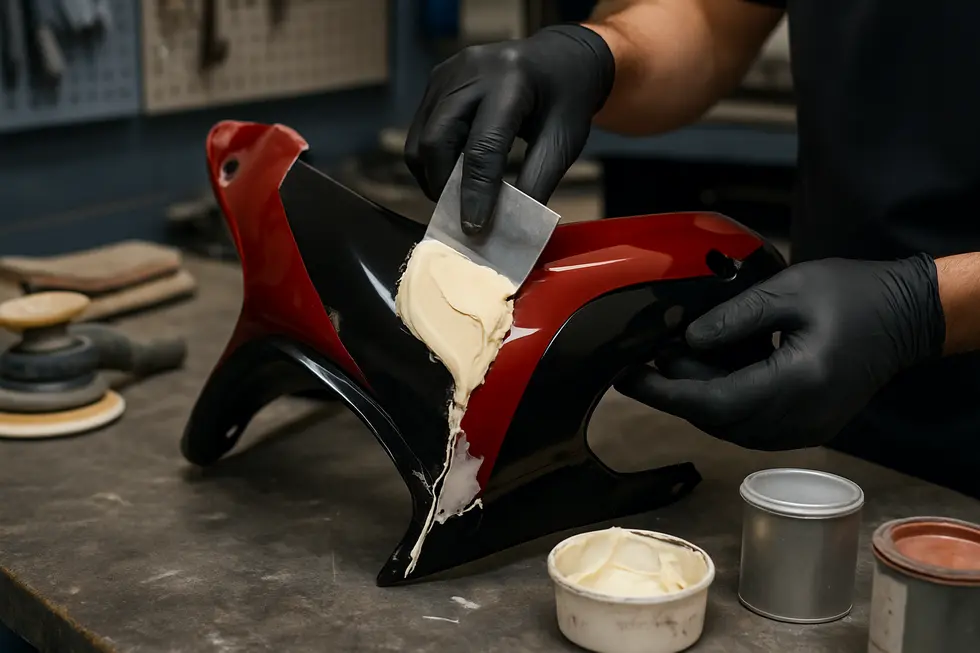
Repairing cracks and paint damage in motorcycle fairings requires a careful balance between structural integrity and visual restoration. Typically made from ABS or acrylic plastics, these panels demand specialized adhesives like high-temperature epoxy or solvent welders that bond securely while withstanding engine heat and vibrations. The process begins by thoroughly cleaning the cracked area to remove oils and debris that can weaken adhesion. For minor cracks, these adhesives alone can restore strength, while larger damages often call for fabrication of new sections using ABS or acrylic sheets that can be heat-formed or CNC routed to match the original contours.
After bonding or replacement, any surface imperfections are leveled with plastic fillers designed for flexibility and durability. Sanding with fine grit ensures a seamless transition between repaired and original areas, feathering the edges gently into the existing surface to prepare for painting. Proper surface preparation is crucial: cleaning must remove all contaminants before applying a primer formulated specifically for plastics. This primer promotes paint adhesion and guards against peeling in harsh conditions.
The painting stage involves layering color coats that match the original finish, followed by clear coats that provide UV protection and a glossy, resilient surface. For carbon fiber fairings, repair processes are more advanced, involving resin-impregnated carbon fiber patches cured to re-establish strength and finish, though large-scale repairs may require professional intervention and mold tooling.
Understanding these materials and techniques ensures that repaired motorcycle fairings regain both their strength and aesthetic appeal, delivering results that approach factory quality. For additional insights into selecting quality replacement parts and repair materials, explore affordable motorcycle fairings at Summit Fairings.
More detailed technical guidance and community experiences can be found at external resources like V11LeMans forums on materials and methods.
2. Essential Surface Preparation and Cleaning for Flawless Crack and Paint Repairs on Motorcycle Fairings
Achieving a professional repair finish on motorcycle fairings begins with meticulous surface preparation and cleaning. These initial steps are critical to ensure that fillers, adhesives, and paint adhere firmly, resulting in a long-lasting and visually seamless repair.
The process starts by thoroughly cleansing the fairing surface to remove all dirt, grease, oils, and environmental contaminants. Using cleaners specifically suited for plastic or fiberglass fairings prevents surface damage while prepping the area for repair. For matte or specialized finishes, gentle detailers that both clean and protect the texture maintain the fairing’s original appearance without causing harm.
Once cleaned, sanding becomes essential to remove any loose, flaking paint or damaged sections surrounding cracks and scratches. Sanding not only smooths the surface but also creates a slightly rough texture that promotes strong adhesion of fillers and paint. Typically, sanding is done lightly around the damaged area to preserve surrounding finish integrity while exposing a clean base. Fine grit sandpapers are recommended to avoid excessive abrasion.
After sanding, another cleaning step removes dust and debris. This is often achieved using a tack cloth or mild solvent to guarantee a fully clean surface free of particles that could interfere with bonding.
Before applying any fillers or primers, confirming the area is dry and free from oils is essential. This careful attention prevents common issues such as peeling, cracking, or imperfect finishes later in the repair process. These preparation principles align closely with professional motorcycle and automotive bodywork standards, emphasizing patience and precision.
Thorough surface preparation not only supports the durability of the repair but also ensures the final paint finish looks flawless, restoring both the appearance and function of your motorcycle fairings. For more detailed guidance and part options, visit Explore the Best Motorcycle Fairings at Summit Fairings.
(External reference: Professional fairing pre-season preparation guidelines)
3. Enhancing Fairing Durability: Structural Reinforcement Techniques for Crack and Paint Restoration
When tackling cracks and paint damage on motorcycle fairings, structural reinforcement plays a pivotal role in restoring both strength and aesthetics without compromising the lightweight nature crucial to motorcycle performance. The process begins with meticulous surface preparation—cleaning away dirt, grease, and loose paint creates an ideal foundation for durable bonding. For reinforcing cracked sections, advanced composite materials such as unidirectional carbon fiber fabrics are applied over the damage, saturated with epoxy resin. This combination cures into a rigid yet lightweight patch that markedly improves the fairing’s mechanical integrity. The fiber orientation is strategically chosen to counteract the specific stresses experienced at mounting points and fractured areas, often layering multiple plies for enhanced resilience.
Application of these materials benefits significantly from controlled curing environments, like autoclaves or heat-assisted setups, ensuring the epoxy resin achieves optimal bonding and finish consistency. Flexible, high-strength adhesives such as urethane-based epoxies further secure these reinforcements without adding brittleness or unnecessary weight.
Once structural repairs are solidified, focus shifts to surface restoration. Sanding prepares the area for primer application, which readies the fairing for repainting with plastic-compatible automotive paints. This ensures color matching and long-lasting protection against elements and wear. Although welding techniques are rarely used for composite fairings due to material incompatibility, professionals sometimes employ such methods on metal components when needed.
This integrated reinforcement approach balances restoring the fairing’s durability with maintaining its aerodynamic efficiency and appearance. For readers seeking added insights and repair inspiration, exploring expert sources on quality motorcycle fairings can provide further guidance on compatible materials and finish options. For a deeper dive into composite reinforcement methods in racing applications, detailed industry resources can be consulted here.
Discover more about selecting and maintaining high-quality fairings at Summit Fairings blog.
4. Mastering Paint Restoration: From Surface Prep to Polished Finish in Motorcycle Fairing Repairs
Restoring the paint and finish of motorcycle fairings after repairing cracks demands a meticulous, multi-step approach to revive both visual appeal and protective qualities. The process begins with thorough cleaning using motorcycle-specific shampoos and degreasers, which remove dirt, oils, and contaminants while preserving the original paint and plastic integrity. This essential preparation ensures superior adhesion for fillers and subsequent coatings.
Light sanding is next, targeting the edges of cracks or scratches to smooth the surface. For deeper cracks, application of plastic-compatible fillers or epoxy suited for ABS or fiberglass is critical. Once cured, these repairs are sanded again to create an even plane, allowing paint layers to bond seamlessly. Sanding also prepares scratched areas that have exposed primer or bare plastic.
Priming follows with plastic adhesion primers designed to enhance paint durability and prevent peeling, particularly important for aftermarket panels or repaired sections. The painting stage involves applying thin, even coats of color-matched paint formulated for motorcycle plastics or automotive use. Allowing each coat to fully dry avoids imperfections such as runs or uneven hues.
After color coats, clear coating protects the finish from UV rays, scratches, and environmental damage. Multiple clear coats build gloss and ruggedness, providing a showroom-quality shine. Once fully cured, polishing with fine compounds eliminates minor flaws and heightens luster. A final application of motorcycle-safe wax or ceramic coating extends protection and enriches gloss longevity.
Performing these steps in dust-free, shaded environments and using microfiber cloths protects against contamination and new scratches. Masking adjacent areas prevents overspray, preserving sharp, clean edges. For severe damage, expert repair services are advisable to assure safety and flawless results.
This careful paint restoration not only repairs but elevates the fairing’s appearance, sustaining your motorcycle’s value and presence. For practical guidance, detailed visual tutorials like this comprehensive paint restoration video demonstrate these techniques step by step.
For further insights into sourcing quality parts to complement your restoration, explore the explore the best motorcycle fairings at Summit Fairings blog.
5. Achieving Seamless Strength and Visual Excellence in Crack and Paint Repairs
Balancing durability with aesthetic restoration when repairing cracks and paint damage on motorcycle fairings requires a detailed, careful approach. The process begins with restoring the fairing’s structural integrity, which is essential to ensure the part can endure vibrations, impacts, and the rigors of riding. Techniques such as plastic welding, epoxy bonding, or fiberglass reinforcement are applied based on the fairing’s material. After reconstructing the damaged area, sanding smooths out imperfections, creating a solid foundation for refinishing.
Paint restoration focuses on precise color matching and finish replication, essential for achieving a factory-quality look. Cleaning the area meticulously removes contaminants, while applying a primer encourages strong paint adhesion. The base coat is then sprayed carefully, matching the original color to blend invisibly with the surrounding surface. Final clear coats not only provide a glossy finish but also add resistance against environmental elements like UV rays and moisture.
The finishing touches involve wet sanding and polishing, which attenuate any surface irregularities such as runs or orange peel effects in the clear coat. This step is vital to seamlessly merge the repaired section with the rest of the fairing, ensuring visual uniformity and durability. Throughout the repair and paint process, patience and precision avoid over-sanding or faulty layering, both of which could compromise the repair’s strength or appearance.
Quality materials and adequate curing times underpin a reliable and attractive repair. Ultimately, combining robust structural fixes with flawless paintwork revitalizes the fairing’s protective function and aesthetic value. For those interested in deeper guidance on smoothing paint defects and clear coat application, real-time demonstrations provide invaluable support for mastering these skills. As you work through this process, consider exploring a comprehensive source for motorcycle fairings to source quality replacement parts that complement your restored fairings.
Chapter 3: Reinstalling and Finishing Techniques in Fixing Motorcycle Fairings
1. Essential Surface Preparation Techniques for a Flawless Fairing Reinstallation and Finish
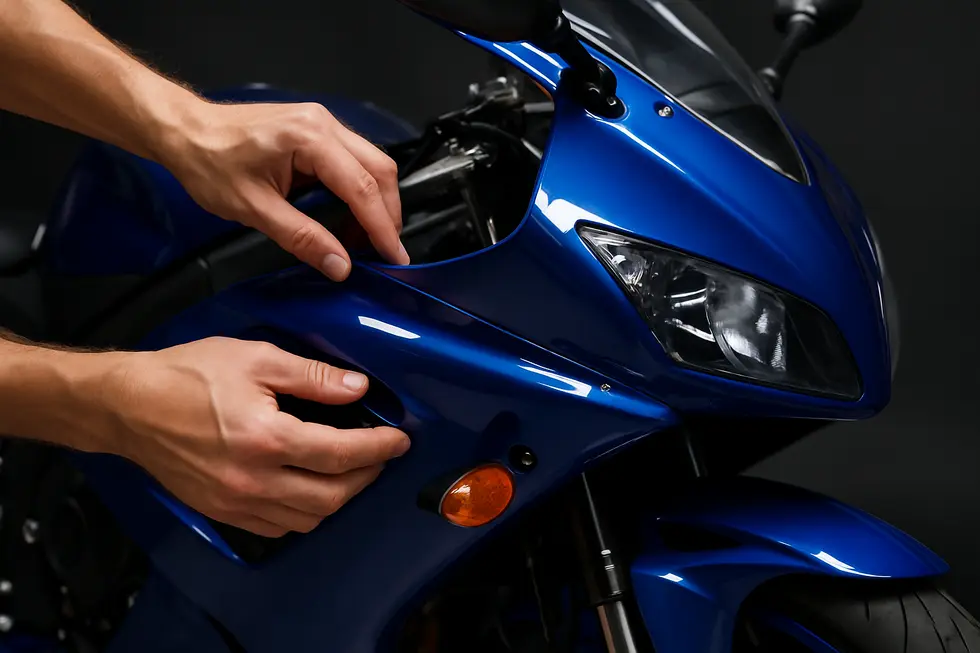
A successful reinstalling and finishing of motorcycle fairings begins long before reattachment—it starts with meticulous surface preparation that ensures both durability and visual appeal. The process commences with a thorough cleaning using gentle, pH-neutral soaps and soft cloths, effectively removing dirt without dulling the underlying finish. For fairings that have seen extensive use, degreasing is imperative to eliminate oils and grime from mechanical components, setting a clean stage for subsequent treatments.
Following cleaning, light sanding plays a pivotal role. Using fine abrasives creates a subtle, textured surface that promotes optimal adhesion of paint or protective layers. This step demands care to avoid over-sanding, which might damage contours or original paint. Once sanded, the surface should be freshly cleaned again to remove all dust and residues that could interfere with coating application.
For panels exhibiting scratches or imperfections, paint correction techniques elevate the finish to a professional level. Mechanical polishing with abrasive compounds smooths out minor defects and revitalizes surface gloss—a vital step before applying sealants or waxes. When protective coatings are considered, options range from traditional waxes that impart a rich sheen and basic protection to advanced ceramic-like coatings infused with materials such as graphene. These modern treatments offer enhanced scratch resistance, hydrophobic properties, and extended UV protection that can preserve the fairing’s appearance for years.
Maintaining this finish also involves environmental awareness—parking in shaded areas and using UV-protective covers curtail fading and degradation. Importantly, these preparatory and finishing steps require a well-ventilated, dust-minimized workspace alongside appropriate safety gear like respirators, especially when working with solvent-based products.
In sum, dedicating time and precision to cleaning, sanding, correcting, and protecting fairing surfaces guarantees a smooth reinstall with a durable, eye-catching finish. For detailed preparatory and airbrushing techniques, it’s helpful to consult specialized beginner-friendly guides, such as those found on Best Beginner Motorcycles. Furthermore, exploring professional insights on quality restoration and fairing care can be found through resources like Summit Fairings’ blog.
2. Mastering Adhesives and Fasteners: Ensuring Durable and Precise Fairing Reinstallation
Reinstalling motorcycle fairings to achieve a flawless finish depends heavily on the strategic use of adhesives and fasteners, each selected to suit the material and purpose involved. Plastic fairings often require robust bonding for cracks or breaks, where plastic welding stands out as an effective solution. Using a nitrogen plastic welder, technicians can fuse damaged areas, producing a strong, seamless bond that withstands sanding, priming, and professional painting. This process restores the fairing’s integrity and appearance, ensuring repairs blend invisibly with the original surface.
For attaching lighter trim pieces or panels that may need removal, heavy-duty self-adhesive hook-and-loop tapes provide a practical alternative. These allow for quick detachment without compromising the plastic’s finish or requiring tools, ideal for routine maintenance or customization.
Secure fastening is equally critical for maintaining the fairing’s position against the motorcycle frame. Stainless steel bolts, screws, and specialized clips offer both durability against vibration and resistance to corrosion. Speed clips and spire clips are favored where overlapping panels demand reliable yet gentle fastening that can endure repeated removal. The addition of quick-release fastener kits elevates convenience, enabling rapid fairing work during servicing.
Preparation is vital: all surfaces must be impeccably cleaned to maximize adhesion or mechanical grip. Worn or missing hardware should be replaced with quality components designed for the specific motorcycle model, ensuring fitment precision and longevity. In cases where immediate hardware replacement is unavailable, temporary repairs using compatible threaded inserts allow continued use until proper parts can be sourced.
By balancing strong adhesive repairs with carefully chosen fasteners, riders and technicians alike can restore fairings with professional-level strength, aesthetic value, and maintainability. For more insight into quality fairing materials and components, explore affordable motorcycle fairings options.
External Reference: Plastic welding repair technique with primer/paint finish.
3. Mastering Paint and Coating for Durable, Gorgeous Motorcycle Fairings
Achieving a flawless, long-lasting finish on motorcycle fairings demands precise surface preparation and expert application of paint and protective coatings. The process begins with meticulous cleaning and repairing of any cracks or scratches using specialized plastic fillers or repair compounds compatible with the fairing’s material. This initial step ensures the base surface is smooth and free from imperfections that would affect the final appearance.
Painting is often best performed with airbrushing techniques, allowing for seamless color blending and crisp lines. Multiple layers of base coat are applied carefully, with drying intervals to build up even coverage. Clear coats follow, typically enhanced by hardeners that boost gloss and significantly improve resistance to environmental factors such as UV rays, rain, and debris impact. These layers protect the paint beneath, preserving the fairings’ aesthetic for years.
Custom touches, including pin-striping or personalized graphics, add distinctiveness and can also increase the motorcycle’s value. Such artwork benefits from professional craftsmanship to guarantee durability and a refined finish. For additional durability, especially on high-contact areas like side mirrors or edges, paint protection films or wraps may be applied. While these alternatives enhance toughness without repainting, a well-executed paint job remains the preferred approach for fully integrated, seamless finishes.
Using premium-quality paints, clear coats, and materials is non-negotiable for results that endure daily wear and exposure. The combination of proper repair, precision painting, and solid protective layers ensures fairings not only look stunning but also withstand mechanical stress and weathering. For those seeking a visual, stepwise explanation of these painting and coating methods, a detailed tutorial video covering repair and painting techniques is available here.
For insights on sourcing high-quality replacement and custom fairings to complement your restoration and finishing work, explore the excellent selection curated by Summit Fairings.
4. Mastering Repair Challenges: Enhancing Structural Strength and Flawless Finishes During Fairing Reinstallation
Ensuring the longevity and aesthetic appeal of motorcycle fairings during reinstallation hinges on expertly addressing both structural repairs and finishing nuances. When cracks or breaks threaten a fairing’s integrity, using high-strength epoxy combined with reinforcing agents like fibrous fillers creates durable bonds that restore mechanical resilience. Preparing the damaged areas by sanding is essential to achieve strong adhesion, while carefully aligning panels during reattachment prevents undue stress that can cause future failures.
As the structural foundation is restored, the next challenge lies in preparing the surface for a seamless finish. Employing wet sanding techniques with sanding blocks eradicates imperfections while preserving delicate contours and decals. This smooth canvas is crucial for paint adherence and contributes to a flawless final appearance.
Paint defects such as runs, fish eyes, or decal inconsistencies can mar the finish but are resolvable through diligent sanding and repeated clear coat applications. Patience during drying intervals and meticulous layering help conceal flaws and bring back a glossy, professional look. For minor scratches, simple cleaning followed by targeted touch-up paints or polishing compounds offers a quick yet effective cosmetic fix that avoids full panel repainting.
Balancing these repair and finishing elements optimizes both the durability and aerodynamic function of the fairings. Achieving this requires attention to detail throughout each stage, ensuring that the motorcycle not only looks refined but maintains structural soundness under riding stresses. For an in-depth visual guide demonstrating paint defect corrections and finishing steps, the following tutorial on paint defect repair and finishing provides valuable step-by-step insights.
Further enhancing understanding of structural repairs using epoxy and fiber mixtures can be gleaned from technical approaches applied to aircraft gear fairings, offering useful parallels for motorcycle fairings. For additional resources on the range and quality of aftermarket options, explore the Summit Fairings blog to deepen your knowledge of fairing selection and maintenance.
5. Balancing Cost Efficiency and Environmental Impact in Motorcycle Fairing Repairs
When approaching the reinstalling and finishing phases of motorcycle fairing repairs, balancing economic efficiency with environmental responsibility is essential. Opting to repair rather than replace damaged panels significantly reduces expenses related to new materials and labor. Techniques such as wet sanding, precise clear coat application, and targeted paint defect correction, including addressing paint runs or decal flaws, allow for effective restoration without incurring the cost of new parts. Employing do-it-yourself strategies—for instance, drilling to halt crack propagation and careful sanding—further minimizes reliance on professional services and associated costs.
From an ecological standpoint, extending the lifespan of fairings by repair conserves plastic resources and reduces waste generation. This decreases the demand for new raw materials and lowers the carbon footprint linked to manufacturing and transporting replacement fairings. Choosing finishing products and methods that limit the release of volatile organic compounds (VOCs) and hazardous chemicals adds another layer of environmental stewardship. Applying clear coats with precision and allowing proper curing, as illustrated in expert repair demonstrations, helps reduce material waste and emissions.
Adopting these thoughtful reinstalling and finishing techniques merges financial prudence with sustainability. This holistic approach not only preserves your motorcycle’s aesthetic and functional qualities but also aligns repair work with eco-conscious practices. For those looking to deepen their understanding of these repair methods and their impact, comprehensive instructional resources, including videos focused on paint defect repair and clear coat finishing, offer valuable, practical guidance.
Explore more insights into cost-effective and sustainable motorcycle fairing care at your ultimate source for affordable motorcycle fairings.
Final thoughts
Fixing motorcycle fairings encompasses a triad of critical steps, each interdependent and vital for delivering robust, visually appealing results. For business owners, investing in meticulous removal, expert crack and paint repair, and exacting reinstallation paired with superior finishing techniques can transform ordinary repairs into standout services that boost customer trust and retention. Mastery of these phases optimizes workflow, reduces costly errors, and enhances product quality—key factors in building a thriving motorcycle repair and customization enterprise. By viewing fairing repair as a comprehensive process rather than isolated tasks, businesses position themselves to meet rising market demands for precision, aesthetics, and durability.
Ready to elevate your ride? Summit Fairings delivers premium, custom-fit fairings that blend style and durability. Whether you’re chasing speed or turning heads, we’ve got your bike covered. Don’t wait—transform your machine today. Click, customize, and ride with confidence. Your perfect fairing is just a few clicks away. Act now!
About us
We are one of the leading motorcycle fairing export sites, with over 3,000 styles across almost all motorcycle models. Buy from summitfairings.com, and pay 10-40% less than the prices on other sites. If you have any questions, we promise we will have your answer within six hours.