Understanding the costs associated with painting motorcycle fairings is crucial for business owners looking to provide quality service to their customers. This article delves into essential aspects such as basic pricing structures, factors influencing costs, the impact of custom designs, and a comparison between DIY and professional services. By exploring these interconnected chapters, business owners can gain insights that enhance their service offerings and cater to their target market effectively.
How Much to Paint a Motorcycle Fairing: Decoding Prices from Touch-Ups to Custom Resprays
Understanding what you’ll pay to paint a motorcycle fairing starts with recognizing that a single number rarely tells the whole story. Costs vary widely because the jobs themselves differ wildly. A small touch-up to hide a scuff is not the same as a full respray with metallic flake and custom graphics. The pricing you encounter reflects materials, labor, skill, and the scope of work. It also reflects where you live and who you hire. Read as a steady narrative that moves from simple repairs to high-end custom work, so you can see why prices range and where your money goes.
At the low end, minor repairs and spot painting are inexpensive. When you have a tiny chip or a few scratches, a technician can blend paint into the surrounding area. This avoids stripping the entire panel and keeps labor time short. Expect small fixes and spot touch-ups to cost roughly $20 to $100. That covers materials and a short labor session, often in the same day. These jobs are common and useful when preserving the factory finish or delaying a full repaint.
A full respray of a single fairing or a complete set of fairings moves the needle considerably. A standard, single-color respray with proper preparation and clear-coating usually falls between $300 and $600 in many markets. However, this is a baseline. Shops that promise a longer-lasting finish, or that use higher-quality paints and clear coats, often charge $400 to $1,500 for a more professional result. That range reflects whether the shop performs thorough prep, whether it uses premium automotive paints, and whether the work happens inside a proper spray booth.
Preparation is the invisible cost driver that matters most. Paint will only look and last as well as the prep allows. Dents, deep scratches, or crazing in older plastic fairings require repair. Repairing cracks, filling gouges, sanding to a smooth surface, and applying primer add hours of labor. A high-quality job often includes disassembly of the motorcycle or removal of entire panels. Each panel may need to be sanded, cleaned, and masked before paint can be applied. Shops that take those steps are charging for both materials and meticulous labor, and the price reflects that care.
Paint type sets the next major cost tier. Standard single-stage enamel or basic automotive paint gives acceptable coverage at a lower price. But if you want metallic, pearl, or custom-mixed colors, expect to pay more. These specialty paints require precise mixing, multiple coats, and careful layering to achieve depth and consistency. Pearl and metallic finishes also need specific clear coats and more polishing. In practice, premium paints and clear coats can add hundreds of dollars to the bill. If longevity and appearance matter, investing in better paint will pay off over time.
Skill level matters in a way that affects both aesthetics and cost. A seasoned painter who specializes in motorcycle fairings charges for experience. They know how to match factory colors, avoid orange peel, and create durable edges. They use controlled environments, like spray booths, and advanced tools for blending and curing. Less experienced shops may offer cheaper rates, but the finish could show runs, poor color match, or premature failure. When a fairing is integral to your bike’s look, hiring a reputable professional usually reduces the risk of costly redo work.
Design complexity multiplies cost rapidly. A straightforward single-color respray is predictable. Add stripes, two-tone schemes, masked graphics, or hand-painted artwork, and the hours climb. Multi-color jobs require careful masking and often multiple rounds through the paint booth. Custom graphics and airbrushed art need a skilled artist and extra time for layout, stenciling, and protective clear coats. Prices for intricate designs commonly exceed $1,000 and can go much higher for award-quality work. If you want a show-level finish, expect to pay accordingly.
Labor rates and local market conditions shape the final invoice. Urban shops with high rent and local demand charge more. Shops in rural areas may offer lower rates but might not have the same level of specialization. Always factor in that a higher upfront cost can mean longer-lasting results and fewer return visits. Ask shops about warranties or guarantees for their paintwork. A warranty on finish and adhesion is a sign that the shop stands behind its process.
Replacement versus repaint is another financial consideration. Sometimes buying a replacement fairing and installing it is cheaper than repairing and painting the original. Aftermarket fairings often come in unpainted or primed states and can cost less than the combined price of complex repairs and painting. If the fairing is cracked or heavily damaged, a replacement may save time and money. Browse compatible parts collections to see options for your model if you’re weighing replacement. For example, owners of certain sportbikes often find ready-fit fairings that reduce the need for extensive repair and repaint work: https://www.summitfairings.com/collections/honda-cbr1000rr-fairings-2008-2011
When planning a repaint, communication is essential. Describe the end goal clearly. Are you restoring a factory look, matching a single panel, or creating a custom design? Ask the shop to outline the process and provide an itemized estimate. A detailed estimate will list preparation steps, paint type, number of coats, and whether disassembly and reassembly are included. It should also state the expected timeline and any guarantee offered. Transparent shops give better estimates and avoid surprises.
Timing and scheduling also affect cost. Rush jobs often carry a premium. Painting involves drying and curing stages. Proper curing prevents runs and ensures durability. If you need your bike back quickly, expect higher fees. Similarly, demand cycles—like the start of riding season—can push up prices. Booking your job during off-peak months may yield lower rates or more flexible timing.
Small cost-saving choices exist but carry trade-offs. Doing some prep work yourself—like removing fairings or performing basic cleaning—can reduce labor time. However, leave sanding, filling, and painting to professionals unless you have proven experience. Cheap paints and shortcuts may save money now but often lead to fading, chipping, or poor adhesion later. Weigh the savings against the likely lifespan of the finish.
Finally, think long term about value. A quality paint job protects the underlying plastic and preserves resale value. A well-done repaint can restore a bike’s visual appeal and attract buyers. Conversely, a subpar paint job can be an immediate deterrent and may require correction. Investing in better materials and reputable labor can therefore be a cost-effective decision over the life of the motorcycle.
If you want a concise benchmark: small touch-ups run from $20 to $100; standard single-color resprays typically land between $300 and $600; and professional, high-quality or custom work ranges from $400 to $1,500 or more depending on complexity. Use these ranges as a starting point, then get written estimates for your specific job. For more detailed guidance on factors that influence repainting and replacement costs overall, see this industry overview: https://www.motorcycle.com/
By understanding preparation, paint quality, labor skill, design complexity, and local market conditions, you’ll be prepared to budget realistically. The most important step is a written, itemized estimate from a trusted shop. That turns general ranges into specific numbers tied to the job you want done.
Pricing in the Paint Booth: How Design, Materials, and Craft Shape the Cost to Paint a Motorcycle Fairing
When riders consider giving a bike a fresh look, the sticker shock rarely comes from the color alone. The cost to paint a motorcycle fairing emerges from a complex interplay of design ambition, material choices, labor realities, and the practical constraints of work flow in a shop. It is a problem of mathematics in motion: the surface area may be fixed, but the bill grows or shrinks with every decision about how the finish will behave, how long it will last, and how precisely the lines and curves will be aligned with the bike’s geometry. A single, solid color across a modest fairing set will sit toward the lower end of the spectrum, yet even that seemingly simple finish depends on preparation discipline, surface condition, and the smoothness of the final coat. The sum of these decisions is the price you see quoted, and it is rarely just a line item for paint. It is a total product of design psychology, material science, and the craftsman’s time and expertise working in concert on a highly contoured, bike-ready shell.
One of the most consequential factors is the complexity of the design itself. Sport bikes and full fairings, with their deep recesses, sharp angles, and flowing lines, demand more meticulous prep and masking than a flat, uninterrupted panel. Intricate contours complicate every stage of the process. Masking must be precise to protect adjacent surfaces, and each color transition requires exacting handling to prevent bleed, edge feathering, or misalignment. The result is a broader range of possible outcomes, and with that comes a broader price spectrum. In practice, the cost range for complex designs can climb from the mid hundreds to well into the thousands. A rough guide shows how complexity translates into dollars: simple, single-color finishes often start at a few hundred dollars, while sophisticated art, multi-color layouts, and detailed graphics can push the price into the higher thousands, sometimes between eight hundred and two thousand five hundred dollars. The higher end reflects not just the physical time spent but the precision demanded by the design, especially when the finish needs to be camera-ready or race-quiet in alignment with a rider’s exacting standards.
The paint itself also carries a weighty influence on the final bill. The quality and type of paint determine the base cost and the durability of the finish. A standard base coat followed by a clear coat provides a solid, reliable result at a moderate price, but when a finish is called for with depth, sparkle, or a pearlescent glow, the chemistry changes. Metallics, pearlescents, candy colors, or layered clear coats require more pigment, more passes, and often more coats of clear to protect the effect. Each additional layer not only adds material cost but extends curing time and the chance of rework if a defect appears during polishing. The cost of materials climbs quickly with the addition of specialty coatings that promise UV resistance, impact protection, or enhanced gloss retention. In short, the type of paint chosen for the job is a lever that can tilt the overall cost noticeably, even if the base surface and labor inputs stay constant.
Labor plays a central role, and its price tag can be surprisingly variable. Regional wage differences and the reputation of a shop shape the hourly rate you’ll see on an estimate. Typical labor rates span a broad corridor, often from about seventy-five to one hundred fifty dollars per hour. In a market where highly skilled painters bring years of experience with color matching, masking finesse, and flawless finishes, you may encounter higher rates that reflect the value of a refined, repeatable process. Conversely, a shop situated in a less costly region or one with a leaner operation may quote toward the lower end while still delivering solid results. The hours charged depend on the scope of work: prep, taping, primer, color application, masking for graphics, clear coat layers, and final polishing. It is not unusual for a complete paint job on a full fairing to occupy a spectrum of hours that ranges from moderate to extensive—more if there are complex elements like airbrushed artwork or intricate color transitions. When the design is simplified, the time locked into masking and paint passes decreases, and so does the labor cost. When the design requires artistry, the painter’s hours multiply because of careful layering, color-matching precision, and the risk of needing a flawless finish after each step.
Customization ups the ante in several measurable ways. A simple, clean look may require fewer steps than a tailored piece featuring airbrushing, gradients, or custom artwork. Airbrushing, in particular, adds not only the direct cost of materials but the intangible cost of time. An artist may spend many sessions blending colors, building layers, and correcting unintended nuances. The more transitions and the finer the gradation, the longer the process will take, and the higher the price will climb. Custom designs also demand more in the way of post-paint work. For instance, when a finish requires extra clear coats to secure a protective layer or to maintain the integrity of artwork over time, the price rises further. In this sense, customization is not just an aesthetic decision; it is a commitment to a specific execution standard, and that standard is priced accordingly. This is why two bikes with identical fairings can have very different quotes if one carries a simple sheen and the other bears a bespoke mural or hyper-realistic shading.
The decision between DIY painting and professional services introduces a practical cost bifurcation. A do-it-yourself approach appears tempting to save on labor, but it is a choice that shifts risk rather than eliminates it. The DIY path requires access to proper equipment, including spray guns capable of delivering consistent atomization, a ventilation system, and a clean, dust-free environment. The upfront outlay for equipment can be substantial, and the learning curve is nontrivial. Even small mistakes can manifest as fisheyes, orange peel, or uneven color coverage that requires strip and redo, multiplying both time and material costs. On the other hand, a professional service delivers expertise, repeatable results, and often clinical quality control, but it comes with a higher labor cost that reflects the shop’s overhead, insurance, and the painter’s skill. The decision, then, hinges on more than the bottom line. It hinges on the rider’s tolerance for risk, the bike’s value, the expected durability of the finish, and the desired level of finish quality. For riders who want a pristine, showroom-like result and who plan to ride aggressively or in harsh climates, investing in a professional finish often proves more economical over the life of the bike than cutting corners in DIY attempts that may lead to early maintenance costs.
Beyond the shop floor, the broader ecosystem of parts and materials also shapes the final number. For some riders, painting is coupled with the consideration of sourcing replacement fairings or components. In this arena, regional pricing and manufacturing capabilities can influence the strategy. Regions with robust manufacturing hubs may offer competitive pricing for large-volume or technically intricate parts, though that advantage tends to be associated more with the parts themselves than with the painting service. The interplay between new or replacement panels and the quality of the finish that will be applied adds another layer to the total cost, especially when the replacement parts require reshaping or repainting to achieve a perfect color match with the rest of the bike. This is not a universal rule, but it is a factor some riders weigh when planning a project that blends aesthetics with performance and resale considerations. For those who want a broader sense of options and stock, a quick look at readily available fairing collections can provide a tangible sense of the shapes, contours, and panel boundaries that affect preparation and masking complexity. For context on fit and contour, you can explore the Honda fairings collection.
If we step back and look at the larger picture, the final cost of painting a motorcycle fairing emerges as a balancing act. It is a negotiation between how the rider imagines the finished product and what the shop’s operational framework allows. The aesthetic expectation—whether a solid color, a dramatic two-tone, or a gallery-worthy artwork—sets the ceiling for the price. The durability requirement—whether the finish must resist UV degradation, impact chips, or chemical exposure from fuel and cleaners—sets the material and process floor. The budget constraint then determines how aggressively the project pursues the upper reaches of the design and material spectrum. In practical terms, the cost envelope starts with a baseline for a straightforward, one-color finish that covers the prep and paint with adequate surface preparation. It expands upward as complexity grows—from the introduction of multiple colors and outlines to the inclusion of custom graphics and delicate airbrush work. Each added dimension, be it in pigment chemistry or technique, nudges the number upward by a noticeable amount. The shop’s labor model, the regional market, and the aims of the rider all conspire to place the final quote somewhere along a broad spectrum, with the most elaborate projects pushing into the thousands of dollars when high-resolution artwork, specialty finishes, or extended durability requirements are in play.
In reading these equations, it becomes clear that the cost to paint a motorcycle fairing is not simply a matter of painting a panel. It is a layered decision-making process that harmonizes art, chemistry, and craft. A rider who appreciates a clean, durable legacy finish, but who does not require the peak of customization, can expect a reasonable investment and a solid return in aesthetics and protection. A rider who demands a bold, intricate design should anticipate a higher price, but the result can be a fairing that stands out in a crowd, retains its gloss longer under sun and wind, and preserves its value as the bike ages. The key is to engage with the process openly: discuss the intended look, confirm expectations for color depth and edge quality, and understand how much additional time or material will be necessary to achieve the desired effect. When these conversations occur early, the final quote often reflects a transparent mapping of the project’s milestones to the work that will actually be performed.
In closing, the cost to paint a motorcycle fairing is a function of design ambition, material sophistication, labor intensity, and strategic choices about how and where the finish will be applied. It is the product of careful planning and skilled execution, not a single line item for paint. The more a rider values durability, color fidelity, and precise artistry, the more the price naturally tracks toward the upper end of the spectrum. Conversely, a straightforward, well-prepared surface with a simple color can deliver a competent, long-lasting finish at a more accessible price point. For readers mapping out their own projects, the guiding principle remains straightforward: balance your aesthetic goals with your budget, then let the painter translate that balance into a finish that meets both the eye and the road.
External resource: Autobody News.
From Sketch to Spectrum: How Custom Designs Elevate the Cost to Paint a Motorcycle Fairing
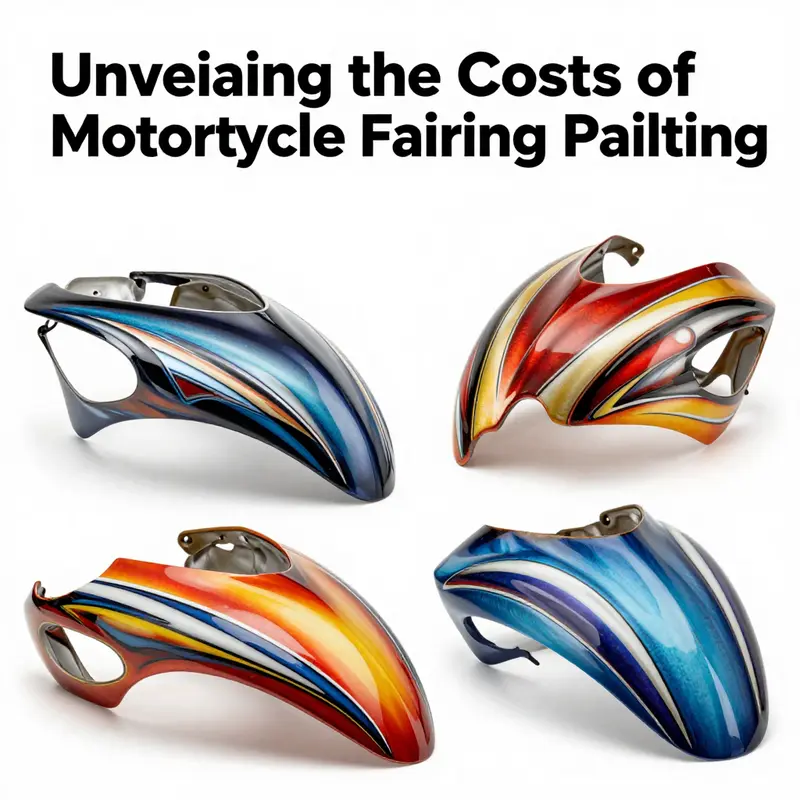
Every rider who leans into a turn knows the bike’s look can be as defining as its exhaust note. When a fairing becomes a canvas for a personal statement, the decision to paint shifts from a simple color choice to a project that blends artistry with engineering. Custom designs do more than decorate; they alter how a bike is perceived and, inevitably, how much it costs to achieve that look. The base cost to repaint a fairing often covers preparation and paint application, but once a rider requests a design that is complex, multi-layered, or highly tailored, the budget climbs in ways that reflect time, skill, and material choices as much as the finished surface. In practice, what begins as a desire for a cleaner color or a refreshed finish quickly expands into a design brief that can redefine the entire project timeline and the final price tag. This is not merely about aesthetics; it is about translating a rider’s vision into durable, ride-ready art on curved plastic and composite surfaces that must endure vibration, weather, and road grit. The numbers tell a clear story: a basic single-color repaint may be within reach for many, but as soon as the plan calls for intricate graphics, airbrushed shading, or a palette that requires precise color matching, the price range shifts upward, sometimes well into the thousands for truly bespoke results. The framework of pricing becomes a dialogue among several factors: the complexity of the artwork, the materials chosen, the durability required, and the level of customization that is necessary to integrate the design with the bike’s geometry and overall aesthetic. This dialogue is essential to understand before any spray gun comes off the booth shelf, because the first quote often hinges on the shape-shifting nature of the design itself. The scope of work grows not linearly but exponentially with the depth of customization, and that progression is what riders should expect when they embark on a journey from a simple color change to a fully styled, one-off finish. In this context, the design is not a garnish but a central mechanic of the project, shaping not only the final appearance but also the labor hours, the set of tools, and the kinds of finishes that will best serve the intended look and the bike’s life on the road or track. A well-executed custom paint job may justify a higher price because it marries artistry with practical considerations—how the finish will wear, how easily it can be touched up, and how faithfully it will reproduce at speed the exact effect imagined during the design phase. For those exploring this path, it helps to begin with a realistic sense of where the costs start and how they are likely to climb as decisions accumulate, one by one, around color, texture, and form. When designers and riders align on a clear vision, the result can be striking: a fairing that feels like a natural extension of the bike’s lines and the rider’s personality, rather than a surface treatment added after the fact. The price anchor for many riders still resides in the basic respray: a single-color job that addresses the prep, the primer, the paint, and the clear coat. In most markets, that path lands somewhere in the mid hundreds to around a thousand dollars, depending on local labor rates and the condition of the existing surface. But once the plan graduates into custom territory—whether it’s a delicate airbrushed gradient, a multipart graphic, or a pattern that requires precise masking across curves—the labor hours surge. Complex artwork is a careful choreography: the artist must measure, mask, and protect every edge, then lay down layers that may require additional coats for depth and protection. Each stage adds time, and time translates directly into labor costs. The art of painting a bike fairing is, above all, a craft that demands patience and precision. There is no shortcut that preserves the integrity of a complex design. Each color patch, each highlight, and each shadow layer needs to cure properly, while the masking lines must remain razor-sharp through multiple passes. Because the surface is not flat and the fairing’s geometry shifts with temperature changes and road vibrations, consistent results demand meticulous surface preparation, from sanding and sealing to the application of adhesion promoters. In turn, the finish—whether a glossy, high-gloss look or a matte, satin, or metallic effect—adds its own budget line. Specialty finishes carry premium pricing not only for the pigment but also for the clear coats, reflective layers, or pearlescent effects that must be layered and cured with controlled environments. This is where the value of experience becomes visible. A veteran painter who has navigated similar curves and overlapping panels can anticipate masking challenges, anticipate how a particular substrate will respond to a given clear coat, and know how to blend edges so a complex design reads cleanly from every angle. The result is not merely a pretty surface but a durable finish that resists chipping, fading, and weathering. In practical terms, that translates into a pricing spectrum where basic resprays begin at roughly $500 and can approach $900 under certain conditions, while custom work with intricate graphics, multiple colors, airbrushing, or unique patterns typically lands in a broad range from $800 up to $3,500. It is not unusual for highly detailed or one-of-a-kind designs to exceed that upper boundary, especially when the project involves color-matched components, specialized textures, or a full integration with the bike’s other cosmetic elements. The variability is a function of several interdependent factors: the complexity of the artwork, the materials used, durability targets, and the precision required for color matching. Each factor adds layers of decision making and technical steps. The complexity of artwork, in particular, multiplies the hours spent in prep and production. A simple pair of stripes that follows the fairing’s contour can be achieved with straightforward masking and a standard color path, yet a composition that weaves in fine line work, micro-graphics, or atmospheric shading requires an extensive masking strategy, multiple stencils, and perhaps airbrushing to build depth. The painter who accepts such a brief must not only be adept with a spray gun but also with the delicate science of color mixing. The color path itself can become a project unto itself: when the design calls for a custom color matched to the original paint or to a specific reference shade, the process of color matching introduces additional steps. Colors must be mixed to exacting tolerances and then tested under the same lighting conditions used in the workshop. The inner, hidden surfaces—such as the inner fairing panels—may also need to be color matched to ensure continuity once the bike is reassembled. A precise match, like an Alpine Green reference on a specific Street Glide, illustrates a broader point: the inner and outer surfaces carry color through different application layers or pre-treatments, and achieving uniformity can require extra layers of base coats, multi-angle checks, and careful resealing. The result is a more resilient finish, but it comes at a cost. The finishes themselves contribute to the total price. Buyers who specify matte, gloss, or metallic effects should expect to pay more than for a standard single-stage color. Matte finishes, for instance, demand specialized topcoats and care regimens; metallic or pearlescent effects require additional pigments and precise layering to maintain shimmer and depth. In many cases, the optimal solution blends several effects to achieve a design that reads as a cohesive whole rather than a collage of independent components. This approach often entails a custom workflow that includes multiple color passes, a tailored clear-coat schedule, and a final polish that preserves both color integrity and surface gloss. The broader design challenge is not just to apply color but to ensure that the completed artwork remains repairable. A high-gloss finish, while visually striking and straightforward to buff, may show scratches more readily and can require careful, sometimes expensive, touch-ups if the bike sees rough terrain. Conversely, a matte or satin finish might hide minor wear but demands more precise cleaning and specialized maintenance. These durability and repair considerations influence the long-term value of the finished job and can be a source of cost discipline or laxity, depending on the rider’s expectations. A truly bespoke project often extends beyond the paint shop into the realm of integration with other components. Some riders seek full harmonization—matching the fairing cap, media doors, and other accessories to create a single, flowing aesthetic. In such cases, the project becomes a holistic bodywork undertaking that may include sourcing high-quality, custom-finished components from manufacturers. The literature on this approach notes that regions known for advanced manufacturing ecosystems can offer scalable solutions for original equipment manufacturers and aftermarket brands. While the core craft of painting remains a bespoke service requiring significant artistry and materials, the scale-up to integrated finishes can elevate both complexity and cost. Yet even with a fully integrated design, the guiding principle remains the same: the more elaborate and personalized the design, the higher the investment in time, talent, and materials. It is this relationship—between design ambition and the resources required to realize it—that explains much of the price dispersion in this space. For riders who want to imagine the possibilities before committing, an internal reference point can be helpful. The Yamaha fairings collection represents one compact way to picture how a set of panels might carry a design across the bike’s silhouette, offering a sense of how pattern, color density, and contour interaction contribute to the final aesthetic. This approach points to a broader takeaway: the relationship between form and finish matters as much as the finish itself. A design that works well on a flat surface may not translate cleanly to a curved fairing without adjustments, and those adjustments often introduce further costs. This is why a detailed design brief that anticipates the bike’s curvature, the lighting conditions in which the rider rides, and the anticipated wear pattern can help keep costs reasonable while still achieving a distinctive look. In short, the cost to paint a motorcycle fairing with a custom design is not merely a function of color sophistication; it is a function of design complexity, materials, and the painter’s ability to translate a vision into a durable, road-ready surface. For riders who regard the paint job as an investment in identity, the higher price tag can be justified by the level of craftsmanship, color fidelity, and longevity that a well-executed custom design promises. The practical takeaway is to collaborate openly with a skilled painter, to articulate the design’s scale and the surface’s constraints early, and to be prepared for a pricing curve that reflects the breadth of choices at every stage—from initial concept to final clear coat. If the goal is a unique statement that complements the bike’s lines and the rider’s personality, the journey through the pricing landscape becomes a measured pursuit of value rather than a sprint toward a low sticker price. Internal alignment on color paths, masking strategies, and finish types helps keep the project on track and ensures the final result is not only visually striking but also robust enough to withstand the realities of riding. If you need to visualize how a given scheme might unfold on your bike, exploring a relevant catalog can be a helpful first step, and a practical way to gauge how your chosen design would interact with the bike’s geometry and lighting. For those curious about model compatibility and visual possibilities, you can browse the Yamaha fairings collection to imagine the proportions and curve lines involved in a coordinated design approach. Yamaha fairings collection.
External resource: For a broad overview of paint costs and the factors that influence pricing across automotive and motorcycle chromatics, see Autobody101’s general guide on paint costs and finishes: https://www.autobody101.com.
Weighing the Numbers and Risks: DIY Versus Pro Painting for Motorcycle Fairings
Balancing cost, time, and finish quality is the real decision when painting a motorcycle fairing. The choice between doing the job yourself and hiring a professional is rarely only about the dollar amount on the invoice. It is a decision that folds in experience, the tools you own, how you value your time, the desired longevity of the finish, and what you will accept if the work falls short. This chapter walks through those trade-offs in a continuous, practical narrative so you can clearly compare what each route costs, what it delivers, and when one option outranks the other.
If you line up the pure, upfront numbers, a basic DIY kit for a single-color repaint typically runs between $100 and $300. That covers primer, basecoat, and clear coat in most kits, sometimes along with small bottles of reducer or activator. A professional single-color repaint, by contrast, commonly falls in the $300 to $600 range. On paper the DIY route looks cheaper. But the comparison must include more than sticker prices. Tools and protective gear, the quality of preparation, the environment in which the paint cures, and the skill to apply thin, even coats all matter. If you need a spray gun and a compressor, or a proper respirator and extraction, those purchases can push your DIY cost above the cost of a basic professional job right away.
Time is the invisible currency here. A seasoned painter can flow through preparation, masking, sanding, priming, painting, and clear-coating with predictable timing, leveraging a shop’s climate-controlled booth to deliver consistent results and cure times. For a novice, the same sequence stretches into evenings and weekends, with frequent pauses to research technique, replace wasted material after a run or dust nibble, and perform multiple sanding passes to correct small defects. When you tally the hours you spend and assign them a reasonable hourly value, the apparent savings shrink. And when mistakes happen, they often require stripping the fairing back to bare plastic or fiberglass, re-prepping, and starting again — costs that can easily exceed the professional range for a simple single-color job.
Beyond cost and time, quality and durability set the stakes. Professionals use equipment and processes that are difficult to replicate in a home garage. Proper adhesion to plastic or fiberglass fairings requires thorough cleaning, often a plastic adhesion promoter, and meticulously even primer layers. Professionals may use sandblasting for stripped parts, advanced primers, and high-solids clear coats applied in multiple stages and baked or properly cured to harden. The final finish resists chips, UV fade, and abrasion better than many home-applied clear coats. When the goal is a long-lasting showroom-quality result, the premium professionals charge for their expertise is an investment in durability — fewer touch-ups and less frequent repainting down the road.
Complexity multiplies cost quickly. If you want custom artwork, pinstriping, two-tone schemes, metal flake, or airbrushed graphics, a professional shop’s price can jump to $1,500–$3,000 or more. These jobs require significant time for design, masking, layering, blending, and protective coats. While a talented hobbyist might produce striking custom work, it typically takes years to match the speed and consistency of a pro who paints custom motorcycles every week. For multi-color jobs, the labor component in the professional quote becomes the dominant factor, offsetting the mere material price differences between DIY and shop work.
There are middle-ground approaches that many riders find sensible. One common path is to buy replacement fairings pre-primed or in basic color from a specialist supplier, then perform limited customization or accent work yourself. Another is to handle disassembly, cleaning, and minor repairs at home, then deliver the parts to a painter. Prepping and repairing cracks, deep scratches, and mounting points can reduce a shop’s labor charge and keep the final bill lower, while the professional delivers the final paint and clear. Likewise, some painters will paint off-bike parts brought to their shop, which allows you to avoid the expense of a full booth while still getting pro application and curing.
Warranty, accountability, and finish guarantees are often decisive. Most established shops offer some warranty on paint and workmanship. If a defect shows up within the warranty period — peeling, delamination, or a clear coat failure — they will repair it. With a DIY job, you are on your own. The absence of a warranty matters particularly when you consider environmental effects; UV exposure, road debris, and repeated washing will reveal weaknesses in a finish over months and years. A pro’s work, done with quality materials and correct curing, will commonly withstand those conditions longer.
Choosing between DIY and professional work also depends on how visible the fairings are and how you use the bike. Track bikes see more chips and scuffs, and riders sometimes prefer a less-polished aesthetic they can repair themselves. For daily riders or show bikes, the higher initial outlay for a pro job usually pays off through fewer repairs and a more confident presentation. If your fairings are scratched but structurally sound and you only need minor touch-ups, a DIY approach with touch-up pens, small spray cans, or local spot repair can be perfectly acceptable. For extensive damage, mismatched colors, or a high-stakes custom finish, the professional route reduces the long-term cost through better longevity.
The quality gap between competent DIY and professional work narrows if you invest in learning and the right tools. A hobbyist who practices on scrap panels can learn how to avoid common errors: over-spraying, heavy application that leads to runs, insufficient flash times between coats, and poor masking that causes overspray edges. Masking correctly is surprisingly time-consuming, and improper masking alone will sabotage otherwise careful painting. Safety matters too: breathing airborne paint and solvents without an approved respirator and ventilation is dangerous. Factor in the cost of safe disposal for chemical wastes and leftover solvents as well.
If you plan to go DIY, plan the project like a professional. Allow a realistic budget for materials and tools, schedule time for multiple sanding and curing steps, and practice technique on less-visible surfaces first. Learn how to test adhesion and how to use an adhesion promoter on plastics. Understand that two critical inputs save time and money: practice and patience. If you skip either, you will compound the risk of needing to redo the work.
When you choose a professional, pick the painter on more than price. Ask to see recent, comparable work and request references. A lower quote may trim corners with cheaper materials, inadequate surface prep, or shortcuts in curing — all of which shorten the lifespan of the finish. A higher quote often includes better products, longer prep, controlled curing, and a warranty. Discuss specifics: whether the shop will strip the old finish, repair mounting points, and address any structural issues before painting. Confirm whether the quoted price includes disassembly and reassembly if you want the shop to handle those tasks. If you plan to supply replacement fairings rather than have the shop paint your originals, check fit and finish standards to avoid surprises later.
Negotiation and options matter. Some shops offer tiered services: standard single-color repaints at a modest price, premium multi-stage basecoats with ceramic clear at a mid-tier price, and bespoke art and graphics at the top end. If your budget is constrained but you want a professional look, ask about a high-quality single-color repaint with optional accent pieces painted in-house. Alternatively, consider painting only the most visible parts professionally and handling less-visible parts yourself. This hybrid approach often hits a good balance between cost and finish.
Finally, be realistic about the resale and personal value of a painted fairing. A flawless professional paint job can raise a bike’s curb appeal and perceived value. Conversely, a poorly executed DIY paint job can reduce desirability or raise questions about how well the bike was maintained. If you anticipate selling the motorcycle or displaying it, professional work can offer a stronger return on investment than a home job that bears visible imperfections.
For those shopping for replacement or pre-primed parts to support any painting choice, specialized fairing collections can be a useful resource. If you need parts that fit your bike before painting, check a reputable online collection for compatible fairings, such as the Honda fairings collection. For guidance on factors influencing pricing and when replacement makes more sense than repainting, consult the industry guide referenced earlier, which explains the trade-offs between repainting and replacing fairings and offers detailed cost guidance. External resource: https://www.harley-davidson.com
Weigh the numbers and the risks before you start. DIY can be rewarding and cost-effective for small, low-stakes jobs or for riders who already own tools and have painting experience. Professional painting is the safer path for long-lasting finishes, complex designs, and when accountability matters. Many riders find a middle path—prepping at home and finishing with a pro or purchasing pre-primed parts and commissioning final coats—strikes the best balance between cost and quality.
Final thoughts
In conclusion, comprehensively understanding the costs associated with painting motorcycle fairings allows business owners to make informed decisions, optimize pricing strategies, and meet customer demands effectively. Whether offering basic services or venturing into custom designs, the factors identified in this article pinpoint essential considerations that can influence overall profitability. Armed with this knowledge, businesses are positioned to deliver value while managing costs successfully.