Motorcycle fairings paint jobs are essential for any professional looking to customize the appearance of bikes while boosting their market appeal. This intricate process starts with mastering techniques to ensure optimal adhesion and finish, followed by understanding the necessary materials and tools that can make or break the project. Additionally, assessing cost considerations can help shape your budget wisely, ultimately leading to stunning designs that draw in customers. Throughout this guide, each chapter contributes to a holistic understanding of the nuances involved in motorcycle fairings paint jobs, paving the way for business owners to capitalize on this lucrative service.
From Primer to Polished Curves: The Quiet Precision Behind Motorcycle Fairings Paint Jobs
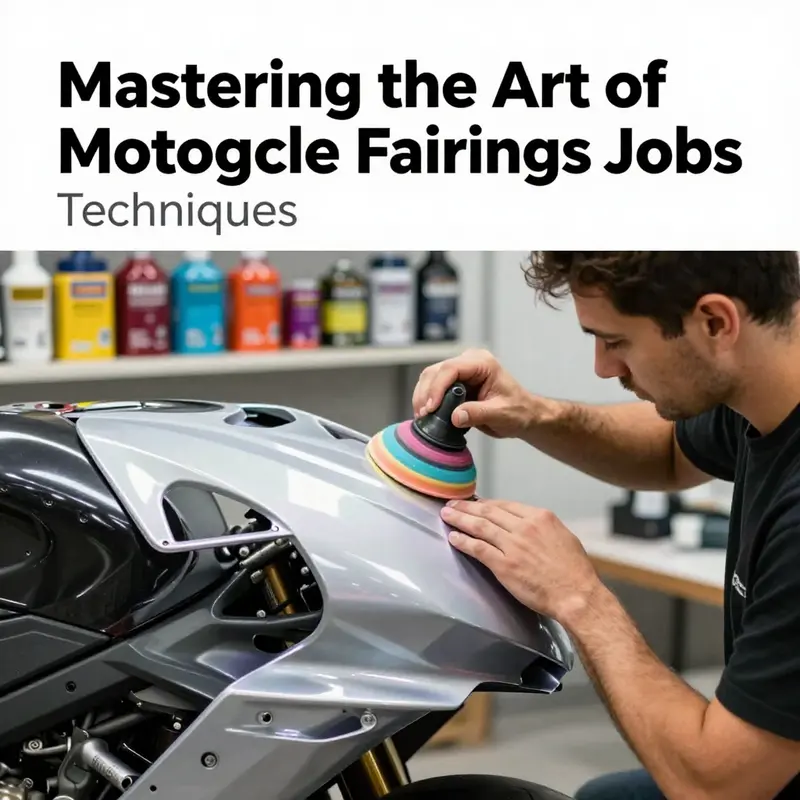
When riders talk about personalizing a motorcycle, the conversation often turns to color, gloss, and bold graphics. Yet the true heart of a standout paint job lies not in the final flourish alone, but in the careful choreography that happens before a single drop of color ever touches the surface. A fairing’s paint job is a dialogue between material science and artistic intention, a careful balance of adhesion, durability, and visual depth. The process begins with a decision that seems almost mundane but proves decisive in the end: how the fairings are prepared. ABS plastic, fiberglass, or composite materials each respond differently to primers and topcoats, so the first conversation is about surface readiness. Thorough cleaning removes the invisible film of oil and dust that would otherwise sabotage adhesion. Then comes the sanding, not to strip the surface away but to create a microtexture that the primer can grip. The grit choice matters; a rougher texture, approached with restraint, helps the primer bite while preserving the smoothness that a high-gloss finish demands. The dialogue continues as fillers meet seams and small imperfections. A light application of body filler or putty fills gaps and panel transitions, followed by meticulous sanding until the surface is even and ready to accept color with a uniform, unbroken plane.
The primer stage is where the foundation of longevity is laid. It is not a mere base coat but a seal that locks in moisture resistance and builds the bedrock for color accuracy. Epoxy or urethane primers are common choices, chosen for their balance of build, hardness, and sandability. The primer’s job is to erase the memory of the original imperfections and to provide a uniform canvas. In practice, this means feathering edges at transitions and ensuring that any filler lines disappear under the upcoming layers. The primer is evaluated under careful lighting; any pinholes or rough patches become the focus of corrected touch-ups. Only after the surface has cured and been re-sanded to a flawless feel does the work move to the base color. At this point, the rider’s mood becomes visible, and the painter’s technique takes center stage.
Color application is where the craft reveals its subtleties. The base color, whether a single, solid tone or a complex multi-layer system, is applied in thin, even coats. The choice between traditional spray painting and more intimate airbrushing depends on the design intent and the level of control required. For a clean, uniform field, modern spray methods provide speed and consistency, but airbrushing offers the finesse needed for gradients, fades, or delicate shading. The key is patience; multiple layers, each fully dry before the next, prevent cracks and allow the color to settle into the microtexture created by the previous steps. In a more elaborate design, the base color becomes the stage for metallics, pearlescents, or color-shifting clear tones. The technician builds the depth through careful layering, often letting subtle variations in pigment emerge under light. As the base sets, masking becomes a quiet art in itself—curves and edges masked with precision to protect areas that will receive decals, wraps, or intricate airbrushed detail.
With the base color in place, the clear coat enters as a protective, refractive veil. This top layer does more than simply seal; it unlocks depth and luster that give the bike its visual weight. The clear coat is applied in layers, with attention to evenness and solvent balance. After the final coat dries, a deliberate, light wet-sanding step can smooth out minor imperfections, reducing the “orange peel” texture that can betray a rushed finish. The sanding is followed by polishing, where cutting compounds and a soft cloth or machine buffer coax the surface toward a mirror-like gloss. The result is not merely shiny; it is a reflection of light that makes the color sing and the contours of the fairings become more legible with every angle change. This is where the artistic vision and the mechanical craft finally converge.
Yet the story of a fairing paint job does not end with gloss. Advanced techniques open doors to a broader palette of expression. Metallics shimmer with a mineral glow; pearlescents shift their hue with the observer’s angle, giving the bike a living surface that seems to move with light. For designers seeking a more dramatic presence, color-shifting clears layered over a controlled base can produce dramatic shifts in tone as the rider moves past streetlights or sunset. The graphic element, whether applied as decals or full-wrap vinyls, adds another layer of complexity. Decals must sit precisely along panel lines, building a narrative that follows the bike’s silhouette rather than fighting it. Wraps offer a versatility that hand-painted graphics sometimes cannot, enabling complex motifs that look seamless over compound curves. In practice, the most compelling results blend these approaches: a restrained base color with a single, carefully airbrushed highlight; a metallic edge that catches the eye; or a bold graphic that reads clearly at speed yet remains legible at rest.
A healthy respect for the environment surrounds every stage of the process. Proper ventilation and dust control are non-negotiable. In a well-controlled space, dust motes are kept at bay, humidity is monitored to maintain paint flow and cure, and temperatures are kept within a range that ensures the film does not seize or crack. These conditions matter more than most riders realize because a single stray insect, a lingering fiber, or a dust speck caught in a fresh layer becomes a visible blemish that undermines the entire effort. The modern painter also considers health and safety: respirators, fume containment, and clean, organized spaces reduce risk and improve results. The discipline echoes that of studio craftspeople who understand that material science and artistry share a birthplace: a controlled, respectful environment where precision is valued as much as imagination.
As materials evolve, so too do the coatings designed to extend longevity and uplift performance. Innovations in the coating world explore stronger, more wear-resistant layers that resist UV damage and micro-scratches without sacrificing the reflective quality that makes a color scheme come alive. Graphene-enhanced or similarly advanced coatings are discussed in whispers of future potential, promising durability that holds steady through a rider’s daily grind and the harsher realities of road grit and weather. While these developments may seem distant to the hobbyist, they remind us that a paint job on a motorcycle is a living project—an ongoing conversation between evolving materials and an enduring aesthetic goal.
A practical realism threads through every care decision, because a well-painted fairing is not a static sculpture but a functional, resilient surface. Maintenance after curing is as important as the prep before painting. Gentle washing with mild detergents, avoiding harsh solvents, and drying carefully with a soft microfiber cloth help preserve the integrity of the clear coat. Protective wax or dedicated sealants, when used appropriately, can add an extra shield against environmental exposure and micro-scratches. The goal is to retain the original clarity and depth of the finish for as long as possible, so the colors stay vibrant even after miles of wind, rain, and sun. For riders who want a reliable baseline that still leaves room for future experimentation, it helps to plan for eventual touch-ups or updates. A well-documented paint plan—notes about surface conditions, primer types, and layer sequences—can make future refinishing tasks smoother and less reactive.
Inspiration often surprises, arriving from the everyday and the unusual alike. A fairing’s paint job is not just about chasing the newest trend; it is about translating motion into color, about letting the body lines guide the palette rather than forcing a design onto a rigid shell. The design language can draw from classic automotive influences, or it can be a personal symbol carved into the curvature of the bike’s panels. To see how these ideas translate into practical options, many riders browse curated galleries and catalogues that showcase effective integration of color with form. For those who want to explore compatible options and hardware, the Honda fairings collection provides a thoughtful starting point for riders considering a project that blends new color with familiar shapes. The collection page can be a useful resource when planning color blocks, matching tones to existing components, or imagining how a graphic will lay out across multiple panels.
Ultimately, the journey from bare fairing to a finished paint job is a testament to patient practice and a careful balance of science and art. It rewards those who approach it with curiosity and discipline, who respect the material realities of the surface and the mood they want to convey. A single gloss coat can reveal the depth of a color, and a well-placed airbrushed highlight can transform a silhouette into something that feels faster, more aerodynamic, even when the bike is at rest. The best finishes are those that invite a second, lingering look—where light plays across the panel edges and the rider senses not just a color, but an intentional story expressed through texture, tone, and craft. In that sense, the motorcycle fairings paint job is a conversation that begins with preparation and ends with a reflection: a surface that not only looks fast but feels alive as it catches the light and holds it in a way that is distinctly personal.
null
null
Weighing the Investment: Real Costs Behind a Motorcycle Fairings Paint Job
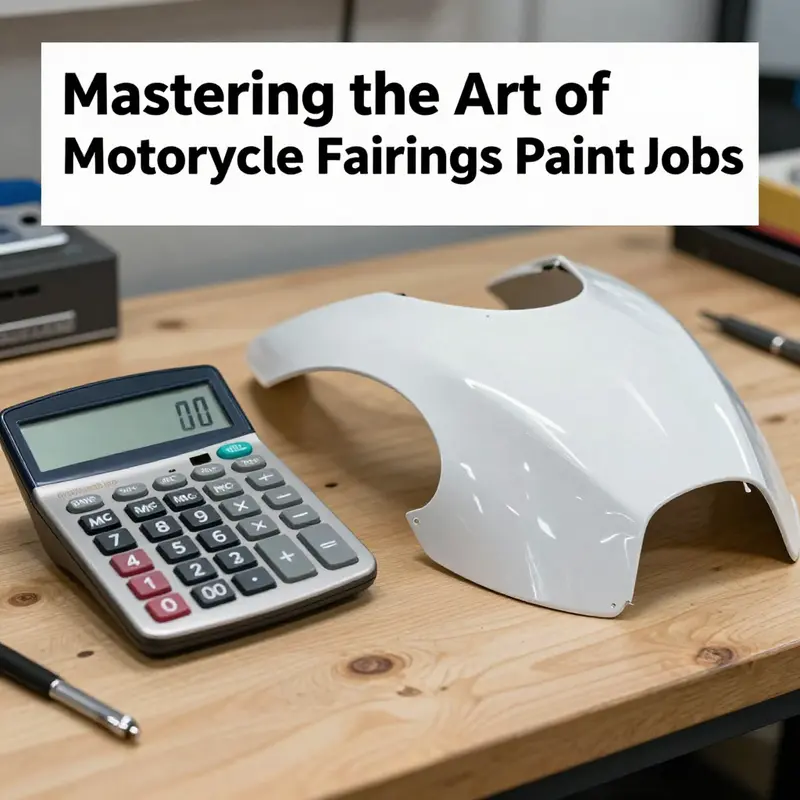
A motorcycle fairings paint job is more than a cosmetic upgrade; it’s an investment in appearance, resale value, and long‑term durability. Understanding the real costs involved helps you choose the right path: a budget respray, a professional multi‑stage refinish, or a full custom airbrushed design. Costs can surprise even experienced riders because they combine material expenses, labor time, and hidden prep work. This chapter unpacks those elements so you can budget with confidence and make tradeoffs that match your priorities.
Start with the most visible number: labor. Shops price paint work largely by the hour and by the reputation and location of the painter. A general range is between $50 and $150 per hour, with many urban shops landing in the $75–$120/hour zone. Labor covers sanding, priming, painting, clear coating, and the hours spent disassembling and reassembling parts. That time adds quickly when panels need repair, alignment, or specialized masking for stripes and graphics. When a shop quotes you a per‑panel or per‑bike price, that figure already folds in an estimate of labor hours, but it’s wise to ask for the hourly breakdown so you can spot where time — and therefore cost — is being spent.
The next obvious figure is the total project price. For a standard fairing paint job you’ll commonly see quotes from roughly $300 to $1,600. At the low end are simple single‑color resprays on a few panels with minimal prep. At the high end are multi‑panel jobs with high‑grade materials and meticulous finishing. Several factors push a job from a low estimate into the upper tier: the number of panels, the complexity of the design, and the quality of the paint system used.
Type of fairing matters. Full fairings cover the bike’s front and mid‑section and often include the headlight cowl, fuel tank, and under‑tray pieces. Painting a full set takes more time and materials and generally costs more than painting just the upper or lower sets. Partial fairings — upper cowls, belly pans, or side pieces — may be quicker to process but still require the same careful prep and matching if you want a seamless, factory‑quality look.
Preparation is where cost control becomes possible — and where shortcuts can backfire. Proper preparation requires careful sanding to achieve the right profile so paint adheres; priming to seal and flatten surfaces; and masking to protect fasteners, vents, and mating edges. Each step consumes both labor and materials. For example, a thorough sanding and primer stage may consume multiple abrasive grits, filler for minor imperfections, and a high‑build primer that costs more than a basic primer but reduces the number of subsequent sanding passes. Masking tape, paper, and shrink wrap add small costs per panel but protect expensive finishes. Cutting corners on prep saves money now but often leads to peeling, orange‑peel texture, or premature fade, which translates into higher lifetime cost.
Material selection has a strong influence on final cost and longevity. High‑quality two‑part urethane paints are the industry standard for fairings because they resist UV, chemicals, and chips better than cheaper single‑stage paints. Two‑part systems require a catalytic hardener; they cure harder and provide a durable finish, but they also need a spray booth, precise mixing, and controlled environmental conditions. Clear coat quality is equally important: a thicker, harder clear provides scratch resistance and gloss retention but costs more and adds curing time. For custom work, additional layers — pearl, metallic bases, or special effect coats — add both material and labor costs because each layer needs proper flash time and often multiple passes for uniformity.
Custom designs dramatically increase cost because they demand additional skill and time. Simple two‑color splits or pinstripes are cost‑effective if the shop can mask and spray quickly. But airbrushed artwork, complex gradients, or multi‑tone fades require a highly skilled artist and hours of meticulous handwork. Airbrush work is slow: tiny passes build depth and realism, and the artist must often sand and clear coat between layers to protect underlying work. Intricate graphics are priced not just for time but for artistic talent: expect to pay a premium for an artist with a portfolio you admire.
Another decision that affects cost is whether to paint original or replacement fairings. Aftermarket fairings can be far cheaper to replace than repairing original panels. However, cheaper aftermarket materials may present challenges for paint adhesion and longevity. Low‑grade ABS or poorly finished fiberglass requires more prep, special primers, or surface treatments to get a high‑quality finish. That increases labor even if the parts themselves are inexpensive. If you’re replacing a cracked fairing set, consider parts that balance price with surface quality; investing a bit more in better‑made replacement panels often reduces painting headaches and long‑term maintenance costs. For replacement fairings and a wide selection of model‑specific parts, you may find appropriate options like replacement Honda fairings to compare part quality and cost.
Matching existing paint is a practical cost driver. If only a few panels are being painted, they must blend visually with the untouched pieces. Perfect color matching sometimes requires custom blended basecoat or layering techniques and more time in color testing. Alternatively, painting all panels together eliminates blending issues but increases the scope and thus the cost. Consider the visual tradeoff: a full respray creates a cohesive appearance, while spot painting saves money but risks visible mismatches under different light.
Labor rates, panel count, and materials create obvious costs, but do not overlook indirect expenses. Disassembly and reassembly, while often billed as part of paint labor, sometimes incur separate shop charges for mechanical work. Shipping costs may apply if you send panels to a specialized artist. Storage and curing time can mean you’re without your bike for days or weeks; if you rely on your motorcycle daily, consider rental or alternate transport costs. Also factor in potential repairs discovered during prep. Minor cracks, stress fractures, or stripped fastener bosses require filler or reinforcement work. Fixing those can add to the bill but prevents future failures that would necessitate repainting later on.
Quality considerations can justify higher upfront spending. A good paint job lasts longer and resists chips, UV fade, and chemical exposure. The longevity of a high‑quality two‑part urethane finish with a durable clear coat often exceeds that of a budget respray by several years, especially when the bike is regularly exposed to sun and road debris. If the bike is a collector or a restoration project, spending more to achieve a factory or show finish preserves value and reduces future touch‑ups. For daily riders who want a fresh look on a tight budget, a simpler single‑color respray with honest expectations about longevity might be the right decision.
Budgeting with transparency helps avoid surprises. When you get quotes, ask shops to itemize labor hours, material types, and additional charges such as disassembly, panel repair, or shipping. Request a timeline so you know when the bike will be returned. Ask about warranties — some reputable shops guarantee their work against peeling or major defects for a set period. Also ask how they protect your parts during storage and transport. A clear, written estimate that lists each cost component makes it easier to compare shops and identify where cheaper quotes cut corners.
For riders considering a do‑it‑yourself approach, DIY can save money but has hidden costs in tools, ventilation, and learning curve. A professional finish requires a spray gun, compressor, filtration, respirator, and ideally a controlled booth or room. Mistakes in mixing ratios, application thickness, or environmental control lead to costly rework. DIY suits those with prior experience and the right equipment; otherwise, outsourcing to a reputable shop often delivers far better long‑term value.
Finally, weigh the non‑monetary value. A high‑quality paint job can be a point of pride, a reflection of personal style, and a ticket to meet other riders and judges if you enter shows. That subjective value often factors into a rider’s willingness to invest more than strictly necessary. Conversely, if the aim is practical protection and quick refreshment, a conservative approach that balances repair, replacement parts, and a modest paint job will serve the purpose without overspending.
Choosing the right balance between cost and quality requires clarity about goals and constraints. If the objective is a long‑lasting, factory‑quality finish, accept that labor and high‑grade materials will push the project toward the higher end of the $300–$1,600 range. If your goal is a fast, inexpensive refresh or a temporary style change, lower estimates with honest expectations can be a smart route. For replacements, compare fairing source options and consider the tradeoff between cheap parts and the extra prep they need; exploring replacement Honda fairings may reveal parts that reduce overall painting headaches.
For a practical benchmark and deeper breakdowns of painting versus replacement costs, consult the detailed guide: https://www.motorcycle.com/how-much-to-paint-or-replace-motorcycle-fairings/.
From Canvas to Velocity: Crafting Inspirational Paint Jobs on Motorcycle Fairings
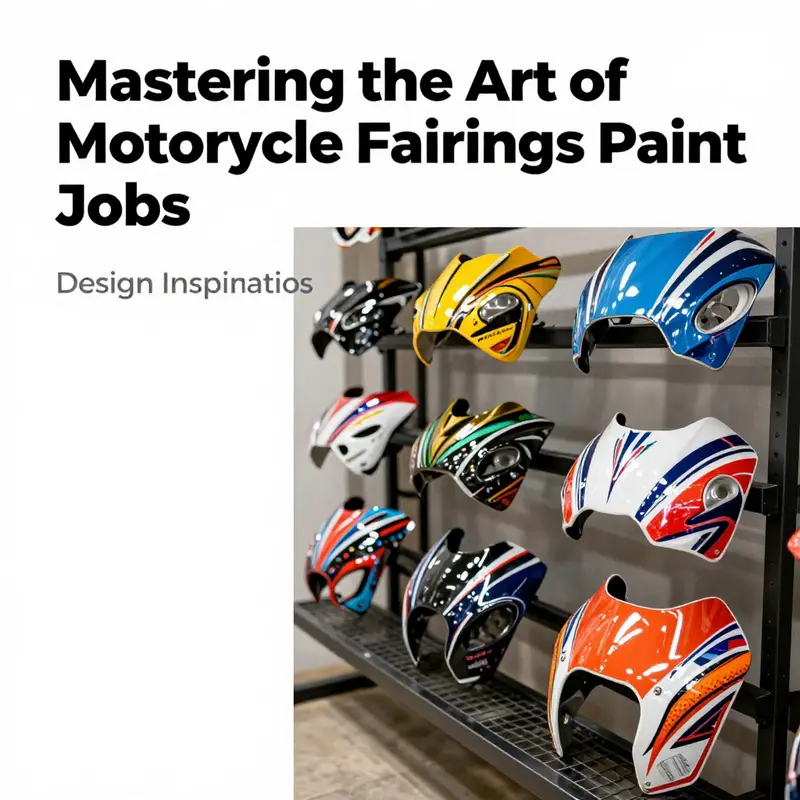
Paint on motorcycle fairings is more than color; it is a conversation between form, function, and the rider’s identity. The fairing itself is a carefully engineered shell that channnels air, cools components, and houses electronics. When a painter steps in, the surface becomes a canvas where engineering precision meets artistic energy. The result is not merely a new coat of color but a transformed silhouette that tells a story every time the bike moves. This chapter explores how designers translate personal taste into a painting strategy that respects the fairing’s material reality, the rider’s aspirations, and the spectacle of riding itself. What begins as a quest for visual impact gradually reveals itself as a study in balance: between sheen and matte, between bold statement and legible linework, between durability and detail.\n\nAt the heart of any compelling paint job is a vision. A rider might want a look that communicates speed before the bike even roars. Others seek a narrative—an arc of imagery that unfolds along the contours of the fairing as the machine leans into a corner. In either case, the painter starts by imagining how light interacts with curves, how shadows emphasize aero transitions, and how color can guide the eye along a sweeping profile. This is where light becomes a design tool. Gradients can mimic the subtle shifts seen at the edge of a windscreen, while strategic contrast can carve negative space where the eye settles. In practice, the palette is chosen not just for personal taste but for how it reads at speed, under streetlights, or in the tunnel of traffic. A well-chosen color story can make a fairing feel lighter or heavier, more aggressive or more refined, depending on the atmosphere the rider wishes to evoke.\n\nAirbrushed art remains one of the most flexible and expressive methods for translating a concept into a finished painting. Airbrush techniques excel at smooth gradients, delicate transitions, and fine textures that would be difficult to achieve with bulk spray alone. An airbrushed design can bend color into depth, creating a sense of volume on a flat surface. A classic example is the fire and skull motif—a skull surrounded by flowing flames that suggests power without crowding the overall silhouette. The adaptability of airbrush work means a design can start as a bold central element and then extend with secondary motifs that echo the rider’s chosen theme without competing for attention. When done with restraint, it feels like a narrative stitched across the fairing rather than a collage pasted on top.\n\nBeyond single motifs, the painting world embraces a spectrum of styles, and it is easy to find inspiration across communities where riders and artists share their ideas. Custom painting communities, particularly those that curate large image libraries and concept boards, offer a wealth of starting points. Designers often gather color swatches, texture studies, and graphic templates that can be adapted to a specific fairing shape. For someone entering this world, a prudent approach is to collect several references that resonate with a brand-new concept, then distill those ideas into a cohesive plan that respects the bike’s geometry. The benefits of this approach are twofold: it keeps the project aligned with the rider’s personality and it provides a practical road map for the painting process. A well-curated mood board helps prevent a design from becoming a hodgepodge of disparate elements.\n\nWhen inspiration takes a futuristic turn, finishes such as iridescent and glitter effects rise to prominence. These finishes have a kinetic quality, catching light differently as the bike tilts and leans. A subtle iridescent layer over a dark base can reveal a spectrum of hues as the viewing angle shifts, giving the fairing depth that changes with the rider’s stance. Glitter tones, when used judiciously, can add a starry or cosmic feel without overwhelming the primary graphics. The key here is moderation and scale: small accents that catch the eye in movement are often more compelling than large, static fields of sparkle. The modern look thus evolves from a single striking element into a layered surface where color, texture, and light perform in concert as the bike moves through space.\n\nColor theory also plays a central role in inspiring fairing paint jobs. A color palette is not merely a collection of hues but a choreography of warmth, intensity, and contrast. Warm colors like reds, oranges, and yellows convey energy and speed; cooler tones such as blues and teals suggest precision and calm intensity. Neutrals like charcoal, gunmetal, or graphite serve as anchors that allow brighter accents to pop without creating visual noise. The choice of a palette should consider how the bike will be used, the rider’s personal style, and the anticipated environments—daylight, urban glow, or dimly lit highways. A cohesive palette guides the eye along the fairing’s lines, reinforcing the shape rather than fragmenting it with conflicting patches.\n\nThe surface finish is another decisive factor in translating concept into durable art. Clear coats provide protection against UV exposure, micro-scratches, and weather. But the clear coat is more than a shield; it can enhance or soften the underlying colors, influencing how vivid a hue appears and how much depth the paint manages to convey. A multi-layer system can yield a high-gloss finish with a pristine look, or a satin or matte topcoat that carries a subtle modern edge. Each finish interacts with the base color differently, which means the painting plan must envision the final surface early in the design process. The finish also affects maintenance: gloss tends to show dirt and micro-scratches more readily but is easier to polish, while matte finishes hide imperfections but demand more careful cleaning and regular maintenance to retain their texture and tone.\n\nMaterials matter as much as aesthetics. motorcycle fairings are commonly made from ABS plastic, fiberglass, or composite materials. Each base material behaves differently under primer, paint, and clear coats. ABS, for instance, requires primers that not only promote adhesion but also seal the plastic’s surface to prevent blooming and peeling. Fiberglass and composites may demand reinforcement or specialized primers to ensure even coverage and long-term adhesion. A skilled painter plans for these realities by selecting primers and topcoats formulated for the fairing material, and by choosing sanding grades to prepare the surface just enough to grip the subsequent layers without introducing scratches that could show through in the final coat. Sanding itself is a discipline: it should be light enough to keep the edges crisp, yet thorough enough to remove any residual mold lines or imperfections from the raw shell.\n\nPractical consideration of the workflow also affects how an inspiring concept becomes reality. The sequence often starts with disassembly and careful cleaning. Any dust, oil, or wax left on the surface will undermine adhesion and can cause pinholes or solvent blooming. Then comes priming, where the base layer not only improves adhesion but helps achieve uniform color absorption across the curved surfaces. The paint itself is typically applied in thin, even coats to avoid runs and orange-peel texture. This step requires meticulous technique and controlled ventilation to manage overspray and off-gassing. For intricate designs, airbrushing is used in combination with masking and stencils to ensure the crisp edges of graphics while preserving the glow of gradients. Finally, a clear coat seals the finished image and provides the protective layer against UV rays, road debris, and weather extremes. When performed with discipline, the sequence yields a finish that looks as flawless under a bright sun as it does under the glow of street lamps.\n\nThe tasteful complexity of a good design often emerges from a dialogue between the rider and the artist. Clear communication is essential—both sides must articulate the story behind the imagery, the preferred balance of color and negative space, and the intended use of the bike. Detailed reference boards, rough sketches, and even digital renders help align expectations before a single can is opened. The most successful designs honor the bike’s silhouette and do not fight its lines. Instead, they enhance them, letting the fairing breathe while the artwork travels along its curves with ease. In some projects, simplifying a concept can lead to stronger, more legible graphic statements that perform consistently in busy urban settings and at highway speed. Simplicity, after all, does not imply a lack of ambition; it can be the vehicle through which ambition finds its most precise expression.\n\nThe social dimension of design should not be underestimated. Platforms that curate and celebrate bike art, like image boards and design galleries, are invaluable for imagining possibilities and validating a concept. Inspiration is not about copying a look but about translating a mood into a paint plan that can be adapted to a particular rider, fairing size, and color family. If a rider is drawn to the idea of a geometric pattern with tribal influences, the artist can craft a rhythm across the panels that honors the geometry while referencing the energy and tradition embedded in those motifs. The result is a design that speaks across cultures while still feeling uniquely personal. A well-executed paint job becomes a wearable, moving sculpture—one that changes with light and velocity and invites a second, longer look from passersby and admirers.\n\nWithin this creative ecosystem, there is also a practical path for those who want to explore the craft themselves without losing sight of quality. Resourceful enthusiasts can begin by studying the conversations within design communities and by collecting visual references that crystallize the rider’s intent. They can then translate these ideas into a stepwise plan that respects material realities and safety considerations, including proper ventilation and respiratory protection. The transition from concept to canvas is iterative: a first pass may be components or color blocks; a second pass might refine masking, linework, and gradient transitions; and a final pass seals the piece with a protective gloss or matte veil. The journey is as much about learning technique as it is about nurturing an aesthetic voice that can grow with time.\n\nFor readers who want to see concrete examples of how inspiration translates into finished work, the Yamaha fairings collection offers a practical reference point. It represents how a range of shapes and curves can accommodate radical or restrained paint ideas while maintaining structural integrity and functional aerodynamics. The presence of a broad fairing family demonstrates how designers adapt a single concept to multiple models, preserving a cohesive family look while allowing individual expression. This kind of adaptable approach is a model for any painter seeking both variety and consistency across a project. Yamaha fairings collection gives a sense of how designers map art to form, a principle that can be applied to any fairing family when the design begins to take real, paintable shape.\n\nIn the end, a successful motorcycle fairing paint job is the result of a conversation: between the idea and its execution, between the rider’s identity and the machine’s engineering, and between color, line, and light. It is a process that rewards patience, curiosity, and disciplined execution. The final finish must withstand the demands of real-world riding—the cleansing of road grime, the sun’s harsh ultraviolet rays, and the occasional abrasion from a tumble or a brush with a gate post—without losing the essence of the image or the clarity of the linework. When these elements come together, the result is a fairing that looks fast even when the bike is standing still; a design that communicates immediately, yet rewards the viewer with depth upon closer inspection. It becomes more than a painting; it becomes a statement about how a rider sees the world when they lean into a turn and the wind smooths over the surface as if the fairing itself were a living part of the machine.\n\nFor designers and riders alike, this is the core appeal of motorcycle fairing painting: the chance to craft a moving, personal emblem that travels with every ride. The canvas is not a studio idol but a functional surface that must perform under the realities of weather, vibration, and motion. The art must endure and evolve with time, maintaining readability in bright sun and resilience in rain. If a design achieves this balance, it becomes a long-term partner in the rider’s story—a visual shorthand that invites a second and third glance as the bike passes by, leaving a trace of its creator’s voice in the wake of speed. The journey from concept to coast is not a single leap but a sequence of careful decisions: about materials, about primer and paint systems, about sequence and finish, and about how imagery will ride along the bike’s geometry without overpowering its purpose. The design that endures is the design that chooses its elements with restraint, respects the fairing’s function, and finally invites the rider to tell a new chapter with every ride.\n\nAs you move from inspiration to application, consider how your chosen motifs can harmonize with the bike’s lines and the rider’s daily realities. Start with a clear narrative, map it into color and form, and then refine through layers that reveal themselves as light hits the fairing at different angles. Let the design lead the eye along the curves, not crowd them. Embrace both boldness and discipline, for a memorable paint job balances daring artistry with practical durability. When this balance is achieved, the motorcycle emerges not just as a machine but as a dynamic canvas—ready to convey character, velocity, and a personal legend to anyone who catches a glimpse in motion. External inspiration, once anchored in a thoughtful plan, becomes a living, evolving language on the road.\n\nExternal resource for further inspiration: Explore bike fairing ideas on Pinterest.
Final thoughts
A well-executed motorcycle fairings paint job not only beautifies bikes but also represents an untapped potential for business growth. By mastering techniques, investing in quality materials, and considering cost factors, business owners can elevate their services. Whether you aim for sleek, professional aesthetics or bold custom designs, utilizing creative inspiration can lead to standout offerings that resonate with customers. Embrace the artistry involved in motorcycle fairings paint jobs to create unique experiences that enhance both bike performance and aesthetic appeal.