Painting motorcycle fairings at home offers an incredible opportunity for business owners to expand their services and cater to the customization needs of motorcycle enthusiasts. By equipping themselves with the right techniques, materials, and safety practices, businesses can transform fairings into personalized art pieces. This guide addresses each crucial step, from preparation and material selection to painting techniques and final touches. By following these guidelines, business owners can enhance their offerings while ensuring safety and quality, elevating their reputation in the motorcycle community.
The Quiet Foundations: Mastering Preparation for Home Motorcycle Fairing Painting
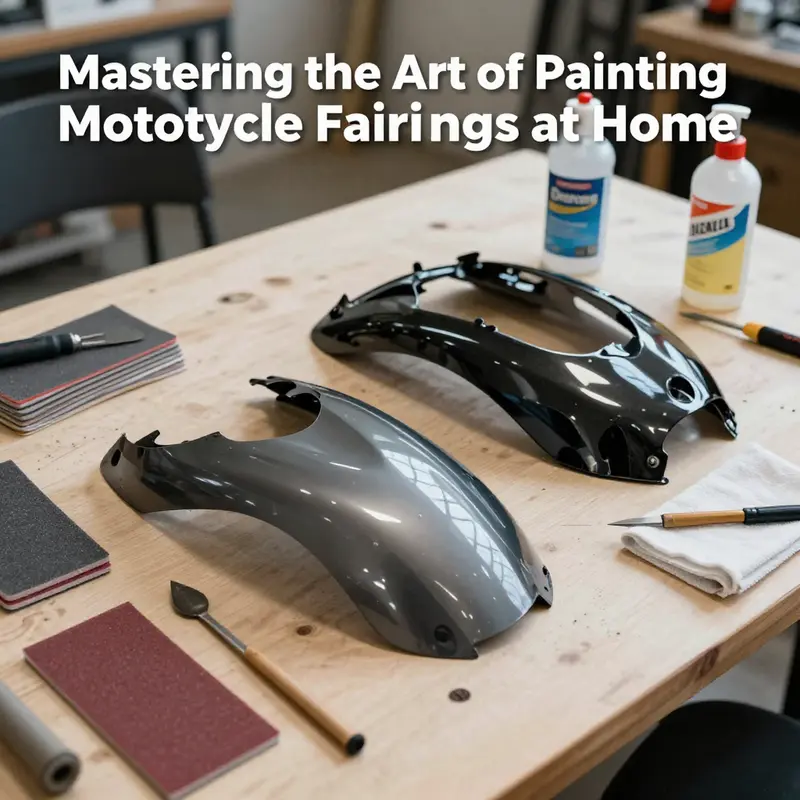
Preparation is the quiet architect behind any bold color job on a motorcycle. It doesn’t shout, but it makes the difference between a finish that lasts and one that looks good for a season before problems creep in. When you decide to paint fairings at home, you’re choosing a path where patience, precision, and a methodical mindset matter as much as the paint itself. The work begins long before the first drop of color touches plastic. It begins with understanding that the surface you see on a fairing is a surface you must shape, clean, protect, and guide toward a durable, aesthetically pleasing outcome. When done right, the final gloss is not just a reflection of the color or the brand of your clear coat; it is the visible evidence of a plan honestly executed from the moment you unbolt the fairings and set them in a clean workspace.
The most important truth about preparation is disassembly. Removing the seat, the mirrors, the gas tank shrouds, and any non-paintable components is not merely a matter of convenience for spraying. It prevents overspray from creeping into crevices that would otherwise trap dust or degrade the fit of the panels once they return to the bike. A fairing that has all non-essential pieces detached gives you clean, crisp edges and the freedom to reach every contour without masking and masking again around stubborn corners. It also protects chrome, rubber, and sensors from potential damage. As you lay out the parts in a labeled, organized way, you create a mental map of the project that reduces the chance of reassembly errors and misaligned lines later on. A neat, planned teardown also minimizes the risk of scratching edges or gouging delicate mounting points, which would otherwise demand time-consuming touch-ups before priming even begins.
Next comes surface cleaning and preparation. Dirt, oil, wax, and fingerprints are not cosmetic obstacles; they are adhesion killers. Begin with a dedicated degreaser or a cleaner designed for automotive plastics. The goal is to remove oils and residues that a casual wipe would miss. After cleaning, inspect the texture of the surface. Plastic fairings often have a slight gloss or uneven areas from wear and weathering. To create the proper “key” for the primer, you should abrade the surface just enough to dull the gloss without weakening the plastic. A fine grit—usually starting with 400 or 600—works well for a light scuff that invites the primer to grip securely. The trick is to be deliberate but gentle; you want the surface to feel slightly rough, not scored. Then, with a lint-free cloth, wipe the entire panel with isopropyl alcohol. This step removes any remaining dust and ensures the surface is clean and will not outgas during primer cure. The result is a smooth, uniform base that rewards the subsequent layers with even adhesion and a consistent finish.
Masking and protection follow closely, and here the discipline of the approach shines through. The goal is to shield everything you do not intend to paint while allowing perfect access to the edges and curves you do. Start with high-quality masking tapes designed for automotive painting; line up tape carefully along the factory edges you want to preserve. For larger areas or irregular shapes, masking film or plastic sheeting can keep overspray from drifting onto adjacent panels, handles, or hardware. Edge sealing is not optional; it is the frontline defense against paint bleed-through. Press the tape down firmly, checking for corners and folds where paint could creep. If you encounter textures or trim that could trap moisture, consider specialty tapes or pre-cut masks to maintain sharp lines. The masking phase, while meticulous, requires only moderate time compared with what you will save by avoiding misapplied paint or the need to strip and redo later. It is the moment when the project begins to take on a professional character, even before any color has touched the first panel.
Environmental setup is the unsung hero of predictable results. Your workspace matters as much as your technique. A controlled space—ideally a garage converted into a dedicated spray area or a small, ventilated spray booth—ensures that dust does not settle on freshly applied coatings and that temperature and humidity remain within forgiving ranges. Temperature plays a decisive role in how the solvent burners support or hinder drying. The recommended window is approximately 18–25°C (65–77°F) with low humidity, a combination that promotes uniform cure and minimizes orange-peel texture. Keep the area free from direct sunlight, which can cause uneven drying and cause the base coat to flash too quickly. Before you mix and apply, set up your spray gun according to the manufacturer’s instructions, and perform a test spray on a clean, disposable panel to confirm your pattern, fan width, and spray distance. This is not a ceremonial ritual; it is a practical check that catches misadjustments before they mar your fairings. The goal is consistent atomization, even coverage, and the absence of pressure spikes or hesitations that would betray themselves as sags or dry spray.
Discipline in the preparation phase also means thinking ahead about material compatibility and the sequence of application. You want to align the primer, base coat, and clear coat so they work together in terms of chemistry and surface tension. Imperfections in the surface can be filled with an appropriate fast-drying filler, followed by another light sanding to restore that smooth texture. When you’re ready to prime, you apply thin coats rather than a single heavy layer. A single thick coat invites runs and drips; multiple thin layers, with drying time between coats, create a uniform surface that accepts color evenly and reveals fewer imperfections as you progress into the base layer. Primers differ—some are designed to seal the plastic, others to improve adhesion on glossy surfaces. Choose a primer that is compatible with the chosen paint system and the plastic type of your fairings. The primer acts as the foundation of durability; it seals microscopic pores and provides a uniform tint that helps you predict the final color more accurately. A well-executed primer laydown reduces the likelihood of staining or bleed through once the color is applied and provides a reliable anchor for the clear coat that follows.
As you prepare to advance from primer to color, the careful observer within you should also consider the edges and contours that define a neat paint line. The masking plan you created earlier should be completed with a final check, especially around fasteners and mounting tabs. If you discover any edges where primer or base coat might creep into a seam, address them with a touch-up from your base color after the first transformations have set. The transition between base coat and clear coat is where unforeseen texture issues most often appear; that is why many experienced hobbyists advocate a light, final wetsand between layers to eliminate texture and to harden the surface before the final gloss or matte layer. Wet sanding is a delicate technique that requires water-based lubrication and the right grit—usually something in the 1500–2000 range—to smooth small imperfections without erasing detail or affecting panel stiffness. Take care not to over-sand, which can dull the edges or reveal the underlying primer. The moment you finish the last sanding pass, wipe the surface with a clean, damp cloth and then a dry one to remove any trapped moisture before proceeding.
Safety and good practice thread through every choice you make in preparation. You are working with solvents, airborne particulates, and moving parts, so protective gear is not a luxury but a requirement. A ventilated space, a respirator or dual-filter mask, chemical-resistant gloves, and eye protection are essential. The idea is to minimize exposure to fumes and to prevent any accidental contact with bare skin. If you experience any irritation, you should pause, reassess ventilation, and ensure your protective equipment is adequate. Even the best preparation cannot compensate for poor ventilation—dust and fumes can ruin a finish just as easily as a rushed primer or a ragged edge. Finally, maintain a clean, organized workspace. A tidy environment accelerates the process and reduces the chances of contamination or misplacement of critical parts. A well-ordered bench and a dedicated prep area mean you can focus your attention on the delicate steps that ensure a smooth, durable paint job.
With preparation complete, you stand at the threshold of color, clear coats, and the satisfying glow of a job well done. The work you have done—careful disassembly, thorough cleaning, precise sanding, meticulous masking, and disciplined environmental control—becomes the invisible backbone of what follows. If you’re starting with a Honda fairing, for example, you can explore compatible panels in the Honda fairings collection. That reference point helps keep your project grounded in practicality, ensuring you can source panels that fit correctly and that won’t jeopardize the alignment and fit of the full bike when you reassemble. As the layers build, you will see how the careful groundwork you laid pays off in a final finish that reflects light evenly, resists chipping, and maintains its sharp lines for miles to come. When the next chapter turns to the actual paint application—primer, base coats, and the protective clear—the chapter-wide respect for the preparation process will remain evident. A good finish is not luck; it is the reward for discipline that begins long before a sprayer touches the plastic surface. For readers seeking a broader, standards-based reference after the project, there are extensive guides and verified practices that outline the recommended steps and safety considerations, including industry-informed recommendations like those found in detailed DIY guides. And for further reading on how seasoned hobbyists approach the craft, see the related external resource linked here: https://www.bikeexif.com/2023/04/18/diy-motorcycle-fairing-painting-guide.
Material Mastery for Home Paint Jobs: Durable Primers, Plastics-Friendly Paints, and Clear Coats for Motorcycle Fairings
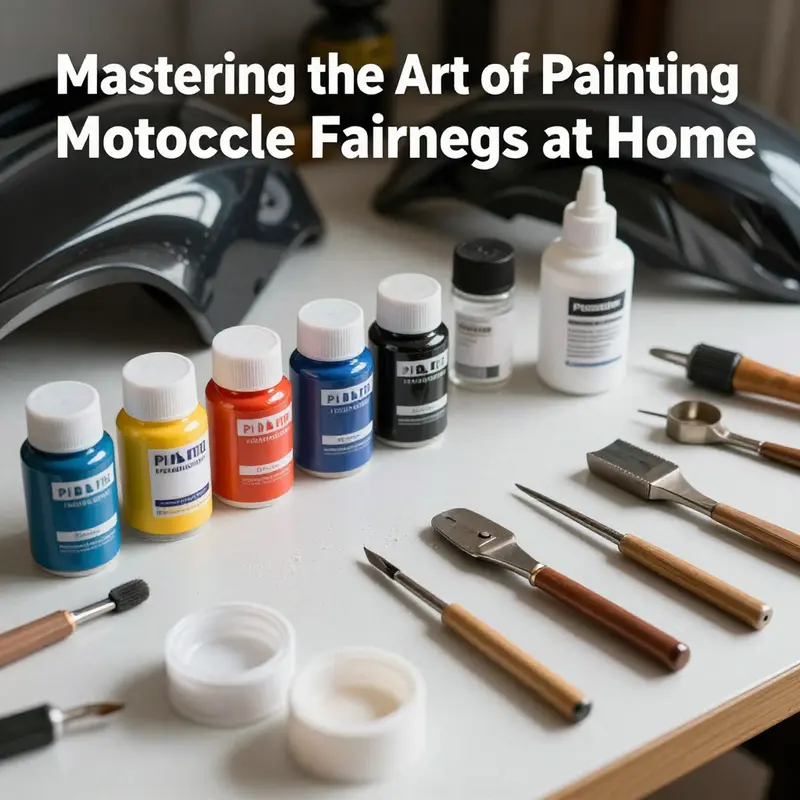
Choosing the right materials for painting motorcycle fairings at home is less about chasing a perfect color and more about building a durable, weather-resistant finish that flexes with the plastic and holds up to UV exposure, rain, and road grit. The materials you select—primer, paint, and clear coat—work together like layers in a carefully crafted armor. They determine how well the color adheres to the surface, how smoothly it lays down, how resistant it is to chips and fading, and how easy it is to maintain the surface over time. In practice, this means starting with a thoughtful assessment of the fairing material, typically plastic or fiberglass, and choosing products designed for those substrates. Automotive-grade prim ers are worth the investment because they are formulated to bond with plastics and composites, filling in minor imperfections and creating a uniform base that prevents the top coats from lifting or cracking. The primer acts as the bridge between the flexible surface and the rigid paint layer, sealing the substrate from moisture and oils while providing a surface that the paint can grip. Beyond adhesion, a good primer also helps even out color and texture, reducing the number of coats needed later and delivering a more professional result. When you’re shopping for primers, look for options specified for plastic or composite surfaces. A dedicated plastic-primer often includes fillers and sealers that tackle micro-porosity in molded fairings, creating a smoother canvas for the color you want to apply. If you notice any deep scratches or small gouges, a light skim with a surface filler primer can help level these imperfections before you move on to paint. A tacky, clean surface is essential here, so a tack cloth is indispensable for removing any lingering dust after sanding and before priming. As with many DIY painting tasks, preparation is everything, and the quality of your primer will shape the final appearance more than most people expect. You can also find value in a two-step sequence: a high-build primer to fill micro-scratches, followed by a sealer or light primer to create a uniform base. If you’re unsure about the right primer, test a patch on a small, inconspicuous area of the fairing first. This isn’t just a test of adhesion; it’s a preview of how the color will look on the surface once all coats are finished. The idea is to catch adhesion problems, pinholes, or orange-peel texture early, before you’ve laid down several coats that would require rework. For sourcing and options, those exploring fairing replacements or practice panels might consider the Honda fairings collection as a reference point for consistent plastic quality and fit, which is helpful when you’re practicing on a spare panel before tackling a seat or a full fairing swap. For example, you can explore the Honda fairings collection to gauge the feel of different plastics and prep work on a non-structural panel, then transfer the lessons to your bike’s actual fairings. Honda fairings collection.
With primers out of the way, the paint you choose should be compatible with plastics and designed to handle the flex and temperature swings typical of riding conditions. Plastic-compatible paints are the right direction here. In the world of home painting, two broad families stand out: acrylic enamel and urethane-based paints. Acrylic enamel offers good coverage, a relatively simple application, and decent color retention, while urethane-based paints provide greater flexibility and resistance to cracking, chipping, and UV damage. The key is selecting a formula that remains flexible enough to move with the fairing as it experiences vibration and temperature changes, yet hard enough to resist fading and wear from road debris. Whichever you choose, be mindful of the thinner or reducer recommendations and work in a well-ventilated area to control fumes. You’ll also want to verify that the product is designed for the plastic or composite materials your fairings are made from, since some paints bond best to certain substrates and may require a specific type of primer to maximize adhesion. The finish you ultimately achieve—whether satin, semi-gloss, or high-gloss—will depend in part on the paint’s chemistry and the number of coats you apply. In general, multiple thin coats yield a smoother, more uniform finish than one heavy layer, reducing the likelihood of runs and sags that can mar color depth. A test patch is again a wise precaution when experimenting with color depth or metallic effects on plastic. You may also want to experiment with a subtle mid-coat or a color-sanding approach if you’re aiming for a showroom-like depth of color. The goal is a finish that looks even and professional, not rushed or patched together. Clear protection follows the color. A urethane clear coat applied over the cured color builds gloss, adds a protective shell against UV rays, and helps resist clear coat scratches. It’s common to apply a higher-solids clear for durability, or a satin-matte finish if you prefer a subdued look with less glare. A clear coat also helps with UV resistance, which is critical for bikes that spend long hours in the sun. As with any topcoat, follow the manufacturer’s guidance on tack time, recoat windows, and curing conditions to minimize peel or solvent entrapment. Wet-sanding between base coat and clear coat is recommended by some artists for achieving a glassy, smooth surface. If you do this, use progressively finer grits and a careful hand to avoid burning through the paint. The result, when done right, is a depth that makes the color pop and a finish that remains resilient through the miles ahead. The materials you choose—primer, paint, and clear coat—work in concert with the way you apply them, your climate, and your equipment. Even the distance you hold your spray or airbrush, the temperature, and the air-flow can influence the final look. The best approach is to learn the nuances of your chosen products, practice on a spare panel to dial in your technique, and then commit to a steady hand for the entire project. When you plan your workflow, think about the entire chain: plastic-appropriate primer, a flexible paint suitable for plastics, a clear coat that protects and shines, and the basic prep gear to support everything. The simplest path to a professional look is a methodical, stepwise approach that honors the substrate and the finish you want. The goal is a finish that not only looks good but also endures. You’ll protect your time and effort by treating each layer as a critical element in a longer, smarter process. The result should feel like a factory finish—consistent color, even gloss, and a surface that invites you to ride with confidence.
Preparation supplies are the quiet workhorses of a successful home paint job. Sandpaper in the 1200–2000 grit range is a must for the final scuff and for removing burrs from edges, while cleaning solvents—such as isopropyl alcohol or equivalent—strip away oils and fingerprints that can sabotage adhesion. Masking tape helps protect seams and hardware from overspray, and a spray booth or a well-ventilated garage creates the safe breathing space required for safe painting. The tack cloth is essential to pick up surface dust after sanding and again before priming, ensuring that no particles are trapped in the first coat. These tools may seem small, but they are the difference between a surface that appears smooth and a surface that reveals every grain and ripple after the clear coat cures. The actual ambience of your workspace—airflow, temperature, and humidity—plays a supportive role. A cool, steady environment reduces the risk of premature drying, which can cause texture defects or solvent entrapment and lead to a dull finish. When you plan your project, build in time for these steps, because rushing the prep work will almost always show up as an imperfect base on which you’ll later paint. If you’re looking for a practical starting point for sourcing, consider the Honda fairings collection as a reference for practicing on panels with realistic contours and mounting points, helping you to gauge how your prep steps translate to real-world fitment and finish on a bike. The journey from bare plastic to a mirror-like coat is paved with good habits: degrease, sand, wipe, prime, sand between coats if needed, color coat, clear coat, and finally a careful cure. The careful discipline you bring to material selection will pay off in the end with a finish that stands up to sun and rain and a color that stays true through the miles. For a comprehensive, step-by-step guide that complements these principles, and to explore specific techniques and product suggestions, you can consult external resources that walk through home painting procedures in depth. External resource: https://www.autogeek.net/how-to-paint-motorcycle-fairings-at-home/.
From Primer to Perfection: Techniques for Painting Motorcycle Fairings at Home
Painted motorcycle fairings at home blends artistry with the practical rigor of preparation. A successful finish does not rely on luck; it grows from a deliberate sequence of steps, each building a durable, visually striking shell that can stand up to sun, rain, and road debris. The aim is not merely to apply color, but to create a surface that feels smooth to the touch, that reflects light evenly, and that adheres without peeling over years of vibration and temperature shifts. When approached with a calm plan, the home painter can produce results that look like they came from a shop, yet carry the tactile signature of a personal project that understood the craft from first light to last coat. The process starts with respect for the material, moves through disciplined technique, and ends in a finish that invites both admiration and pride every time the bike rolls out of the garage.
The journey begins long before the first spray. It starts with the decision to remove the fairings carefully, giving full access to every contour and edge. This access matters because overspray on unintended areas is not merely a nuisance; it can complicate masking and contaminate surfaces that should remain pristine. As you lift each piece away, you can visualize how the color will travel across curves, transitions, and rivets. A bike is a sculpture in motion, and your approach to each panel should honor its geometry rather than rush it. Once removed, the fairings are brought to a clean workspace where dust and oil can no longer threaten adhesion. A degreaser followed by a rinse with clean water ensures the surface is neutral and receptive to the next layer. The decision to work in a well-ventilated area is more than safety advice; it sets a predictable backdrop for the entire operation. Humidity, air temperature, and airflow shape how the primer and paint lay down, how long coatings flash off between passes, and how the final clear coat cures. Rushing through this setup stage is a common pitfall, and it often shows up later in texture and gloss.
Once clean, the fairings meet the sander. A uniform, controlled finish is the backbone of a durable paint job, and that begins with a gentle, broad hand using 400-grit paper. The goal is not to remove material aggressively but to create a micro-roughness that gives primer something to bite into. You may notice micro scratches that catch the light; these are your friend when they are evenly distributed. Any dents or gouges, no matter how small, should be addressed with body filler and a careful subsequent sanding. A well-executed fill blends seamlessly with the surrounding surface so that, once primed, the area reads as one continuous field. In this phase, the eye is a critical tool. Move across the surface slowly. If you see a dull patch that seems to stand out, work it until the texture feels uniform under your fingertips.
Repair and smoothing extend into the edges and corners, where contours change direction. These zones benefit from focusing your attention with a light hand and a deliberate touch. After sanding comes a meticulous dust removal with a tack cloth. Any residual dust can ruin a prime job, leading to pinholes or a rough feel that will be exaggerated after color is applied. The primer itself is a leap forward in durability and uniformity. A high-quality automotive primer designed for plastic or fiberglass equips the surface to accept the topcoat evenly and resist peeling. The primer should be applied in thin, even coats, with proper flash times until the layer feels dry to the touch but not fully cured. A good rule of thumb is to wait for a brief, powdery touch that shows no wetness when you run a gloved finger over the surface. Rushing the primer invites drips or an orange-peel texture that will haunt you in the final finish.
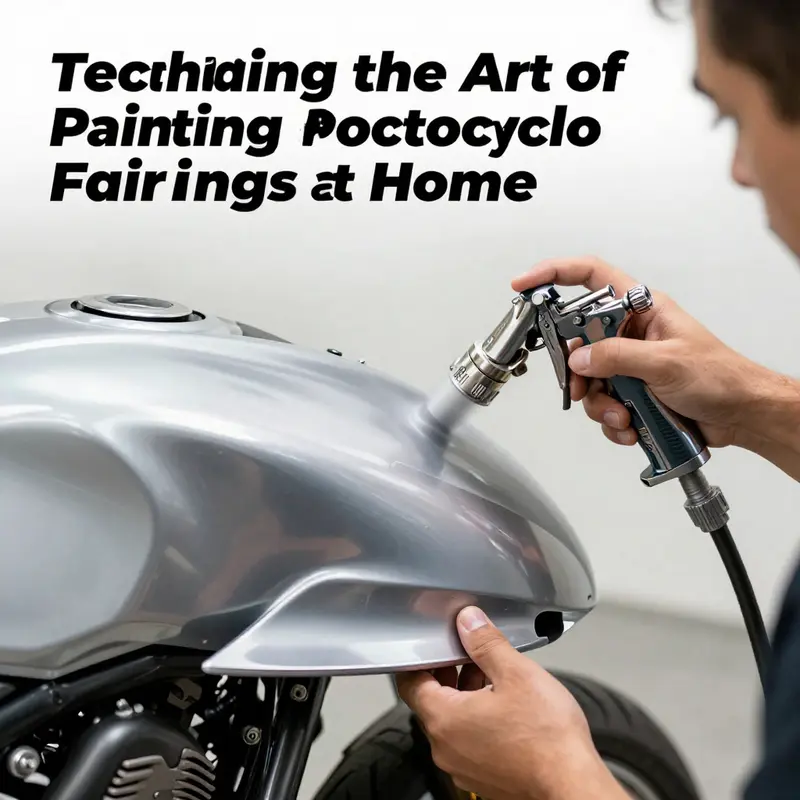
With a sound primer in place, the color layer follows. The choice between spray cans and an air-assisted system like an HVLP or airless unit depends on budget, space, and patience. Spray cans are accessible and convenient, but a spray gun offers more control over pressure, spray pattern, and atomization. The essential practice remains the same: apply thin, even coats, allowing each layer to flash-dry before the next. A candy coat of hard color often requires multiple ultra-thin passes rather than a single thick application. Between coats, the surface should stay free of dust and humidity that could cause micromote imperfections to set in. The key is to layer color in increments, with attention to even coverage across complex geometry and through tight radii. If a panel shows a run or sag, stop, let it set, and approach with a light sanding and a careful recoat. The result is a uniform field of color that reads clean and consistent as light travels across it.
At this stage, a clear coat becomes more than an aesthetic choice. It is the protective shield that locks in the color and adds depth. A clear should be applied in several transparent layers, each with appropriate flash times to prevent crowding of solvents. The finish type, glossy or matte, should align with the rider’s overall aesthetic and the bike’s lines. A glossy coat will amplify the curvature of the fairings, while a matte finish can lend a modern, understated drama. Whichever path you choose, the surface should be clean and free of contaminants before the clear coat begins. Some practitioners advocate a light wet-sand between color and clear to reduce orange-peel and promote optical clarity. This technique, if used, requires careful water filtration and gentle abrasion so you do not dull the color layer or expose tiny scars on the surface. The final clear should cure in a dust-free environment, ideally with stable temperature and humidity. The patience paid here is visible in the glassy, even sheen that accompanies the cured finish.
Polishing after cure completes the transformation. It is a step that rewards a steady hand and a measured approach. A fine-cut compound used with a dual-action polisher can erase micro-scratches and haze, bringing the finish into showroom-gleam territory. The goal is not to remove material but to reveal the true depth of the color and the clarity of the clear. Work in small cycles, checking your progress under soft lighting that emphasizes the surface texture. If you notice imperfections, rework only the affected area rather than the entire panel. The discipline of polishing rewards consistency and quiet focus, especially when the fairings return to the bike and reflect the world in a pin-sharp mirror.
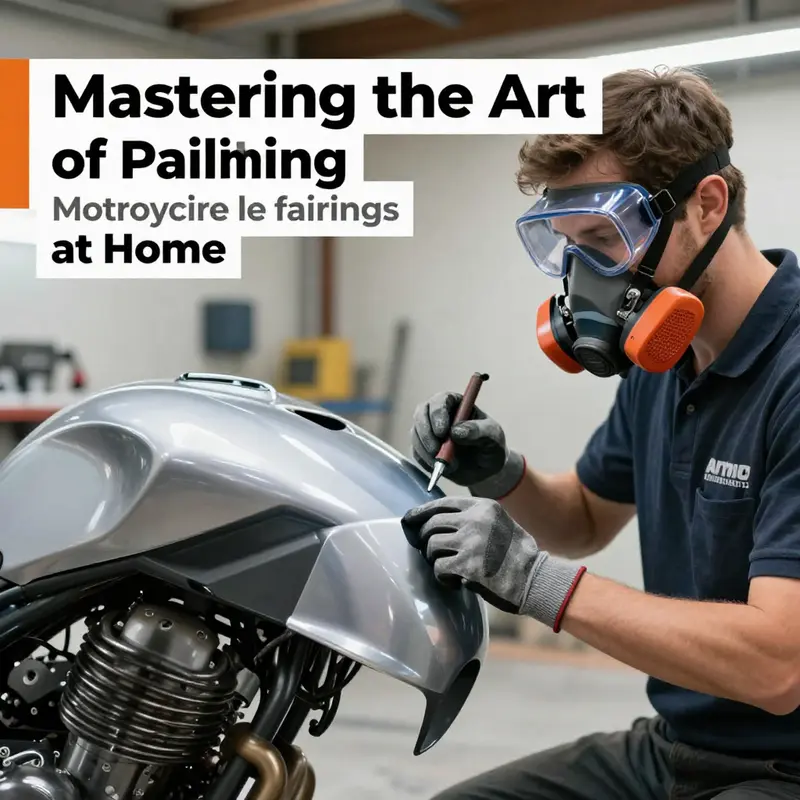
Beyond the technique, environment and safety anchor the entire process. Work in a dedicated space with good airflow and controlled humidity. A clean, dust-free area reduces the chance of debris landing on wet coatings, which can ruin gloss and evenness. Protective gear is not ceremonial; it is a practical shield for you and your breathing space. Gloves, goggles, and a respirator are the minimum, with ventilation that moves air without pulling dust into the workspace. Temperature control matters; neither paint nor clear cures well in extreme heat or cold. The rhythm of the project—cooling between passes, steady flash times, and a calm pace—translates to a more forgiving process and a better final result. The craft hinges on patience, not frenzy, and the home painter learns to appreciate the subtle cues that tell you when a layer is ready for the next step.
As you color and finish, the overall project gains coherence. The fairings, once bare plastic or fiberglass, carry a new personality, yet harmonize with the bike’s silhouette. The finish should read as a unified canvas, with edges meeting cleanly and transitions between panels staying consistent in tone and brightness. It is helpful to document the sequence you followed, the ambient conditions you faced, and any adjustments you made to technique. A simple log can prevent repeated mistakes and guide future projects. The art of at-home painting is as much about method as it is about color—about how you read the surface, how you time each step, and how you respond when the surface reveals a fault you overlooked at the outset. When done with care, the ride becomes a moving gallery show for your craft, a testament to the idea that a rider can personalize without surrendering quality.
For readers who want a broader view on compatible fairings and how to pair colors with the lines of a particular model, a resource with extensive collections can illuminate choices and fitment considerations. For broader context on compatible fairings and related options, see the Honda fairings collection. This reference helps you understand how color interacts with form across different shapes and how to maintain proportion when you mix new color with existing graphics. It is a reminder that the craft sits at the intersection of design, engineering, and handwork, where every panel you paint contributes to a cohesive whole that respects the bike’s lineage while expressing your own taste.
The path from primer to perfection is a disciplined journey. It rewards careful prep, restrained application, and a calm, patient approach to finishing. The beauty lies not only in the color but in the soul of the finish—the way light travels across the surface, the evenness of the glaze, and the crispness of the reflections. When you finally mount the fairings back onto the motorcycle, the result should feel like a seamless extension of the rider’s intention, a personal mark that still honors the machine’s engineering and aerodynamic truth. The process demonstrated here—not borrowed from a single technique but built from consistent, repeatable steps—can be adapted to many models and color schemes. It is more than a method; it is a way to engage with the bike as a canvas and the road as a moving exhibition space. If the finish reveals any minor flaws, remember that most are fixable with patience, with a careful touch, and with the knowledge that perfection in a home project is a spectrum rather than a single moment. The chapter on techniques becomes, in practice, a handbook for patient hands and curious minds, teaching an artisan how to respect material, timing, and atmosphere while delivering a result that feels both professional and personal.
External resource for further guidance and visual step-by-step references can be found at this practical guide. It offers additional context on the painting process, including detailed demonstrations of spray technique, color layering, and finishing strategies: https://www.motorcycle.com/how-to-paint-motorcycle-fairings/
Gloss Armor in a Home Workshop: Mastering the 2K Clear Coat for Motorcycle Fairings

Applying a durable clear coat is the final act in a home based fairing project. A proper 2K clear coat provides the shine and the protection that keeps a painted surface looking fresh through sun and rain. It is a two component system that cures to a hard, resilient film. The trade off is that it requires careful mixing, good ventilation and patience. When done right, the result is a smooth, glassy surface that enhances the base color and gives the fairings a showroom like depth. The goal is a finish that resists UV fading, minor scratches and chemical exposure from cleaners and fuel spills.
Before any clear coat goes on, the surface must be clean and perfectly prepared. The fairings need to be free of dust, oils and fingerprints. After the base color has cured, inspect the surface for dust nibs and pinholes. If any flaws exist, address them with a light flow of filler or micro sanding. Then a final wipe with a tack cloth removes fine dust that can ruin clarity once the clear coats are applied. The surface should feel smooth to the touch, not rough or tacky. Any contamination at this stage becomes magnified under the clear layer.
Mixing and safety come next. A 2K clear coat requires a hardener and a resin in the can or bottle. Measure precisely according to the product guidelines and mix only what you can apply within the pot life. Work in a ventilated area, ideally a dedicated paint space with a good exhaust. Wear a respirator, eye protection and gloves. Keep the work area free from ignition sources and flame or sparks since the components are reactive until cured. Also use eye protection and a suit or coveralls to prevent dust from settling on the wet film.
Application technique is smooth and deliberate. Start with a light tack coat to lay the clear over the base color without pushing dust into the finish. Then apply two to three thin layers, allowing a brief flash between coats. The flash off time depends on temperature, humidity and the product itself, but a typical window is a few minutes. The key is to keep coats ultra thin to avoid runs and sags. A heavier coat might look deeper at first but it will trap solvents, leading to a cloudy or uneven appearance once cured. An even, glassy finish comes from these controlled layers rather than one thick application.
Equipment matters. A good airless or HVLP spray system produces a fine spray pattern with minimal overspray. A nozzle around 1.0 to 1.4 millimeters works well for most 2K clears, and keeping the spray distance steady helps maintain uniform film thickness. If you only have cans, two or three steady passes per coat can mimic a spray gun, though the result may show more texture. In all cases, keep the gun moving and avoid pausing in one spot to prevent sags or drown spots.
Environment and temps influence the cure. Work in a clean, dust free zone with stable temperature and humidity. Fluctuations can cause the clear to cure unevenly, showing as orange peel or hazy patches. If your garage is prone to drafts, consider a temporary enclosure or a small portable tent to reduce dust. Be mindful of relative humidity; high humidity can slow cure and create condensation on the surface. The combination of a controlled environment and the correct flash times makes the finish crisp and clear.
Curing and polishing are the final choreography. After the last coat has dried completely, give the surface ample time to cure—usually 24 to 48 hours depending on the product and climate. Only when fully cured should you begin polishing. Use a fine abrasive or polish designed for clear coats and work in gentle circles with light pressure. The aim is to remove micro scratches and to bring back the gloss without introducing new scratches. This step is what separates a home project from a showroom finish. The polish enhances clarity and makes the reflections crisp, as if the fairings were cast in glass.
Dealing with imperfections is part of the process. If you notice a small dust nib or minor run, lightly wet sand with a very fine grit and recoat with a fresh layer after dew points shift. For deeper imperfections, you may need to level the area with careful sanding and reapplication. If a scent of solvents lingers, check that the ventilation was adequate and any moisture is under control. Patience here is critical because rushing the cure can trap imperfections that show up as white or cloudy patches once the finish hardens.
Beyond the technical, consider how the finish will age. A high quality 2K clear coat resists UV and chemicals far better than basic solvent acrylics, but it still benefits from protection. Regular washing with pH balanced cleaners and avoid aggressive scrubbing helps preserve the gloss. If you park in bright sun, a yearly maintenance wipe and a light polish can maintain depth and clarity. The goal is not a flawless one off but a durable, enduring shine that matches the bike as a whole and respects the original lines of the fairing.
Finally, think of the broader workflow that threads this stage into the whole project. The clear coat is the capstone on your careful prep and color work. It should be treated as part of a finished piece rather than a quick spray. The right approach brings together preparation, technique, environment and patience. When set up properly, your fairings will not only look striking but will also hold their appearance under sun, rain and engine heat. If you want more detailed step by step guidance and product recommendations, you can consult authoritative resources such as the automotive detailing guidance on applying a 2K clear coat. For more on model and fitment references, you can browse the Honda fairings collection.
For a deeper dive into the specifics of applying a 2K clear coat and achieving a professional finish, an external resource offers practical instructions and tips that complement the home workshop approach. You can read the detailed guide here: https://www.autocar.co.uk/article/how-to-apply-2k-clear-coat-professional-finish
null
null
Final thoughts
As we’ve explored, painting motorcycle fairings at home not only allows for personalized customization but also presents a unique business opportunity for service providers. Mastering the preparation steps, selecting appropriate materials, employing effective painting techniques, and ensuring safety will set business owners apart in an evolving market. By integrating these practices, businesses can satisfy the strong demand for customization while maintaining high standards of safety and quality. The world of motorcycle customization is vast, and with the right strategies, you can make your mark.