Respraying motorcycle fairings is a crucial service that enhances the aesthetic appeal of bikes while also offering protection to the underlying materials. For business owners engaged in motorcycle sales or customization, understanding the ins and outs of this process can provide a significant competitive advantage. Not only does a newly painted fairing enhance the attractiveness of a motorcycle, but it also plays a key role in its resale value and overall customer satisfaction. This article will discuss essential techniques for respraying motorcycle fairings, the materials and equipment required, the common challenges one might face, the cost implications, and crucial safety and environmental considerations. Each chapter provides a deeper dive into these aspects, equipping you with all the knowledge needed to excel in this area of motorcycle customization and repair.
From Bare Plastic to Showroom Shine: Mastering the Respray of Motorcycle Fairings
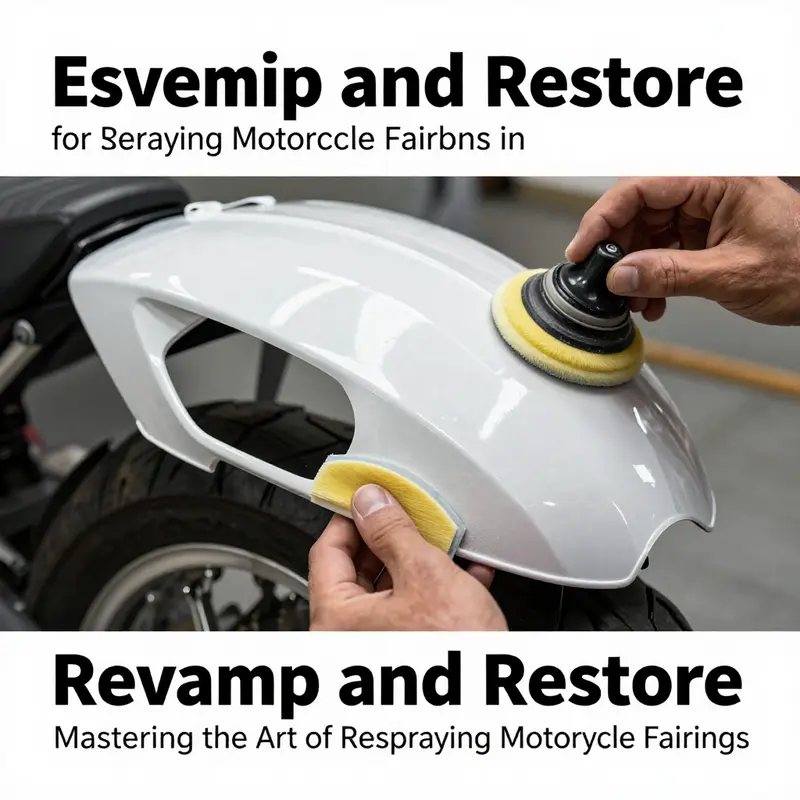
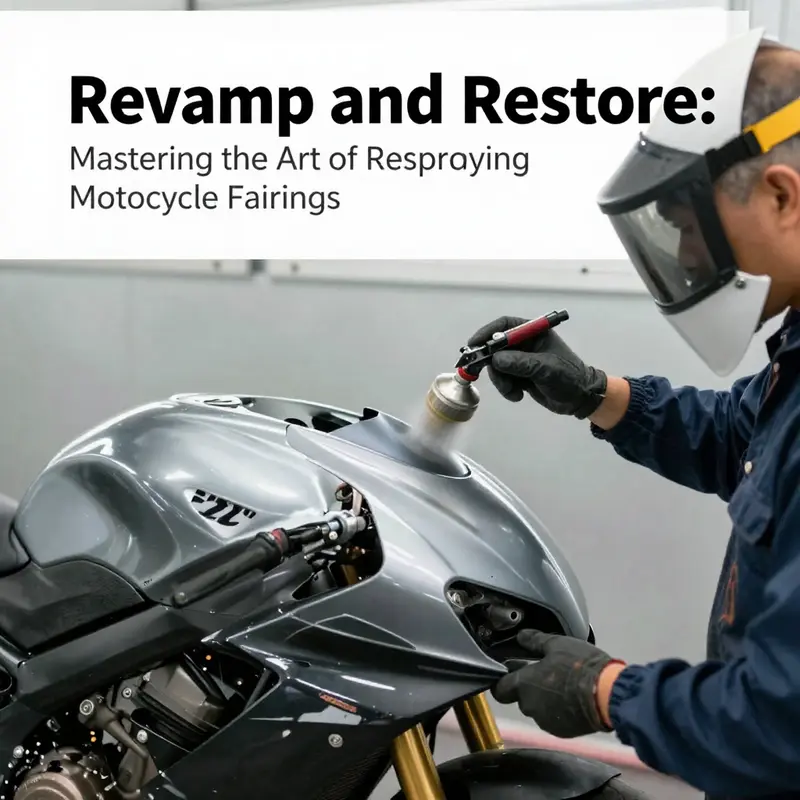
Respraying motorcycle fairings is more than color swapping; it is a craft that blends preparation, control, and a patient eye for finish. When done correctly, the ride in front of you looks like a factory-new machine, but the process is about more than aesthetics. It is about protection, adhesion, and the kind of durable gloss that resists UV, road grime, and the occasional stone strike. The journey from rough plastic to showroom shine begins with a decision to commit to quality materials, a clean workspace, and a method that respects the substrate. The typical plastic used for fairings accepts coatings differently from metal, so the choice of primer, adhesion promoter, and topcoat matters as much as the color itself. For many riders, the result is not just a new hue; it is renewed confidence in the bike’s look and the assurance that the finish will endure through seasons of riding, cleaning, and parking under variable weather conditions. To begin, you must first disassemble and free the panels from the motorcycle, a step that protects both the bike and the finish you are about to apply. Handling the fairings with care minimizes the risk of cracks or stress lines that can compromise adhesion later on. This preliminary stage is quiet but essential, because every subsequent layer rests on the stability of the surface you prepare today. The narrative of a high-quality respray unfolds in the details: how you wash, how you sand, how you mask, and how you apply each coat so that the final color sits evenly, without crowding, without orange peel, and with a depth that invites the eye to linger on the curves rather than the flaws of the previous finish. In this chapter, the emphasis is on technique and discipline rather than shortcuts. The goal is not simply to paint; it is to engineer a surface that breathes durability and beauty with every mile. When the work is completed, the fairings bear a seamless unity with the bike’s lines, and the color speaks with clarity under daylight and streetlamps alike. The pathway to that outcome is a disciplined, repeatable sequence that honors the plastic substrate while exploiting modern coatings engineered for automotive and motorcycle plastics. If you are new to this, let the steps settle into your routine the way riders settle into a confident rhythm on a familiar road: smooth, deliberate, and patient. The very first practical move is just as important as the last finishing touch, and it is the one most easily overlooked: removing the fairings from the bike and laying them out in a way that gives you unimpeded access to every contour. Once the pieces are free, you can begin the meticulous cleaning that makes or breaks adhesion. A thorough cleanse is more than a wipe down; it is a process that eliminates grease, wax, and remnants of old paint that can create flaws in the new layer. Isopropyl alcohol or a dedicated automotive degreaser works best. You want a surface that behaves the way bare plastic should—smooth, even, and clean. If any residue lingers, you lose control of how the new paint lays down and how the primer bites into the surface. With the surface clean, you move into surface preparation. Here, the contact between substrate and coating depends on texture. A careful sanding using 400- to 600-grit sandpaper creates just enough tooth for the primer to grip without leaving visible scratch marks that translate into dull spots after clear coat. It is tempting to rush this stage, but skipping or rushing it invites peeling or delamination down the line. After sanding, the surface is wiped again to remove dust, and the next step, adhesion promotion, becomes crucial. An adhesion promoter primes the pathway between the plastic and the primer, dramatically reducing the risk of paint lifting when you expose the fairings to heat or flex during riding. The promoter must dry according to the manufacturer’s instructions, forming a chemical bridge that helps the primer adhere to the plastic. In many builds, this step is counterintuitively brief but indispensable; it is the quiet hinge that supports everything that follows. Once the surface is prepared and dry, you can select a plastic-specific primer. The primer is not merely a color coat but a working layer designed to create a uniform base, minimize plastic absorption, and fill micro-scratches that sanding leaves behind. A high-quality plastic primer designed for automotive or motorcycle plastics types is essential. The primer should be applied evenly, with attention to coverage and the avoidance of runs or drips. Achieving a consistent film across large panels takes practice, but a steady hand and steady passes deliver the best outcome. After application, let the primer cure completely. Curing times vary by product and ambient conditions, so you follow the product’s drying window meticulously. The primer sets the stage for color, and the way it cures influences gloss depth and color fidelity. When ready to paint, the choice of topcoat becomes a dialogue between color, finish, and the rider’s goals. Some prefer bold metallics that catch light from multiple angles; others seek a matte or satin finish that softens lines and hides minor surface irregularities. Regardless of the tint, the application technique remains consistent: use a spray gun in a clean, dust-free environment with controlled airflow and humidity. The objective is multiple thin coats rather than a single heavy layer. Each pass should lay down color evenly, with a slight, even distance from the surface to avoid splatter and runs. Between coats, allow proper flash time so the solvent can evaporate, leaving behind a smooth, cohesive film. If the weather or shop environment is unfavorable, you risk solvent entrapment, which manifests as solvent pop or finishing errors that degrade the final appearance. The topcoat, chosen for its compatibility with automotive or motorcycle plastics, is the color layer that does the work of the visual transformation. The artistry lies not in the single mythic coat but in the cumulative effect of several deliberate, transparent layers that merge into a uniform hue. In this careful process, a spray gun—not a rattle can—offers control over spray pattern, atomization, and flow. A disciplined approach uses long, steady passes, with the gun held at a consistent distance to ensure a smooth, even distribution. The best practices include maintaining clean air, a stable temperature, and a humidity level that prevents the finish from drying too quickly or too slowly. Once the color has been laid down with the desired opacity, the fairings are given time to cure. Curing is not the time to rush. The finish stabilizes as solvents evaporate and the pigment settles, integrating with the primer to form a cohesive bond that resists chipping and peeling. After the color achieves blanket coverage and cure, a clear coat follows. The clear coat protects the color, enhances depth, and provides a durable barrier against UV light and the abrasion of road debris. A well-chosen clear coat adds a glassy or high-gloss finish, or, with the right additives and techniques, a more forgiving satin or matte appearance. The clear coat must be applied in thin, even layers, then allowed to cure fully before any handling. Only after the clear coat has cured should you move to polishing and waxing. Polishing smooths minor imperfections, removing micro-scratches and blooming that can appear as the coating ages. A careful, diminishing abrasive sequence helps restore the gloss without cutting through the clear layer. Finally, waxing adds a protective shield that repels water, reduces grime buildup, and preserves the color’s vibrancy. A properly waxed surface also makes future maintenance easier and prolongs the life of the respray, especially in harsh riding environments where dust and road salt can threaten longevity. The entire process—sanding, priming, painting, clear coating, and finishing—benefits from a controlled environment. A dedicated spray booth or a clean room with minimal dust particles and controlled airflow reduces the risk of debris embedding in the wet finish. Temperature and humidity influence drying times; too cool or too damp a setting can lead to haziness or cloudiness in the final coat. Even with all these precautions, the best practice remains testing a small, inconspicuous area before committing to a full panel. A test patch confirms compatibility of paint and adhesion promoter, helps calibrate spray pressure, and reveals any tackiness or orange peel that must be addressed before you proceed. For those who want to extend the reach of their project, the respray can be a chance to reassess the bike’s overall look and feel. You might combine a color swap with a finish update, such as moving from gloss to matte or choosing a metallic that shifts under different lighting. In some cases, riders pair the respray with new, compatible fairings that align better with their vision, using internal links to explore compatible options such as the Honda fairings collection Honda fairings collection. This approach ensures not only a refreshed color but also a cohesive package that fits the bike’s frame lines and ergonomics. When all is done, the respray should feel like a natural evolution of the bike’s identity, not a reconstruction of its history. The finish should be durable, easy to clean, and resistant to the everyday challenges of riding. Practically, that means a finish that will stand up to stone chips, subtle scratches, and the occasional fuel spill, all while maintaining color fidelity and gloss. If a rider questions the feasibility of DIY work, a professional detailer or body shop experienced in motorcycle paint can be an excellent choice. They bring experience with plastics, adhesion, and color-matching that can save time and reduce the risk of a botched job. For those who pursue this path, there is a wealth of knowledge to tap into, including step-by-step guides, mixing tests, and environmental controls that improve outcomes. To deepen your understanding, you may consult an external resource that outlines practical steps and troubleshooting tips for repainting motorcycle fairings, such as a comprehensive guide published in early 2026. This reference can complement the hands-on experience gained from preparing, priming, painting, and finishing your own panels, providing additional tips on sanding, panel alignment, and color calibration. If you prefer to explore parts and panels that match a specific model line, you can browse the Honda fairings collection and related options to coordinate a color scheme with existing decals and shapes. This alignment is not simply about color; it is about ensuring that the respray respects the bike’s silhouette and character, preserving the lines that make a motorcycle unique. The respray journey is therefore as much about patience and discipline as it is about pigment and gloss. It rewards careful preparation, layered coatings, and a finish that stands up to the road. In the end, the rider’s eyes will notice the depth of color, the clarity of the reflections, and the smoothness of the surface—qualities that tell the story of a job well done. External resource: https://www.motorcycle.com/how-to-repaint-motorcycle-fairings-a-practical-guide/
The Pro’s Arsenal: Tools, Materials, and Method for Respraying Motorcycle Fairings
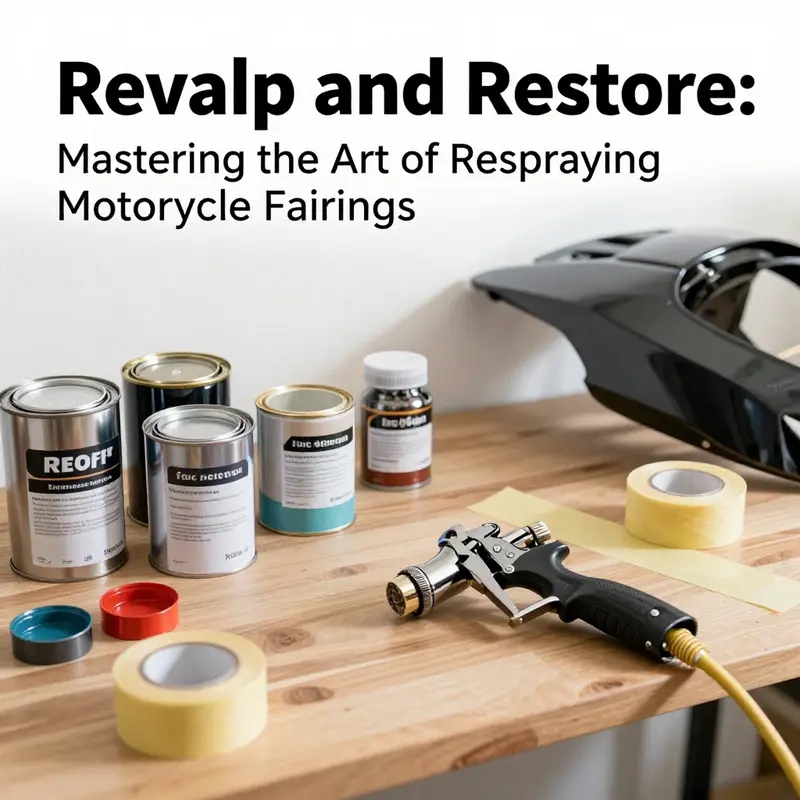
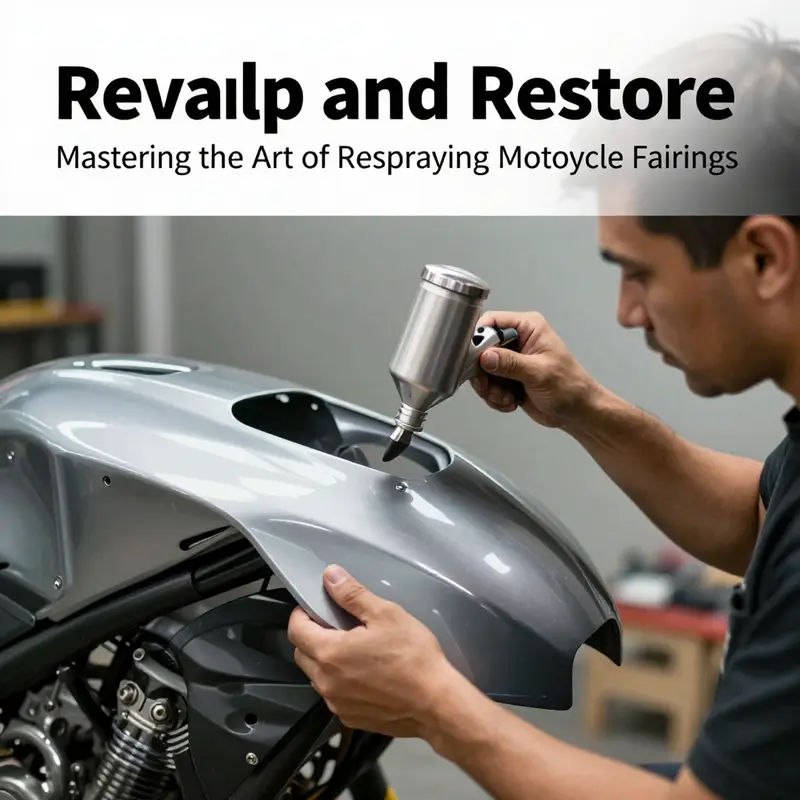
Respraying motorcycle fairings is more than a color change. It is a careful dialogue between surface, product, and technique. The right toolkit unlocks a showroom finish and a finish that stands up to sun, rain, and highway grit. This chapter threads together the essentials you need to move from a dull, faded shell to fairings that look as if they rolled off a factory line. You start by acknowledging that each step builds on the last: if the surface isn’t properly prepared, even the finest paint will not adhere or stay true to color. The goal is a uniform base, smooth texture, precise color laydown, and a clear coat that resists UV rays and minor scuffs. In practice, that means assembling a focused set of materials and equipment and learning to read the surface as you would a lean-timed piece of metalwork or plastic sculpture. A well-chosen kit reduces variability and gives you predictable results, which makes the difference between a DIY finish that looks homegrown and a professional result that endures.\n\nOne of the first considerations is the environment. While a full spray booth is ideal, not everyone has access to one. A dust-free workspace remains essential. If you lack a dedicated booth, create a clean, enclosed area with good lighting, minimal ambient dust, and controlled temperature. Simply setting up a plastic drop cloth and a couple of fans is not enough; you need containment and filtration so that airborne dust doesn’t settle into your finish between coats. After you’ve removed the fairings from the bike, you’ll be working on a stand or a worktable that spins, so you can tackle curves and edges with equal attention. The surface you see at the end should feel as deliberate as the effort you put into prepping it. With that frame in mind, gather the core categories of materials and equipment and then tune them to your shelter and your color plan.\n\nSurface preparation is the foundation. Sandpaper comes in a range of grits, and the choice isn’t arbitrary. For plastic fairings, you typically begin with a coarser stage to remove old paint and imperfections—think in the 800 to 1200 grit range. This initial pass eliminates major irregularities and gives the primer something to grip. From there, you step up through progressively finer grits, ending around 1500 to 2000. If you have access to an orbital sander, it can dramatically speed the process and deliver even results on curved surfaces, but a hand sanding technique, when done with care, can achieve a smooth, feathered edge as well. The goal is a surface that feels slightly tacky to a gloved finger, devoid of wax, grease, or old sealant, yet not scored with deep scratches that will telegraph through paint.\n\nThe cleaning regime is as critical as any grit sequence. A dedicated plastic cleaner or degreaser strips away grease, wax, and silicone residues that would otherwise repel primer and paint. Everything you apply afterward must adhere to a clean, dry base. This means wiping with a fresh microfiber to remove any resulting dust from the cleaning step. Some painters employ tack cloths between sanding passes to capture micro-dust before the next coat, and this extra step pays dividends when you’re chasing a flawless finish. Once the surface is clean, you can proceed to priming with intent. A high-quality automotive primer designed for plastic provides two essential functions: it fills minor imperfections and, more important, it creates a uniform, porous bed that bonds well with the subsequent color coats. For plastic surfaces, an adhesion-promoting primer or an appropriate adhesion promoter may be advisable. It’s a difference you can see in the evenness of the color and the depth of the final surface. The primer should be applied in thin, even coats, with time allowed for flash-off between passes, so you don’t end up with runs or sags. If you are working with multiple fairings, consider a light tack to verify adhesion and to check for pinholes or mismatches in the primer coat. These cues guide the decision to proceed with color or to apply another primer layer.\n\nWith the base prepped, the attention shifts to the paints themselves. For plastics, the preferred route among professionals is a two-part urethane system or an equivalent advanced coating designed for plastics. The advantage is clear: these systems offer robust color retention, improved UV resistance, and a forgiving glide under the spray when used correctly. Color matching becomes particularly important if you’re blending panels or replicating a factory finish. The base coat should be applied in several translucent, evenly spaced passes, allowing each layer to level out and dry before the next is laid down. This approach minimizes orange peel, a texture that can rob the surface of the smooth, glassy look your eye expects. A cautious hand and the right spray technique—thin coats, a steady distance from the surface, and controlled, consistent passes—are crucial for a uniform film that dries clear and true.\n\nAfter the color lays down and has cured, the clear coat seals and intensifies depth. The clear is not merely a cosmetic overlay; it provides abrasion resistance, UV shielding, and a glossy finish that can accentuate color. A quality clear coat must be compatible with the underlying base and designed to resist yellowing over time. Just as with primers and color, you’ll apply the clear in multiple thin coats, letting each one flash off and cure before the next layer. Some enthusiasts opt for a wet-sand step between coats to eliminate the finest imperfections and to refine the gloss, but this requires careful judgment and proper lubricants. When the final coat reaches the gloss you desire, resist the urge to rush into handling. Cure times will vary with temperature and humidity; patience here translates to a smoother final appearance and fewer blemishes.\n\nTools and equipment tie the process together in a way that is more than the sum of parts. A high-volume, low-pressure (HVLP) spray gun is the standard, paired with a reliable air compressor. The nozzle size will influence atomization and spray pattern; many practitioners favor a nozzle in the 1.3 to 1.7 mm range for color applications, and a slightly larger or smaller nozzle for primer or clear. The goal is a fine, even mist that lays down a uniform film rather than pooling or dragging. The air supply must be clean and dry; moisture and particulates undermine the finish as surely as a rough surface would. Alongside the gun, you need masking tape, masking film, and soft paper or fleece for edge protection and to protect chrome, lights, and visible hardware. A painter’s mask or respirator with organic vapor cartridges is non-negotiable, as is eye protection and disposable gloves. Partitioning off the area of the bike that should not be painted—rails, hinges, and fasteners—prevents rogue color from arriving where it doesn’t belong. A tack cloth or microfiber is useful for catching stray dust between coats. Finally, a dust-free work surface, a stable stand for rotating panels, and a way to warm the area modestly help paint levels settle smoothly in cooler environments.\n\nAn integrated approach to the process also means carefully planning color schemes and finishes. If you want a matte look, you’ll adjust your technique and your clear for that texture, ensuring the final layer doesn’t reflect like glass. For metallics or iridescents, you’ll need to slightly vary the base coat’s transparency and potentially apply a tailored clear that emphasizes the metallic flake. These finishes demand patience and a disciplined approach to layer thickness. A practical habit is to test the paint mixture and application technique on a small, inconspicuous area before committing to the entire set of fairings. This test patch can reveal how the color settles, how it lays down, and whether any surface irregularities become pronounced after curing. If you’re unsure, consider seeking a professional detailer or body shop experienced in motorcycle paint work.\n\nBeyond the kit, a thoughtful plan for time and budget prevents frustration. A well-organized schedule accommodates proper drying and curing times, which vary with temperature and humidity. It also leaves space for occasional touch-ups before you reassemble the bike. The budgeting angle is straightforward: invest in quality primer, base coats, and clears; they pay dividends in durability and depth of color. A simple rule of thumb is to avoid the cheapest options for the critical layers—primer and clear—and reserve the less expensive choices for noncritical components if you’re testing techniques or experimenting with color. As you assemble your toolkit, you’ll notice that some items are more essential than others, but the cumulative effect of good prep, proper coatings, and patient execution cannot be overstated. The result is a finish that holds its color against sun exposure, resists chipping at the edges, and reflects light with a showroom-like clarity.\n\nIf you’re assembling your library of reference images and guides, consider including a visual reference section that mirrors the layouts commonly seen in your preferred fairing shapes. The Honda fairings collection, for example, can serve as a practical reference for handling curves, edges, and panel transitions in a way that informs your masking and paint strategy. This internal reference, accessible through the collection page, anchors your plan and helps ensure consistency across panels. Honda fairings collection.\n\nExternal resources complement this chapter with practical, step-by-step instruction that translates theory into hands-on practice. For a detailed, tested approach to painting motorcycle fairings, consult How to Paint Motorcycle Fairings – A Practical Guide. This external reference provides additional context on technique, drying times, and troubleshooting that can save you from common missteps. By combining your toolkit with disciplined technique and reliable references, you’ll approach respraying as a craft rather than a set of chores, and the results will justify the effort.\n\nIn sum, the right materials and equipment are the bridge between intention and outcome. Sand, degrease, prime, color, and seal with patience and precision. The process rewards careful preparation as much as it rewards careful technique. The goal is a surface that looks flawless, feels smooth to the touch, and remains vibrant for years of riding. The toolkit you assemble—grits, cleaners, primers, urethane paints, clear coats, spray guns, and protective gear—becomes a language for translating your design into reality. And with the right environment, a plan that respects curing times, and a respect for the surface you’re refinishing, respraying motorcycle fairings becomes not just a task, but a crafted outcome that breathes new life into an old ride. External references and internal guides provide the framework, but the execution—steady hands, disciplined technique, and a patient mind—delivers the durable, showroom-like finish you set out to achieve.
From Peel to Perfection: Overcoming Common Challenges in Respraying Motorcycle Fairings for a Durable, Showroom-Ready Finish
Respraying motorcycle fairings is more than a cosmetic project; it is a test of patience, precision, and perseverance. The surface you begin with matters as much as the color you end with, because fairings live in a harsh orbit of heat, fuel vapors, UV light, and the constant flex of riding. The challenges riders face are rarely fatal in isolation, but left unaddressed they compound into a finish that peels, sags, or dulls long before its time. The path from a rough or faded base to a showroom-grade coating is a sequence of careful steps, each feeding the next: meticulous cleaning, proper sanding, the right priming, disciplined masking, precise paint application, and a durable topcoat. When these elements align, the finish not only looks fresh but stands up to the stresses that a bike’s daily life imposes. In this chapter, the focus is on the common stumbling blocks and the practical ways to overcome them, with an emphasis on results that endure rather than a quick hit of color that fades with the first hot day or the first fuel splash.
The most frequent enemy in any respray is paint adhesion failure. ABS plastic and fiberglass, the two most common fairing materials, stubbornly resist paint if the surface isn’t prepared to welcome it. A glossy, contaminated surface creates a barrier that repels bonding agents and primers, and that barrier becomes a fault line where paint eventually peels or flakes. The cause is rarely one misstep; it’s usually a chain of small omissions. The first link in that chain is cleaning. Degreasing with a dedicated plastic cleaner removes silicone, wax, and cruds that a casual wipe will miss. Then comes the key mechanical step: sanding to give the new coating something to grip. A light abrading with 400–600 grit sandpaper creates a micro-mechanical “tooth” for the primer, balancing enough bite with minimal glare from scratches that will telegraph through the paint. Some painters like to finish with a very fine scuff just before priming, ensuring the surface is uniformly textured. The third essential step is priming—specifically a plastic bonding primer designed for automotive or motorcycle use. A primer tailored for plastics is more forgiving of flex and heat than a general-purpose primer, and it helps prevent the dreaded adhesion failure that makes a respray look excellent at first but fail in weeks. Skipping degreasing, skipping the right sanding, or skipping a dedicated plastic primer is not a minor error; it is a shortcut that almost always costs the final finish.
A second major hurdle is achieving a smooth, even finish. Orange peel, runs, drips, and sags betray a finish applied with too much force or too little control. Flexibility is the critical property here. Rigid paints crack as the fairing flexes during riding, so it is wise to use paints formulated for flexible surfaces. The general strategy is to move away from traditional rigid enamel-like paints toward flexible polyurethane systems or flexible acrylics that can absorb minor flexing without cracking. The application technique matters almost as much as the chemistry. An HVLP spray gun is highly recommended for its superior control of atomization, which translates to finer droplets and a smoother laydown. The distance from the surface matters too: a consistent 6–8 inches helps keep the spray pattern uniform and reduces the risk of heavy spots that dry into texture or sags. The environment is part of the technique as well. A clean, dust-free, temperature-stable space minimizes defects that would otherwise require repaints. If you don’t have a spray booth, a well-sealed room with good filtration and a steady temperature is the next best option.
Color matching presents its own set of complications. The original paint on an aging bike has likely oxidized, faded, or changed hue over years, making a direct color match difficult. In these cases, two reliable strategies exist. The first is to obtain a custom-mixed paint from a professional shop that can digital-match a color against a representative chip or a newer panel, ensuring color fidelity across the field. The second strategy is uniformity: respraying the entire panel or fairing section to achieve a seamless match and avoid visible seams or mismatched tones. Either approach is preferable to attempting a spot repair that leaves the repaired area conspicuously different. The key is patience and testing. Tackle a small, inconspicuous patch first to evaluate adhesion, color, and finish before committing to a larger area. When color matching becomes a necessity, the guidance of a shop with digital color-matching capabilities becomes invaluable, and the conversation should include the ideal base coat, the exact tint system, and the appropriate clear for protection and gloss retention.
Durability is the long game for resprayed fairings. The coating must withstand fuel splashes, road debris, UV exposure, and temperature fluctuations across seasons. Common acrylics or paints not designed for automotive or motorcycle use are simply not up to the task. The recommended path is to finish with a durable topcoat selected for fuel resistance and impact resistance. A clear urethane topcoat is a traditional choice, offering a robust barrier against UV and abrasion. Some riders opt for even more advanced protection, such as ceramic-based clear coats that promise enhanced gloss retention and chemical resistance. Whatever topcoat is chosen, it must be compatible with the base color system and applied in the recommended sequence with proper curing times. Curing is more than just time; it is a matter of chemistry and temperature. In most products, full cure can take 24 to 72 hours, depending on product formulation and ambient conditions. Rushing this step invites trouble in the form of soft film that can smear or dent under decals, stickers, or minor impacts.
The finish’s long-term health also depends on the surface not being touched or stressed before it reaches a stable state. A common mistake is rushing to handle the fairing as soon as the topcoat is superficially dry. The statement “dry to touch” and “fully cured” are not interchangeable. Dry-to-touch refers to surface dryness, not the film’s chemical cure. Until the coating has fully cross-linked, it remains vulnerable to marring and solvent damage, which can ruin an otherwise perfect job. A cautious window of drying time should be observed, and then a full cure before exposure to fuel vapors or high heat. This patience pays off in a finish that resists yellowing from UV light and remains glossy and hard-wearing well into the ride’s life cycle.
An often-underappreciated factor is masking. Even well-prepared surfaces can be derailed by paint creeping into areas that should stay clear, or by the collector’s fault of masking edges leaking during spraying. The masking step is not just about coverage; it is about preserving the lines and features that give a bike its character. Meticulous masking of lights, mirrors, and chrome takes time but saves rework later. A clean edge—achieved with high-quality masking tape and careful burnishing of the tape edge—prevents bleed and ensures crisp, professional boundaries. Another crucial aspect is the order of operations: apply primer, then base color, then topcoat. Each layer should have the right cure interval. Skipping a cure between layers or applying a second coat too quickly can trap solvents, causing blushing or solvent pop that mars the surface before you even see the color.
For riders who are contemplating a DIY respray, there is value in treating the process as a controlled laboratory experiment in disguise. Test early and test often. A small panel or sample piece can reveal how the paint lays down, how it levels, and how it reacts to heat and light. If you’re painting in a non-professional setting, creating a temporary protectant environment helps reduce dust and contaminants. Even tiny particles can become embedded in a fresh finish and become visible once the gloss climbs. The discipline to maintain cleanliness, temperature, and dryness throughout each stage cannot be overstated. Mask off the surrounding components with care, and consider a temporary cover for the entire bike if you’re working in a workspace that isn’t perfectly clean. Environmental control is the silent partner of a good finish.
As you plan a respray, a broader question often arises: should you replace or repair a panel? This is not merely a cost concern; it is a decision that affects paint strategy. If the panel is warped, cracked, or badly deformed, the added work and potential color- and texture mismatches may push you toward replacement. Conversely, minor damage or fading that is localized can be repaired with careful sanding, spot primer, and color blending. The blended approach requires practiced technique in feathering edges and maintaining a consistent texture across transitions. In practice, the choice depends on the extent of the damage and the project’s final goals. A carefully blended patch can be indistinguishable from factory panels when done correctly, but it demands more time and a steadier hand. Conversely, a full panel respray offers uniformity and a simpler color match, especially in the context of an uneven fade across a larger area.
In the broader view, the materials and the technique must be understood as parts of a single system. The chemistry of the base color, the bonding of the primer, the resilience of the topcoat, and the curing environment all interact. The best outcomes happen when these elements are chosen with an eye toward the bike’s expected conditions—fuel exposure, sun exposure, rain, and the occasional bump from road debris. The successful respray, then, is less about chasing a perfect paint swatch and more about building a resilient, flexible system that remains stable under real-world stresses. When the finish is done well, the bike doesn’t just look new; it resists the creeping signs of age that plague poorly applied finishes, such as microcracking, dullness, and color drift.
If you want a practical pointer beyond the theory, consider the broader context of your project. For those considering future color changes or pattern work, planning your color strategy at the outset can prevent rework later. For instance, deciding on a color that plays well with a clear coat and a flexible base can reduce the risk of yellowing or hazing on warm days. If you need a real-world reference to the types of panels and shapes you may encounter, a quick browse of the Honda fairings collection can offer context on fitment and lines, helping you plan masking and edge work with greater confidence. You can explore this reference here: Honda fairings collection.
Ultimately, the goal of respraying is not simply to repaint but to restore or elevate the bike’s presence with a finish that lasts. The challenges described here are not insurmountable obstacles but milestones on a measured path toward that goal. Patience, preparation, and precision are your allies. The more you respect the sequence—from surface prep to the final cure—the more forgiving the final result will be to the inevitable ride-day realities. When the finish emerges, it should do more than please the eye; it should endure the heat of summer and the toll of highway speeds, maintain its gloss through wash after wash, and resist the weathering that years of use inevitably impose. That is the essence of a respray that stands the test of time, turning a cosmetic project into a durable investment in the bike’s character and ride experience.
External resource: For additional guidance on selecting paints and finishing techniques, see a comprehensive external guide on paint selection for motorcycle fairings: How to Choose Paint for Motorcycle Fairings – A Practical Guide.
Beyond the Coat: The Economic Equation Behind Respraying Motorcycle Fairings
When a rider weighs the option to respray motorcycle fairings, the decision hinges on value, longevity, and willingness to invest in aesthetics that ride with you every mile. Respraying is not merely applying a new layer of paint; it is an investment in durability, fit, and identity. The economics unfold as a balance between upfront expenditure, expected performance, and the likelihood of future needs. Several core factors shape the final cost and the long-term value.
First, the labor component sits at the core of most quotes. In many shops, skilled painters bill between seventy-five and one hundred fifty dollars per hour, depending on the project complexity. A straightforward color change on a clean set of ABS fairings may require fewer hours than a full rework with repairs and graphics. The variability reflects expertise as well as time. Intricate fades, ghost graphics, or custom metallics demand precise masking and multiple coats that must dry cleanly. The hourly rate translates into a total that can swing widely with scope and how aggressively a shop negotiates its labor. A seasoned painter with plastics experience tends to justify a higher rate if the result promises longevity and a precise fit.
Beyond labor, the choice of paint matters. High gloss, matte textures, metallics and pearlescents each carry material costs and application challenges. Premium paints for plastics resist chipping and fading but come with higher price tags and longer curing windows. The finish helps determine not only appearance but durability under riding conditions. A glossy finish may require extra coats and longer polishing; matte textures demand careful prep to maintain texture fidelity. The long-term performance of these finishes informs future maintenance and how soon you might repaint again.
Surface preparation is the unseen heavy lifter. Fairings harbor micro dents, scratches, and adhesive residues. Thorough prep improves adhesion and longevity. Sanding, priming for plastics, and addressing repairs add tangible costs and hours. Skipping prep may yield a faster job but can lead to early wear and costly rework. The economic implication is clear: investing in prep pays dividends in durability and aesthetics that last through seasons of riding.
Design complexity and color strategy add to the bill. A single color is straightforward but still requires color matching. Multi-color schemes, racing stripes, or custom graphics increase masking time and edge work. Special finishes such as gradients or textures require tools and techniques that push price upward but can sharpen the bike’s visual signature. The value lies in alignment with the rider identity and potential resale appeal.
Regional variation matters. Labor rates reflect local markets and shop overhead. Urban shops may command premium pricing, while smaller towns may offer value. Model-specific fit and detailing influence prep approach and finishing outcomes. Experienced technicians who understand a bike model can save time and reduce the risk of misalignment or finish flaws during reassembly.
From a budgeting standpoint, many riders compare respray to replacement. If the shell is sound, respray often makes economic sense versus buying new panels and possible shipping costs. A quality respray that uses proper primers and plastics-approved paints can last several seasons with good maintenance, while a cheaper job may fade or chip sooner, triggering additional cost. Long-term value improves when the finish resists wear and stays easier to clean.
To navigate confidently, request an itemized quote that breaks down labor, materials, prep, masking, and finishing steps. Ask about curing times, dust control, and warranty on workmanship and materials. A test on a small area can help avoid surprises on visible panels. If you want broader context on cost ranges beyond respray versus replace, a broader guide can be consulted at https://www.bikebandit.com/motorcycle-fairing-replacement-cost
Green Finishes, Safer Rides: Environmentally Mindful Respraying of Motorcycle Fairings
Respraying motorcycle fairings is rarely just about color. It sits at the crossroads of art, engineering, and responsibility. When a rider refreshes or reinvents a bike, the process invites a careful reckoning with safety and the environment. The air in a spray area, the warmth of a curing surface, and the presence of solvents remind us that a respray is a dialogue with materials science. To honor the bike, the technician, and the neighbors, a disciplined approach to safety and sustainability becomes as essential as the choice of color and finish. The chapter below threads practical steps with a mindful ethic, so the transformation of the fairings does not come at the expense of health or the wider ecosystem. In practice, this means cultivating ventilation, personal protection, careful material handling, and thoughtful waste management that scales from a home workshop to a professional body shop.
Ventilation forms the backbone of a safe and clean respray. Even in a modest garage, the right airflow reduces volatile organic compounds (VOCs) and helps draw solvent vapors away from breathing zones. A dedicated spray booth functions as a containment zone with exhaust designed to capture overspray and minimize drift. In spaces without an industrial setup, portable filtration and regular air exchanges can still make a meaningful difference. The goal is to dilute fumes to safer levels and prevent them from landing on skin, eyes, or lungs. During curing, heat and solvents drive off more volatiles, so good ventilation also supports a safer finishing phase. Clean air supports a cleaner workspace, reduces dust intrusion, and helps the final finish retain gloss and depth. Sealing off the spray area, using drop cloths, and keeping containment tidy also reduce the chance that fumes migrate to adjacent rooms or outdoor spaces.
Protection for skin, eyes, and lungs completes the core safety triad. Nitrile gloves guard against skin contact with solvents and paints, safety goggles shield against splashes and airborne particles, and a respirator with organic vapor cartridges provides more reliable protection than a simple dust mask. Fit testing and cartridge replacement according to manufacturer guidelines are essential. PPE is more than a barrier—it signals that the work is conducted with discipline and care. Breaks to ventilate, monitoring for irritation or dizziness, and mindful handling of materials all reduce overexposure. Good PPE habits also minimize contamination of work surfaces and completed parts.
Surface preparation is the quiet, transformative stage that enables durable adhesion. Thorough cleaning removes wax, grease, and particulates; proper sanding feather-edges and creating a uniform surface improves primer and paint adhesion. A well-prepared surface reduces the number of coats needed, saving solvent, energy, and time, while improving the final finish’s longevity against UV exposure and road wear. The preparation stage sets the tone for a finish that lasts and limits environmental impact by reducing waste and rework.
The actual spraying phase centers on controlled atomization and routine inspection. A high-quality spray gun—air-assisted or HVLP—applies thin, even coats rather than heavy layers. Allow adequate drying time between coats to minimize runs, solvent entrapment, and dust adhesion. Maintain consistent spray distance, motion, and trigger control to reduce overspray and material waste. Between coats, view the surface under proper lighting for dust nibs or imperfections that can be corrected with gentle scuffing and a touch-up rather than a full recoat. A final clear coat adds protection, gloss, and depth while sealing in color and providing abrasion resistance. Each well-executed coat reduces the need for rework and the overall ecological footprint of the project.
Storage, handling, and waste management round out responsible practice. Store paints, primers, and solvents in cool, dry places away from heat and direct sunlight; seal containers tightly when not in use; and keep used materials in closed, labeled waste bins. Separate waste streams for used solvents, contaminated rags, and spent materials, and recycle where possible. Do not pour solvents or paint down drains, and comply with local hazardous-waste regulations. Planning batches to minimize leftovers reduces disposal challenges and environmental impact.
Eco-friendly options—low-VOC paints, water-based additives, and compliant formulations—offer meaningful ways to reduce environmental impact without sacrificing finish quality. These products align with growing regulatory expectations and a rider’s sustainability values, supporting durable finishes and healthier workspaces for everyone involved.
Final thoughts
In summary, respraying motorcycle fairings is not just an aesthetic improvement; it’s a comprehensive process that can greatly influence customer satisfaction and business success. Understanding each step—from the essential techniques and materials involved to the potential challenges and safety measures—is vital for ensuring a high-quality finish. By investing in proper tools and continuously educating staff on best practices, motorcycle businesses can enhance their services and stay competitive in a vibrant market. Incorporate these insights into your operations, and watch as customer interest and satisfaction soar.