Transforming the look of a motorcycle while protecting its bodywork can be a game-changer for business owners in the automotive industry. Adding a clear wrap to a motorcycle’s curved fairing not only elevates its visual appeal but also safeguards against scratches and minor abrasions. This guide will explore the critical aspects of surface preparation, the best techniques and materials for application, and the numerous benefits and considerations of clear wrap for motorcycle fairings. By understanding these components, business owners can deliver exceptional service and results to their customers, enhancing the overall motorcycle ownership experience.
Laying the Groundwork: Surface Preparation for Clear Wrap on Curved Motorcycle Fairings
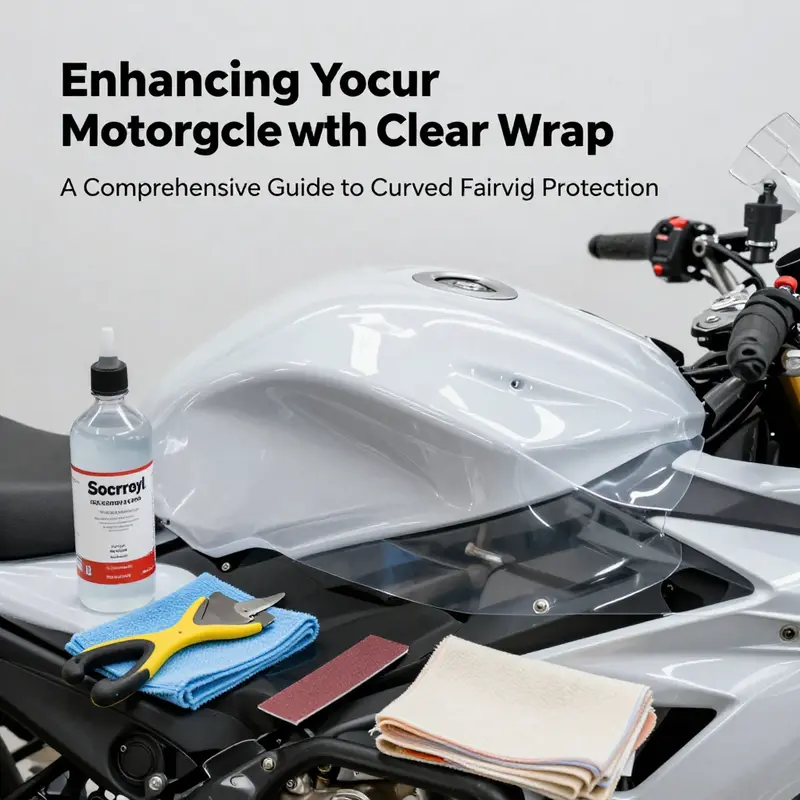
The gleam of a newly wrapped curved fairing starts long before the film meets the plastic. It begins with meticulous surface preparation, a patient, almost methodical ritual that determines whether the final finish looks showroom-new or merely decent. When a rider selects a clear wrap, the intention is to protect and enhance without painting. The curved geometry of fairings, with its tight radii and sweeping contours, only magnifies the importance of a flawless base. This chapter follows a single through-line: preparation is not a step to be rushed, but the foundation upon which every crease, bubble, or edge must be measured and managed. The goal is to create a surface that invites adhesion, channels air out of every crease, and welcomes the wrap to settle in place with minimal resistance. In practice, that means disassembly, cleanliness, careful inspection, and a climate-controlled workspace that respects the film’s sensitivities and the fairing’s deformable nature. It also means recognizing what lies beneath the surface—chips, scratches, residual wax, or embedded dust—that can sabotage adhesion or trap air when the wrap is applied to a curved plane.
The first move is not glamorous, but it is fundamental: complete disassembly. The fairing does not exist in isolation. It is part of a system—a sculpture of plastics and composites that carries lights, mirrors, controls, and a network of fasteners. Removing these components opens up access to every curve and corner, especially on the inner radii where dust and oil accumulate most stubbornly. When mirrors, signals, and hardware obstruct access, the film’s edge will follow the path of least resistance rather than conform to every contour. A clean, obstruction-free working area makes it possible to prep the entire surface in one pass, achieving consistent texture and depth of bond across the largest possible area. This step also reduces the risk of obstructing adhesives during later trimming and edge finishing. In environments where a clean disassembly is feasible, the operator can examine each seam for signs of wear or micro-cracking that might transfer to the wrap and become visible in the final finish.
With the fairing exposed, the cleaning begins. A gentle wash with mild soap and water removes loose dirt and road grime without introducing aggressive solvents that could cloud the surface or leave residues. Rinsing thoroughly is essential because any soap film trapped under the film can cause hazing or allow micro-bubbles to form as heat is applied during the wrap process. After the initial rinse, a secondary step using 70% isopropyl alcohol targets the invisible grease and oil films that soap alone might miss. The alcohol acts quickly, leaving a dry, residue-free surface. Oil residues, even microscopic ones, are the enemy of a clean bond. They create a slippery barrier between the vinyl and the fairing, encouraging air pockets and detachment along the curved sections where the film must bend and stretch. Allow the surface to dry completely in a dust-free environment before proceeding. The importance of dryness cannot be overstated; any lingering moisture becomes a tunnel for dust to ride into the adhesive layer or to form micro-bubbles as the wrap cools and contracts.
The conditions under which the preparation takes place influence the outcome as much as the steps themselves. Direct sunlight acts like a heat lamp on those delicate curvatures and can speed up the adhesive cure or prematurely set the film in a way that traps moisture or dust beneath. High humidity also introduces a risk: moisture trapped under clear vinyl can appear as clouding or whitening, particularly along tight curves where air must escape through multiple layers. The ideal environment is a clean, shaded space with a stable temperature and low humidity. If possible, a workshop with controlled climate or a well-ventilated garage can make a difference. In cases where environmental control is limited, strategic timing matters: wrap during a cooler, drier portion of the day and reduce exposure to any lingering moisture on the fairing’s surface by allowing extra dry time after the initial cleaning pass.
Beyond cleanliness and climate, the surface’s physical condition must be assessed with care. Clear wrap is forgiving, but it is not magical. Curved fairings magnify any flaws. Shallow scratches, pitting, or micro-scratches can act like tiny anchors for dust and debris under the film. Lightly inspecting and addressing surface imperfections keeps them from becoming visible through the vinyl as the film settles. Minor scratches might be improved by a careful, non-abrasive polish or by smoothing with a very light sanding if the underlying material permits. The aim is not to remove material but to create a uniformly textured surface that promotes even contact with the adhesive. This is delicate work: aggressive sanding or abrading can dull paint, remove protective coatings, or alter the fairing’s surface in a way that becomes noticeable once the wrap is applied. If there is any doubt about the fairing’s tolerance for abrasive work, it is wiser to stop and consult a professional or revert to techniques that preserve the integrity of the original surface.
Part of inspection is also about planning the wrap’s entry and its edges. Curved fairings present a constant challenge: the film must lap around corners with enough slack to allow movement while resisting stretch-induced wrinkling that could trap air. That planning begins during preparation by masking off areas not intended to be wrapped and by visualizing the wrap’s progression across the surface. A simple, clear mental map of where the film will travel helps in arranging the workspace so that the operator can apply the film from the center of the curved panel outward, smoothing as it goes. This approach reduces tension at the most pronounced curves and minimizes the probability of lifting at seams and corners. In another sense, preparation is also mental rehearsal. A steady pace, a clear line of sight to every curvature, and a working plan for how to tuck along tight radii all contribute to a cleaner result than improvisation on a curved surface would.
Product choice matters as much as technique at this stage. The wrap film used for curved fairings should have several properties tailored to the task. It should be highly flexible to bend with the curves without kinking, while boasting UV resistance to minimize yellowing over time. Self-healing properties are a bonus, allowing minor surface imperfections to disappear with heat, keeping the surface pristine after handling and riding. Clarity is another critical attribute; any cloudiness or haze under the wrap can ruin the perceived depth of the finish, especially on high-gloss or metallic paints. A film designed for automotive and motorcycle use often carries these traits in combination, but it is essential to verify compatibility with curved geometries and the fairing’s material composition. The choice of film is not a cosmetic decision alone; it represents a commitment to the wrap’s long-term durability and the ease with which future maintenance or replacement might occur. Even the most precise preparation cannot compensate for a film with the wrong balance of stretch, elasticity, and adhesion.
With these preparations in place—the fairing fully disassembled, the surface thoroughly cleaned and dried, the environmental conditions controlled or optimized, and the surface condition carefully assessed—the stage is set for the wrap to meet the surface in the most thorough way possible. This is when the rules of micro-adhesion come into play: small, deliberate contacts that guide the film into place, rather than heroic, large pulls that risk trapping air on any curved surface. The hands become instruments of fidelity: steady, measured pressure with a squeegee, deliberate heat to encourage the film to take the curve without ballooning, and constant attention to the film’s edge as it approaches the fairing’s seams. The best practitioners treat preparation not as a final act but as a prelude to precision, a quiet, almost ceremonial moment that welcomes the wrap to perform as designed.
In some scenarios, a rider or a shop may opt to consult published protocols or professional guidelines to refine their approach. While the principles described here are universal—thorough cleaning, careful drying, environmental awareness, meticulous inspection, and a measured application—the field benefits from broader experience. For readers seeking step-by-step demonstrations or troubleshooting tips, there are comprehensive guides that lay out multiple techniques for curved bodywork. A practical starting point can be to explore general wrap workflows and then tailor them to curved fairings. For riders aiming for a structured, model-agnostic approach, a recent, detailed guide provides a solid framework for the process, including handling of curved panels and how to manage edge finishing without compromising the paint beneath. This is especially useful when the target is a high-gloss, clear wrap that must complement, rather than compete with, the aesthetic of the bike’s curves. See a broad, model-agnostic walkthrough that emphasizes preparation and technique, with visuals to illustrate the critical moments of surface contact and edge control.
As a practical measure, consider integrating a visit to a curated catalog of fairing collections for reference during prep. While the breadth of models and shapes can be daunting, selecting a representative sample of curved panels to study can illuminate how different contours influence the preparation approach. For riders targeting a specific model family, exploring a general fairings collection can provide context for the shapes you will encounter and the typical challenges you will face. This broader perspective helps in planning the preparation workflow, from tool choices to edge finishing strategies. The goal is not to mimic a single egress path but to build a flexible, repeatable routine that respects curvature while preserving the underlying finish.
Ultimately, the quality of the surface preparation is a predictor of the wrap’s performance on curved fairings. When done correctly, the base becomes a compliant canvas that accepts heat, conforms to radius turns, and remains stable under tension. The result is a film that lays down smoothly, with minimal wrinkles and an appearance that remains true to color and clarity. The rider benefits from a finish that resists minor abrasions and scratches and a transparent layer that showcases the fairing’s original geometry rather than obscuring it. The final impression is a seamless blend of protection and aesthetics, a clear coat that rides with the bike rather than fighting it. As the wrap cures and the film settles into the curves, the importance of the preparation remains visible in the absence of air pockets, the evenness of the edge lines, and the uniform glow across the fairing’s surface. Those who have learned to respect preparation often report that the difference between a professional finish and a DIY patchwork lies not in the final step but in the quiet discipline of the steps leading up to it.
If you are seeking a model-agnostic starting point for this journey, consider browsing a general fairings collection for inspiration and practical references. These collections provide a sense of the shapes you will encounter and can help you anticipate how to approach the most challenging curves. For readers who want to connect this preparation philosophy with a broader range of parts and kits, there is a curated catalog of fairings that can offer a sense of scale and curvature without tying the discussion to a single model. When you are ready to move beyond preparation into application, you’ll find that the foundation you’ve built here makes the subsequent steps more intuitive and more likely to produce a consistent, bubble-free result. For further exploration of model-specific contexts, you can consult a general fairing catalog or the broader wrap-focused guides that emphasize preparation as the essential framework for success. This integrated approach—start with clean, accessible surfaces, verify and protect the base, and then apply the wrap with measured steps—translates into a final finish that is not only protected but also aesthetically faithful to the bike’s curvature.
For riders who want a practical touchstone that ties this preparation philosophy to real-world practice, consider reviewing a model-agnostic guide that emphasizes surface preparation and application techniques. The guidance there highlights how to maintain a dust-free workspace, how to manage air removal on curved panels, and how to protect edges and seams during final trimming. Engaging with such resources can help you pair the disciplined preparation described here with the hands-on steps of wrap installation, giving you a clear path from bare fairing to a pristine, protective clear wrap. And when you’re ready to expand into more advanced techniques, a linked internal reference point can help you explore additional resources that address curved surfaces and film behavior in greater depth. This integrated approach ensures that the process remains coherent across chapters and that the chapter on preparation serves as a solid foundation for the role of installation technique and post-application care that follows.
For readers who want to dive deeper into hands-on guidance, a detailed external resource provides step-by-step instructions that complement the principles outlined here. It covers surface prep, heat-assisted conforming, bubble-free adhesion, and edge finishing, with careful attention to curved geometries and the specific challenges they pose. Such additional reading can be a valuable companion to the preparation-focused narrative, offering practical visuals and examples that reinforce the concepts discussed and help readers translate theory into reliable, repeatable outcomes. External resource: How to Apply Motorcycle Vinyl Wrap – Step-by-Step Guide. This resource can help bridge the gap between the discipline of preparation and the precision of application, ensuring a smooth transition from base to finish. As with any complex finishing task, the interplay between preparation, technique, and environment determines the quality of the final impression. In this case, preparation is the quiet partner of precision—the part of the process that makes the rest possible and sets the stage for a finish that endures under the road’s wear and the bike’s daily demands.
If the reader wants a quick waypoint to reference during work, a practical reminder would be to keep the workspace as clean and controlled as possible, to verify the surface is completely dry before any film contact, and to manage the curve with regular, small adjustments rather than large, sweeping motions. The discipline of preparation is a defender against common wrap problems: dust entrapment, micro-bubble formation along radii, edge lift at seams, and premature adhesive set when heat is applied too aggressively. In mastering these reminders, riders and technicians can approach curved fairings with confidence, knowing that the base they’ve prepared will respond predictably to the wrap’s demands. And with that assurance, the transition from preparation to application becomes a sequence of deliberate, repeatable actions that culminate in a finished product worthy of the bike’s curvature and the owner’s pride. The journey from bare plastic to a protected, clear-glow surface is not merely a technical task; it is a craft that blends cleanliness, patience, and a respect for the geometry of curved fairings. The result is a protective layer that is as much about preserving the bike’s identity as it is about extending its life on the road.
In closing this chapter, the overarching message remains: preparation determines outcome. If the surface is pristine, the film can lay down with confidence; if dust or oil clings to a curve, the wrap pays the price with blemishes. The rider who treats preparation as the first, most deliberate act of the wrap process reaps the benefits of a finish that endures. The curvature of the fairing no longer feels like a constraint but a canvas that the prepared surface can embrace. And as the wrap cures and the bike returns to the road, the result speaks as much to the discipline of the steps taken before installation as to the film’s own properties. The road ahead for any wrapping project begins with a careful, patient, and thorough preparation that respects both the material and the geometry it must cover. If you keep that in mind, the curved fairing will reveal the full potential of a clear wrap that protects and enhances without altering the essence of the bike’s shape. The path from disassembly to a finished edge becomes not a hurdle but a practice—one that rewards careful hands, steady decisions, and a clean environment with a flawless, bubble-free result. Access to additional model-agnostic references and collections can help you contextualize your own process, but the heart of the chapter remains the same: thorough preparation is the gateway to a durable, aesthetically faithful clear wrap on curved motorcycle fairings.
Conforming to Every Contour: Mastering Clear Wrap on Motorcycle Curves
The moment a rider considers a clear wrap for curved motorcycle fairings, the mental picture often treads between pristine optics and battle-tested protection. A transparent film can sharpen the lines of a bike, guard the paint from road rash and minor abrasions, and deliver a customized sheen without painting. Yet the allure of a flawless, bubble-free finish on a curved surface demands more than a straight pull from a roll. It calls for a patient, deliberate approach that respects the geometry of each contour and the performance demands of a motorcycle that spends time in wind, heat, and dust. The journey from idea to a smooth, nearly invisible shield begins with preparation, flows through careful material choice, and culminates in a methodical application that listens to the film’s needs as much as to the bike’s curves. In this chapter, we traverse that journey with a narrator’s eye for the bike’s anatomy, the film’s behavior, and the hands-on discipline that transforms a garage project into a finish worthy of professional pride, all while keeping the rider’s eye on the road ahead.
The first truth to consider is surface condition. A clear wrap has to meet a surface that is clean, dry, and free of anything that can compromise adhesion. Dirt, wax, grease, and even micro dust can create valleys where air pockets hide, and those pockets can become stubborn bubbles once heat is applied. The standard advice—wipe the fairing with a dedicated cleaner and a soft, lint-free cloth—becomes a linchpin in the craft. It’s not merely cosmetic. It’s functional, because a clean surface reduces the risk of lift along the edges and ensures that the adhesive layer can prime itself to the shape beneath. Special attention should be given to seams and edges; these are the zones where debris can linger and where the wrap must eventually bend and settle. Even if the fairing has a glossy finish, a light, controlled scoring or sanding can create a micro-texture that improves grip for the film. This step must be done with care, to avoid marring the underlying paint or plastic. The goal is not roughing the surface to the point of damage, but inviting the film to anchor confidently around every radius and edge.
Material selection follows from that foundation. The most forgiving clear wraps for curved fairings are high-quality, flexible vinyl films designed specifically for automotive and motorcycle use. These films typically offer superior conformability, durability, and clarity compared with generic alternatives. The texture and surface behavior of a true automotive/motorcycle wrap are engineered to respond to heat, stress, and time the way a bike responds to air and speed. Look for features such as UV resistance to prevent yellowing in sunlight, self-healing properties that smooth minor abrasions, and a clarity that remains true across the curvature. When you choose film with these characteristics, you’re selecting a material that can bend and spring back around tight radii and creases without compromising the visual integrity of the bike. The wrap should be thick enough to resist micro-scratches yet supple enough to lay down with a single, even motion. The selection process is not a cosmetic detour; it is a practical decision that determines how smoothly sections will lay and how forgiving the film will be around the most stubborn curves.
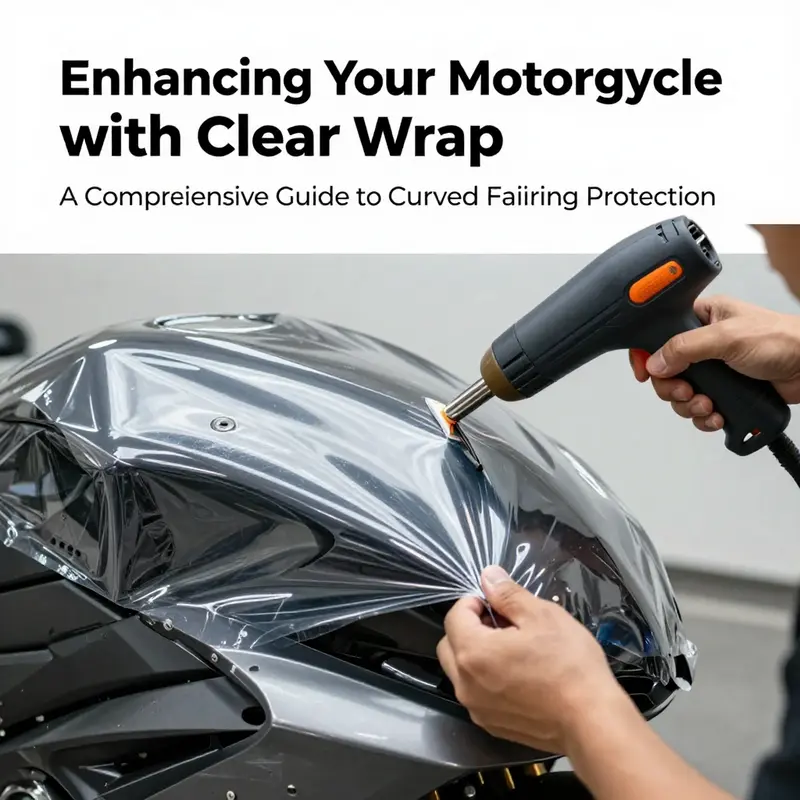
The application phase unfolds like a careful choreography. Begin by placing the film on a flat, clean work surface and aligning it with the fairing’s most prominent contours. This alignment is not about forcing the film into position; it’s about letting the geometry guide the material to where it must hug the surface. Start the wrap at the center of the largest flat or gently curved area, then progress outward in small, deliberate motions. A squeegee or a hard-edged plastic card becomes an extension of the hand, pushing out air pockets and drawing the film toward a uniform adhesion. Patience here is not an indulgence; it is the entire point of achieving a bubble-free result. When you encounter curves that depart sharply from flat planes, the film’s natural pliability becomes your ally. Warm the film with a heat tool at a conservative setting, mindful of the film’s tolerance. A typical mid-range temperature of about 100 to 150 degrees Fahrenheit (approximately 38 to 65 degrees Celsius) is enough to relax the polymer, enabling it to settle into creases and around tight radii without softening to the point of distortion. Heat must be applied evenly and briefly, and never concentrated in a single spot that could scorch or scorch-bake the edge. The practice of heating should be iterative: heat a small region, squeegee it into place, confirm the contour, then move to the next segment. In this way, the film can be coaxed to follow every contour from the crown of the fairing to the underside of a belly curve.
The heart of the technique lies in how you manage the transition zones—the corners, the tight radii, and the edges where the film must wrap around a 3D form. For pronounced curves, gentle stretching with fingertips or a controlled application of heat allows the material to ease into shape rather than bunch or buckle. The trick is to balance flexibility with control. Overheating can shrink the film unevenly or weaken the adhesive, especially near critical edges where the wrap needs to lock in place. Conversely, insufficient heat leaves the film too stiff to conform, resulting in stubborn wrinkles that will not smooth out with mere pressure. The goal is seamless conformity, a look that whispers “factory finish” rather than “home wrap.” As you advance, a re-check of each area with the squeegee ensures the elimination of micro-bubbles and the smoothing of any residual creases. The process is not a single pass but a dialogue between film, heat, and pressure, conducted in small, measured steps that respect both the run of the fairing and the physics of the film.
Trimming and finishing demand equal part precision and restraint. Excess material around edges and seams must be trimmed with a sharp blade, close to the edge but never scraping the paint or the plastic. Corners and tight curves require extra care; a nick in the film at a critical bend can compromise the seam’s integrity and invite peeling later. After the initial application and trimming, re-squeegeeing the entire surface helps ensure that the film seats correctly over rivets, seams, and any sculpted features. The curing window for the wrap is not a suggestion; it is a practical requirement. Allow the film to cure for at least 24 hours before the bike resettles under riding conditions. During this period, avoid washing or exposing the surface to moisture and temperature swings that could impede the adhesive’s full bond. The longer the cure, the more confident the wrap will stay fixed, especially on the curves that challenge adhesion.
Bubbles are part of the process, not a failure. They often appear where dust hid during installation or where the film’s cling met a stubborn pocket of air. In most cases, small bubbles can be coaxed out with gentle heat and a rolling motion with the squeegee from the center outward. Larger pockets require careful attention, possibly re-heating the area to re-flow the material so the air can escape toward the edges. If the film resists, take a step back and re-address the alignment, but never force a stubborn area into place; forcing can create creases or lift that will be visible once the wrap cools. The aesthetic payoff is a smooth, glass-like surface that makes the fairing look as if it has been molded from a single piece of clear shield—an unbroken line wrapping the bike’s silhouette and echoing the rider’s intent to protect and personalize in one clean motion.
The decision to invest in professional installation surfaces in the most challenging contexts. A fairing’s curvature can be more intricate on some models than on others, and the margin for error shrinks as the complexity grows. In these situations, a seasoned installer brings experience with the film’s memory, a practiced eye for alignment across complex geometries, and the proper combination of tools to deliver a flawless, bubble-free surface. It is not a sign of retreat but a recognition that some contours demand a higher level of expertise to meet the standard of a factory-like finish. Even for enthusiasts who enjoy the process, professional help can provide a safety net—ensuring that the investment in the film remains attractive and that the wrap’s longevity is maximized.
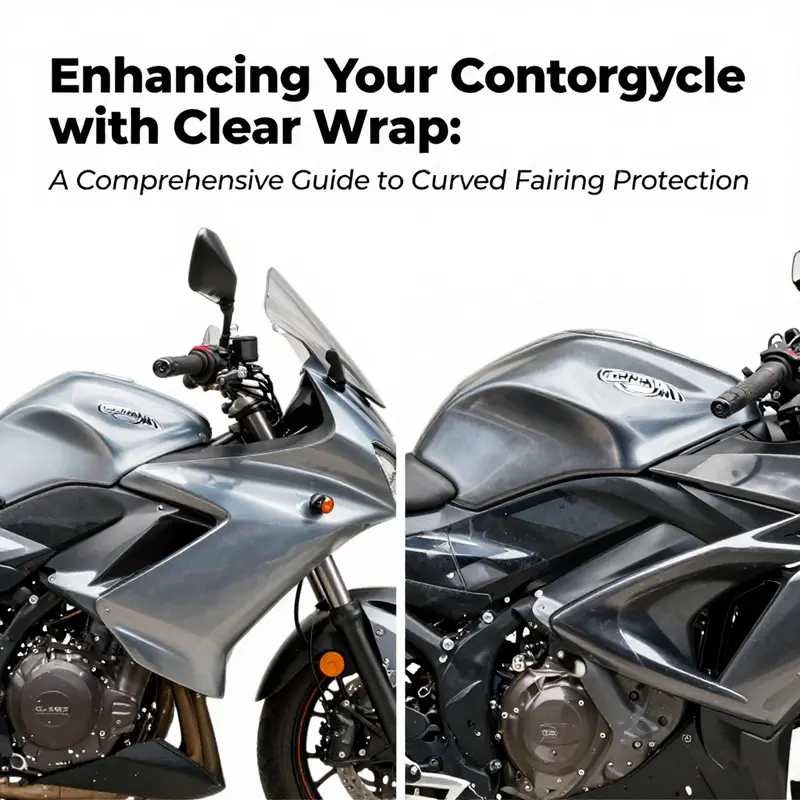
Within this practical flow, a rider might also consider the broader ecosystem of options that surrounds curved fairings. The choice of fairing shapes, the underlying paint condition, and the type of film used all feed into the final appearance. If the goal is a consistent aesthetic across an entire bike, it’s sensible to harmonize the wrap with the color and texture of other panels, or to reserve the clear wrap for the most exposed sections where impact resistance and abrasion protection are most valuable. The external look is not the sole measure of success; durability and ease of maintenance matter just as much. A properly applied clear wrap resists micro-scratches and allows light to pass through with minimal distortion, preserving the original color and gloss while acting as a sacrificial barrier against the elements and road debris. When well-executed, the wrap becomes both shield and stage—clear protection that lets the bike’s lines speak for themselves rather than competing with paint or graphics.
From preparation to curing, the narrative of wrapping curved fairings is a study in patience and precision. The rider who undertakes this craft learns to read the fairing’s geometry as if it were part of the motorcycle’s anatomy. The centerline of a panel, the curve of a shoulder, and the taper near a tail all become guides, not obstacles. The process teaches a rhythm: clean, align, apply, heat, press, trim, recheck, and cure. It rewards the careful, measured approach with a finish that not only looks sharp but remains resilient under everyday riding conditions. And as with any work that balances form and function, the result is more than a cosmetic upgrade. It is a quiet declaration that protection and personality can coexist—an unspoken agreement between rider and machine that the curves deserve careful stewardship.
For riders who want a broader perspective or a step-by-step, image-rich guide, detailed walkthroughs from respected sources in the field offer additional insights and visuals that can complement the hands-on practice described here. If you’re exploring the range of fairings and their fit across different models, a curated collection such as Honda fairings can provide context for how curved surfaces vary between bikes and how the wrap interacts with those contours over time. Consider visiting a centralized hub that aggregates model-specific fairings and accessory options to inform your planning and ensure compatibility with your chosen film. Honda fairings collection.
As you finalize a plan to apply clear wrap, it’s worth remembering that the best outcomes come from clarity about the goal and patience during execution. The bike’s curvature is not an enemy to overcome but a feature to harmonize with the film’s properties. With the right preparation, material, and technique, the wrap becomes a transparent layer of defense that respects the bike’s original artistry while offering a durable shield against the road. The result is a ride that looks as good as new and remains safeguarded against the light tests of travel and weather. The process is as much about keeping things simple and controlled as it is about achieving the near-invisible aesthetic that riders crave for their curves to read as a single, uninterrupted sculpture.
External resources can further illuminate the subtleties of the process, providing practical demonstrations and tips for tackling particularly stubborn curves or unusual fairing geometries. A detailed external guide offers a broader view of steps, tools, and best practices, reinforcing the core ideas presented here and expanding the repertoire of techniques available to riders who pursue flawless results. For readers seeking a deeper dive, the following external resource can be consulted: https://www.motorcycle.com/tech-tips/how-to-wrap-a-motorcycle-fairing
Sheen as Shield: Mastering Clear-Wrap on Curved Motorcycle Fairings
A clear vinyl wrap on a motorcycle’s curved fairing is more than a glossy safeguard; it is a deliberate act of craftsmanship that honors both form and function. The wrap, when applied correctly, becomes a seamless extension of the bike’s sculpted lines, a transparent shield that preserves the original paint while adding a depth and clarity that often rivals factory finishes. It is a choice that many riders make not merely for protection, but for the flexibility it affords—the chance to refresh the machine’s look without the permanence or cost of repainting. Yet for all its advantages, wrapping curved fairings demands a careful balance of preparation, material choice, and technique. On a complex surface, every decision from surface conditioning to the final trim can tip the result from a flawless gloss to a compromised finish marked by wrinkles, air bubbles, or edge lift. The following narrative weaves together the practical knowledge that wraps are built on with the sensitivity required to coax a clear film to bend, breathe, and settle across a motorcycle’s most contoured geometry.
The journey begins with surface truth. A fairing is rarely a blank slate, even when it appears finished and pristine. It carries the history of sun exposure, ride debris, and the subtle shifts of daily use. Preparation, then, is not a chore but a ritual of respect for the substrate you are about to cover. Start with a thorough cleaning using a dedicated cleaner, followed by a solvent like isopropyl alcohol to remove any residual grease, wax, or silicone. The goal is a surface that the film can truly cling to. If the paint or plastic feels slick, a light, controlled scuff with a fine abrasive can help create micro-etching that improves adhesion. The trick is to keep protectors, primers, and the underlying substrate intact while inviting the film to bite into the surface without creating visible abrasion. Every ridge and seam deserves equal attention; misses here become the most stubborn spots later, visible as halos or lifts when light strikes the work area.
From the outset, the choice of film is a conversation with the bike’s curves. A high-quality clear vinyl wrap for automotive and motorcycle use offers a blend of transparency, durability, and flexibility that matters on a sculpted surface. The modern sport-wrap market emphasizes features that are easy to work with in real-world conditions: UV resistance to prevent yellowing with sun exposure, self-healing properties to close minor scratches, and a tight optical clarity that won’t degrade the paint’s radiance. The material’s stability and “memory” are not mere buzz phrases; they are practical benefits that show up when a sheet is flexed across a convex fairing, then stretched over a dip or around a tight corner and released to return to its original shape. When the film recalls its original geometry after a stretch, you have a living tool rather than a brittle sheet that cracks or surrenders to the curve. This is especially valuable on the most contoured panels where the danger of wrinkles increases with every degree of bend. The memory of the film helps maintain a factory-like gloss across the entire fairing, even as light plays across the curved surface.
The narrative of wrap is also a narrative of fit. It’s not enough to buy a sheet that claims universal compatibility; curved fairings are rarely universal in their demands. Fitment can be limited to specific brands or models, and even the most forgiving film can become a source of frustration if the panel geometry is beyond its natural arc. In practice, the approach is to plan in three dimensions: how the film will lay along the largest planes, where it must bend to follow the contour, and where it must tuck into an edge or lip without stressing the material. The preparation phase includes masking, tracing, or measuring critical curves so you know where to begin and where to anticipate trouble. It is not a ritual of hesitation but a procedure that translates the bike’s geometry into a set of manageable zones. In some cases, riders find it helpful to start from the most prominent plane—often the center of a fairing’s side—then gradually work toward the edges. By working in this way, you build confidence as the wrap conforms to each successive curve.
When you apply the wrap, the heat is your ally, not your enemy. A heat gun or a hair dryer set to a gentle, steady warmth encourages the film to soften and flow over the surface. The heat helps the film conform to the complex radii of a curved fairing, allowing it to press into recessed areas and around tight corners without creating tension ridges. The technique requires patience and precision. Work in small sections, beginning at the center of each panel and radiating outward toward the edges. A soft, steady motion with a high-quality squeegee helps push out air pockets and release any trapped solvent. The aim is to create a uniform sheet that kisses the surface—no bubbles, no pinches, no waviness around a curve. The center-out method reduces the risk of the film pulling away from the edges as the heat is applied, a common pitfall when attention shifts too quickly to the outward edges. It also minimizes distortion by letting gravity and natural curvature guide the sheet into place rather than forcing it into a shape it cannot naturally adopt.
The actual choreography of wrapping a curved fairing hinges on a few subtle decisions. When encountering a shoulder, a concave contour, or a tight radius near a seam, the installer must anticipate how the film will behave under heat and pressure. It is here that the film’s memory plays its most generous role; it can be stretched slightly to accommodate an acute bend and then settle back as the heat fades. The squeegee becomes both instrument and guide, guiding air out from beneath the surface while preserving the film’s smooth, camera-ready plane. To avoid the most common errors—wrinkles in the belly of a curve, micro-bubbles forming at the interior bend, or edges lifting after a few rides—the approach is meticulous: keep the surface clean; mist or lightly cushion the lay with the applicator; insist on a precise overlap so the seams never reveal themselves under light; and never rush the trim. The trimming process itself demands a sharp blade and a patient hand. Edges, corners, and tight curves require extra care because these are the spots where film is most apt to pull or lift. A clean cut at a true edge is more durable than a forced overlap in the corner, which can peel with time and heat cycling.
No project of this scale shies away from the reality of long timelines. A confident, lasting finish often requires more time than a casual weekend job. If the curves are pronounced, if the panel joins are awkward, or if the fairing has a multi-layered construction with vents and fasteners, the installation can become a slow, almost meditative process. It is a discipline that rewards the patient rider and the patient technician. For those who want to take a hybrid approach, starting with a base layer and letting a professional refine the edges is a path that preserves value while delivering satisfaction. The reality is that even with the best materials, technique matters more than price. A bubble-free, well-aligned wrap is less a miracle than a record of disciplined steps, a sequence in which preparation, careful measurement, and thoughtful heat application converge to yield a surface that reads as a single plane rather than a layered quilt of panels.
The finished look is the aspect most riders value once the wrap has cured. A clear film does not just guard the paint; it enhances depth and clarity. The gloss can appear deeper because the film’s surface acts like a clear lens over the base color, amplifying the bike’s contour and line. It is a subtle yet powerful enhancement that exists without altering the vehicle’s color or identity. The protective role of the wrap is equally important. The film absorbs or deflects UV rays, repels light scratches, and provides a sacrificial layer that takes the brunt of minor impacts, road grit, and environmental contaminants. In practice, this means you would rather replace a clear wrap than peel and repaint a damaged fairing. The cost of re-wrapping a panel is generally far less than repainting, and it offers the practical advantage of preserving original factory finishes while enabling style changes when the mood or the season calls.
An essential consideration for riders contemplating this path is the removal process. When the time comes to refresh the bike’s look or to switch to a tinted finish, a good quality wrap can be removed with less risk to the underlying paint than a traditional adhesive would pose. However, the removal remains a technical endeavor. Substandard films or improper removal techniques can leave adhesive residues or micro-scratches that require careful cleaning or professional restoration. This is why many owners decide to seek professional installation for the initial wrap and then plan for periodic refreshes as a simple, cost-effective way to update the bike’s appearance without committing to a repaint. The practical takeaway is straightforward: treat clear wrap as a repairable, replaceable layer rather than a one-and-done modification. It aligns with a rider’s desire to balance aesthetics, protection, and value—preserving the bike’s original appeal while offering a practical path to style evolution.
To those who are building this practice into a personal workflow, the social dimension of wrapping is meaningful as well. A well-wrapped curved fairing can become a showcase for technique—an indicator of how a rider values preservation and presentation in equal measure. The wrap is not merely a finish; it is a statement about how the bike is used and maintained. It communicates a philosophy of care: a belief that the machine deserves a surface that respects its curves, its exhaust note, and the way light drapes across its form. And when the bike is parked in a garage or displayed at a show, the gloss and transparency of the wrap often draw appreciative attention from fellow riders who recognize the craft behind the finish. The practical benefits—protection, ease of future styling, and an affordable path to a fresh look—coexist with the more intangible rewards of pride and identity the rider carries with their machine.
For riders who want to start from a prepared baseline, a curated set of OEM or replacement panels can provide a solid foundation. For example, you may find that starting with a standard Honda fairing kit offers a symmetrical baseline to wrap more reliably. The choice of source is as important as the wrap itself; a clean, well-fitting set of panels reduces the risk of misalignment or visible seams and makes the entire operation smoother. If you are sourcing OEM-like panels as a starting point, consider exploring options such as Honda fairings. This approach does not guarantee a universal fit, but it can make the initial layout more predictable, especially when dealing with curved sections where a misfit can create tension across the film. By selecting panels that are known to align with the bike’s geometry, you reduce the complexity of the wrap’s shaping and ensure edges meet cleanly along critical contours. The result is a wrap that reads with a factory precision, a testament to how careful planning and appropriate sources can elevate a DIY project into a professional-grade finish.
In the broader context of wrap aesthetics and long-term value, the decision to wrap rather than repaint aligns with modern maintenance philosophies. A clear wrap offers a practical pathway to refresh the bike’s appearance every few years without devaluing the machine by repeated paint jobs. It preserves the original design language while allowing riders to experiment with the bike’s surface personality in a reversible way. This flexibility is particularly compelling on models with bold, curved fairings where the sensation of motion is part of the visual identity. The wrap behaves like a lens—clearing the view of the bike’s lines and colors while protecting them from wear. It is an investment in longevity and flexibility, a way to maintain the bike’s value while keeping it visually dynamic.
The end of a wrapping project is not a timestamp but a moment of quiet refinement. The final checks include ensuring every contour is smooth, every edge is secured, and the surface is free from micro-bubbles that could compromise the long-term integrity of the finish. Once you are confident in the film’s placement, you can proceed to a light, controlled cure period and then a gentle buff or wipe to enhance the film’s clarity. The result is a surface that looks as if it belongs to the bike’s shape, a protective layer that glows with the same intensity as the paint underneath and a practical shield that will endure daily riding, wash cycles, and exposure to the elements. The process may demand time and patience, but the payoff is tangible: a curved fairing that remains legible, protected, and visually cohesive for years ahead.
In sum, the decision to apply a clear wrap to curved motorcycle fairings is a thoughtful one. It requires a disciplined approach to surface preparation, an informed choice of film with memory and clarity, and a patient installation process that respects the fairing’s curvature. The result can be a striking, durable finish that preserves the original paint while delivering a gloss that resonates with the bike’s lines. And for riders who want to explore the boundaries of surface design, the wrap is a flexible, reversible path to express a speed-fueled aesthetic without committing to paint at all. As with any advanced modification, the role of experience—and, in some cases, professional support—cannot be overstated. When done well, clear wrap on curved fairings becomes not just a protective layer, but a crafted interface between rider, machine, and the road ahead.
External resource: For a broader guide on choosing and applying motorcycle wraps, see this practical overview: https://www.carinterior.com/motorcycle-wrap-guide
Final thoughts
Incorporating clear wraps into motorcycle customization offers a dual benefit: enhanced aesthetic appeal and valuable protection against everyday wear and tear. For business owners, understanding the intricate process behind applying clear wraps will ensure high-quality results that meet customer expectations. By mastering surface preparation, application techniques, and recognizing the benefits involved, you can establish yourself as an authority in motorcycle customization while satisfying the demands of motorcycle enthusiasts. Keep in mind that a premium finish not only reflects your business’s standards but also enriches customer experience and loyalty.