Understanding and repairing ABS motorcycle fairings is vital for any business in the motorcycle industry. As ABS (Acrylonitrile Butadiene Styrene) becomes the standard for motorcycle bodywork due to its durability and impact resistance, knowing how to repair it effectively can save costs and enhance customer satisfaction. This article will delve into the intricacies of ABS motorcycle fairing repair, highlighting techniques, common issues, and essential tools and materials needed for successful repairs. Each chapter will contribute to a holistic understanding of how to maintain and restore the integrity of ABS motorcycle fairings, ensuring your business thrives in this competitive market.
From Cracks to Gloss: Mastering ABS Motorcycle Fairing Repair for Aesthetic and Aero Performance
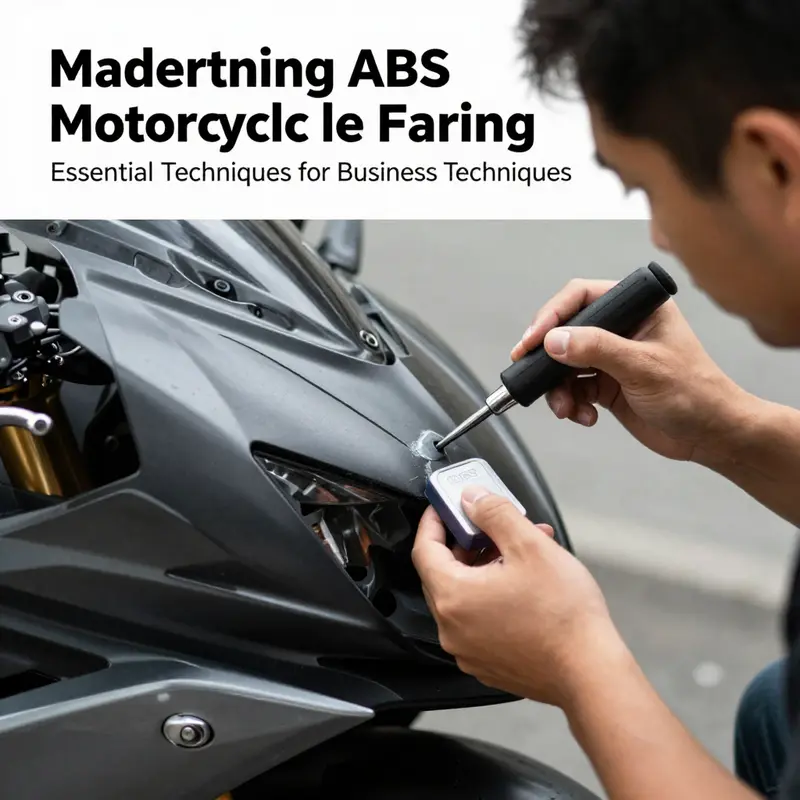
ABS motorcycle fairings sit at the intersection of form and function. They shield vital components, shape the bike’s aerodynamics, and contribute to the rider’s visual impression. When those fairings suffer damage—whether from a low-speed tumble, a parking-lot collision, or a stray rock kicked up by the tire—the aim is not only to restore appearance but to recover the structural integrity that preserves aerodynamics and protection. ABS, or acrylonitrile butadiene styrene, provides a practical balance of cost, formability, and impact resistance, which is why it dominates modern fairing design. Yet its benefits come with a caution: while ABS tolerates minor impacts well, cracks and chips can propagate if left untreated, UV exposure wears the surface over time, and mismatched repairs can undermine both the gloss and the smooth airflow that the fairing is meant to manage. The repair journey, therefore, requires a careful blend of material science, fabrication technique, and finish quality that respects the original engineering while delivering a visually seamless result.
A practical repair starts with understanding the material itself. ABS is a thermoplastic that can be heat-softened and reshaped, which makes it appealing for complex fairing geometries. It holds adhesive bonds reasonably well when the surface is properly prepared, and it accepts paint and clear coats that can return a factory-like finish if color matching is precise. The downside is UV sensitivity; prolonged sun exposure can dull color and lead to surface embrittlement if the coating system is neglected. This reality explains why high-quality primers, color-matching paints, and robust topcoats are essential components of most repair strategies. For riders and shop technicians alike, the objective remains clear: restore the surface so it both looks right and behaves consistently against wind and contact stresses.
Repairing ABS fairings is a continuum, not a single trick. The process begins with a careful assessment. Minor damage—small chips, scratches, or shallow gouges—can often be addressed with a targeted filler and professional refinishing. More pronounced damage, such as deep cracks or broken sections, demands a different calculus: structural restoration, heat forming, or even panel replacement may be necessary. In many cases, shops will blend approaches, using an ABS-compatible filler for the internal restoration, followed by heat-forming techniques to re-create a contiguous outer surface. This is where the chemistry meets the craft: the filler must bond well with ABS, cure evenly, and sand flush without introducing new stress points. A key point that echoes across credible repair guidance is the need to use products explicitly rated for ABS. Generic adhesives or fillers may not provide the same bond strength or aging performance, and they can compromise future refinishing efforts.
The repair sequence, when viewed as an uninterrupted arc, reads like a careful choreography. It begins with cleaning the damage thoroughly. A degreaser or plastic cleaner removes oils, waxes, and residues that can inhibit adhesion. Dust and surface contaminants are the silent saboteurs of any repair; they can create micro-melt pockets during epoxy curing or interfere with primer adhesion. After cleaning, surface preparation becomes critical. Sanding the damaged area with progressively finer grits, typically starting around 120 or 180 and moving toward 240 or finer, creates a rough texture that improves mechanical bonding. The aim is not to grind away all edges but to establish a uniform surface where the repair material can grip without creating a step that will telegraph through to the final coat.
For actual restoration of the damaged geometry, the choice of filling material matters. A two-part epoxy filler or a specialized ABS repair compound is commonly used. The repair is applied in layers, allowing each layer to cure before adding the next, which helps control shrinkage and reduces the risk of cracking at the edge of the repair. When cracks extend through a panel or when a chunk of material is missing, some technicians opt for a containment approach: using a backing with a thesaurus of materials—often a clean fabric mesh or a thin structural patch—beneath the surface to restore stiffness and resist crack propagation. After the filler has cured, the area is re-sanded to achieve a seamless transition between the repair and the surrounding fairing. It is essential here to ensure the repaired surface is flush with the original contour; any high spots will be visible after painting and can disrupt airflow. At this stage, the repair begins to resemble plastering a wall: the goal is to even out the surface while preserving the fairing’s aerodynamic profile.
Priming then plays a decisive role in the final appearance and behavioral performance. Plastics-specific primers are designed to adhere to SBS plastics and ABS with minimal raise in surface energy. They smooth the surface, seal tiny pores opened by sanding, and establish a uniform base for color. A thin, evenly sprayed primer layer is typically enough; heavy coats can create runs and micro-sags that complicate subsequent painting. The primer is not merely cosmetic. It reduces the risk of paint lifting in the future and improves the overall longevity of the finish, especially in the face of environmental exposure and the thermal cycling that motorcycle fairings undergo during riding. The choice of primer interacts with the subsequent paint system; compatible primers and paints form a cohesive layer stack that resists peeling and delamination when the fairing experiences temperature shifts and wind pressure.
Color matching follows primer. The handling of color is both a science and an art. Factory color codes provide a reliable baseline, but color aging in ABS surfaces can differ from the original pigment due to UV exposure and the baseline plastic’s own aging. A skilled repair uses a careful color-matching process, often employing a spectrum of tinting options and multiple very thin coats to approach the factory shade. The repair should not only visually blend but also preserve the original texture. ABS surfaces can have a slightly different gloss level than newly painted areas, so technicians frequently apply a clear coat that has been tuned for the same appearance and hardness as the surrounding panels. A meticulous approach to the finish will ensure the repaired area remains visually cohesive after years of exposure and weathering.
Painting is the moment when the repair begins to disappear from sight. The paint must be chosen for its compatibility with ABS and its durability under the heat and UV load a bike experiences. Multiple thin coats are preferred over a single heavy layer. Light sanding between coats helps maintain a smooth, even surface and reduces the risk of sags. When the final color layer has cured, a clear coat is applied. The clear is the final bulwark against UV fade, abrasion, and micro-scratches. It also imparts the high-gloss appearance characteristic of a well-maintained fairing. Curing conditions are often overlooked, but temperature and humidity can significantly affect the finish’s hardness and durability. A patient approach to curing—allowing the panels to acclimate to ambient conditions before handling or reassembly—yields a more durable result.
The decision tree becomes more nuanced when the damage is substantial. A large crack that travels across a curve, a broken corner, or a missing fragment may require more than bonding and topcoating. In some cases, heat-forming an ABS sheet to recreate the damaged section becomes a viable option. This approach demands a capable workshop, specialized tools, and skilled hands; it uses heat to soften ABS sheet stock, which is then formed to the fairing’s contour and bonded in place with structural adhesive or fusion welding techniques. Alternatively, some shops offer restoration services using controlled thermal welding, a technique that can join fractured edges and restore stiffness in the repaired area. Injection molding or overmolding is another advanced route, used in more complex break scenarios where a replacement profile must be integrated into an existing shell. These methods extend beyond basic repair and enter the realm of structural restoration, requiring precise process control and quality inspection to ensure airtight seams and consistent surface continuity.
Throughout this journey, certain core considerations persist, shaping every repair decision. First, the color and texture must align with the surrounding surface. A hue mismatch or a rough texture will betray the repair, defeating both aesthetic and aerodynamic goals. Second, adhesives must be compatible with ABS. Using an adhesive not rated for ABS can lead to poor bonding, creep, or eventual failure under vibration or temperature changes. Third, ventilation and safety gear are not optional luxuries but essential requirements. Sanding and painting release particulates and fumes; adequate ventilation, respiratory protection, and eye safety guard against long-term health risks and provide a safer work environment. Fourth, and perhaps most practical, testing matters. After curing, test the repaired area under conditions that simulate real-world loads. A gentle flex test, followed by a modest heat cycle, can reveal latent weaknesses that might not be obvious in a static inspection. If any sign of movement, stress concentration, or edge lift appears, it’s prudent to rework those areas before final reassembly.
Part of the craft of ABS repair is knowing when to seek professional help. Some damage patterns exceed the capabilities of standard filler-and-paint repairs. A certified body shop with experience in plastic repair can bring additional tools and methods to bear—such as controlled heat forming, precision sanding, or WINDSHIELD-quality edge finishing—that help restore both the structural integrity and the aesthetic integrity of the fairing. The right shop will balance the desire for a factory-like finish with a practical assessment of whether the panel should be repaired or replaced, taking into account the fairing’s exposure to stress areas near mounting points and fasteners. The overarching goal is to preserve the fairing’s original behavior—its stiffness, fit, and ability to resist wind pressure—while delivering the appearance that the bike deserves.
Color, texture, and gloss compatibility are not afterthoughts; they are the glue that binds this process to the rider’s confidence. When a fairing is repainted to match the exact factory shade, it helps preserve the bike’s identity and aerodynamics. A well-executed repair reduces drag irregularities that can emerge at higher speeds, where turbulent air around an imperfect surface can degrade stability and handling. The interplay between airflow and surface finish makes every repair decision practical rather than purely cosmetic. In a broader sense, the repair is an investment in the bike’s longevity. Properly restored ABS panels resist crack propagation, maintain their protective role, and keep the rider safer by preserving the fairing’s intended deflection and energy dispersion characteristics.
For readers aiming to connect their repair journey to real-world resources, there is a useful reference point for related parts and replacement panels. The Honda fairings collection provides a catalog of panels that can inform decisions about when a repair is practical versus when a panel replacement might be more efficient or cost-effective. This resource is a helpful anchor for understanding profile geometry, corner radii, and mounting interfaces that matter when rejoining repaired sections with the rest of the shell. You can explore that collection here: Honda fairings collection.
In keeping with best practices, every repair should be documented with clear notes on the materials used, the curing times achieved, and the environmental conditions during finishing. This documentation is more than administrative housekeeping; it helps determine how a panel will age and how easily future repairs can be completed if needed. It also aids in troubleshooting should color drift or texture mismatch appear after long-term exposure. A well-documented repair is a reliable reference for both the rider and the shop, helping to ensure consistency across maintenance cycles and avoiding the frustration of chasing cosmetic mismatches after the fact.
The repair path described here is not a single recipe but a framework that aligns with the broader aims of ABS repair: preserve the panel’s protective role, maintain its aerodynamic efficiency, and restore the appearance that riders expect when they ride a machine that looks and feels like new. Minor chips and scratches can be coaxed back to life with disciplined surface preparation, proper bonding, and measured finishing steps. More extensive damage asks for a careful balance of repair and replacement options, with heat forming or welding techniques reserved for situations where bonding alone cannot restore structural continuity. The essential discipline is to treat ABS as a living material that responds to the right combination of chemistry, heat, and finish. When those factors come together, the result is a seamless repair that stands up to wind, weather, and the rigors of daily riding, while preserving the bike’s aesthetics and aerodynamic performance for years to come.
For further reading on practical repair procedures that inform these approaches, a comprehensive guide offers step-by-step procedures and validated materials recommendations. This external resource provides detailed, up-to-date guidance on ABS fairing repair techniques and the considerations that accompany each repair stage. It reinforces the importance of material compatibility, controlled finishing, and the role of proper curing in achieving durable results. Motorcycle Cruiser guide.
In sum, repairing ABS motorcycle fairings is a careful blend of science and craft. It demands respect for the material’s properties, a disciplined approach to preparation and finishing, and an awareness of when to escalate to professional services. The reward is a fairing that looks right, fits correctly, and continues to offer the protective and aerodynamic performance that helps a rider feel secure and connected to the machine beneath. The path from a damaged panel to a restored surface is not a single moment but a sequence of well-chosen steps that, when executed with care, returns the bike to its former glory and maintains the rider’s confidence on every mile.
Notes on imagery and texture fidelity can help further. After a repair, one may consider applying UV-protective topcoats or clear coats designed to resist yellowing and surface degradation. This is especially helpful for riders who park in bright sun or ride in climates with strong UV exposure. Additionally, if the fairing holds a decorative finish or graphic work, the finishing strategy should preserve those edges and lines. The transition between repaired material and original plastic should be as invisible as possible, which often means masking carefully, using fine-tuned spray techniques, and allowing time for proper solvent evaporation before final handling. When done well, the repair not only hides the damage but reinforces the sense of high-quality engineering that drew many riders to ABS-based fairings in the first place.
Repair Realities: Navigating Common ABS Motorcycle Fairing Challenges
The ABS motorcycle fairing is more than a cosmetic shell; it is a carefully engineered shield that blends aerodynamics, rider protection, and the visual language of performance. When that shell suffers damage—cracks threading along a mounting point, chips flashing on a leading edge, or a panel weathering under UV glare—repair becomes more than a patch job. It becomes a test of material behavior, structural judgment, and the discipline of restoration. ABS, or acrylonitrile butadiene styrene, provides a favorable balance of stiffness, impact resistance, and ease of shaping. Yet those very properties demand respect. The repair mindset begins with understanding how ABS behaves when stressed and how it responds to the processes we use to restore it. The goal is not merely to hide a flaw but to recover the fairing’s integrity, preserve aerodynamic performance, and maintain the visual cohesion that signals to others that a rider treats the machine with care.
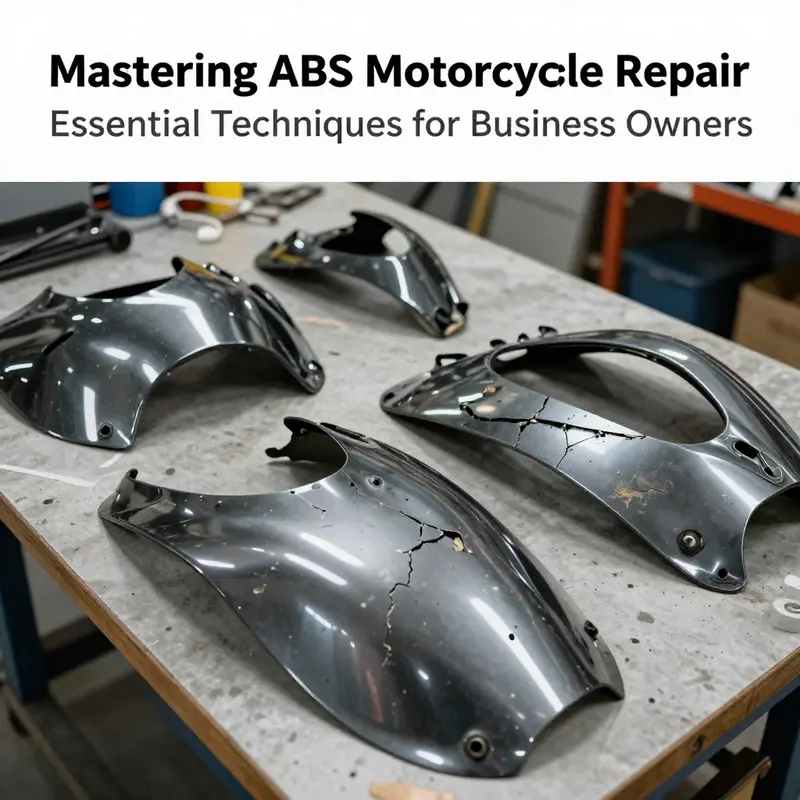
Cracks often announce themselves in quiet ways at first—hairline fissures that widen under the crank of the fairing screws or around mounting brackets where the bracket’s load transmits through the plastic. These stress points are not casual areas; they endure repeated vibrations, sudden torque from wind gusts, and the leverage of the fairing trying to stay aligned with its frame while the bike moves through changing speeds. The moment a crack is noticed, the repair approach shifts from cosmetic to structural. The fundamental rule is to trace the crack to its origin: does it originate at a fastener hole, at a corner where thickness thins, or along a seam where two panels meet? Each origin point points to a repair strategy that honors the way ABS absorbs and distributes load. In many Honda-inspired configurations, the geometry of the fairing around the headlight housing or the under-brace region creates natural stress raisers. Acknowledging these zones early helps prevent a small crack from becoming a door opened to larger fractures.
Chips, by contrast, tend to reveal themselves on the outermost edges and on the forward-facing surfaces where debris impact is most likely. A chip may seem inconsequential at first glance, a tiny flaw that could be overlooked in a crowd of scratches. But in ABS, even a small chip can become a nidus for moisture ingress and a locus for minor delamination if left untreated. The edge of a panel is also a principal pathway for aerodynamic separation. When the surface texture or edge geometry is disturbed, airflow can separate earlier or later than designed, subtly altering the fairing’s performance at speed. The discipline here is precision: the repair must restore the original edge profile and maintain the micro-surface texture that interacts with airstreams. This is not a “fill and paint” task alone; it is a re-creation of the panel’s functional geometry.
Discoloration is a more gradual adversary. UV exposure, heat cycles, and environmental pollutants slowly erode the factory finish. In ABS, discoloration can mask deeper material fatigue. A faded shell might still be structurally sound, but the color shift can obscure evidence of micro-cracking or crazing beneath the surface. The prudent repair strategy treats discoloration as a potential signal. If the discolored area coincides with a softening spot or a change in surface hardness, a more comprehensive restoration—possibly including refresh of the underlying resin or a careful panel replacement—may be warranted. The vision of the finished job must harmonize both color and gloss with adjacent panels to preserve the bike’s overall aesthetic integrity and its ability to reflect light evenly at speed.
Paint issues are often a telltale sign that more than aesthetics is at stake. Fading, peeling, or crazing indicate a complex interaction between the original coating system and the ABS substrate. The paint layer, the primer beneath, and the adhesion of each layer to the plastic all contribute to longevity. When a repair is executed, matching not only color but texture is essential. In even the most faithful color jobs, subtle differences can draw the eye—especially on newer fairings with high-gloss finishes. The repair sequence must therefore incorporate a multi-step system that respects both the optical qualities and the mechanical compatibility of the materials involved. A precise color match is achieved by reading the original pigment depth and applying a finishing coat that mimics the factory’s reflectivity and micro-roughness. This is where the craft of repair meets the science of plastics, and where patience becomes as critical as skill.
Alignment issues after repair can be invisible at first glance, but they surface as wind noise, gaps along seams, or water ingress during rain rides. ABS fairings are not uniform slabs; they are composed of multiple panels that must meet within tight tolerances. When a panel has been repaired, or when a replacement piece has been fitted, the likelihood of misalignment increases if the underlying mounting geometry has shifted or if the adhesive bonds have altered the panel’s stiffness. In practice, this means test-fitting before the final bond, ensuring the line of the panel follows the bike’s contour, and confirming that fastener torque is consistent with the original design. A misfit is not merely a cosmetic nuisance; it can alter airflow, which in turn can influence handling and even the way wind forces are transmitted to the rider at speed. The careful reader will see that alignment is a cumulative outcome of material behavior, mounting geometry, and the handling of fasteners across the repair workflow.
The compatibility of adhesives and fasteners with ABS is a recurring theme because these are the bridge between damaged plastic and restored structure. Some adhesives can chemically attack ABS if they are not rated for thermoplastics, leading to micro-brittleness or gradual loosening of the bond. Fasteners must be chosen to complement the material’s behavior: too much torque at a marginal spot can create new cracks; too little can cause panels to rattle and loosen over time. This is where sticking to manufacturer guidance and using automotive-grade materials designed for ABS makes a real difference. The goal is to preserve the integrity of the bond over the long term, so that vibrations do not become accelerants for crack growth. A well-executed repair considers not only the immediate fix but the endurance of the fix through the ride, the heat of the sun, and the stress of high-speed wind pressure.
Within this frame, best practices emerge as a set of disciplined steps rather than a checklist of tricks. It begins with surface preparation: removing contaminants, verifying the plastic’s surface energy, and ensuring a clean, dry work area. ABS adheres best to surfaces with good adhesion potential, so gentle sanding to create a micro-roughness, rather than a brutal flattening, is preferred. The next step is choosing the right repair medium. For minor damage like small chips or superficial scratches, a high-quality epoxy or a dedicated ABS repair filler, matched to the resin, can be troweled and sanded to blend with the surrounding contour. The filler’s ability to bond with ABS is critical; some general-purpose fillers may not form a durable bond, especially at the edges where stress concentrates. After the filler cures, careful sanding with progressively finer grits prepares the surface for painting. Color matching is not a luxury but a necessity; ABS can take paint differently than fiberglass or other plastics, and a mismatch will be noticeable in bright daylight. The final finish should reproduce the original texture, whether it’s a smooth gloss or a softly textured surface that helps hide minor imperfections. Throughout this process, ventilation, respiratory protection, and appropriate PPE are not optional; they protect the technician and ensure a safe, controlled environment for the cure and paint steps.
When damage is more significant—large cracks, fractured panels, or panels that cannot be rejoined with confidence—restoration or replacement steps into the frame. A skilled repair culture recognizes when a panel can be salvaged and when replacement is the economically and technically prudent path. In such cases, fabricating a patch from ABS sheet and heat-forming it to fit the contour can yield a seamless result, but this technique demands a high level of skill and the right equipment. For complex breaks, specialists may employ thermal welding or resin injection to reconstitute the internal structure. Each approach has its own limitations, but the guiding principle remains: the repair must reestablish the panel’s structural stiffness while preserving compatibility with adjacent panels and the fairing’s aerodynamic function. Even when replacement is chosen, the surrounding composite or plastic system must be prepared to accept the new piece, which includes ensuring mating surfaces are clean, the color balance is achievable, and the mounting points align precisely with the frame.
In the longer arc of a riding career, the importance of concluding the repair with rigorous testing cannot be overstated. A repaired fairing must stand up to the same conditions that the original panel endured. This means reassembling and reinstalling the panel, then testing the fit under load: gentle pressure along edges, inspection of seams for gaps, and, when feasible, a controlled wind-check at highway speed. The aim is to confirm that the repair has not compromised the fairing’s ability to channel air over the rider and the bike, that there is no creasing at the repaired seam, and that the panel remains stable when subjected to the varied temperatures and humidity of a typical riding day. Safety margins in repair are not optional extras; they are the baseline of responsible maintenance. The rider’s confidence is rooted in knowing the repair can withstand the demands of stiff winds, heat, and vibrations at speed.
In practical terms, the person performing ABS fairing repairs benefits from staying close to the sources of authentic guidance. Manufacturer recommendations are the north star, providing the tested materials and the sequence that aligns with the engineering intent. But the repair mindset also thrives on understanding the material’s behavior under temperature swings—ABS can become more brittle in cold and softer under heat, which affects how it accepts fillers and how the cured composite responds to bending moments. Surface preparation, crack mitigation, and color matching all hinge on this fundamental physics. The most durable repairs blend a surgical attention to detail with a patient, methodical approach; they do not rush the cure or shortcut edge finishing. And because ABS is often part of a larger family of thermoplastics found on many modern bikes, an awareness of how the material will age in adjacent panels helps ensure that the fixed area will age in harmony with its neighbors.
A note on the broader context: the repair of ABS fairings is as much about preserving the rider experience as it is about restoring the bike’s appearance. The visual language of a fairing—the lines that convey speed, the shade of color, the gloss and texture—contributes to the rider’s sense of control and pride. When a repair stands up to close inspection, it elevates the perception of maintenance discipline and care. For those who want to view compatible options or to explore panels that fit a specific model, the Honda fairings collection can provide a useful point of reference for fitment expectations, geometry, and styling cues. See the Honda fairings collection for options that match the original contour and mounting philosophy of your bike. Honda fairings collection.
Ultimately, the repair of ABS motorcycle fairings is a practice that rewards patience, precision, and a respectful respect for material behavior. It invites riders and technicians to treat plastics not as a disposable shell but as a engineered element that can recover its strength and its shine with proper care. The path from crack to confidence is a careful balance of engineering sense, practical technique, and an eye for detail that aligns color, texture, and fit with the bike’s overall design language. When done well, a repaired fairing does more than hide damage; it reinforces trust between rider and machine, reaffirming the sense that speed is best enjoyed with a body that has been cared for as thoughtfully as the engine beneath the tank.
External resource: https://www.motorcyclecruising.com/abs-fairing-repair-guide
Between Heat and Finish: The Toolkit Behind ABS Motorcycle Fairing Repair
Repairing ABS motorcycle fairings is a craft that blends materials science with practical artistry. When a fairing bears the scars of a ride or a doorstep mishap, it is tempting to treat the damage as purely cosmetic. Yet even a small crack or chip can compromise aerodynamics, increase drag, and impact the structural integrity of the panel during vibration and exposure to sun, rain, and road grit. The repair journey begins with a calm assessment of the damage and the creative decision about how far to go. Minor chips and shallow scratches can be coaxed back to life with a dedicated ABS repair kit, a two part epoxy compatible with ABS, filler compounds, and a precise color match. The more demanding cases—large cracks, broken segments, or sections with missing material—demand a broader toolkit and a more deliberate plan, sometimes culminating in heat forming new sections from ABS sheet, or even structural replacement. Throughout this process, attention to material properties, process control, and surface finishing is essential to restore both the look and the performance of the fairing, while extending its life in the elements.
ABS, or acrylonitrile butadiene styrene, is chosen for motorcycle bodywork because of its toughness and impact resistance, its cost efficiency, and its ability to be mass produced. It behaves as a thermoplastic, which means it can be softened with heat, reshaped, and remelted without decomposing the material. This is the core reason why the repair toolkit centers around heat, bonding, and careful shaping rather than brute force. The repair plan must respect the network of fibers and ribs beneath the surface, preserving the structural contours that contribute to the fairing’s aerodynamics and protection of internal components. A well executed repair looks and feels like a part of the bike rather than a stitched on patch; it should pass a light wind test and should not reveal the repair under a glossy finish when viewed from a practical riding distance.
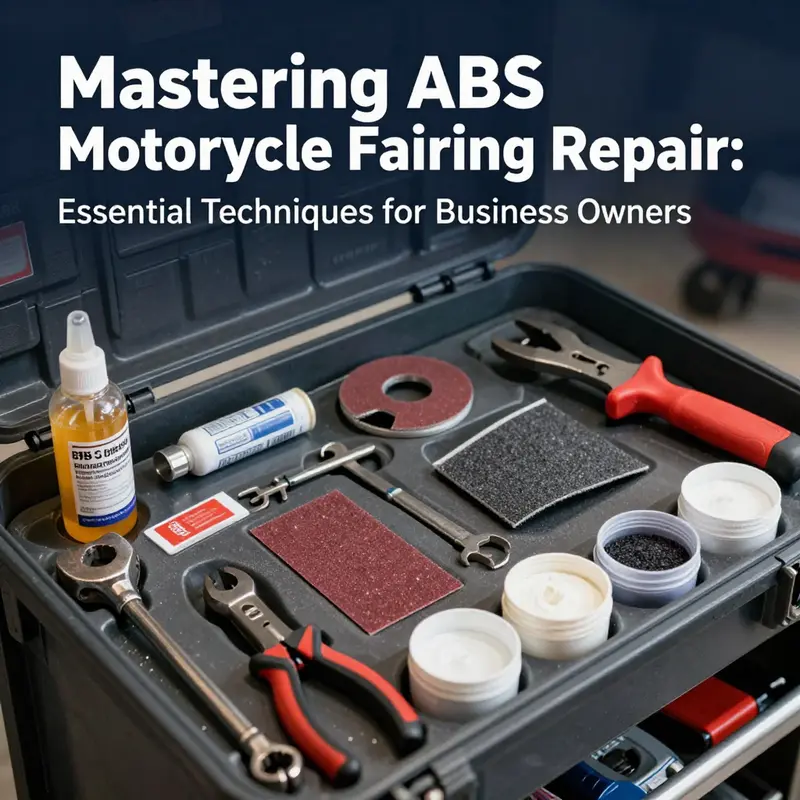
Core repair materials form the backbone of this workflow. The most essential element is a set of ABS plastic welding rods. These slender rods are composed of the same polymer as the original fairing and are designed to melt and fuse with the surrounding plastic when heat is applied. The welding process is not simply about gluing two pieces together; it is about reestablishing the molecular continuity across the joint. When the welding rod is melted and drawn into the crack or through a damaged section, it fills voids, bonds to the base material, and creates a seamless interface as the material cools. The geometry of the repair—whether a shallow crack along a seam or a deeper break across a panel—drives the technique. Small chips or narrow cracks can be treated with a controlled bead that is then shaved flush. More significant gaps may require a combination of welding and filler to rebuild the missing material. This approach preserves the original stiffness and helps maintain the fairing’s geometric integrity for subsequent shaping and painting.
In cases where welding is not ideal or not required, ABS specific adhesive products offer a robust alternative. These adhesives are designed to bond with ABS and resist common stresses encountered while riding. They cure to a strong bond and can be used for edge repairs or to seal joints under a panel that has experienced slight delamination. When selecting an adhesive, the key criterion is compatibility with ABS and the intended load path. The aim is to avoid a bond that becomes brittle in hot sun or soft in cool nights. The repair kit may also include discrete fillers or putties designed to work hand in hand with the welding process. After the adhesive cures, a filler can restore the original smoothness of the surface, filling minor imperfections left by the welding or adhesive process. The filler then becomes the canvas for sanding and painting, a step that will determine how convincingly the repair blends into the surrounding surface.
The tools required to translate these materials into a solid repair form a second essential pillar. A heat source with fine temperature control is indispensable. A hot air gun or a dedicated plastic welding gun is used to apply heat to the welding rod and to the damaged zone. The operator must modulate the heat to keep the ABS soft enough to flow and bond without scorching or distorting. Overheating can cause warping or residual stress that manifests later as ripple patterns or color shifts. A steady hand and a careful approach are critical here; the goal is to produce a uniform surface that mirrors the factory contour. Alongside heat, shaping tools such as scrapers and contouring blades help organize the molten material into a precise profile. After the surface hardens, a set of sandpapers—ranging from relatively coarse to finish—systematically eliminates tool marks, scratches, and surface irregularities. Starting with a mid grade, say around 800 to 1000 grit, and progressing toward finer grits, 1500 and 2000, the craftsman creates a uniform, glossy base for the paint.
The finishing phase brings color, gloss, and protection to the repaired panel. Color matching is paramount; ABS responds to paint differently than metal, and the pigment chemistry must be tuned to the original shade, tint, and depth. A precise color match ensures that the repaired zone is visually indistinguishable from the surrounding area, even under bright sun or highway glare. The finishing sequence typically begins with a primer or an ABS compatible base coat that provides a sound anchor for the topcoat. The base is followed by the automotive color layer, carefully matched to the bike’s factory finish, and finally a clear coat that seals the surface, adds gloss, and provides UV protection to slow color fade. The order and thickness of each layer matter, and the painter must work in a clean environment to avoid dust particles that could embed in the wet coating. The final polish then removes any micro-scratches and contributes to a surface that reflects light with a smooth, even sheen. When executed with attention to color and texture, the finished repair is virtually indistinguishable from the original panel.
A practitioner will tell you that the best repairs begin with a realistic assessment of the damage and a plan that respects the fairing’s design constraints. The decision to pursue a full repair versus part replacement is influenced by the severity of the damage and by the material condition of the surrounding area. Large cracks that extend through significant portions of the panel, or areas where the surface has become fatigued, may be better served by reconstructing the damaged region from ABS sheet and heat forming a new patch, followed by the same sequence of bonding, filling, and finishing. Advanced techniques can involve thermal welding for complex breaks or even an element of injection molding for multi piece repairs where a single piece cannot be adequately reconstituted. The consistent theme across these options is the need to maintain the panel’s original geometry, ensuring that mounting points align, that the airflow around the bike remains stable, and that the repair does not introduce new stress concentrations that could worsen the damage under load.
In practical terms, the workflow can be imagined as a sequence of careful decisions and controlled actions. The repair begins with thorough cleaning, removing oil, wax, and old paint around the damaged area to expose a pristine bonding surface. Any existing paint around the repair zone must be prepped to ensure good adhesion of the new coat. This step also serves as a moment to inspect for hidden cracks that may have propagated behind the visible damage. Following cleaning, the prepared area is gently heated to reopen the polymer matrix just enough to allow the welding rod to flow and fuse with the base material. The operator watches for a glossy bead that indicates a good bond, then cools the area under light pressure to maintain the original contour. If the joint forms a slight depression, a carefully measured layer of filler can bring the surface back to the same plane as the surrounding area. After curing, light sanding refines the surface, and the paint process begins with a compatible primer that accepts the top coats without lifting or cracking later in sun or heat. The final clear coat seals the finish, delivering a protective shield against UV rays and weathering while giving the panel its intended luster.
As this chapter centers on tools and materials, it is worth acknowledging the broader ecosystem of repair culture that surrounds ABS fairings. The same toolkit and approach translate to a wide range of Honda and non Honda models, reinforcing a practical philosophy: use materials that talk to each other, apply heat with care, and finish with a color and texture that respects the original design language of the bike. For riders and hobbyists who want to explore more specific applications, the same principles apply whether repairing a Honda CBR or a sport bike from another manufacturer. When in doubt, consult manufacturer resources or trusted repair guides to ensure that the selected materials and methods align with the intended use and environmental exposure. If you are curious about model specific bodies or color variants, you can explore a catalog of Honda fairings to understand the variety of shapes and contours that may influence repair strategy. See the Honda fairings collection for context and examples that illustrate how the material behaves across different panels and finishes.
In a broader sense, the discipline of ABS fairing repair is a study in restoration. It is a careful balance of preserving the original geometry, maintaining the aesthetic integrity of color and texture, and restoring the panel to function under real world conditions. The toolkit is not a mere bag of gadgets; it is an ecosystem of material compatibility, controlled heat, and a disciplined finishing sequence that, when executed thoughtfully, yields results that endure. The repair not only returns a piece of plastic to service but also preserves the rider’s confidence and the bike’s overall appearance. The best repairs are less noticeable after the fact, blending into the bike’s silhouette as if the crack never existed, and they stand up to the combustion of sun and rain that a fairing routinely endures on the road.
In closing, the toolkit for ABS motorcycle fairing repair is a concise, focused collection of what matters: compatible materials that bind and fill without compromising the base plastic, tools that deliver heat and shape with precision, and finishing steps that honor color, texture, and gloss. The process rewards patience and a disciplined approach, encouraging riders to view repair as a craft rather than a quick fix. For those embarking on this path, beginning with a clear assessment, selecting the right combination of welding or bonding methods, and following through with meticulous surface preparation and color matching will yield results that not only look right but hold up under the stresses of riding.
For riders who want to explore model specific context or buy into the idea that the same fundamental toolkit applies across models, a relevant repository of Honda fairings offers a useful frame of reference. The interconnectedness of model design and repair techniques reinforces the idea that good repair is not about improvisation but about respecting the material properties and the original geometry that provide the bike its stability and character. As you plan the repair, keep in mind the environmental considerations, the safety requirements during sanding and painting, and the testing phase that will verify structural soundness under real world loads. When you see a repaired fairing that matches the surrounding surface so closely that it disappears from view at speed, you will understand the value of the right tools, the right materials, and the disciplined hand that brought it back to life. Honda fairings provide a practical reference to how different panels integrate with the overall bike design and remind us that every repair should honor that integration.
External resources for further reading and verification are available, and one widely referenced guide discusses the practicalities of ABS repair. It provides a grounded, technique oriented perspective on welding, filler use, sanding strategies, and color matching processes that support the description outlined here. Access to this external resource can deepen understanding of the concepts mentioned above and offer concrete exercises for refining technique and judgment in real repair scenarios. https://www.ebay.com/itm/375569123456
Final thoughts
In the competitive motorcycle market, mastering the repair of ABS fairings is essential for maintaining customer loyalty and reducing costs. By understanding the techniques involved, recognizing common repair issues, and utilizing the right tools and materials, business owners can enhance their service offerings and client satisfaction. Investing time in developing these skills and knowledge can set your motorcycle business apart and lead to a more efficient repair process overall.