Owning a motorcycle often comes with the pride of showcasing a gleaming fairing, but scratches can undermine that aesthetic appeal. For business owners involved in motorcycle repairs or detailing, understanding how to buff out scratches effectively can lead to increased customer satisfaction and repeat business. This article delves into crucial strategies for assessing scratches, applying effective buffing techniques for surface and deep scratches, and ensuring long-term protection after repairs. Each chapter will equip you with actionable insights to enhance your service offerings and meet the demands of motorcycle enthusiasts.
Buffing the Shield: A Practical Journey to Restore Motorcycle Fairings
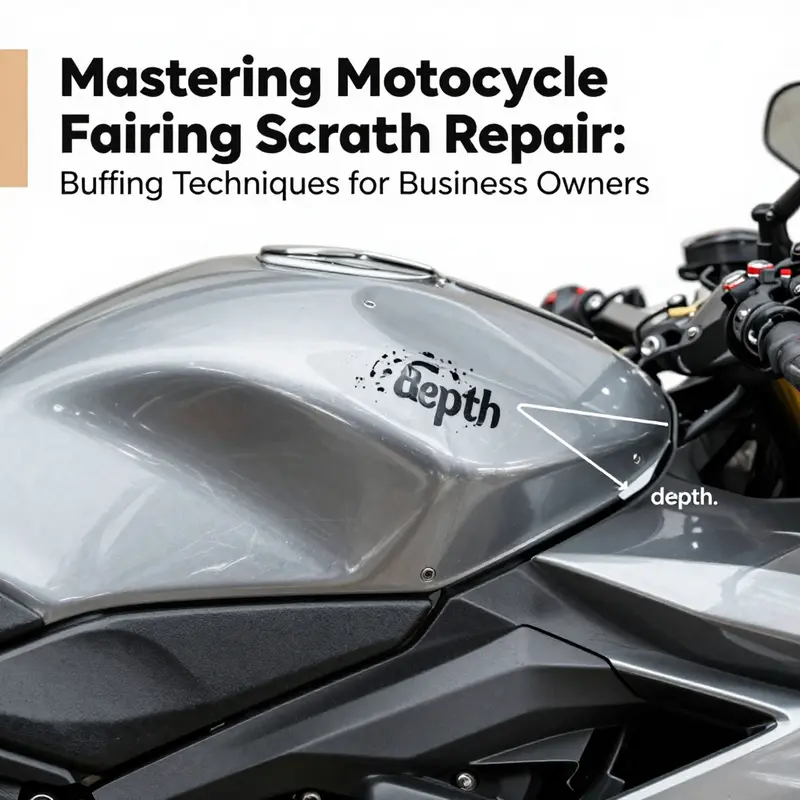
The first sign of a rider’s care is not the shine of the chrome or the roar of the engine, but the way a scratched fairing is treated when it first catches the eye. Scratches on a motorcycle fairing tell a story: a close encounter with gravel during a lean into a corner, a careless brush against a wall in a crowded garage, or simply time wearing down the gloss that once framed the bike’s silhouette. Restoring the surface, then, is not just a cosmetic task. It is a careful dialogue with the paint and clear coat, a chance to preserve the original finish and maintain the bike’s value and aesthetic integrity. The approach is methodical, not rushed. It begins with a clean slate and ends with a surface that feels smooth to the touch and looks uniformly glossy in the right light. The goal is to buff out the blemish, not to erase it by removing more material than necessary or to force a patchwork repair that betrays the original contours of the fairing.
To begin, you must clean the area thoroughly. Dirt and dust trapped in a scratch can act like sandpaper, grinding the edges of the flaws and dulling any potential blend. A mild soap solution and warm water work best for this step. After washing, dry the area completely. The absence of moisture is essential because moisture can hide subtle texture changes that indicate depth, and any residual moisture can interfere with the bonding of fillers, paint, and clear coats. The first impression you gain from the surface guides the entire repair, so take your time here. If you jump ahead while the area is still damp, you risk creating a composite of textures—glassy patches where the water has pooled next to matt, dulled spots where the cloth dragged and introduced new micro-abrasions. It is a small but telling detail that sets the tone for what comes next.
With the area clean, the next step is to assess the depth and severity of the scratch. Scratches can be broadly categorized as surface scratches, which affect only the clear coat, and deeper scratches that pass through the clear coat and into the base paint or primer. This distinction matters because it determines the path forward. Surface scratches are the friend you can buff away with patience and the right polishing compound. They respond to gentle abrasion and leave the surrounding gloss intact. Deeper scratches, on the other hand, reveal a scar that requires more than polishing. They may necessitate a filler to level the low point, color-matching touch-up paint to restore even tone, and finally a new layer of clear coat to restore the barrier, followed by careful polishing to blend the repaired area with the rest of the fairing. The exact path depends not only on how deep the mark is but also on the material of the fairing—whether it is a hard plastic, a fiberglass composite, or a composite with a painted surface under a clear coat. In all cases, though, the approach honors two principles: preserve as much of the original finish as possible and avoid creating new lines or ridges that betray the repair.
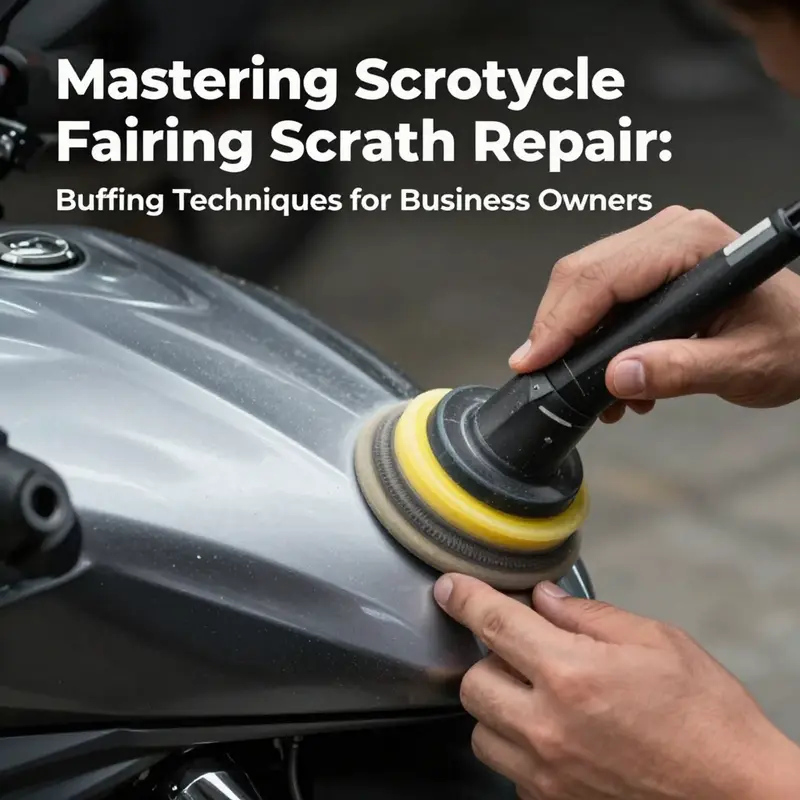
For superficial scratches that remain within the clear coat, the process can be surprisingly effective with a measured approach. The tools you’ll rely on include a fine polishing compound designed for automotive or motorcycle finishes, a soft foam pad or microfiber application cloth, and the ability to work with a dual-action (DA) polisher or by hand. The method is simple in concept but requires attention to pressure, speed, and movement. Begin with a small amount of compound on the pad. Place the pad on the area and use slow, circular motions. If you are using a DA polisher, set a low starting speed and keep the pad moving to avoid heat buildup, which can soften the clear coat unevenly or cause yellowing in some finishes. The goal is not to remove material aggressively but to abrade the very top surface lightly enough to flatten micro-scratches and restore a smooth plane. You’ll often notice the scratch disappearing as you work, but it’s important to monitor heat and avoid staying in one spot for too long. You should keep the session brief on each area, then step back to assess. In many cases, a second pass with a cleaner, lighter touch can bring the finish to a level of gloss that makes the scratch barely perceptible, especially when the lighting angle is favorable. Finally, wipe the area with a clean microfiber cloth to remove any haze and inspect the result under different lighting. If the shine returns consistently and the edge of the scratch is no longer catching light, you have achieved a successful buff.
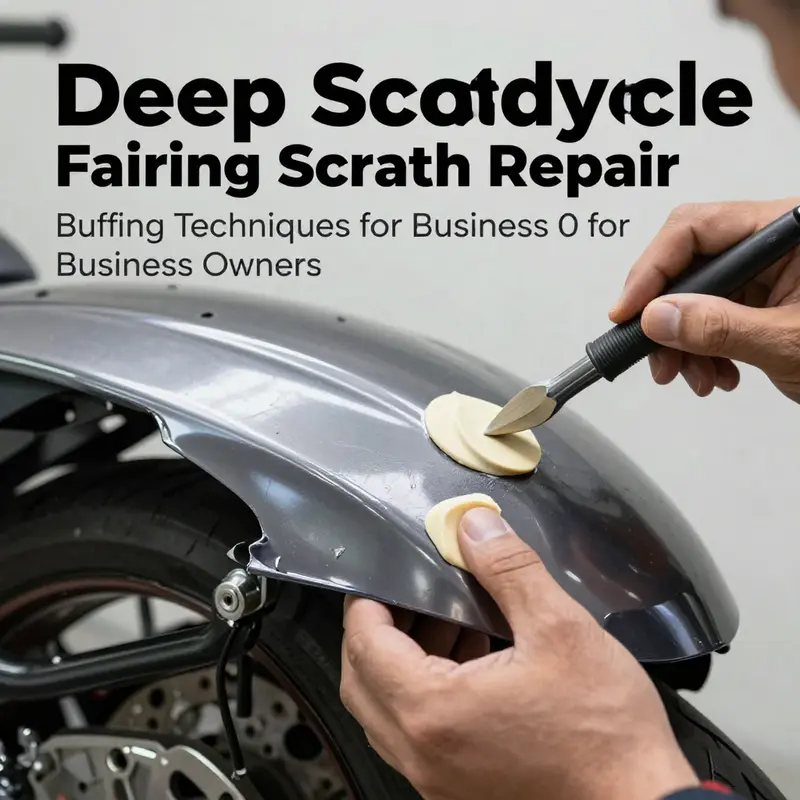
But there are scratches that demand more than a polishing cloth and a pad. When the scratch has penetrated the clear coat and exposed the base paint or primer, it becomes a different kind of repair challenge. These marks cannot be fully erased by buffing alone. They require a staged repair: first, address the exposed substrate so the repair does not stand out as a different color or texture. For fiberglass or composite fairings, this often means applying a plastic filler or body filler to level the indentation. The filler must be chosen with the material in mind and applied with attention to creating a smooth, flush surface that can be sanded without creating new valleys or edges. After the filler cures, sanding becomes essential. Wet sanding is the preferred method at this stage because it minimizes heat buildup, reduces dust, and produces a finer finish that better accepts paint. You typically begin with a coarser intermediate grade such as 1000 or 1200 grit and progress through 1500 and up to 2000 grit as you dial in the feathered edge. Each step should be done with a clean, damp sheet or block to maintain a smooth stroke and avoid creating new scratches that only become visible after the paint cures.
The color-matching phase follows, a task that requires as much patience as the prep. When the base color or primer is compromised, you may need to apply color-matched touch-up paint to fill the repaired area. This is a careful operation. A tiny brush or airbrush can deposit small, precise amounts of paint, letting you build up color in thin layers rather than laying down a thick slab that dries mottled or thick. It is crucial to let each layer cure fully before applying the next. If you rush, you risk wrinkling the finish or creating a second patch that stands out against the surrounding area. After the color has formed a uniform field, you seal it with a thin layer of clear coat. The clear coat does two things: it protects the pigment and adds the high-gloss finish that makes the repair blend seamlessly with the rest of the fairing. The timing and technique here matter. Clear coats cure differently depending on temperature, humidity, and the thickness of the layer. A light, even spray in a controlled environment can help ensure a smooth, uniform gloss without drips or sags. If you lack the experience to spray with an even hand, the patch can be built up with thin layers using a brush or airbrush and then feathered into the surrounding area with gentle, measured polishing.
Once the base repair has achieved a smooth, uniform texture and color, the narrative moves from repair to reintegration. The final stage is to bring back the overall depth and clarity that the bike’s finish enjoyed before the scratch appeared. A carefully selected polishing compound—one that is compatible with the clear coat and the base color—applied with a soft pad, can restore the luster of the entire repaired region. The goal here is not to create an over-polished patch but to ensure the repair reflects the same level of gloss as the adjacent surface. The polishing process should be slow, measured, and deliberate. Work in small areas at a time, always moving the pad in circular motions to prevent creating flat spots. Between passes, wipe the area with a clean microfiber to assess progress and to remove any residue that could obscure the true finish. When the area looks uniform and reflective, a sealant or wax is applied to introduce a protective layer that guards against UV damage, water spots, and minor abrasions. The wax or sealant should be chosen to complement the existing paint system and should be applied in a cool, shaded environment to prevent early drying and streaking. This protection helps ensure that the repair remains pristine for longer and that the gloss remains as close to factory quality as possible.
The care for the repaired surface should extend beyond the initial fix. Safety in the workshop remains a constant companion throughout the process. Protective gloves and eyewear guard against splashes and dust; a mask helps reduce inhalation of sanding or polishing particulates. Adequate ventilation is more than a comfort; it’s a health and safety necessity when using solvents, filler resins, and paint. A well-lit, clean space helps you see the color match and gloss during the cure and buff phases. When you work in cramped or poorly lit environments, your perception of depth can be distorted, which in turn affects how you apply filler, paint, and clear coat. It is also wise to test any material in a small, inconspicuous area first. While this test adds time to the project, it can prevent a disaster that would require repainting larger sections later.
A veteran detailer will tell you that the best outcome is achieved when you balance restoration with preservation. If the damage is minor or if the fairing has a distinctive finish, you may decide that small scratches are an acceptable character mark and choose to preserve them rather than pursue an exhaustive repair. This is a nuanced decision that depends on the bike’s use, its aesthetic goals, and the owner’s tolerance for upkeep. For riders who intend to ride aggressively or take the bike on long trips where it could encounter the elements, the investment in a thorough repair pays dividends in longevity and resale value. For others who view the fairing as a canvas—part of the bike’s personality—the choice may be to repair only what is necessary, ensuring the edge of the mark is not sharp, the surface remains smooth, and the color integrity remains intact. In either path, you preserve the integrity of the fairing, protect the underlying materials, and retain as much of the original finish as possible.
If you are looking to explore compatible parts or further options for repairs, consider checking a broader selection of fairing components that suit your bike model. For example, you can explore the Honda fairings collection to see if a replacement panel or a compatible repair kit aligns with your repair plan. This kind of exploration can help you gauge whether a small repair is the most economical route or if a replacement panel would yield a more consistent finish across the entire fairing. Link below shows a model line that often intersects with common repair considerations:
- Honda fairings collection: https://www.summitfairings.com/collections/honda-fairings
In practice, many riders discover that the simplest, most enduring path is the one that keeps the center of the repair as close as possible to the original finish. When done with patience, a combination of cleaning, precise buffing, careful filler, color-matched touch-up, and a final gloss coat can deliver a surface that feels as flawless as the day the bike left the showroom. The process honors the craft of color depth, the physics of clear coats, and the subtleties of how light interacts with paint chemistry. It is an iterative discipline: you assess, you test a small section, you refine your technique, and you confirm the result under different light conditions. The better you become at recognizing how light plays across a repaired patch, the more consistently you can judge whether your work has truly vanished the scratch or merely camouflaged it, and you can adjust your approach accordingly.
As with many repair tasks, there is value in learning from higher-level techniques without becoming overwhelmed by the complexity. A few guiding principles can help you stay on track. First, respect the layers: clear coat, color coat, primer, and substrate each have a role and a practical boundary. Cross-layer mistakes—such as applying color over a wet surface or sanding through the color layer—are visible and often irreversible in the short term. Second, progress is incremental. The most convincing repairs are the ones that show gradual improvement across the same surface, not quick, heavy-handed patches. Third, practice yields results. If you’re new to polishing or painting, practice on a discarded panel or a spare fairing piece first. This practice reveals how quickly heat can damage plastic, how easily color runs, and how gentle you must be with the tool and hand pressure. Finally, remember that the goal is a finish that stands up to daily use and maintains the bike’s visual language. A well-executed repair is not a hidden fix; it is a restoration that integrates into the bike’s aging patina in a way that looks intentional and durable.
If you want to deepen your understanding of the broader bodywork repair domain, you can turn to comprehensive tutorials and professional guidance on established motorcycling information platforms. These sources provide context for the nuances of paint systems, the differences between plastics and fiberglass, and the environmental considerations that affect how finishes cure and age. External resources can offer perspectives that supplement hands-on practice, expanding your capacity to assess depth, select the right materials, and execute refinements that align with the bike’s original design intent. External resource: https://www.cycletimes.com/
null
null
From Buffing to a Flawless Finish: Deep Scratch Repair for Motorcycle Fairings
Deep scratch repair on a motorcycle fairing starts with a clear diagnostic view. It tests the balance between speed and precision, and whether you can restore the finish without compromising the material beneath the paint. When damage penetrates beyond the clear coat into the color layer or primer, the repair becomes a small reconstruction project rather than a quick polish. The flow matters: assess, fill if needed, cure, sand, prime, paint, seal, and finally buff for a uniform gloss.
If the scratch has not breached the color layer, you can think in terms of surface restoration. Begin with cleanliness: warm water, a mild cleaner, and a soft cloth to remove grit that would gouge the finish. Allow the area to dry fully. Test a tiny spot on an inconspicuous edge before treating the visible face. If the scratch remains strong after a test, it is likely more than a surface abrasion.
For surface scratches, a polishing compound is often enough. Use a soft pad or microfiber and gentle circular motions to feather the edge of the scratch without removing too much clear coat. A dual action polisher helps manage heat; if you do not have one, a slow, steady hand with several light passes can still work. Wipe with a clean dry cloth to check gloss and uniformity. If the line is no longer visible under light, the surface restoration is successful.
Deep scratches require a different approach. When the clear coat is breached and base paint or primer is exposed, you cannot rely on polish alone. The repair here becomes a fill and contour task. Apply a scratch filling compound to fully level the damaged area, then cure according to the manufacturer instructions. The goal is a flush, even surface that sits in line with the surrounding contour.
After curing, carefully sand the filled area. Start with a coarser grit such as 1000, then progress to 1500 and 2000 to blend the patch with the rest of the panel. The aim is a level surface with no raised edges. Move to primer appropriate for the fairing substrate and the topcoat you intend to apply, using thin, even coats and allowing adequate dry time between layers.
Color matching is then addressed. Build up the base color with several light coats rather than one heavy one, feathering into the surrounding paint to blend under different lighting. If you are working with a common color you may find an exact match from tinting a base coat, while rare shades may require careful blending. Finish with a clear coat to lock in color and gloss.
The sealing stage completes the repair. Apply clear in light coats to protect the color, filler, and primer, then allow full cure. A final light polish can help blend the repaired area with the rest of the fairing. Wet sanding with very fine grit followed by polishing yields the smoothest transition.
Material compatibility matters. Polycarbonate, ABS, and fiberglass laminates respond differently to heat, solvents, and fillers. Test any material on a hidden spot and allow full cure before expanding the repair. The goal is durability and a natural transition without obvious seams.
Beyond repair or replacement, consider the overall plan for the bike. In some cases it is more efficient to source a compatible panel rather than perform a large repair, especially if mounting points or structural layers are involved. See resources like the Honda fairings collection for examples of matching shapes and finishes. External references can deepen your understanding of the technique, for example a detailed guide at https://www.motorcycle-maintenance.com/repair-guides/deep-scratch-repair-on-fairings.
The disciplined rhythm of assess, fill, cure, sand, prime, paint, seal, and buff keeps surprises to a minimum and improves predictability. The final result should be a seamless appearance with color and contour restored and a smooth touch to the surface. With care, you can extend the life of the fairing and maintain its protective and aerodynamic function, turning a damaged panel into a story of restoration rather than a mark of wear.
Beyond the Buff: Protective Coatings that Preserve Repaired Motorcycle Fairings and Shield Against the Next Scratch
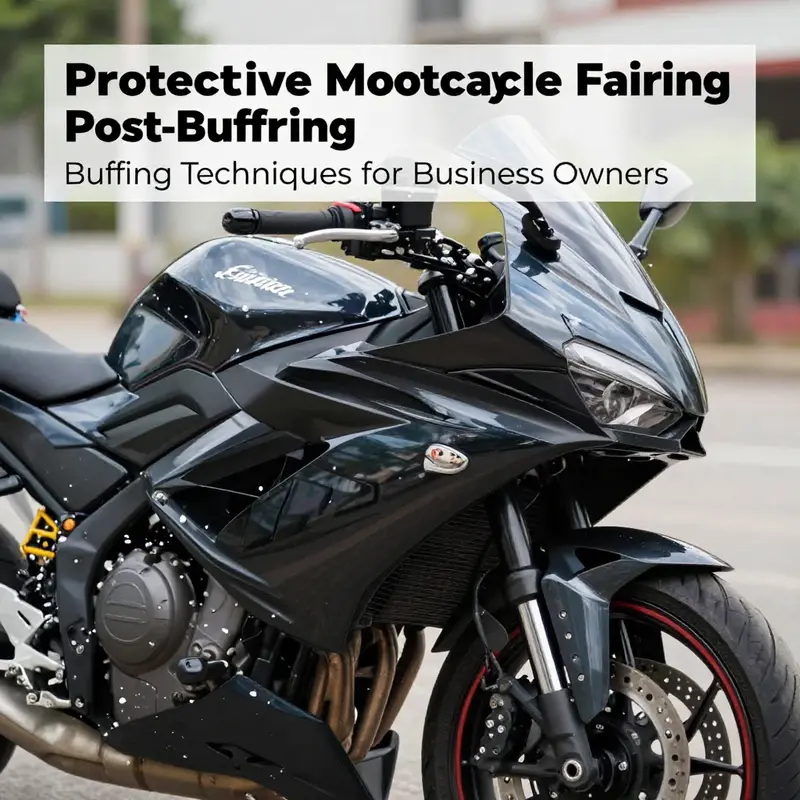
Buffing scratches out of a motorcycle fairing is only half the repair puzzle. The surface may gleam again, but without a thoughtful layer of protection, that shine can fade under the daily ballet of sun, rain, wind, and road debris. The transition from a polished patch to a durable, long-lasting finish hinges on two quiet choices: first, choosing a protective coating that can tolerate the harsh realities of riding life, and second, applying and maintaining that coating with discipline. The idea is not to turn the repair into a shield that never wears but to create a resilient barrier that slows the clock on new damage, keeps color and gloss aligned with the rest of the fairing, and makes routine maintenance simpler rather than more burdensome. A well-applied protective layer becomes a partner to the repair, not a gimmick that promises miracles without effort.
To begin, envision the protective step as an essential part of the repair workflow, not an afterthought. After you have completed the initial buffing, the area should be thoroughly cleaned to remove any polishing residues, oils, or dust that could interfere with adhesion. A clean canvas equals a more uniform cure and a more even surface. Once the area is spotless, dry and free of contaminants, you can assess the optical and tactile readiness of the repaired patch. A coating will behave differently on a flawless original paint job than on a patched or filled area. The key is to ensure that the repaired surface is as level, as smooth, and as dry as possible before applying the protective layer. Any micro-roughness or remaining solvent film can create tiny imperfections that become visible after curing, undermining the very clarity you sought when you buffed the scratch away.
There are two broad categories of protective coatings that riders frequently choose after a scratch repair: ceramic coatings and durable polymer sealants. Each offers distinct advantages, and while neither makes the fairing invincible, both can dramatically extend the interval between waxes and polishings and reduce the frequency with which you must repeat more invasive maintenance. A ceramic coating forms a hard, glass-like layer that bonds chemically to the clear coat and, in many cases, to the color layer as well. The result is a surface with enhanced hardness, improved water beading, and a higher resistance to UV rays and minor abrasions. It is a shield that repels road grime and chemicals to a greater extent than traditional waxes. A polymer sealant, on the other hand, tends to be easier to apply, requires shorter cure times, and offers excellent gloss and slickness that many riders find more approachable for DIY application. It serves as a robust barrier, though it may require more frequent reapplication than a premium ceramic coating.
The decision between these options should be guided by a few practical considerations. First, think about exposure: if your bike spends long hours under strong sun, near coastal air, or in areas where you ride through dusty routes, you will benefit from a coating with strong UV resistance and durable chemical resistance. Second, consider maintenance habits: if you prefer a straightforward routine that fits into a busy riding schedule, a high-quality polymer sealant with a reasonable cure time and forgiving reapplication window can be more forgiving than a multi-step ceramic treatment. Third, the repair’s location matters. Fairings are often composite or fiberglass and can be sensitive to pinholes, micro-cracks, or edges where adhesion may be uneven. For those spots, a coating that cures to a strong, continuous film across irregularities is valuable because it reduces the risk of micro-damage gathering at the seams.
Application, at its core, is about patience and precision. Start by ensuring the entire repaired area is impeccably clean and dry. Any leftover solvent from polishing, or even a stray microfiber fiber, can ruin adhesion. Next, apply the coating in a thin, even layer according to the manufacturer’s directions. The best results come from a controlled environment: low dust, moderate temperature, and a dry air setting that won’t prematurely affect the curing process. It’s important to respect cure times, which can vary from product to product. Rushing the cure can trap solvents beneath the film and create hazing or clouding that defeats the purpose of enclosure and protection. In practice, most riders find it worthwhile to allocate a block of time for a single-coat solution rather than attempting multiple layers in a rush job. A single, well-applied coat that cures properly often yields better long-term resilience than a rushed, heavy-handed application.
As the coating cures, you’ll notice the surface taking on a clearer, more vibrant look. This is not merely cosmetic; it is a sign that the material has formed a continuous film, bridging minor micro-scratches and sealing the repaired area from environmental intrusions. After curing, a light, final buff with a soft microfiber can enhance smoothness and remove any stray high spots. This final step is crucial for ensuring the coating sits flush with the surrounding finish, creating an even visual plane that visually integrates the repair with the rest of the fairing. Perfection in this stage is often a matter of inches and milliseconds—the difference between a patchy edge that catches the light awkwardly and a seamless seam that reads as one continuous surface.
Protection doesn’t end at the application. Long-term protection relies on a disciplined maintenance routine that respects the coating’s chemistry and the bike’s living environment. A lot of the visible durability comes from how you wash and how you treat the surface between detail sessions. Use a pH-neutral soap and warm water for routine washing, and avoid aggressive brushes or scouring pads that can nick the coating or introduce new micro-scratches. The goal is to cleanse without abrading. For stubborn spots, a soft microfiber or cotton pad with a gentle touch is more effective than hard scouring motions. Dry the surface with a clean, plush towel to prevent water spotting, which can become a nuisance on shiny finishes over time if left to air-dry.
Waxing and sealing still have their places, even with a ceramic or polymer coating in place. A maintenance layer every three to six months can preserve the coating’s slickness and extend its life by reducing surface energy and deterring dirt adhesion. The exact interval depends on riding conditions, climate, and how aggressively you ride through rain or road salt. If you are in an environment with frequent exposure to corrosive contaminants—think coastal air, industrial areas, or winter road treatment chemicals—the interval may be shorter. If conditions are milder and the bike spends more time in the garage, you might push the interval toward the longer end of that range. The essential idea is to treat the wax or sealant as a supplementary shield that refreshes the surface’s slickness, ease of cleaning, and water management rather than as the sole protective measure.
Another practical layer of protection is about reducing the bike’s exposure to certain stressors in the first place. Parking in shaded areas whenever possible minimizes UV exposure, which can be particularly harsh on clear coats and resin-based fairings over time. A breathable, weather-resistant cover can shield from dew, bird droppings, tree sap, and abrasive dust that can bake onto the surface in sunlit heat. The cover should be clean, well-fitting, and used when the bike is parked for extended periods, especially in dry, dusty environments. Even the most robust coating can benefit from a little preemptive care; by reducing the amount of direct exposure to the elements, you limit the instances in which you’ll need to buff away or repair micro-scratches in the future.
For riders considering replacement panels after repair, it can be helpful to browse the broader ecosystem of available fairings to understand color matching and finish options. A practical way to connect with options is to explore a curated collection such as the Honda fairings section, which can provide context for color palette, finish, and compatibility with your model. This kind of exploration also helps you plan future upgrades or replacements with a clear eye for how a repaired section will age alongside new panels. You can find a representative range of options in the Honda fairings collection, which offers a sense of how aftermarket pieces can harmonize with the repaired area when you decide to refresh larger portions of the bodywork.
The broader philosophy behind protective post-buffing care is consistency and respect for the craft of repainting and refinishing. Scratches are more than cosmetic blemishes; they expose the underlying layers and invite more serious issues if left unaddressed. A well-chosen coating and a thoughtful maintenance cadence produce a durable finish that respects both the aesthetic and the structural integrity of the fairing. Even the most meticulously performed color-matching and filler work can be undone by neglect, letting dirt accumulate, UV degrade the clear coat, or the surface become rapidly oxidized. In this context, maintenance becomes part of the repair itself. The aesthetic payoff is not just a momentary glimmer but a longer, steadier shine that speaks to careful preparation, disciplined application, and informed maintenance choices over the life of the bike.
The practical takeaway is straightforward. Clean, dry, and smooth are your keywords before you apply any protective layer. Choose a coating with properties that align with your climate and riding habits, then apply precisely and cure fully before exposing the surface to the world again. Maintain with mild cleaners and periodic wax or sealant refreshment, and protect against the sun and the elements with shade and a quality cover. Over time, this approach yields a repaired fairing that does not simply look repaired but genuinely feels protected, contributing to a more cohesive overall finish that remains appealing to the eye and resilient to the realities of daily riding.
As you reflect on your post-buffing routine, keep in mind that a chapter of a bike’s life is often written not just by the repair itself but by what comes after. The protective layer you choose and how faithfully you follow its maintenance are the quiet custodians of the repair’s longevity. A well-protected surface resists micro scratches during road debris encounters, repels staining from environmental fallout, and minimizes the chance that the repaired area will age differently than the surrounding panels. In a sense, the paint’s life after buffing becomes a measure of the rider’s commitment to craft and care. The result—gloss that lasts, a finish that remains uniform, and a repair that aging gracefully continues to honor—will be worth the extra minute spent foiling the next potential mark with a durable shield.
For readers seeking further practical direction, a trusted external resource offers a comprehensive, step-by-step exploration of post-repair care, including product recommendations and techniques for maintaining repaired fairings: https://www.revzilla.com/motorcycle-fairing-repair-protection-guide
Internal link guidance: to explore compatible or replacement fairings and finishes that complement repaired sections, consider visiting the Honda fairings collection to gauge color and finish options that align with your repaired panel. This resource can help you plan future maintenance or panel refreshes in a way that preserves overall harmony across the fairing’s surface. For additional context on how to approach maintenance broadly, the following internal link may offer useful insights: https://www.summitfairings.com/collections/honda-fairings
Final thoughts
Effectively buffing out scratches on motorcycle fairings not only enhances the aesthetic appeal of the bike but also contributes to its overall value and longevity. Business owners can capitalize on the knowledge of assessing scratch types, applying appropriate buffing techniques, and ensuring proper protective measures are in place. Embracing these strategies will equip your business with the tools to satisfy customers and position yourself as an expert in motorcycle maintenance. Implement these practices and observe the uplift in client loyalty as they appreciate the pristine condition of their machines.