Introduction
Motorcycle fairings are essential for both form and function, impacting aerodynamics, rider protection, and visual appeal. For business owners in the motorcycle aftermarket or repair industry, understanding DIY motorcycle fairing techniques can provide a competitive edge—cut costs, offer unique customization, and expand your service portfolio. This guide covers core materials and tools essential for fairing projects, practical repair methods that save time and resources, creative customization techniques to attract style-conscious customers, advanced fabrication approaches for premium offerings, and curated resources to deepen expertise. Each chapter connects directly to operational success in the realm of motorcycle fairings, empowering you to innovate and scale your business efficiently.
Tables of Contents
Chapter 1: Materials and Tools for DIY Motorcycle Fairing
- Choosing the Right Materials: Understanding ABS Plastic and Alternatives for Motorcycle Fairings
- Mastering Essential Tools and Safety for Effective Motorcycle Fairing Installation
- Mastering Preparation and Fitment: Ensuring Strong, Durable DIY Motorcycle Fairings
Chapter 2: Repair Techniques in DIY Motorcycle Fairing
- Mastering Fiberglass Repairs: Strengthening and Refinishing Motorcycle Fairings
- Mastering Plastic Fairing Repairs: Effective DIY Techniques for Durable Motorcycle Restoration
- Reinforcement and Aesthetic Renewal: Strengthening and Finishing in DIY Motorcycle Fairing Repairs
Chapter 3: Customization Methods in DIY Motorcycle Fairing
- Mastering Metal Shaping: Essential Techniques for Custom Motorcycle Fairings
- Mastering Painting and Finishing Techniques for Custom DIY Motorcycle Fairings
- Maximizing Style and Function: The Role of Aftermarket Fairing Kits in DIY Motorcycle Customization
Chapter 4: Advanced Fabrication Approaches in DIY Motorcycle Fairing
- Crafting Precision: Handmade Metal Fabrication and Custom Mounting Strategies for DIY Motorcycle Fairings
- Harnessing 3D Printing and Injection Molding for Precision and Efficiency in DIY Motorcycle Fairing
- Selecting Premium Materials and Mastering Finishes for Durable, Custom Motorcycle Fairings
Chapter 5: Resources and Tutorials for DIY Motorcycle Fairing
- Step-by-Step Installation Mastery: Essential Techniques for DIY Motorcycle Fairing Success
- Mastering Fairing Removal: Essential Steps and Expert Tips for DIY Success
- Navigating Model-Specific Replacement Guides for Precise Fairing Repairs
Chapter 1: Materials and Tools for DIY Motorcycle Fairing
1. Choosing the Right Materials: Understanding ABS Plastic and Alternatives for Motorcycle Fairings
When undertaking a DIY motorcycle fairing project, selecting the right materials is crucial to achieving durability, style, and functionality. High-impact ABS plastic is the preferred choice among enthusiasts due to its exceptional balance of toughness and workability. This thermoplastic offers impressive resilience against everyday wear, UV exposure, and weather conditions, ensuring fairings maintain their shape and appearance over time. Its lightweight nature helps preserve the motorcycle’s performance dynamics while providing reliable impact resistance against minor collisions or debris.
ABS’s versatility extends to fabrication processes; it can be heated and molded into custom designs without cracking, and it readily accepts automotive-grade paints. This creates opportunities for personalized aesthetics, from solid colors to intricate graphics, especially when paired with a protective 2K clear coat that guards against fuel spills and environmental damage. While fiberglass and carbon fiber are popular for premium or specialized fairings, their cost and complex fabrication methods make them less accessible for most DIY projects.
Additionally, pre-drilled kits and bolt sets make assembly straightforward, improving alignment and fitment, particularly when replicating OEM parts. For finish options, vinyl wraps are an alternative or complement to painting, offering reversible customization with less commitment.
For further insights and options available in the realm of motorcycle fairings, visit your ultimate source for affordable motorcycle fairings.
Extensive use of high-impact ABS plastic combined with appropriate finishing techniques ensures DIY fairings are both durable and visually impressive, setting a solid foundation before moving on to the essential tools and safety equipment necessary for installation.
Reference: RevZilla – Custom Accessories for Harley Sportster
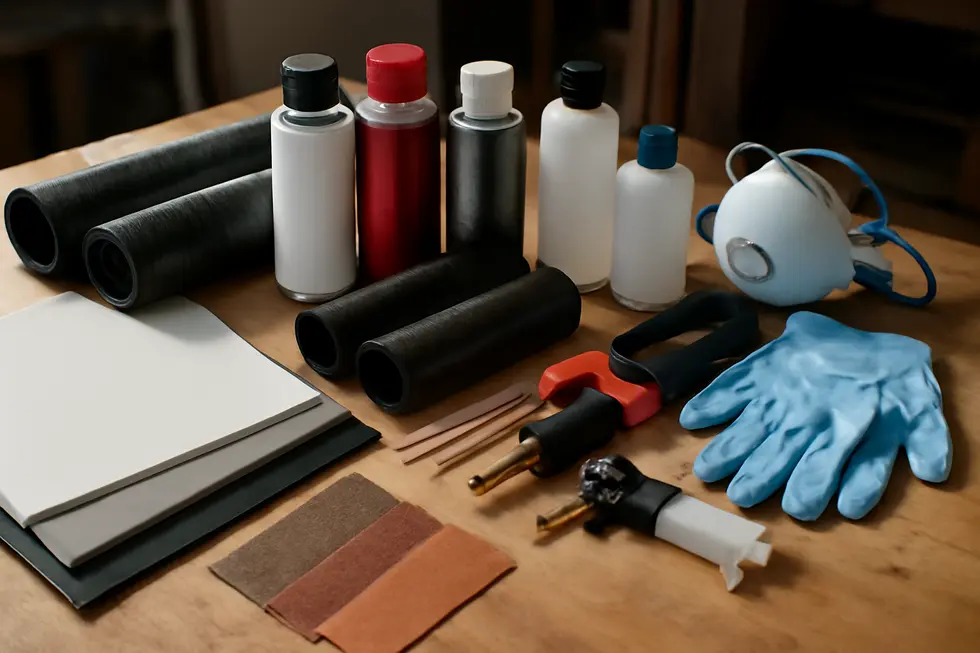
2. Mastering Essential Tools and Safety for Effective Motorcycle Fairing Installation
Successfully installing motorcycle fairings hinges on having the right tools and adhering to key safety practices. Fundamental equipment includes Allen wrenches or hex keys to handle various bolts, particularly for quick-release fasteners common in modern fairing kits. Torx drivers might be needed for certain motorcycles that use specialized screws. A comprehensive socket set aids in loosening or tightening larger bolts like those securing crash bars and skid plates, while pliers and adjustable wrenches provide versatility for gripping and fastening components securely.
Protection during installation is critical; always wear safety glasses and gloves to shield your hands and eyes from shards or sharp edges. Working in a well-lit area improves visibility and reduces errors. Elevating the bike with a motorcycle lift or stand enhances access and prevents awkward postures, while securing the motorcycle with straps or a center stand ensures stability and safety.
Beyond the basic tools, additional equipment such as crash bars and skid plates can be integrated alongside fairings for enhanced protection and durability. Fairing brackets are indispensable for mounting panels firmly, preventing rattling or damage during rides. Following manufacturer instructions precisely guards against installation mistakes.
For a deeper dive into choosing the ideal fairings and understanding their installation, exploring these comprehensive insights on motorcycle fairings can be highly beneficial. Practical tutorials also demonstrate efficient methods to secure fairings while maintaining safety standards, reinforcing the importance of preparation in every DIY fairing project.
External resource for specialized fairing mounting techniques: Memphis Shades Cafe Fairing Installation
3. Mastering Preparation and Fitment: Ensuring Strong, Durable DIY Motorcycle Fairings
Achieving a professional-quality DIY motorcycle fairing installation relies heavily on meticulous preparation and careful fitment. Start by loosely attaching brackets and mounting points, positioning the fairing shell to verify perfect alignment with the frame, wiring, and controls. This cautious approach prevents undue stress or interference that could damage components or hinder riding performance. Using rubber grommets in bolt holes is essential to evenly distribute pressure and avoid cracks, especially with fiberglass or plastic panels. Incorporate washers behind the grommets to secure bolts firmly without risking deformation. When tightening fasteners, avoid overtightening; plastic and fiberglass materials are fragile and can crack under excessive torque. If mounting holes don’t line up precisely, make minor, controlled adjustments by drilling or grinding to ensure a snug, secure fit while preserving the fairing’s structural integrity. Sometimes, relocating electrical components or wiring is necessary to accommodate bracket placement and maintain clean, unobstructed lines. Once positioned, inspect the fairing carefully for gaps or misalignments, confirming all parts are securely attached to prevent vibration or rattling during rides. For repair work, thorough surface preparation is critical—clean damaged areas, apply layered fiberglass resin or filler, then sand and prime the surface before painting to achieve a flawless finish. Basic tools such as screwdrivers, wrenches, and occasionally a drill cover these tasks well. For more insights on fairing installation and preparation, explore detailed guides at Summit Fairings’ blog and see professional advice on fitment and finishing techniques here.
Chapter 2: Repair Techniques in DIY Motorcycle Fairing

1. Mastering Fiberglass Repairs: Strengthening and Refinishing Motorcycle Fairings
Fiberglass repair is a cornerstone technique for restoring motorcycle fairings, prized for its ability to reinforce damaged panels while preserving their original shape and durability. The process begins with careful assessment and thorough cleaning of the damaged area to ensure all dirt, grease, and loose fragments are removed, creating an ideal foundation for bonding. Light sanding follows, roughening the surface to enhance adhesion between the fairing and the fiberglass patches.
Once prepped, any weak or compromised fiberglass must be trimmed away, exposing a stable base for the repair. Fiberglass cloth or mat, cut slightly larger than the damaged zone, is then applied with a generous coating of polyester or epoxy resin. Working from the inside out, the cloth saturates with resin to form a rigid, seamless bond, restoring structural integrity to cracked or punctured areas.
After allowing the resin to cure fully, attention turns to smoothing and finishing the repaired section. Sanding eliminates unevenness, while fillers specially designed for bodywork can sculpt the surface back to its original contours. Finally, priming and painting with UV-resistant coatings restore the fairing’s visual appeal and protect the repair against environmental damage.
This hands-on approach combines durability with aesthetic restoration, making fiberglass repair highly effective for DIY motorcycle fairing projects. For a detailed visual guide through each step, refer to the comprehensive tutorial titled “How Do You Repair Fiberglass On A Motorcycle?” on YouTube.
For further insights on fairings and repair ideas, the blog post on exploring quality aftermarket fairings provides valuable context for selecting or supplementing your DIY efforts: https://blog.summitfairings.com/explore-the-best-motorcycle-fairings-at-summit-fairings/
2. Mastering Plastic Fairing Repairs: Effective DIY Techniques for Durable Motorcycle Restoration
Plastic fairings are the most common and practical surface on motorcycles, valued for their durability and flexibility. Yet, they are also prone to cracking or breaking from impacts or stress. Mastering plastic fairing repair is crucial for any DIY enthusiast aiming to restore a bike’s appearance and structural integrity without costly replacements. A reliable repair begins with cleaning the damaged area thoroughly, removing dirt, oils, and loose fragments, which ensures optimal adhesion for repair materials. For cracks and small breaks, plastic welding or epoxy adhesives are preferred methods. Plastic welding uses heat to fuse the damaged edges by melting compatible plastic or welding rods, creating a long-lasting bond that retains fairing strength. Epoxy, especially formulated for plastics, offers a budget-friendly alternative that fills cracks and adheres firmly once cured, though it may require reinforcement with fiberglass mesh for larger gaps.
After repairing, sanding smooths out any excess filler and prepares the surface for painting or additional finishing. Layering primer and UV-resistant paint helps protect the surface from weathering while restoring a sleek look. For those new to this, video tutorials and step-by-step guides simplify each phase, boosting confidence and skill precision. Using ABS plastic—the most common DIY fairing material—makes repairs more straightforward due to its weldability and adhesive compatibility. Exploring a comprehensive range of fairing options and repair tips, including OEM-style references, can greatly aid your project’s success, as found in resources like the Summit Fairings blog. For an in-depth, practical guide on plastic fairing repairs, detailed techniques can be found at Kings Motorcycle Fairings’ blog, which offers expert advice tailored to DIY enthusiasts.
3. Reinforcement and Aesthetic Renewal: Strengthening and Finishing in DIY Motorcycle Fairing Repairs
Securing damaged motorcycle fairings goes beyond simply bonding broken parts—it requires creating a lasting structural repair that restores integrity. Start by thoroughly cleaning the affected area to remove grease and debris, then lightly sand the surface for better adhesion. For cracks or holes, reinforcing from the inside with fiberglass cloth or mat is crucial. Applying polyester or epoxy resin to the fiberglass layers adds strength and prevents future fractures. Removing any fragile fiberglass fragments ensures the repair won’t weaken prematurely.
Once the fairing’s stability is assured, focus shifts to cosmetic restoration. Surface imperfections are addressed by applying body filler or putty, which smooths out dents and gaps. Careful sanding follows to achieve an even contour that blends seamlessly with the original shape. Primer application is essential to promote paint adhesion and avoid peeling. The final steps involve painting with color-matched, UV-resistant paint and protecting the finish with clear coating, which resists weathering and chipping.
Mechanical adjustments can further secure loose panels; gently bending or realigning mounting tabs helps prevent rattles and keeps parts firmly in place. This combined approach—structural reinforcement paired with meticulous surface finishing—ensures DIY repairs restore both function and appearance effectively.
For detailed step-by-step guidance on fiberglass repair and paint restoration, refer to this comprehensive visual tutorial. Additionally, explore expert advice and fairing options at Summit Fairings’ blog to enhance your DIY projects.
Chapter 3: Customization Methods in DIY Motorcycle Fairing
1. Mastering Metal Shaping: Essential Techniques for Custom Motorcycle Fairings
Metal shaping lies at the heart of crafting unique, custom motorcycle fairings that demand precision and artistry. This process begins with manipulating sheet metal through careful shrinking and stretching to form smooth curves and contours essential to café racer cowls and other bespoke parts. Using tools such as a shrinker/stretcher and a center punch, DIYers can alternate reducing and expanding metal areas to shape complex forms while maintaining structural integrity. For faster and rough shaping, a power hammer enables repeated, controlled hammer blows to heavier steel, accelerating the initial molding process. Transitioning from machine to hand work, artisans employ tools like a nylon hammer, sandbag, and dolly to gently refine shapes, smooth out high spots, and perfect the contour with tactile control. The final step often involves the English wheel, which adeptly smooths and blends the metal surface, removing hammer marks and creating flawless, professional curves on thinner sheet metal. This flow—from power hammer to shrinking/stretching, followed by detailed hand finishing and English wheel smoothing—allows for precise, low-cost customization of metal fairings. Whether refining a classic fuel tank cowl or crafting a custom front fairing, mastering these techniques delivers both functional aerodynamics and striking visual appeal. For detailed guidance and step-by-step insights on these metal shaping methods, the guide at Return of the Cafe Racers is an invaluable resource. Additionally, exploring extensive customization ideas and resources at Summit Fairings blog can inspire your next creative project.
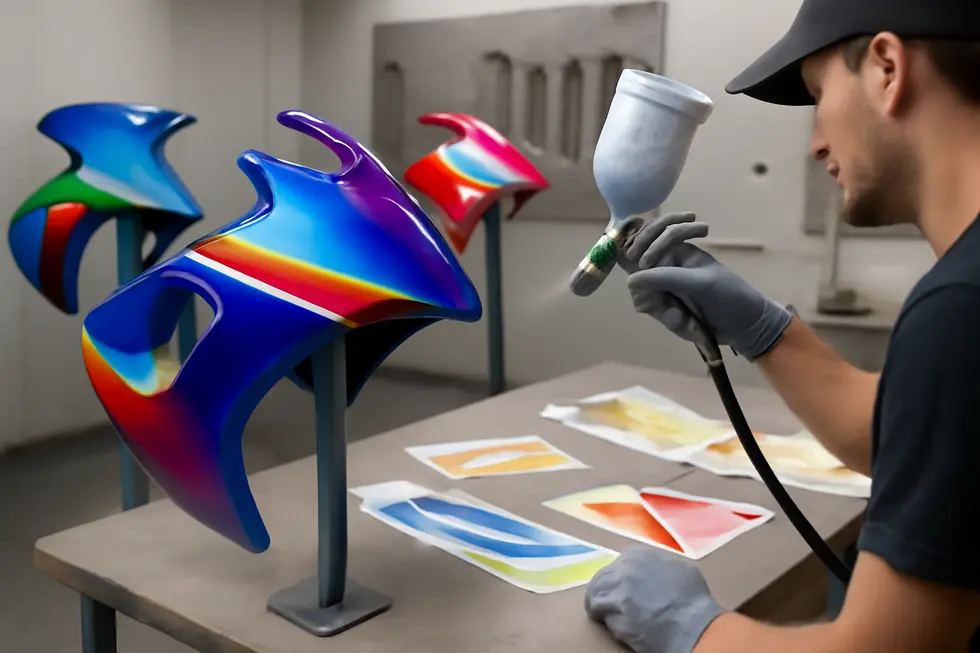
2. Mastering Painting and Finishing Techniques for Custom DIY Motorcycle Fairings
Achieving a durable and striking finish on DIY motorcycle fairings begins with meticulous surface preparation. Sanding smooths out imperfections and creates a texture for paint adherence, while applying a primer seals the surface and ensures an even base coat. A guide coat sprayed over the primer helps identify low spots, enabling refined sanding for flawless results. Once prepared, the base coat is applied in multiple thin, even layers after thoroughly cleaning the surface with wax and grease remover. This step sets the primary color and demands patience to avoid runs or uneven coverage.
Following the base paint, a 2K (two-component) clear coat is essential for protecting the finish. This clear coat not only adds a glossy, vibrant look but also resists fuel and environmental damage common to motorcycles. For those seeking more personalized expression, techniques such as pin-striping or airbrushing introduce intricate designs, requiring steady hands and specialized tools to enhance the fairing’s aesthetic appeal.
Maintenance plays a key role in preserving the finish; limiting sun exposure, washing gently, and applying motorcycle-safe wax keep the paintwork vibrant. Minor scratches or dents can be repaired through sanding and repainting using accessible DIY methods supported by numerous tutorials. Advanced users may explore special effect paints with color-shifting properties, adding dynamic visual elements that respond to light.
Using premium materials like high-quality ABS plastic alongside these multi-step painting and finishing techniques results in a professional appearance that lasts. For further practical guidance on spray painting and clear coating, see the detailed tutorial “2k Clear in a Can. How to Spray Paint like a Pro”.
Explore more about quality fairings and their customization at Explore the Best Motorcycle Fairings at Summit Fairings.
3. Maximizing Style and Function: The Role of Aftermarket Fairing Kits in DIY Motorcycle Customization
Aftermarket fairing kits serve as a pivotal resource for DIY motorcycle enthusiasts aiming to enhance their bike’s aesthetics or restore its original look. Typically crafted from durable ABS plastic or fiberglass, these kits offer a blend of ruggedness and ease of installation, replicating or improving upon OEM designs. High-quality kits are precision-molded to ensure a seamless fit, which simplifies installation and guarantees durability under day-to-day riding conditions. Beyond mere replacement, they open the door to extensive customization—riders can tailor colors, logos, and design elements to express individuality or achieve a factory-style finish. Costs vary widely, from affordable ABS options to premium carbon fiber sets, providing flexibility for different budgets and performance goals. Installation is straightforward for most DIYers and often includes mounting hardware like CNC-machined bolts, securing the assembly reliably. While adding aftermarket fairings may influence warranty standing, U.S. regulations prevent manufacturers from voiding warranties entirely due to such modifications, though coverage for directly linked damages might be affected. Communities supported by suppliers often provide valuable guidance and customization services that empower DIYers to successfully transform their motorcycles. For those interested in exploring diverse aftermarket kit options and detailed customization possibilities, resources like Kings Motorcycle Fairings offer comprehensive selections tailored for enthusiast projects. This integration of quality, customization, and support makes aftermarket fairing kits an indispensable foundation in DIY motorcycle fairing efforts.
Discover detailed options and insights at Kings Motorcycle Fairings and explore a wide range of fairing choices at Summit Fairings.
Chapter 4: Advanced Fabrication Approaches in DIY Motorcycle Fairing
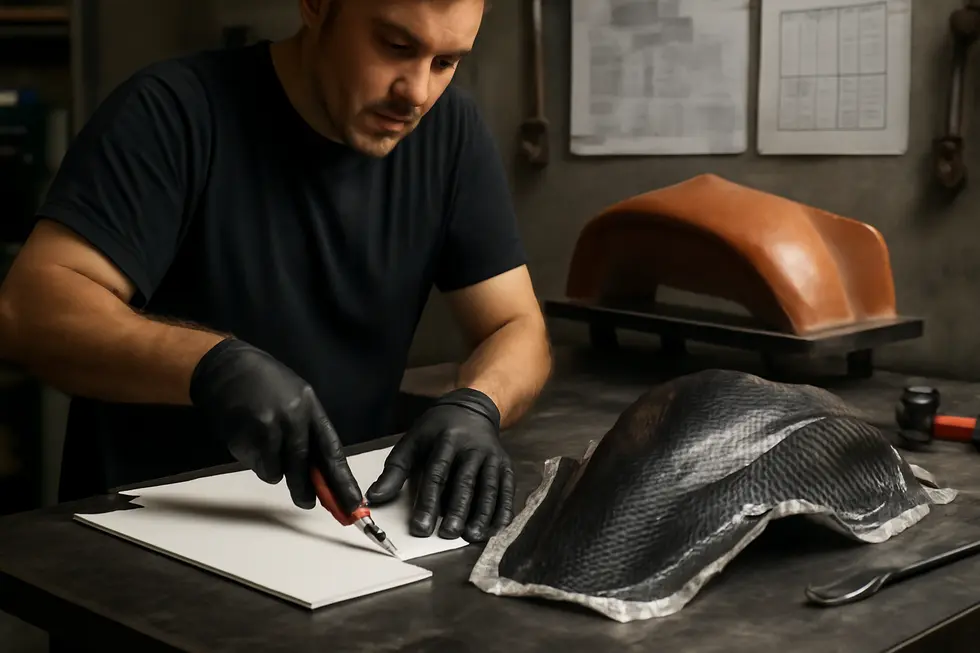
1. Crafting Precision: Handmade Metal Fabrication and Custom Mounting Strategies for DIY Motorcycle Fairings
Crafting Precision in handmade metal fabrication brings custom mounting solutions to advanced DIY motorcycle fairing projects. This method centers on manually shaping, cutting, and joining steel or aluminum components to produce bespoke brackets and supports that seamlessly fit a bike’s frame and fairing. Unlike prefabricated plastic mounts, these handmade fixtures rely on traditional metalworking skills such as grinding, bending, drilling, and welding to ensure precise alignment and long-term durability without compromising style or function.
Artisans cut metal plates and rods to specific angles before welding or bolting them into custom mounts tailored to unique motorcycle geometries. Precision drilling ensures mounting holes align perfectly with the frame or fairing points, often using lock nuts or double nuts for secure fastening. The process demands meticulous hand filing, edge breaking, and surface smoothing to protect both the rider and fairing from sharp edges or abrasion.
This craftsmanship allows adaptation to irregular frame shapes, maintains structural integrity, and integrates with existing OEM brackets, bridging traditional fabrication with modern motorcycle dynamics. A practical example includes custom mounts crafted for a Honda XR200 racer, where hand-cut plates and carefully drilled holes yielded a precise fit and reliable support.
The handcrafted nature of metal fabrication elevates fairing mounting beyond standard mass production, showcasing a blend of skill and functional design vital for complex DIY projects. For those ready to explore these metalworking techniques, detailed demonstrations provide invaluable insight into this advanced approach.
For additional insights on custom fairing projects, explore resources like affordable motorcycle fairings. For a step-by-step visual guide, see this detailed example: https://www.youtube.com/watch?v=ncVEEKHIgtE
2. Harnessing 3D Printing and Injection Molding for Precision and Efficiency in DIY Motorcycle Fairing
3D printing and injection molding represent two transformative fabrication methods advancing DIY motorcycle fairing projects. 3D printing excels in rapid prototyping and customization, enabling builders to convert digital models into tangible parts quickly. Its low setup cost and design flexibility allow for intricate geometries and one-off components, such as airbox covers or custom mounts, that traditional methods struggle to produce. For example, reverse-engineered fairings created through 3D scanning and printing demonstrate impressive strength, easily withstanding heavy loads despite being lightweight. However, 3D printing operates slower per piece and has some material durability limits compared to injection molding.
Injection molding suits riders aiming for medium to large batch production, offering high repeatability and superior surface finishes. While its tooling costs are substantial, this process yields highly durable, uniform fairings ideal for replicating vintage parts or group projects. Many DIY enthusiasts adopt a hybrid approach—first developing prototypes with 3D printing to refine design, then transitioning to injection molding for efficient mass replication. This strategy combines innovation speed with manufacturing efficiency, unlocking new possibilities for custom motorcycle fairings.
Advances in composite-compatible materials further elevate both technologies, allowing fabrication of lightweight yet strong components. This synergy echoes professional trends seen in racing industries leveraging digital manufacturing to produce on-demand parts.
For DIY enthusiasts keen on exploring these methods, detailed guidance and inspiration can be found at Summit Fairings’ motorcycle fairings blog.
More on the evolving capabilities of 3D printing and injection molding in motorcycle fabrication is discussed in specialized resources like the reverse engineering and 3D print workflow.
3. Selecting Premium Materials and Mastering Finishes for Durable, Custom Motorcycle Fairings
Choosing the right materials is foundational to advanced DIY motorcycle fairing fabrication. ABS plastic remains the favored base due to its excellent balance of impact resistance, heat tolerance, and workability, making it ideal for both repairs and custom builds. For those seeking high-performance results, carbon fiber stands out, offering remarkable strength-to-weight ratios and a visually striking weave pattern. However, working with carbon fiber demands skillful molding and finishing techniques, often including autoclave curing or vacuum bagging to achieve optimal structural integrity.
Professional finishing elevates the look and lifespan of fabricated fairings. Multi-layer painting processes start with UV-resistant base coats that protect against fading and environmental wear. This is usually followed by sanding and primer steps to smooth imperfections. The final application of a high-gloss clear coat seals the paint and enhances depth, producing a sleek, durable surface.
In advanced DIY projects, precision fitting influences both aesthetics and structural soundness. Fabricating custom mounts, often from aluminum or stainless steel, requires careful measuring and alignment to hold fairings securely without stress. Attention to edge finishing and surface preparation ensures a cohesive, polished result that rivals professional builds.
Ultimately, mastering material selection paired with meticulous finishing processes empowers DIY enthusiasts to fabricate fairings that are not only robust and aerodynamic but also visually impressive. To deepen technique knowledge, comprehensive tutorials demonstrate these fabrication and finishing steps in real-world applications.YouTube resource
Chapter 5: Resources and Tutorials for DIY Motorcycle Fairing
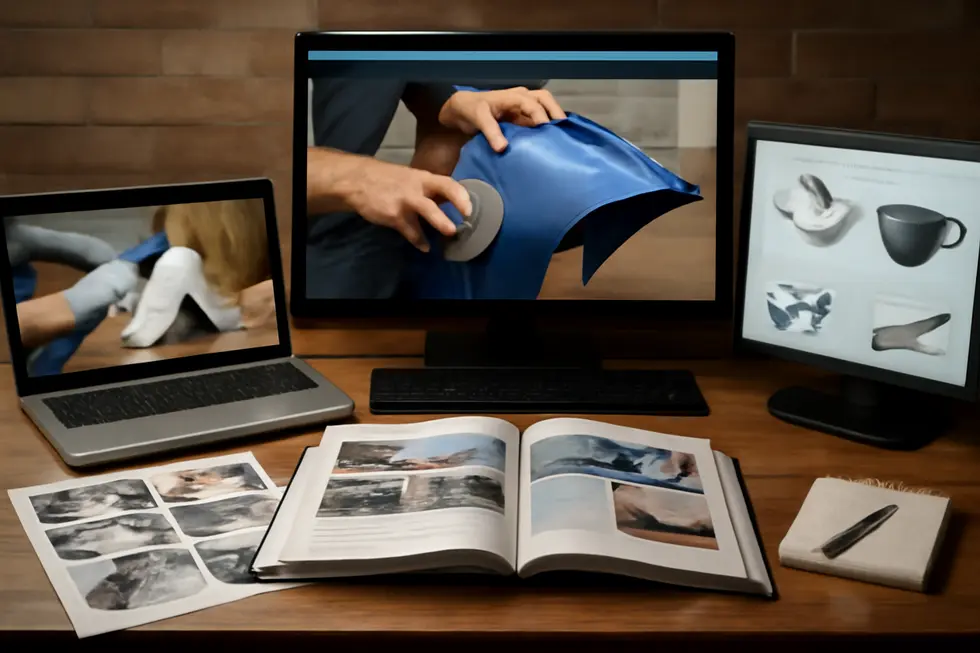
1. Step-by-Step Installation Mastery: Essential Techniques for DIY Motorcycle Fairing Success
Successfully installing motorcycle fairings enhances both style and function, making precise preparation and technique vital for any DIYer. Begin by securing your bike on a stable stand and gathering essential tools such as screwdrivers, hex keys, socket wrenches, pliers, and a drill for any needed holes. Carefully remove existing fairings, keeping track of all bolts and hardware to streamline reassembly. Clean mounting points thoroughly to ensure proper fitment and avoid alignment issues.
Inspection of mounting locations is crucial. Many kits fit directly into existing frame holes, but some require drilling new ones—using painter’s tape for marking and a magnet beneath to catch shavings prevents damage. Before final installation, test-fit panels and adjust as needed; minor trimming often ensures perfect alignment. Assemble multi-piece fairings in stages, attaching components like windshields first, and route cables carefully to avoid pinching wires.
Start mounting by securing brackets firmly but avoid overtightening plastic parts. Attach larger panels first, following with smaller sections, maintaining even gaps to enhance aesthetics and aerodynamics. Use temporary fasteners initially for adjustments, confirming all lights and indicators work properly before final tightening. Double-check all bolts are secure with a moderate torque to withstand road vibrations, using thread locker selectively.
Document each step with photos and label hardware bags during longer projects to avoid confusion. Once installed, inspect edges where panels meet, adding rubber grommets if available to protect from contact damage. A cautious test ride helps identify any rattles or loose parts early. This thorough approach guarantees your DIY motorcycle fairing project looks professional and performs reliably under road conditions. For additional insights, explore comprehensive motorcycle fairing resources and tutorials.
For a visual guide on these installation techniques, see the detailed tutorial at How Do You Install Motorcycle Fairings? – The Racing Xpert.
2. Mastering Fairing Removal: Essential Steps and Expert Tips for DIY Success
Effective removal of motorcycle fairings is a foundational skill for any DIY enthusiast tackling repairs or customizations. Though methods vary between models, most sportbikes share common fasteners such as screws, bolts, plastic rivets, and hidden clips that secure the panels. Before starting, ensuring the motorcycle is stable on level ground and disconnecting the battery minimizes risk during detachment of any electrical components integrated into the fairings. Gathering the right tools—Phillips and flathead screwdrivers, Allen wrenches, and plastic trim tools to avoid paint damage—is critical, along with wearing gloves and eye protection for safety.
The removal process begins by understanding the panel layout and sequence, often starting with upper sections like mirrors or integrated signals. Identifying and gently removing all fasteners, including concealed ones beneath decals or plugs, prevents damage. Disconnecting wiring harnesses carefully and labeling them aids smooth reassembly. Many panels also rely on plastic tabs that require delicate prying to avoid cracking or distortion.
After all connections and fasteners are cleared, panels often need slight angling or twisting to release from internal brackets. Safely storing removed parts along with organized fasteners ensures an efficient rebuild. While general steps apply broadly, variations exist: for example, certain sportbike models demand mirror removal first, or have wiring routed through specific grommets to note.
Avoiding force is paramount; persistent resistance usually indicates overlooked hardware. Masking tape around vulnerable paint edges helps prevent tool-induced scratches, and pre-sourcing replacement clips prevents delays during reassembly. For comprehensive, model-specific visual guidance and further detailed tips, see this video tutorial, which thoroughly walks through the process on popular sportbikes.
For additional insights into affordable and reliable fairings that complement DIY efforts, explore more at your go-to destination for motorcycle fairings.
3. Navigating Model-Specific Replacement Guides for Precise Fairing Repairs
When undertaking DIY motorcycle fairing repairs or replacements, accessing model-specific replacement guides is crucial for accuracy and success. These guides provide detailed, step-by-step instructions tailored to the unique construction of individual motorcycles, outlining key components such as screw types, their exact locations, and the recommended order for removing panels. This specificity helps prevent damage during disassembly and ensures a smooth reassembly process. For example, comprehensive tutorials for certain sportbikes delineate different screw lengths, push-pull insert handling, and proper hose disconnections, reflecting the complexities of modern fairing systems.
In addition, many aftermarket suppliers offer well-designed fairing kits made to match OEM specifications for popular models. These kits often come with installation instructions or online tutorials that complement the physical parts, making the replacement process more approachable even for intermediate DIYers. Careful attention to these documents helps maintain proper fitment and avoids alignment issues.
Beyond dedicated tutorials and kits, some general guides emphasize practical organization during body kit replacement. They focus on systematic disassembly, including labeling fasteners and parts, which can drastically reduce frustration and errors when putting everything back together.
Together, these resources form a powerful toolkit for anyone customizing or repairing motorcycle fairings safely and efficiently. For more detailed model-specific removal and installation instructions, this comprehensive guide is invaluable: BMW S1000XR Fairing Panel Removal Guide. Additionally, exploring the comprehensive tutorials and model-specific resources offered by specialized suppliers can further enhance your DIY fairing projects.
Final thoughts
Understanding and mastering DIY motorcycle fairing techniques offers business owners valuable tools to diversify and enhance their service offerings. From selecting the right materials and tools to leveraging repair and customization methods, each step boosts operational efficiency and market appeal. Advanced fabrication introduces premium possibilities for exclusive products, while accessible resources and tutorials ensure continuous learning and skill refinement. Integrating these practices transforms your motorcycle fairing business, enabling cost-effective repairs, unique customizations, and tailored fabrication that stand out in the competitive aftermarket landscape. Embracing these approaches positions your business to meet diverse customer needs with innovation and confidence.
Ready to elevate your ride? Summit Fairings delivers premium, custom-fit fairings that blend style and durability. Whether you’re chasing speed or turning heads, we’ve got your bike covered. Don’t wait—transform your machine today. Click, customize, and ride with confidence. Your perfect fairing is just a few clicks away. Act now!
About us
undefined