Introduction
For business owners specializing in motorcycle maintenance, fairing repairs present both challenges and opportunities. Cracked fairings—commonly made from fiberglass or plastic—can diminish a bike’s aesthetics and structural integrity. Efficient repair preserves value, enhances customer satisfaction, and reduces costly replacements. This guide meticulously walks through the essential steps: starting with preparing and cleaning the fairing, then strategically applying fiberglass cloth and resin to restore strength. We’ll explore sanding, curing, and painting techniques that refine the repair finish, followed by specialized methods for plastic components. The final chapter offers practical tools, removal, and reinstallation insights. Each section connects directly to optimizing cracked fairing repairs for a profitable, quality service offering.
Tables of Contents
Chapter 1: Preparing and Cleaning Steps to Fix Cracked Fairing Motorcycle
- Thorough Inspection and Cleaning: Essential Foundations for Repairing Cracked Motorcycle Fairings
- Mastering Surface Preparation: Sanding and Material Removal for Durable Motorcycle Fairing Repairs
- Careful Fairing Removal and Cleaning: Foundation for a Durable Motorcycle Crack Repair
- Mastering Fiberglass Reinforcement: Essential Preparation and Application for Durable Fairing Repairs
Chapter 2: Application of Fiberglass Cloth and Resin for Fixing Cracked Fairing Motorcycle
- Mastering Fiberglass Repair Techniques: Integrating Resin and Cloth for Durable Motorcycle Fairing Restoration
- Cost-Effective Restoration: Economic Advantages of Fiberglass Cloth and Resin Repairs for Cracked Motorcycle Fairings
- How Fiberglass Repairs Promote Sustainability, Safety, and Cost Efficiency in Motorcycle Fairing Maintenance
- Global Supply Challenges and Regulatory Impacts on Fiberglass Fairing Repairs
Chapter 3: Mastering Sanding, Curing, and Painting for Durable Motorcycle Fairing Repairs
- Essential Sanding Methods and Materials for Preparing Cracked Motorcycle Fairings
- Mastering Resin Curing and Structural Reinforcement for Durable Motorcycle Fairing Repairs
- Mastering the Painting Process: From Primer to Clear Coat for Durable Fairing Repairs
- Seamless Finishing and Lasting Protection: Mastering Sanding, Polishing, and Maintenance for Repaired Motorcycle Fairings
Chapter 4: Plastic Repair Strategies for Cracked Motorcycle Fairings
- Mastering Plastic Melting and Fusing: Durable Repairs for Cracked Motorcycle Fairings
- Mastering Fiberglass Reinforcement and Resin Bonding for Durable Plastic Fairing Repairs
- Mastering Plastic and Solvent Welding Methods to Restore Cracked Motorcycle Fairings
- Essential Preparation and Finishing Techniques for Durable Plastic Fairing Repairs
Chapter 5: Tools, Removal, and Reinstallation Guidance for Fixing Cracked Fairing Motorcycle
- Comprehensive Tools and Equipment Essentials for Efficient Fairing Removal and Reinstallation
- Mastering Fairing Removal: Essential Steps and Tool Techniques for Safe Motorcycle Panel Detachment
- Essential Repair Techniques and Materials for Durable Motorcycle Fairing Restoration
- Mastering Fairing Removal and Reinstallation: Precision Techniques to Protect and Restore Your Motorcycle’s Bodywork
Chapter 1: Preparing and Cleaning Steps to Fix Cracked Fairing Motorcycle
1. Thorough Inspection and Cleaning: Essential Foundations for Repairing Cracked Motorcycle Fairings
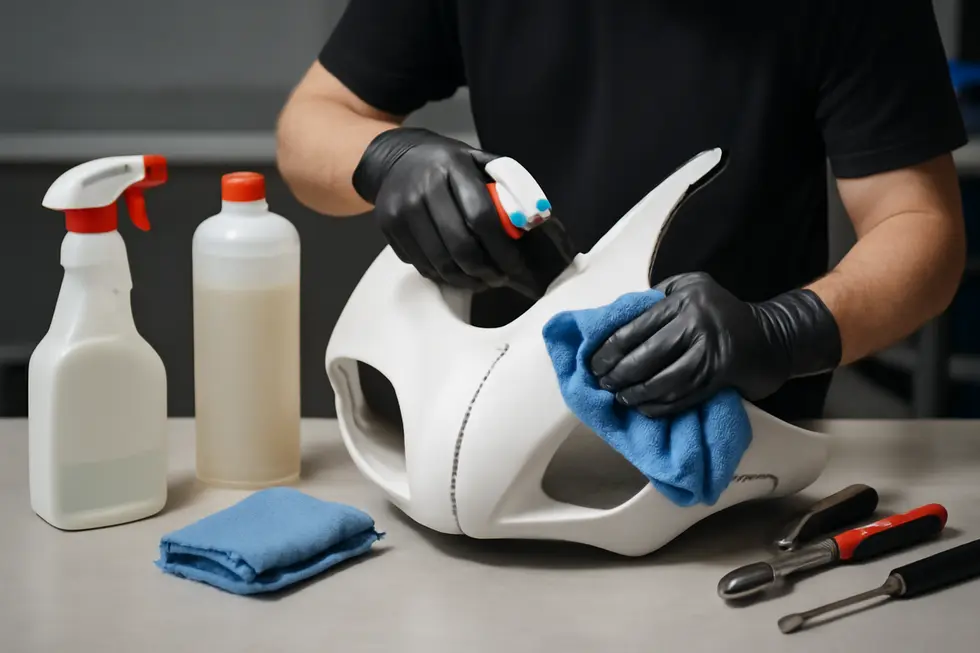
Properly preparing a cracked motorcycle fairing begins with a meticulous inspection to reveal the full extent of damage. This involves carefully examining not only the visible crack but also surrounding areas to uncover any hidden fractures or weak points that could compromise the repair. Ignoring subtle damage risks weakening the entire fix.
Once damage is identified, the fairing must be thoroughly cleaned to remove dirt, grease, oil, and any loose debris. Contaminants interfere with adhesion by creating barriers between the repair materials and the fairing’s surface. Using appropriate cleaners ensures that oils and grime are fully eliminated, leaving a pristine surface ready for bonding.
After cleaning, gently sanding the damaged area creates a slightly rough texture. This roughened base significantly improves the grip of resin or filler by increasing surface area and removing compromised fragments. Any loose or weakened fiberglass fibers around the crack should be removed carefully to establish a solid foundation.
This preparatory phase—comprising detailed inspection, complete cleaning, and careful sanding—is crucial for achieving a durable, visually seamless repair. Skipping these steps risks adhesion failure or premature deterioration, undermining both the fairing’s strength and appearance. For further insights on preparing motorcycle fairings effectively, consult expert guides such as those found at Explore the Best Motorcycle Fairings at Summit Fairings.
2. Mastering Surface Preparation: Sanding and Material Removal for Durable Motorcycle Fairing Repairs
Effective repair of a cracked motorcycle fairing hinges on meticulous surface preparation, focusing on cleaning and sanding to ensure strong adhesion of repair materials. Initially, thoroughly cleaning the damaged area removes dirt, grease, and debris, preventing contaminants from undermining the bonding process. Following cleaning, sanding plays a critical role in removing loose or weakened fragments around the crack and in roughening the surface. This texture enhances mechanical bonding between the fairing and adhesives or fillers. Typically, sanding begins with coarser grit paper to strip away damaged layers and any paint or oxidation near the crack, then progresses to finer grits to smooth the surface without compromising adhesion.
Additionally, shaping the crack edges, such as creating a V-groove, can improve the filler’s penetration and bonding capacity. This technique not only increases the surface area for adhesion but also helps materials fill the crack more effectively, reinforcing structural integrity. Proper execution of these steps ensures the repair materials soak into the fairing’s surface, reducing the risk of repair failure caused by poor adhesion. Using tools like degreasers, various grades of sandpaper, and utility knives or rotary tools enables precise control over this process.
This thorough preparation ultimately strengthens the repaired fairing and extends its lifespan, serving as a critical foundation before any filler application or painting begins. For more detailed guidance on surface preparation techniques, visiting the Plastic Repair Centre provides valuable resources.
3. Careful Fairing Removal and Cleaning: Foundation for a Durable Motorcycle Crack Repair
Properly repairing a cracked motorcycle fairing begins with meticulous removal and cleaning. The first critical step is carefully detaching the fairing panels—upper, mid, and lower—using the correct tools like screwdrivers or Allen wrenches. Disconnect the battery beforehand to avoid electrical shorts during this process. When removing the fairing, protect clips, wiring, and paint from damage by gently prying with trim tools and labeling connectors to maintain organization. Documenting each step with photos helps significantly during reassembly.
Once removed, the damaged area requires thorough cleaning to eliminate dirt, grease, and debris that compromise adhesion. Use mild soap or specialized plastic cleaners with soft cloths to avoid further damage. At this stage, inspecting mounting points and hardware is important to catch any additional wear that could affect the repair’s success.
Handling and storing parts carefully prevents loss or damage to fasteners and wiring. Disconnect wiring harnesses with care, especially on fairings housing electrical components like headlights, to avoid stretching or breakage. A clean, fully accessible damaged surface establishes the ideal foundation for subsequent sanding and resin application.
Following these precise removal and cleaning steps ensures the fairing is perfectly prepared, supporting effective and lasting crack repairs. For a detailed visual guide adapted to many models, see the Yamaha YZF-R6 fairing removal instructions here.
Explore more about comprehensive motorcycle parts preparation at Summit Fairings blog.
4. Mastering Fiberglass Reinforcement: Essential Preparation and Application for Durable Fairing Repairs
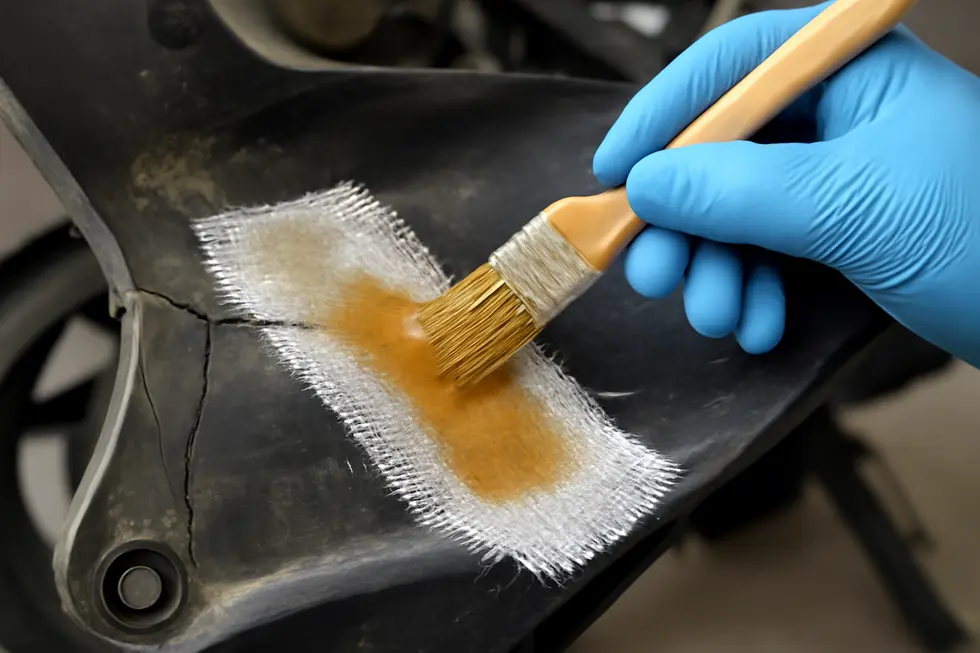
Successful repair of a cracked fiberglass motorcycle fairing hinges on meticulous preparation and precise application of reinforcement materials. Start by thoroughly cleaning the damaged area using isopropyl alcohol or acetone to remove dust, grease, and wax that would impede resin adhesion. After drying, sand the area around the crack with 80 to 120 grit sandpaper, creating a roughened texture that improves bonding. It’s crucial to clear all sanding residue to ensure a clean surface.
Next, cut fiberglass cloth patches larger than the crack to provide ample coverage and strength. Prepare the resin mix—polyester or epoxy—according to manufacturer instructions, combining it carefully with the hardener. Apply a thin base coat of resin over the sanded section before laying the first cloth patch. Using a brush, saturate the cloth thoroughly with resin to embed it fully. Layer additional patches as necessary, allowing each coat to cure if specified, to build up structural integrity without excess pooling.
After curing, sand the surface smooth to eliminate rough edges and prepare for finishing. Applying filler putty at this stage can refine the surface for painting, restoring both strength and aesthetics. This method of fiberglass reinforcement is widely respected for restoring durability and ensuring long-lasting repairs that seamlessly integrate into your motorcycle’s original fairing. For further insights on sourcing quality parts, visit Explore the Best Motorcycle Fairings at Summit Fairings.
Chapter 2: Application of Fiberglass Cloth and Resin for Fixing Cracked Fairing Motorcycle
1. Mastering Fiberglass Repair Techniques: Integrating Resin and Cloth for Durable Motorcycle Fairing Restoration
The application of fiberglass cloth combined with resin forms a resilient composite essential for repairing cracked motorcycle fairings. This process begins with selecting the right materials: woven fiberglass cloth provides the necessary tensile strength, while epoxy resin acts as the adhesive matrix that binds and hardens the fibers into a rigid structure. Epoxy is favored for its excellent adhesion, mechanical durability, and resistance to heat and environmental factors, ensuring longevity in demanding riding conditions.
During repair, multiple layers of fiberglass cloth are precisely cut to extend beyond the crack margins and laid over the area. Each layer is saturated thoroughly with resin, which chemically cures at room temperature to form a robust bond. Clamping the fairing during this curing phase prevents movement, allowing the composite to achieve optimal strength. After full cure, sanding smooths the surface, restoring the fairing’s aerodynamic shape and preparing it for primer and paint application, which protects the repair and maintains visual integrity.
Technological expertise in applying these materials ensures that repairs restore not just appearance but also the structural function of the fairing. Proper curing, layering, and finishing combine to create a strong, durable, and visually seamless repair that withstands the physical stresses motorcyclists encounter. For more detailed insight into selecting suitable composite materials and repair methods, exploring expert sources on composite epoxy applications is invaluable. This systematic approach balances strength, durability, and aesthetics to extend the lifespan of your motorcycle’s fairing.
For comprehensive options on motorcycle fairings and repairs, see this guide to the best motorcycle fairings at Summit Fairings.
2. Cost-Effective Restoration: Economic Advantages of Fiberglass Cloth and Resin Repairs for Cracked Motorcycle Fairings
Repairing a cracked motorcycle fairing with fiberglass cloth and resin offers a highly cost-effective solution compared to full replacement. This method significantly lowers expenses by avoiding the premium prices of new or aftermarket body panels. Fiberglass combined with polyester or epoxy resin forms a durable patch that restores structural strength and enhances longevity, preventing future damage and reducing the frequency of costly replacements. Many riders benefit from tackling these repairs themselves, using affordable materials and basic tools, saving professional labor fees.
Though some finishing steps such as sanding and repainting may add minor costs or time, this approach generally provides excellent value for everyday street motorcycles outside racing contexts. Fiberglass materials and marine-grade resins are widely accessible and reasonably priced, making them attractive for budget-conscious repairs. While high-performance bikes might favor light-weight composites like carbon fiber despite higher costs, fiberglass remains the practical choice for most riders.
By choosing fiberglass cloth and resin repairs, motorcycle owners extend the fairing’s service life and maintain aesthetic appeal without incurring the heavy investment of replacement parts. For further insights on affordable options and maintenance, explore affordable motorcycle fairings.
3. How Fiberglass Repairs Promote Sustainability, Safety, and Cost Efficiency in Motorcycle Fairing Maintenance
Utilizing fiberglass cloth and resin to repair cracked motorcycle fairings delivers significant societal advantages by merging affordability, sustainability, and safety. Compared to replacing fairings entirely, fiberglass repairs offer a cost-effective solution accessible to more riders, reducing the financial burden of maintenance. This approach also aligns with environmental stewardship by extending the service life of existing parts, thereby minimizing waste and conserving resources that would be consumed in manufacturing new fairings.
Beyond economics and ecology, restoring fairings with fiberglass enhances rider safety by reinstating structural strength and protecting vital internal components from exposure or damage. The reinforced composite created through carefully applied fiberglass cloth and resin withstands diverse road stresses—vibration, weather elements, and minor impacts—maintaining durability without sacrificing appearance or performance.
These multifaceted benefits exemplify modern vehicle care practices that prioritize both rider experience and the environment. The use of lightweight, robust fiberglass composites reflects wider industry trends emphasizing materials that optimize strength and longevity. Practical insights into these composite applications are detailed by specialized sources such as Hexcel Composites, underscoring best practices for ensuring repairs endure over time, including considerations for UV protection.
This integrated repair method supports sustainable motorcycle ownership, making high-quality maintenance more attainable while bolstering overall safety and durability. For more on obtaining reliable and affordable motorcycle fairings, consider exploring comprehensive guides at Summit Fairings’ blog.
External resource: https://www.hexcel.com/Resources/DataSheets/HexForce%20Datasheets/Fiberglass.pdf
4. Global Supply Challenges and Regulatory Impacts on Fiberglass Fairing Repairs
The effective use of fiberglass cloth and resin in repairing cracked motorcycle fairings hinges not only on technical skill but also on complex global factors shaping material availability and cost. Fiberglass and resin products are predominantly manufactured in specialized regions with advanced composites industries. Geopolitical tensions, trade disputes, or regional instability can disrupt these supply chains, resulting in delays or price spikes that affect repair accessibility worldwide. Moreover, varying tariff policies and import/export restrictions further impact material affordability. Countries imposing high tariffs on composite materials may discourage local repair shops from using premium resins, influencing the choice of alternatives or repair quality.
Besides trade implications, regional differences in quality and safety standards affect the reliability of fiberglass repairs. Selecting resins that meet stringent certifications is crucial to ensure durable and safe fairing restoration, yet such products may not be readily available in all markets. Environmental regulations also shape resin usage, as some jurisdictions restrict certain chemical components due to sustainability concerns. These rules influence both the types of materials allowed and waste management practices during repairs.
Thus, understanding the broader geopolitical and regulatory landscape is essential for repairing cracked motorcycle fairings with fiberglass cloth and resin. It guides material selection, sourcing strategies, and compliance with local laws, ensuring repairs blend strength with safety and environmental responsibility. For those seeking dependable materials and repair kits, exploring resources like the comprehensive motorcycle fairings options can provide practical local alternatives that align with these considerations.
For further insight into composite material markets and regulations, refer to industry analyses such as Hexcel Composites’ reports on resin and composite materials.
Chapter 3: Mastering Sanding, Curing, and Painting for Durable Motorcycle Fairing Repairs
1. Essential Sanding Methods and Materials for Preparing Cracked Motorcycle Fairings
Achieving a durable and visually seamless repair of a cracked motorcycle fairing begins with meticulous sanding techniques that ensure optimal adhesion of repair compounds and paint. The process starts with thoroughly cleaning the damaged area to eliminate dirt, oils, or dust that could hinder bonding. Next, mechanically preparing the crack edges through beveling or V-grooving provides a secure anchor for fillers or fiberglass patches, enhancing repair strength. Initial sanding uses coarser grits, typically 80 to 120, to smooth rough edges and feather out cracks, establishing the foundation for subsequent refinement.
Progressive sanding with finer grits, ranging from 800 up to 1200, transitions the surface to a subtly textured finish that encourages primer and paint adhesion while minimizing visible scratches. For fiberglass repairs, sanding is interwoven with curing steps, as each resin layer requires adequate hardening before sanding resumes to blend repairs seamlessly. During final preparation, wet sanding is advisable to reduce dust and create a pristine, smooth surface.
In all steps, compatibility of fillers, primers, and paints with the fairing’s plastic or fiberglass composition is crucial to avoid peeling and ensure lasting results. Applying plastic-specific primers enhances paint adhesion, while using multiple thin paint coats and polishing after clear coating restores both protection and shine. This comprehensive sanding and material approach fundamentally supports the integrity and aesthetics of repaired motorcycle fairings, offering a cost-effective alternative to replacement.
For guidance on obtaining quality motorcycle fairings suited for your repair projects, explore affordable motorcycle fairings at Summit Fairings.
External reference: Importance of surface preparation for adhesion and curing techniques (source: https://blog.summitfairings.com/).
2. Mastering Resin Curing and Structural Reinforcement for Durable Motorcycle Fairing Repairs
Successfully repairing cracked motorcycle fairings depends heavily on the correct application and curing of resin, which restores both strength and appearance. Preparation begins with light sanding around the crack to remove contaminants and create a textured surface that promotes strong adhesion. Using a two-part epoxy resin designed for composites, you apply resin carefully over the damaged area, often embedding fiberglass cloth or mesh beneath it to reinforce structural integrity. Clamping the parts firmly during curing is critical; this ensures alignment and prevents movement while the resin sets, typically over 24 hours. Avoid quick fixes like superglue, as they lack endurance under mechanical stress.
After curing, the repaired area is wet sanded with progressively finer grit to smooth imperfections. This prepares the surface for primer and carefully layered color-matched paint, finished with a clear coat that adds UV protection and gloss. On high-performance or carbon fiber fairings, an optional ceramic coating can be applied post-painting to enhance scratch resistance without hindering the curing process. This thoughtful combination of sanding, resin application, curing, and finishing techniques results in a repair that is both visually seamless and mechanically robust.
For additional details on sourcing quality replacement parts and equipment to complement your repairs, visit Explore the Best Motorcycle Fairings at Summit Fairings.
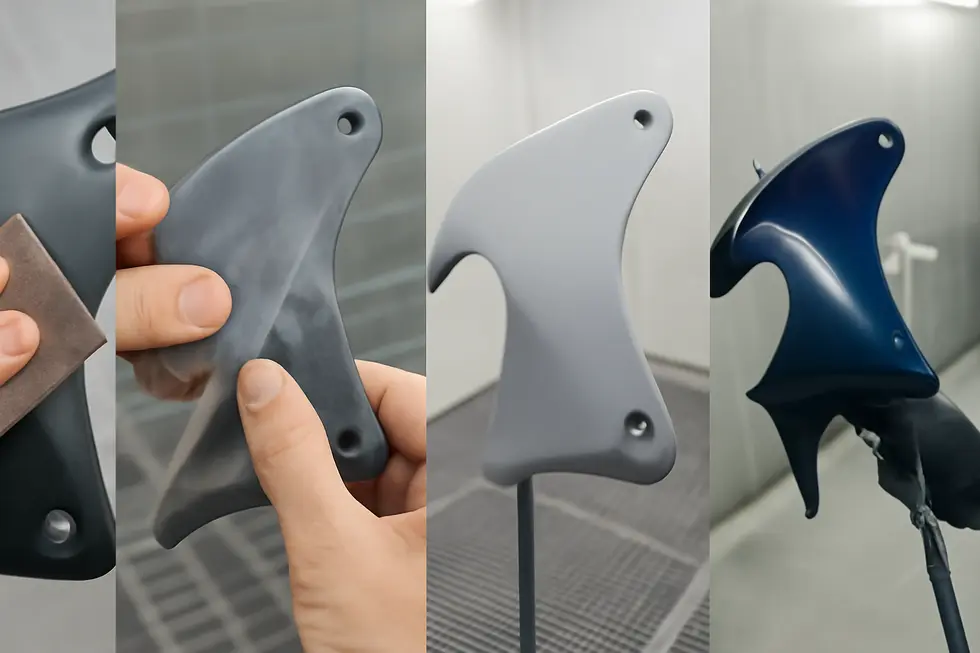
3. Mastering the Painting Process: From Primer to Clear Coat for Durable Fairing Repairs
Successfully repairing a cracked motorcycle fairing extends beyond structural fixes to restoring its finish through a precise painting process. It begins with carefully sanding the repaired area using 800–1200 grit sandpaper, creating a textured surface for primer adherence. Wet sanding with finer 1500–2000 grit paper later ensures a seamless blend with adjacent paint. Before primer application, it’s essential to clean the surface thoroughly to remove grease and contaminants.
Using a plastic-compatible primer reinforces paint bonding and smooths minor surface imperfections. After primer application and adequate drying, a light sanding may be performed to maintain an even base. Next, the base coat matching the original color is applied in thin, uniform layers, allowing each coat to dry fully to prevent runs or unevenness.
The final finishing touch is the clear coat, which imparts gloss and protects against UV exposure, scratches, and wear. Multiple thin coats yield the best durability and shine, with proper curing time observed between layers. Once fully cured, gentle wet sanding and polishing can refine the surface to a showroom shine. For longevity, applying wax or a sealant safeguards the new finish.
Meticulous attention to each stage—from sanding to final polishing—not only restores the fairing’s appearance but also ensures the repair withstands daily riding conditions. For further guidance, consider watching detailed tutorials such as How To Repair Scratches In Motorcycle Paint? – YouTube. For more on quality fairing options, explore the comprehensive resources at Summit Fairings.
4. Seamless Finishing and Lasting Protection: Mastering Sanding, Polishing, and Maintenance for Repaired Motorcycle Fairings
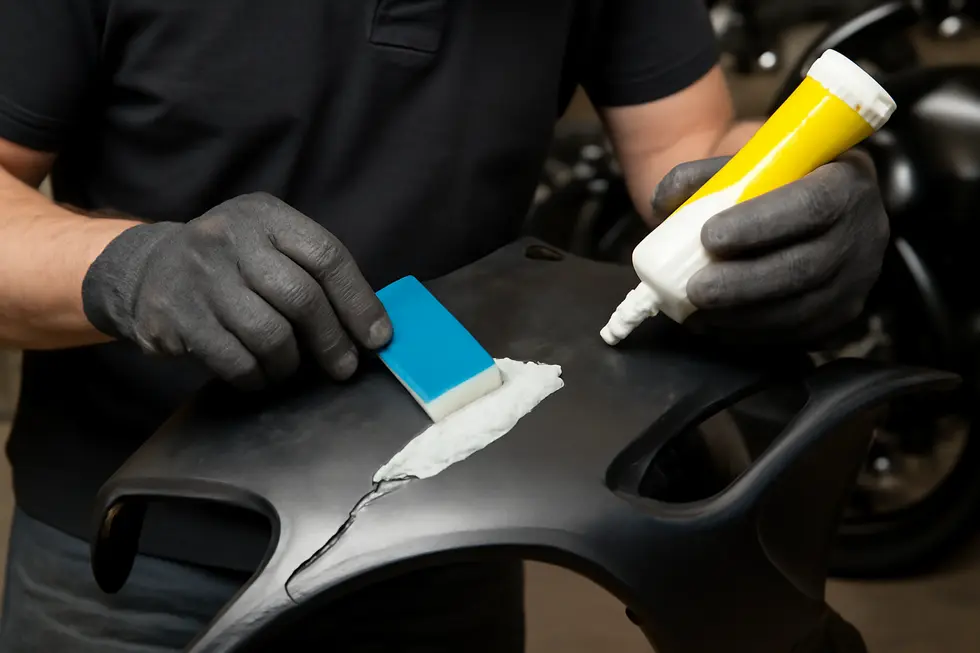
After repairing a cracked motorcycle fairing with fiberglass resin or body filler, the finishing process transforms the patch into a smooth, durable surface that blends naturally with the original fairing. Once the repair fully cures, begin sanding with coarse grit sandpaper to remove roughness, then progress to finer grits to achieve a seamless transition. Address remaining imperfections by applying glazing putty, sanding it smooth before priming.
Use a plastic primer designed for adhesive bonding before applying two to three light coats of color-matched paint. This restores the fairing’s original appearance while multiple clear coats deliver UV protection and a glossy depth. Between coats, allow sufficient drying time; full curing usually takes one to two days. Wet sanding with ultra-fine grit paper afterward ensures the repaired area blends flawlessly into surrounding paint.
Polishing with a fine compound brings out a shine that matches factory finishes without damaging the new paint layer. To prolong this finish, regular waxing and gentle cleaning protect against UV rays, dirt buildup, and environmental wear. Consistent maintenance keeps your fairings looking pristine and preserves the structural integrity of the repair over time.
This comprehensive approach ensures a robust, visually appealing restoration that saves replacement costs and extends your motorcycle fairing’s life. For more tips on finding quality replacement parts, explore affordable motorcycle fairings available through trusted industry resources.
Chapter 4: Plastic Repair Strategies for Cracked Motorcycle Fairings
1. Mastering Plastic Melting and Fusing: Durable Repairs for Cracked Motorcycle Fairings
Plastic melting and fusing techniques provide a robust solution to repairing cracks in motorcycle fairings made from plastic. This method involves heating the crack edges carefully until the plastic softens, allowing the damaged parts to be pressed back together and fused as they cool. The result is a seamless bond that restores the fairing’s structural integrity without adding extra thickness from adhesives. Prior to heating, thorough cleaning and light sanding of the damaged area ensure optimal surface conditions for fusion, removing dirt, grease, and any loose fragments. Specialized tools such as plastic welders or hot air guns are essential for controlled heating, preventing overheating that could deform the panel. For larger or more complex cracks, combining melting and fusing with fiberglass cloth and resin reinforcement can significantly enhance strength. Once fused, the surface is sanded smooth to prepare for repainting, which restores both the appearance and protection of the fairing. This technique creates clean, strong repairs that maintain the original shape and durability of the motorcycle’s fairing, offering a cost-effective alternative to replacement. For a detailed visual guide on applying this method, refer to this practical tutorial. For more insights on acquiring quality components for your repair needs, explore comprehensive options at Summit Fairings.
2. Mastering Fiberglass Reinforcement and Resin Bonding for Durable Plastic Fairing Repairs
Repairing cracked plastic motorcycle fairings with fiberglass reinforcement requires meticulous preparation and precise application to restore both strength and appearance. Start by thoroughly cleaning the crack and its surrounding area to remove all dirt, grease, and debris that hinder adhesion. Then, gently sand the surface to create a rough texture, essential for bonding the fiberglass and resin securely. Carefully cut fiberglass cloth pieces larger than the damage, ideally applying them from the inside to maximize reinforcement without altering the exterior shape. Using an epoxy or polyester resin, coat the fiberglass and the plastic surface evenly, taking care to saturate the cloth fully for a seamless bond.
Epoxy resin is generally favored for plastic repairs due to its superior bonding strength and durability, especially critical for load-bearing sections of the fairing. After resin application, clamp or firmly hold the parts in place during the curing period—typically around 24 hours for epoxy—to ensure a stable, resilient bond. Once fully cured, sand any excess resin smooth to blend with the original surface, preparing it for repainting and finishing to restore the fairing’s aesthetic.
This method not only reinforces the structural integrity of ABS or fiberglass-based plastic fairings but also provides a durable, long-lasting fix that often surpasses cosmetic-only repairs. For more insights, explore this detailed motorcycle fairings repair guide and consult a comprehensive visual tutorial here: https://www.youtube.com/watch?v=pwe0hqwAosM
3. Mastering Plastic and Solvent Welding Methods to Restore Cracked Motorcycle Fairings
Repairing cracked plastic motorcycle fairings relies heavily on understanding and applying plastic welding and solvent welding techniques, each suited to particular plastics and damage severity. Plastic welding involves heating the damaged area and adding matching plastic filler rods—commonly ABS or polypropylene—to fuse the crack seamlessly. This method restores both strength and continuity, ideal for minor breaks or stress cracks. Prior to welding, thorough cleaning and light sanding ensure maximum adhesion and reduce contaminants.
Solvent welding, on the other hand, uses chemical solvents like acetone to soften and dissolve the plastic surfaces around a crack. When pressed together carefully, these surfaces fuse chemically without adding fillers. This low-heat method works best on ABS plastics where solvent absorption creates a strong, almost seamless bond.
Both approaches focus on re-establishing the fairing’s durability while minimizing visible repairs. For larger or composite materials, other methods such as fiberglass reinforcement may be preferable. Safety is paramount; working in ventilated areas with gloves and eye protection guards against fumes and heat risks.
By combining precise cleaning and sanding with these welding techniques, hobbyists and professionals alike can extend the lifespan and aesthetics of plastic fairings. For detailed guidance on plastic welding, refer to this comprehensive overview: Plastic Welding Process Overview. Furthermore, explore affordable and quality fairing options to complement your repairs at Summit Fairings’ blog.
4. Essential Preparation and Finishing Techniques for Durable Plastic Fairing Repairs
Effective repair of cracked plastic motorcycle fairings hinges on careful preparation, precise finishing, and thoughtful maintenance strategies. Begin by thoroughly assessing the damage, cleaning the affected area to remove dirt, grease, and loose fragments, ensuring optimal adhesion. Gently sanding the surface creates the necessary texture for fillers and primers to bond properly. Because plastics are flexible, applying a plastic-specific primer is crucial before adding any filler or paint, enhancing durability and preventing peeling.
Once primed, select appropriate plastic fillers to restore structural integrity. After curing, smooth the surface with sanding to erase imperfections, then apply high-build primers designed for plastic components. Sanding between coats yields an even finish, preparing the fairing for topcoat painting that restores its original look and protects it against elements.
Reinstallation requires attention; use washers or rubber grommets at fastening points to distribute stress, minimizing risk of re-cracking. Align the fairing properly with the frame, and avoid overtightening bolts, which could compromise the repair. Periodic inspection of repaired zones helps detect stress early, while gentle cleaning with mild agents prolongs repair life without degrading materials.
These methods balance structural restoration with aesthetic care, tailored for plastic fairings’ unique demands. For step-by-step visual instructions on priming and finishing plastics, this video guide offers valuable insight.
For further details on sourcing quality replacement and repair parts, visit Explore the Best Motorcycle Fairings at Summit Fairings.
Chapter 5: Tools, Removal, and Reinstallation Guidance for Fixing Cracked Fairing Motorcycle
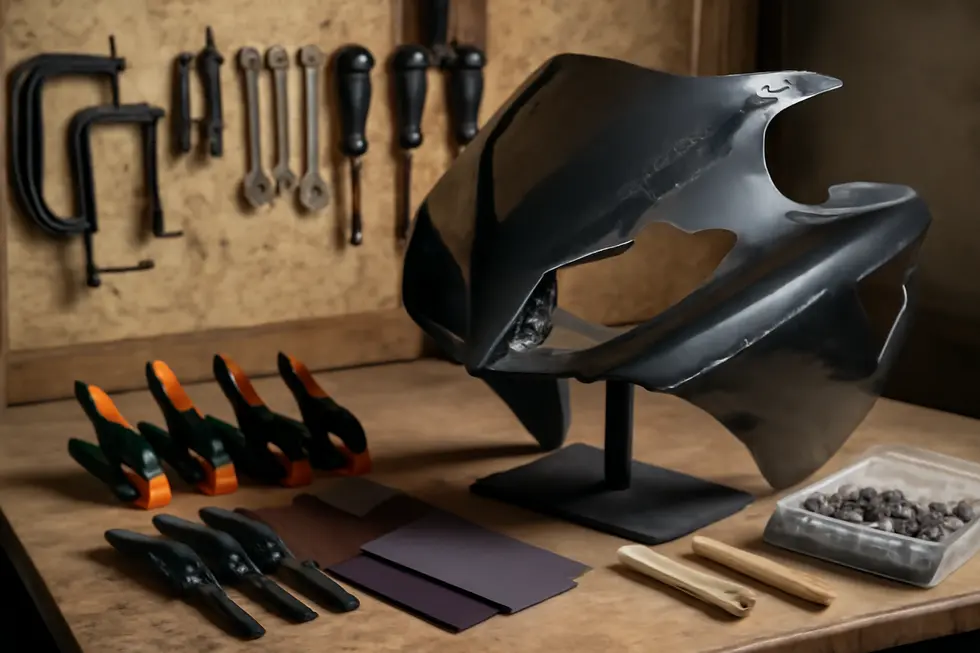
1. Comprehensive Tools and Equipment Essentials for Efficient Fairing Removal and Reinstallation
Successfully fixing a cracked motorcycle fairing begins with having the right tools at hand for removal, repair, and reinstallation. Basic hand tools such as socket wrenches, screwdrivers, and hex keys allow careful panel removal without damage to fasteners or clips. For plastic fairings, specialized items like plastic welding kits and strong adhesives are crucial to bond cracks effectively. Fiberglass repairs require resin, hardener kits, fiberglass cloth, and proper PPE like gloves and masks to safely handle chemicals. To avoid breaking clips, trim panel removal tools provide gentle leverage during disassembly. Once repaired, using a torque wrench to tighten fasteners to manufacturer specs prevents overtightening that can create new cracks. Clamps or tape help hold repaired sections steady during curing, ensuring strong, stable bonds. A well-lit, organized workspace improves visibility and eases the handling of small bolts and fragile panels. Carrying a compact multi-tool kit can also streamline the process by consolidating many essentials. Following these equipment guidelines balances ease, safety, and precision in restoring your fairing’s function and appearance. For detailed torque sizing and general maintenance guidelines, you can refer to resources like this motorcycle maintenance guide. More insights on fairing types and repairs can be found at Summit Fairings’ blog.
2. Mastering Fairing Removal: Essential Steps and Tool Techniques for Safe Motorcycle Panel Detachment
Effective repair of a cracked motorcycle fairing begins with carefully removing the damaged panels using the right approach and tools. First, ensure the motorcycle is parked on a level surface and the battery is disconnected to prevent electrical issues. Gather essential tools such as various screwdrivers—both Phillips and flat-head—Allen wrenches, hex keys, and possibly a drill, tailored to your bike’s fasteners.
Begin by removing any obstructing elements like the seat or covers to expose the mounting points. Identifying and methodically unscrewing all fasteners, often metric-sized screws, ensures panels can be detached without damage. To avoid stripping screw heads or cracking plastic clips, take time loosening each fastener carefully.
Gently pry the panels away using soft tools or your hands, pulling outward then away from the frame to release them without stress. Documenting this disassembly with photos is highly recommended to streamline reinstallation later. If electrical connectors are present behind the fairings, disconnect them with care to prevent breakage.
This careful, systematic removal process preserves both the structural integrity of the fairing and the safety of components attached to it. For riders looking for detailed visual guides on fairing removal, refer to comprehensive tutorials and service manuals specific to your motorcycle model, which illustrate screw placements and techniques.
For additional guidance on selecting appropriate fairings and maintenance tips, explore the full resource on motorcycle fairings.
An authoritative step-by-step breakdown on BMW S1000XR fairing removal can be found at webBikeWorld, offering further insights about screw types and panel locations essential to mastering this process.
3. Essential Repair Techniques and Materials for Durable Motorcycle Fairing Restoration
Repairing a cracked motorcycle fairing demands selecting techniques and materials tailored to the fairing’s construction. For fiberglass fairings, the process begins after cleaning and sanding the damaged area, reinforcing cracks from inside with fiberglass cloth and polyester or epoxy resin. This restores strength while preserving the fairing’s appearance. Plastic fairings require different methods, such as plastic welding, where the cracked edges are carefully fused by melting compatible plastic types, demanding precision to avoid warping. Carbon fiber repairs use a two-part epoxy resin formulated for composites, applied after meticulous surface preparation. Clamping during a proper curing time—typically 24 hours—is crucial to ensure bond strength. Essential tools for these repairs include various screwdrivers, Allen wrenches, multiple sandpaper grits, resin brushes, and clamps to hold parts securely. When removing fairings prior to repair, follow the sequence of panels carefully, disconnect electrical connectors without strain, and avoid forcing clips, preferring gentle prying to prevent further damage. During reinstallation, loosely secure brackets first to allow for alignment adjustments, then tighten fasteners firmly, employing washers or rubber grommets to reduce stress and prevent new cracks. Confirm that the fairing does not obstruct steering or controls before completing the installation. Photos taken during disassembly are invaluable for smooth reassembly, and disconnecting the battery prior to work reduces electrical risks. For model-specific guidance and torque settings, consulting the motorcycle’s service manual is recommended to ensure a secure, professional repair. This comprehensive approach not only preserves aesthetics but also maintains the safe functionality of your motorcycle fairings.
For additional insights into fairing choices and accessories, visit Explore the Best Motorcycle Fairings at Summit Fairings.
For a detailed walkthrough of fiberglass repair processes, refer to this practical guide: How Do You Repair Fiberglass On A Motorcycle?
4. Mastering Fairing Removal and Reinstallation: Precision Techniques to Protect and Restore Your Motorcycle’s Bodywork
Proper removal and reinstallation of cracked motorcycle fairings demand careful attention to detail and the right tools. Start by disconnecting the battery’s negative terminal to prevent electrical shorts during disassembly. Using appropriate screwdrivers and Allen wrenches, gently unscrew bolts without forcing clips or fasteners to avoid breakage. Detach any electrical connectors with care, laying removed parts on soft surfaces to prevent scratches and capturing photos throughout for accurate reassembly.
After inspecting mounting points for debris or damage, clean them thoroughly. When installing new mounting brackets, secure bolts loosely first to fine-tune alignment. Position the fairing carefully, ensuring all mounting holes match their corresponding fasteners without forcing components into place, which risks further cracking. Tighten all fasteners firmly but avoid over-torquing plastic parts.
Throughout the process, employ gentle prying techniques if clips resist removal and always wear eye and hand protection. Park your motorcycle on level ground to stabilize it during repair work. Following these steps preserves the fairing’s integrity and appearance, effectively restoring your bike’s aesthetics and structure.
For comprehensive visual guidance including bracket adjustment and installation methods, explore detailed tutorials on the best motorcycle fairings and their installation.
Final thoughts
Repairing cracked motorcycle fairings is a vital skill set that combines careful preparation, skilled fiberglass or plastic application, and comprehensive finishing steps. For business owners, mastering this process unlocks cost-effective alternatives to full replacement, elevating service offerings and customer satisfaction. From meticulous cleaning through structural reinforcement, precise sanding, and expert painting, each phase enhances both form and function. Plastic repairs demand tailored approaches yet align closely with core repair principles. Proper use of tools and controlled removal and reinstallation safeguard overall repair quality. Embracing these best practices ensures reliable, visually appealing fairing restorations that boost business longevity and rider confidence.
Ready to elevate your ride? Summit Fairings delivers premium, custom-fit fairings that blend style and durability. Whether you’re chasing speed or turning heads, we’ve got your bike covered. Don’t wait—transform your machine today. Click, customize, and ride with confidence. Your perfect fairing is just a few clicks away. Act now!
About us
undefined