Introduction
Scratched motorcycle fairings not only diminish the visual appeal of a bike but can also impact its structural integrity and resale value. For business owners operating in motorcycle repair shops, custom garages, or aftermarket part retailers, understanding how to effectively fix these scratches is vital for delivering quality service and building customer trust. Addressing fairing scratches requires a systematic approach—from initial cleaning and surface treatment to advanced repair methods, proper maintenance post-repair, and appropriate fairing removal when necessary. Each stage plays a critical role in reviving the fairings’ aesthetic and functional qualities. This article delves into these key areas, offering a comprehensive guide tailored for business owners looking to enhance their expertise and refine their repair offerings.
Tables of Contents
Chapter 1: Cleaning and Surface Treatment to Fix Scratched Motorcycle Fairings
- Mastering Initial Cleaning and Scratch Evaluation for Effective Motorcycle Fairing Repair
- Effective Techniques for Treating Light and Deep Scratches on Motorcycle Fairings
- Mastering Surface Preparation and Protective Coatings for Lasting Fairing Restoration
- Essential Cleaning and Preparation Techniques for Seamless Motorcycle Fairing Repairs
Chapter 2: Mastering Advanced Repair Techniques for Scratched Motorcycle Fairings
- Essential Cleaning and Surface Preparation: The Foundation of Advanced Fairing Repairs
- Mastering Filling, Sanding, and Polishing to Restore Scratched Motorcycle Fairings
- Mastering Touch-Up Painting and Color Matching for Flawless Fairing Repairs
- Harnessing Cutting-Edge Protective Coatings for Long-Lasting Fairing Restoration
Chapter 3: Maintenance and Protection After Fixing Scratched Motorcycle Fairings
- Harnessing Modern Technologies to Sustain and Shield Repaired Motorcycle Fairings
- Balancing Costs and Coverage: Economic Strategies in Post-Repair Fairing Care
- Global Supply Chain Influences on Post-Repair Maintenance and Protection of Motorcycle Fairings
- Preserving Repairs and Promoting Sustainability: Best Practices for Post-Repair Fairing Care
Chapter 4: Fairing Removal and Specialized Care to Fix Scratched Motorcycle Fairings
- Mastering Fairing Removal: Essential Techniques for Safeguarding and Preparing Scratched Motorcycle Panels
- Tailored Repair Techniques for Painted and Plastic Fairings After Removal
- Balancing Costs and Quality: Repair Versus Replacement in Motorcycle Fairing Scratches
- Ensuring Rider Safety and Sustainable Practices through Expert Fairing Handling and Repair
Chapter 1: Cleaning and Surface Treatment to Fix Scratched Motorcycle Fairings
1. Mastering Initial Cleaning and Scratch Evaluation for Effective Motorcycle Fairing Repair
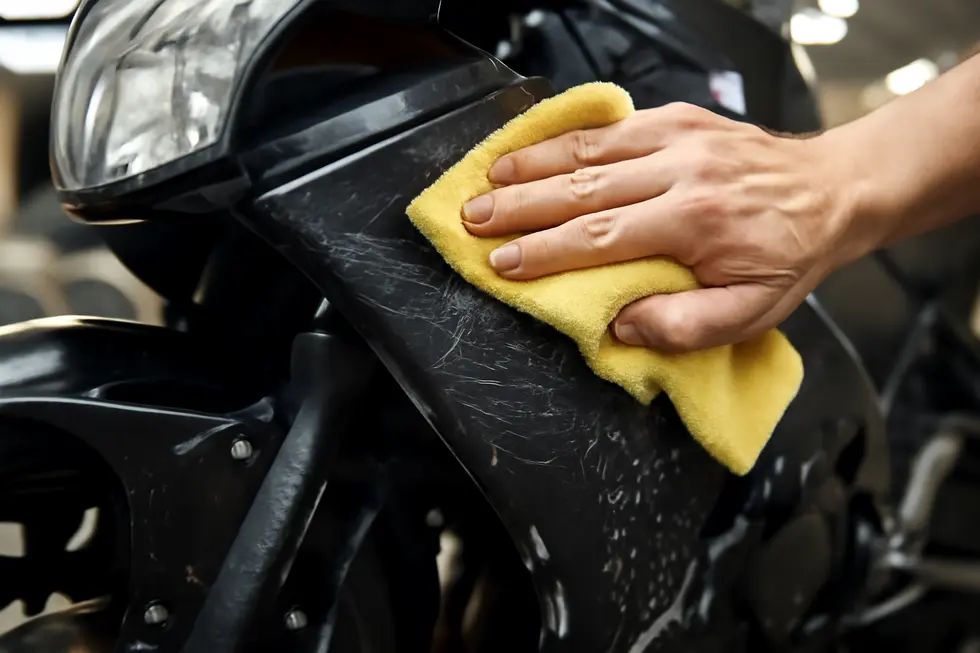
Thorough cleaning and precise assessment form the essential first step in fixing scratched motorcycle fairings. Begin by scrubbing the affected area with soap and water to eliminate dirt, grease, wax, and other residues that can prevent repair materials from bonding properly. It’s important to dry the surface completely using a soft cloth, ensuring no moisture remains that could interfere with subsequent treatments or inspections.
Once cleaned, carefully examine the scratch to determine its depth and severity. Light surface scratches that do not penetrate the paint layer may be treated simply with mild abrasives or polishing compounds, which gently reduce their visibility when applied with circular motions. However, deeper scratches that cut through paint or directly into plastic require more targeted repair strategies such as sanding, filling, or repainting.
Before any repair work, protect adjacent sections with masking tape to avoid accidental damage or overspray, preserving untouched areas from harm. A contaminant-free surface also guarantees better adhesion and a smoother finish after repairs.
This systematic preparation—cleaning, drying, inspecting, and protecting—sets the foundation for successful restoration, ensuring repair materials bond firmly and the fairing’s appearance improves significantly. For those looking for a visual and step-by-step guide, the video tutorial “How To Repair Scratches In Motorcycle Paint?” offers detailed insights helpful to both beginners and seasoned enthusiasts.
For more insights about motorcycle fairings and maintenance tips, explore the comprehensive resources available at Explore the Best Motorcycle Fairings at Summit Fairings.
2. Effective Techniques for Treating Light and Deep Scratches on Motorcycle Fairings
Properly addressing scratches on motorcycle fairings begins with thorough cleaning to remove dirt, grease, and wax that can hinder repair adhesion. Using mild soap and water ensures contaminants are removed without damaging the surface. Once clean and dry, carefully examining the scratch depth guides the repair approach.
Light scratches, typically superficial and not penetrating the paint layer, respond well to gentle polishing. Applying mild abrasives such as toothpaste or specialized plastic polishes with a microfiber cloth in circular motions helps reduce scratch visibility without harming the finish. This method is ideal for minor surface abrasions that do not require extensive intervention.
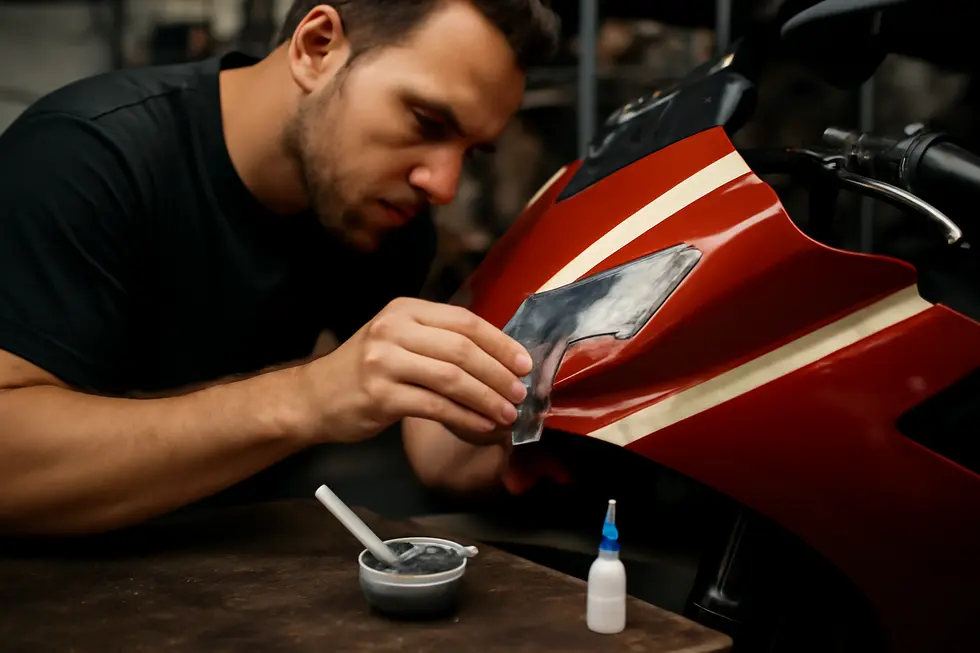
Deeper scratches necessitate a more involved process to restore the fairing’s integrity. The initial step involves defining the damaged area by creating a clean edge through techniques like V-grooving. Filling materials such as plastic fillers or adhesives can then be applied to level the surface. After curing, wet sanding with fine-grit sandpaper smooths the repair zone, preparing it for touch-up paint. Masking tape protects the surrounding areas during painting, ensuring a neat, professional finish.
Avoid harsh chemicals or solvents that may cause discoloration or cracks, especially on plastic or polycarbonate components. Utilize gentle, motorcycle-specific cleaners to preserve both paint and plastic surfaces during treatment.
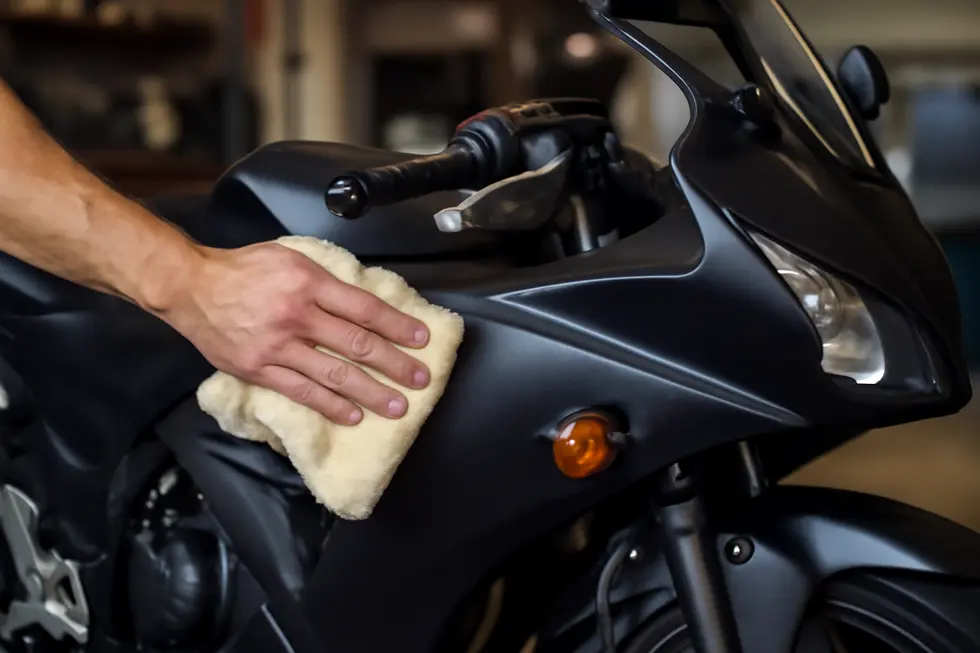
To maintain the repaired finish longer, parking in shaded areas and washing with soft cloths and mild soaps is recommended. Applying UV-protective covers and waxes further shields the fairings from environmental wear.
For more detailed guidance on scratch repair, including polishing, filling, sanding, and painting steps, see this comprehensive visual tutorial. Additional information and resources for quality motorcycle fairings can be found at Summit Fairings.
3. Mastering Surface Preparation and Protective Coatings for Lasting Fairing Restoration
A flawless repair of scratched motorcycle fairings begins with meticulous surface preparation combined with advanced coating techniques to ensure durability and aesthetic appeal. Initially, the fairing must be thoroughly cleaned using gentle soap and water, removing all dirt, grease, and wax residues that hinder adhesion. Avoid harsh solvents that might degrade paint or plastic materials common in fairings and windshields. Once clean, assessing the depth of scratches determines the subsequent approach: superficial marks often respond well to polishing with mild abrasives applied gently in circular motions, while deeper gouges need careful wet sanding and filling to restore smoothness.
After repairing the damage, polishing compounds refine the surface by evening out minor imperfections and enhancing gloss. When repainting is necessary, select automotive-grade enamel sprays designed for high-heat exposure and rust resistance, applied carefully within masked boundaries to prevent overspray and achieve a seamless finish. Beyond paint, applying advanced protective coatings such as ceramic layers offers a semi-permanent shield with impressive resistance to UV damage, road debris, and oxidation. These coatings not only deepen shine but also simplify future cleaning and maintenance, preserving the fairing’s appearance longer.
Handling the fairings delicately during this process is crucial. If removal is required, follow model-specific guides and use the right tools to avoid inducing fresh damage. This comprehensive approach combines precise cleaning, repair, quality repainting, and professional-grade coatings to extend the life and beauty of motorcycle fairings. For those exploring detailed restoration techniques and protective options, resources on safe and effective fairing care provide invaluable insights and step-by-step guidance.
Explore further tips and product recommendations on affordable motorcycle fairings and maintenance.
4. Essential Cleaning and Preparation Techniques for Seamless Motorcycle Fairing Repairs
To effectively repair scratched motorcycle fairings, meticulous cleaning and surface preparation are foundational steps that guarantee optimal adhesion and finish quality. Begin by washing the scratched area with mild soap and water to remove dirt, grease, and wax residues that could interfere with repair materials bonding to the surface. Use a soft cloth or microfiber towel to gently clean without causing further damage, then dry the area fully to avoid moisture trapping beneath coatings. For more thorough preparation, especially prior to repainting, a paint decontamination process is recommended. This step removes invisible contaminants and surface imperfections, resulting in a pristine base that enhances the durability and smoothness of subsequent treatments.
In cases where minor scratches limit access or when a comprehensive repair is needed, removing the fairings is advisable. Using the correct tools specific to your motorcycle model—commonly screwdrivers or Allen wrenches—carefully detach panels without forcing clips or connectors. This careful removal prevents accidental new scratches and allows unobstructed access to the damaged zones.
When addressing scratches, light surface abrasions respond well to gentle polishing with compounds or non-abrasive pastes applied in small circular motions using a microfiber cloth. Deeper marks, however, benefit from careful wet sanding to level edges before applying fillers or adhesives and repainting. During repainting, protecting adjoining sections with masking tape or plastic sheeting is crucial to prevent overspray and preserve the surrounding finish.
Routine maintenance with soft cloths and gentle soaps helps maintain the integrity and smoothness of the fairings, simplifying any future repairs. For further practical insight, a detailed video guide on repairing motorcycle paint scratches is available here. For additional tips about high-quality fairings and parts to enhance your repairs, explore the Summit Fairings blog.
Chapter 2: Mastering Advanced Repair Techniques for Scratched Motorcycle Fairings
1. Essential Cleaning and Surface Preparation: The Foundation of Advanced Fairing Repairs
Achieving a professional-grade repair on scratched motorcycle fairings begins with meticulous cleaning and surface preparation. This critical phase ensures all contaminants like dirt, grease, and wax are completely removed, which is essential for the proper adhesion of fillers, primers, and paints. Starting with a thorough wash using soap and water eliminates surface grime, while carefully drying with a microfiber towel prevents new marks or water spots from forming. Following this, decontamination with polishing removes invisible impurities and minor surface imperfections, creating a smooth and receptive base for further treatments. For deeper scratches, wet sanding with fine-grit sandpaper gradually levels the damaged area, smoothing edges and enhancing adhesion without disturbing adjacent surfaces. During this precise process, keeping the surface wet reduces dust and prevents sandpaper clogging, contributing to an even finish. Masking off surrounding undamaged panels before applying paint or coatings protects them from overspray and maintains clean, sharp lines, which is vital for a polished appearance. Plastic fairings demand additional care since contaminants impact filler bonding more severely; cleaning rigorously preps these surfaces for specialized plastic repair materials. Post-preparation polishing techniques fine-tune the surface, with options ranging from a single-stage polish for light scratches to a cut polish with rotary buffers for deeper damage, followed by a finishing polish to restore gloss and consistency. By integrating these methods, the foundation is set for durable, seamless repairs that stand the test of time and maintain the fairings’ aesthetic appeal. For detailed demonstrations, a practical video guide on cleaning and scratch repair techniques offers valuable visual support. For more insights on sourcing quality replacement parts and fairing options, explore Explore the Best Motorcycle Fairings at Summit Fairings.
External resource: Cleaning & Scratch Repair Tutorial
2. Mastering Filling, Sanding, and Polishing to Restore Scratched Motorcycle Fairings
To effectively repair scratched motorcycle fairings, mastering the techniques of filling, sanding, and polishing is essential. After a careful cleaning removes all dirt and grease to ensure proper adhesion, any deep scratches or gouges requiring restoration are treated with a suitable filler. These fillers, often plastic-based or specialized repair putties, are applied meticulously to level uneven surfaces and allowed to fully cure, providing a solid base for further refinishing.
Once hardened, the repair area undergoes progressive sanding, typically with fine-grit sandpaper kept wet to reduce dust and achieve a smooth, feathered finish that blends seamlessly with the surrounding fairing. This careful sanding removes excess filler and preps the surface for painting or polishing, ensuring no edges or high spots remain visible.
Polishing is the final step that revives the fairing’s gloss and removes the micro-scratches left by sanding. Using a polishing compound applied by hand with a microfiber cloth or a polishing machine in gentle circular motions restores a uniform sheen. This process enhances both the aesthetic and protective qualities of the surface, helping to maintain the fairing’s durability and shine.
Masking adjacent areas before sanding and polishing is crucial to prevent accidental damage or overspray during the refinishing process. With patience and attention to detail, these advanced techniques can bring motorcycle fairings back to near-original condition without full replacement.
For enthusiasts seeking further guidance, this detailed video tutorial on repairing motorcycle paint scratches offers a step-by-step visual walkthrough of cleaning, sanding, filling, and polishing techniques. Additionally, exploring options from Summit Fairings can complement repair efforts with quality replacement fairings if needed.
3. Mastering Touch-Up Painting and Color Matching for Flawless Fairing Repairs
Achieving a professional finish when repairing scratched motorcycle fairings hinges on precise touch-up painting and expert color matching. This process begins with meticulous surface preparation—cleaning the affected area using gentle, plastic-safe cleaners to avoid damaging the existing paint. Once clean, any rough edges or deep scratches must be smoothed carefully with fine-grit sanding to ensure optimal paint adhesion.
Selecting the correct paint color is essential because motorcycle fairings often feature complex factory finishes with unique hues and gloss levels. Small scratches or chips can be addressed with touch-up pens, while larger damaged areas require brush-on or spray applications. In advanced repairs, paints are custom-mixed to match the original factory shade perfectly, preventing noticeable differences between repaired and untouched zones.
Application technique greatly influences the final outcome. Applying thin, even coats and allowing sufficient drying time between layers avoids runs and uneven textures. After building the color layers, a clear coat seals the repair, restoring gloss and enhancing durability against environmental wear. This step is key to blending the repaired spot seamlessly into the surrounding fairing.
To further protect the restoration, many riders opt for ceramic coatings post-repair. These coatings provide a resilient shield against UV rays, oxidation, and dirt accumulation, prolonging the repaired area’s vibrancy and shielding it from future damage.
For those interested in more comprehensive repair strategies or exploring premium fairing options, resources such as Explore the Best Motorcycle Fairings at Summit Fairings offer valuable insights. Additionally, detailed guidance on paint selection and application techniques can be found in specialized paint FAQ resources to ensure a flawless, long-lasting finish.
Reference: https://madpaints.co.uk/pages/frequently-asked-questions
4. Harnessing Cutting-Edge Protective Coatings for Long-Lasting Fairing Restoration
Protective coatings have become an integral element in advanced motorcycle fairing repair, offering robust defense beyond simple scratch removal. Among the most effective are paint protection films (PPF), ceramic coatings, and graphene-infused nano-coatings, each enhancing durability and aesthetic appeal through distinct mechanisms.
The application of PPF begins with meticulous cleaning and polishing to ensure flawless adhesion. This transparent film acts as a resilient physical shield, guarding against scratches, stone chips, UV damage, and environmental contaminants. It’s especially advantageous on vulnerable zones such as side fairings and front beaks of adventure motorcycles, preserving their finish while maintaining a glossy appearance. Premium films often include extended warranties, reflecting their reliability in harsh conditions.
Ceramic coatings provide a semi-permanent chemical bond with painted and plastic surfaces. Beyond offering increased scratch resistance, these coatings repel water, simplify cleaning, and block UV rays that can cause oxidation and fading. Their hydrophobic nature keeps grime and pollutants from clinging, ensuring the fairings remain vibrant and easier to maintain.
An emerging advancement involves graphene-enhanced ceramic coatings, which combine extraordinary heat tolerance and anti-static properties with hardened ceramic protection. This hybrid coating creates an ultra-slick, resilient surface that can preserve the fairings’ condition for nearly a decade with minimal upkeep.
Before these coatings are applied, an essential step involves preparing the surface through polishing and, if needed, gentle sanding to remove deep scratches and varnish imperfections. This two-stage polishing—starting with a cut polish and finishing with a softer buff—ensures the surface is perfectly smooth, maximizing the coating’s bonding and visual impact.
Integrating mechanical repair processes with these advanced coatings represents the forefront of motorcycle fairing restoration. It offers riders a way to restore and protect critical bodywork components, combining durability and enhanced aesthetics for extended periods. For riders seeking expert guidance on fairing quality and maintenance, exploring trusted sources on comprehensive motorcycle fairings can provide valuable insights.
External reference: See detailed polishing and coating preparation steps at FLEX Tools automotive system guide [4].
Chapter 3: Maintenance and Protection After Fixing Scratched Motorcycle Fairings
1. Harnessing Modern Technologies to Sustain and Shield Repaired Motorcycle Fairings
After repairing scratched motorcycle fairings, state-of-the-art maintenance technologies transform how riders protect their investment. Among these, professional ceramic coatings stand out by forming a semi-permanent barrier over painted and plastic surfaces. This advanced layer guards against dirt, UV exposure, and minor abrasions, maintaining the fairings’ restored look far beyond traditional waxes. The durability of these coatings significantly reduces the frequency of upkeep while preserving gloss and vibrancy.
Complementing protective coatings, modern cleaning tools—like microfiber cloths and specially designed wash mitts—ensure that everyday maintenance does not cause new scratches. These delicate materials prevent micro-abrasions during washing, crucial for surfaces freshly repaired or polished. Additionally, advanced degreasers formulated to be safe for plastics and paint work effectively without compromising repair integrity.
Technological refinements in repair protocols have also elevated protection standards. After meticulous sanding and filling, machine polishing combined with careful taping produces an ultra-smooth finish that optimizes coating adhesion. This thorough preparation is key to maximizing the lifespan and appearance of the protective layer.
Moreover, evolved techniques for removing and reinstalling fairings reduce risks of accidental damage during servicing. Proper tools and procedures have become essential parts of post-repair maintenance to safeguard the fairings from new scratches or cracks.
Together, these advances in coatings, cleaning, repair, and handling harmonize to extend the life and aesthetics of repaired motorcycle fairings. For deeper guidance on reliable replacement and enhancement parts, riders can explore a comprehensive selection at Summit Fairings.
2. Balancing Costs and Coverage: Economic Strategies in Post-Repair Fairing Care
Managing the economic aspects of maintaining and protecting repaired motorcycle fairings requires a thoughtful balance between immediate repair expenses, ongoing upkeep, and insurance considerations. Repair costs fluctuate based on damage severity—minor scratches may only need affordable polishing or touch-up paint, while deeper damage can escalate to panel replacement or complete repainting, often carrying labor charges around $125 per hour in professional shops. Beyond initial fixes, preserving the restored look demands consistent maintenance, such as chain cleaning and lubrication costing about $45 every 3,000 to 5,000 miles, plus routine inspections to catch wear before costly issues arise.
Insurance plays a pivotal role in safeguarding your investment. Comprehensive coverage averaging about $45 a month not only protects against accidents and theft but must also accommodate repairs and any customized or aftermarket fairing parts. Having documentation or professional appraisals ensures accurate coverage and smoother claims if needed. Tailoring insurance strategies to rider experience and bike value optimizes protection—novices should focus on essential liability with manageable deductibles, while seasoned riders and owners of premium bikes benefit from higher liability limits and guaranteed value policies that fully cover custom parts.
By approaching maintenance and protection with clear economic foresight, riders can maintain their motorcycle’s appearance and value while minimizing unexpected costs. This careful financial planning ties directly to sustaining the quality and longevity of repaired fairings.
For more insights on sourcing reliable parts for your motorcycle, explore options at Discover Affordable Motorcycle Fairings.
3. Global Supply Chain Influences on Post-Repair Maintenance and Protection of Motorcycle Fairings
Maintenance and protection strategies following the repair of scratched motorcycle fairings intertwine deeply with global supply chain dynamics and geopolitical factors. Though repairing fairings is a localized task, the availability of replacement parts, protective coatings, and specialized materials often depends on complex international manufacturing networks. China, as the dominant producer of many motorcycle components and aftermarket supplies, exerts significant influence through its expansive manufacturing capacity and export policies. This concentration creates vulnerabilities — disruptions from trade tensions or regulatory restrictions can delay access to essential materials needed for effective maintenance.
Countries like the United States have adopted tariffs and protective trade measures impacting industrial inputs linked to vehicle repair sectors, indirectly affecting costs and accessibility of fairing repair supplies. Meanwhile, emerging markets in Latin America encourage localized aftermarket industries through regulations that promote independent maintenance, enhancing resilience against global supply shocks. This shift toward nearshoring and regional manufacturing helps diversify sourcing and stabilize supply for protective products such as clear coats and polishing compounds.
These geopolitical trends underscore the importance of considering supply chain origins when planning ongoing protection and upkeep of repaired fairings. Material choices and procurement strategies must navigate trade policies and production hubs to ensure sustained access. For enthusiasts and professionals aiming for lasting results, understanding these larger economic and political contexts is key to securing quality maintenance resources. For more in-depth insights on fairing materials and options, explore reliable sources for motorcycle fairings.^1
For a deeper understanding of how geopolitical risks shape automotive supply chains, see the analysis by Global Market Insights provided by the Council on Foreign Relations.https://www.cfr.org/
4. Preserving Repairs and Promoting Sustainability: Best Practices for Post-Repair Fairing Care
Maintaining motorcycle fairings after repair is crucial not only for preserving their appearance but also for extending their functional lifespan. A meticulous cleaning process removes dirt, grease, and residues, enabling protective coatings or films to adhere correctly and safeguard the surface from future damage. Beyond cleaning, applying high-quality protective layers like ceramic coatings or paint protection films creates a resilient shield against UV rays, environmental particles, and minor abrasions, often enhancing durability for several years. These coatings serve not only as aesthetic enhancers but also as barriers that reduce wear and tear caused by riding conditions.
Handling the fairings with care during any disassembly or reassembly prevents additional scratches or mechanical damage. Using the correct tools and documenting each step preserves the integrity of the repair and the underlying structure. This mindful approach benefits not only individual motorcycle owners but also the environment by decreasing the frequency of part replacements. Reducing waste from discarded plastics and the need for new manufacturing mitigates environmental impact significantly.
Economically, these best practices lower maintenance costs by minimizing professional repainting or part replacements. Moreover, maintaining well-protected fairings contributes to rider safety and community perception by ensuring the motorcycle remains visually appealing and structurally sound. Businesses offering repair and protection services reinforce trust and responsibility by abiding by safety standards and insurance regulations, fostering a safer industry environment.
For further guidance and detailed step-by-step repair techniques, an informative video tutorial can be found here. Additionally, for those seeking more options or information about motorcycle fairings, the comprehensive resources available at Summit Fairings provide valuable insights and selections.
Chapter 4: Fairing Removal and Specialized Care to Fix Scratched Motorcycle Fairings
1. Mastering Fairing Removal: Essential Techniques for Safeguarding and Preparing Scratched Motorcycle Panels
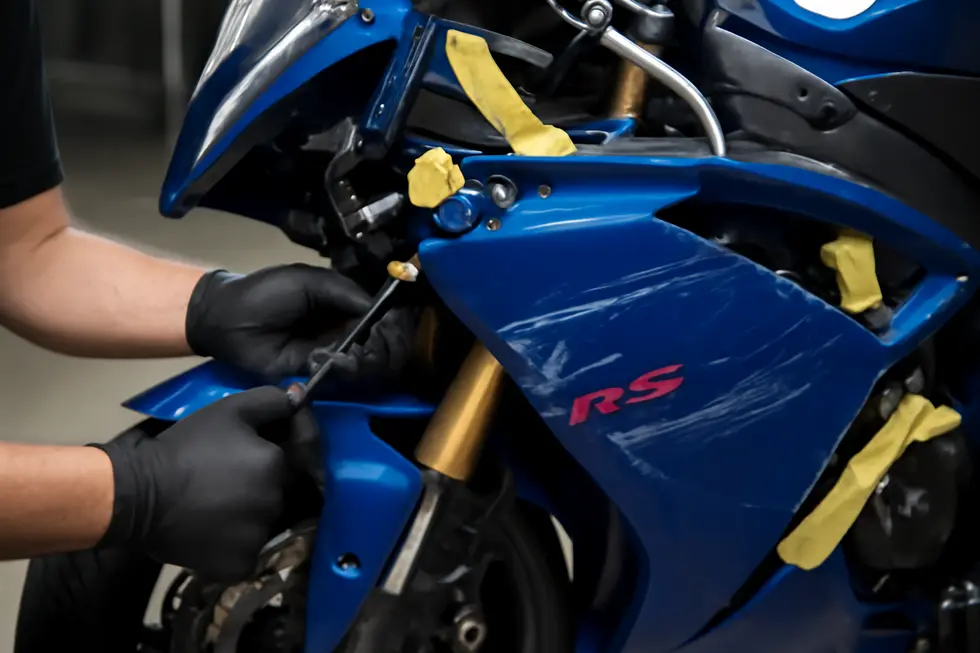
Removing motorcycle fairings to address scratches requires a patient and methodical approach to avoid compounding damage. Begin by carefully loosening bolts and fasteners using the correct tools such as screwdrivers, hex keys, or wrenches. Each part should be set aside on a soft surface—like carpet or foam—to prevent new scratches while disassembled. Before removal, inspect mounting points closely to avoid damaging critical frame holes or brackets, as these can complicate later repairs or reinstallation. If any drilling becomes necessary, placing a magnet wrapped in cloth underneath can catch metal shavings and protect internal components.
When detaching fairings, resist forcing pieces loose; plastic panels are vulnerable to cracking under stress. During reassembly, mounting brackets should be secured loosely at first. This allows fine adjustments to align fairings correctly without applying unnecessary tension on the repaired plastic. Employing washers or rubber grommets at fastening points can absorb pressure and minimize cracking risks.
Once off, the scratched areas can be cleaned gently with mild plastic-safe cleaners to remove debris without harming the surface. Light scratches may be polished out with compounds designed for ABS plastic—a common fairing material. For deeper damage, filling and refinishing become possible after this careful removal process.
Adopting these best practices ensures the fairings remain intact through the repair journey, preserving both structural integrity and cosmetic potential. For those seeking visual guidance, this video guide on safe motorcycle fairing removal offers practical demonstrations that complement these steps. For further insights on sourcing quality parts, explore expert suggestions at Explore the Best Motorcycle Fairings at Summit Fairings.
2. Tailored Repair Techniques for Painted and Plastic Fairings After Removal
Properly addressing scratches on motorcycle fairings after removal requires a thorough understanding of the fairing material and the severity of the damage. For painted fairings, the repair process begins with meticulous cleaning to eliminate dirt, grease, and wax, ensuring optimal adhesion of repair compounds. Light surface scratches can often be diminished by gently polishing with mild abrasives applied using a microfiber cloth in circular motions. However, deeper scratches that breach the paint necessitate more intensive treatment: wet sanding smooths the edges of the damage, followed by precise application of fillers such as super glue to fill voids, then touch-up paint that matches the original finish. After these steps, a two-stage polishing approach—starting with a cut polish using a firm pad to remove imperfections and concluding with a finish polish for a glossy result—restores the fairing’s pristine look. A final protective layer of wax or sealant is essential to defend against UV damage and oxidation.
In contrast, plastic fairings—whether unpainted or stripped prior to repair—demand different care. Cleaning remains vital, but repair often involves structural restoration through techniques like V-grooving the damaged area followed by plastic welding or use of plastic-compatible fillers to maintain integrity. Avoidance of harsh chemicals is crucial as they can degrade these materials. Once repaired, refinishing steps should include light sanding and application of appropriate coatings designed for automotive plastics.
Throughout fairing removal and reassembly, gentle handling with the correct tools prevents new marks or stress on mounting points. Documenting disassembly is useful to avoid damaging clips or wiring when reinstalling components. To prolong repair longevity, shielding repaired surfaces from intense sunlight by parking in shaded spots or using covers helps prevent accelerated fading.
For those seeking comprehensive visual guidance on repairing painted motorcycle scratches, the video tutorial “How To Repair Scratches In Motorcycle Paint?” offers an excellent step-by-step walkthrough from cleaning to flawless touch-up painting. This resource complements the detailed material-specific care outlined here, ensuring enthusiasts achieve professional results.
Explore more on advanced repair techniques and protective finishes in our coverage at Explore the Best Motorcycle Fairings at Summit Fairings.
3. Balancing Costs and Quality: Repair Versus Replacement in Motorcycle Fairing Scratches
When deciding between specialized care and full replacement for scratched motorcycle fairings, economic factors play a pivotal role. Minor scratches can often be addressed through polishing compounds and plastic-friendly scratch removers, which are relatively inexpensive and require minimal labor. Since typical motorcycle repair labor rates hover around $125 per hour, quick touch-ups allow for cost-effective restoration without substantial downtime. This approach is particularly sensible when scratches are superficial and the structural integrity of the fairings remains intact.
However, when damage penetrates deeper or covers extensive areas, replacement fairings frequently become a more viable solution. New fairings, especially aftermarket or quick-release options designed for specific models, can cost several hundred dollars upfront. Coupled with labor-intensive removal and installation—often involving several hours of skilled work—this raises the overall expense substantially. Despite this, replacement fully restores both appearance and durability, potentially enhancing resale value and long-term satisfaction.
The economic trade-off hinges on factors like the depth of damage, availability of skilled technicians, and time constraints. Specialized polishing is prudent for minor blemishes, offering budget-friendly upkeep. Conversely, fairing replacement better suits severe damage, ensuring full restoration but at higher cost and time investment. For tailored pricing and repair guidance, contacting local service providers or visiting comprehensive resources such as the Summit Fairings blog can help motorcycle owners make informed decisions that align with both their budget and repair goals.
For further insights into pricing and repair strategies, detailed analyses of repair labor and aftermarket fairing costs are valuable sources to consider.
4. Ensuring Rider Safety and Sustainable Practices through Expert Fairing Handling and Repair
Fixing scratched motorcycle fairings demands meticulous care, especially during removal and repair, to safeguard both rider safety and the structural integrity of the bike. Proper handling begins with using the right tools—such as screwdrivers and Allen wrenches—while wearing protective gear to prevent injury and accidental damage. Disconnecting the battery beforehand is a critical step to avoid electrical shorts during disassembly. Gentle techniques must be applied to release clips and fasteners carefully, preventing new scratches or cracks which can compromise fairing durability.
Specialized cleaning products play a vital role in repair, as harsh chemicals often cause fine cracks or degrade plastics like polycarbonate and acrylic commonly used in motorcycle fairings. Professionals rely on controlled sanding, polishing, and repainting approaches that restore esthetics without weakening materials. During reinstallation, incorporating washers or rubber grommets dampens stress points, reducing the risk of future cracks caused by vibrations or impacts while riding.
Beyond individual benefits, these precise methods promote broader societal gains. Educating riders through detailed tutorials empowers them to perform safe, cost-effective repairs, cutting down on waste and premature part replacement. By maintaining aerodynamic components in optimal condition, motorcycles achieve better stability and control, enhancing safety for all road users. This sustainable approach protects the environment by minimizing discarded fairings and supports a culture of responsible ownership.
For those seeking in-depth guidance tailored to specific models and materials, exploring expert advice on safe fairing removal and specialized care is recommended to optimize both repair quality and long-term motorcycle performance.
Final thoughts
Effectively fixing scratched motorcycle fairings is a multifaceted process that demands attention to detail at every step—from initial cleaning to advanced repair and ongoing protection. Business owners who master these stages can offer superior quality repairs that restore both the aesthetic and functional value of motorcycles, enhancing customer satisfaction and loyalty. By integrating proper cleaning protocols, precise repair techniques, careful fairing handling, and diligent maintenance, service providers can ensure repairs are durable and visually seamless. Embracing these best practices positions businesses as trusted experts in motorcycle care, capable of meeting the high standards expected by discerning riders.
Ready to elevate your ride? Summit Fairings delivers premium, custom-fit fairings that blend style and durability. Whether you’re chasing speed or turning heads, we’ve got your bike covered. Don’t wait—transform your machine today. Click, customize, and ride with confidence. Your perfect fairing is just a few clicks away. Act now!
About us
undefined