For motorcycle business owners, understanding how to effectively fix cracked fairings is essential—not just for providing better service to your customers but also for maximizing profits and maintaining a good reputation. Motorcycle fairings not only affect the aesthetics of a bike but also its performance and safety. In this guide, we’ll delve into critical steps and methods for assessing damage, choosing the right repair technique, preparing the surface, executing finishing touches, and knowing when it’s best to replace rather than repair. By the end, you will have a comprehensive knowledge that ensures your customers ride with confidence.
null
null
Cracked Motorcycle Fairings: A Practical Roadmap from Diagnosis to Durable Repair
A motorcycle’s fairings are more than a shield for the rider and a streamlining shell for the bike. They influence aerodynamics, reduce drag, and guard vital components. When a fairing cracks or splits, the urge is to glue it back and ride off, but the truth is more nuanced. The damage could be cosmetic, or it could compromise structural integrity and safety. The path you choose hinges on three core questions: where is the crack, how big and deep is it, and how much stress does the area bear during riding? This chapter casts a practical light on those questions and threads a coherent approach from careful assessment to a durable repair—or, in some cases, a smart replacement. The goal is not just a quick fix but a repair that preserves function, appearance, and safety for the long haul. As with any bodywork, preparation is the quiet hero of the process, setting the table for a repair that holds up under vibration, heat, and wind and weather alike.
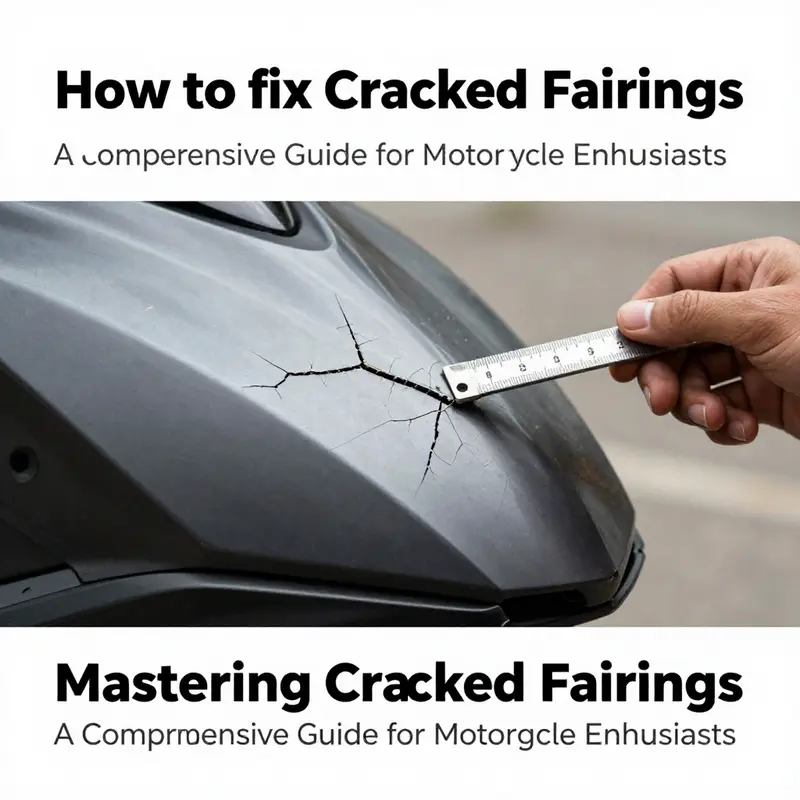
Begin with a steady assessment. Look first at location. Cracks near mounting points, at the junction where the fairing meets the frame, or along edges that bear high loads tend to be more critical. A hairline crack in a non-load-bearing section might be repairable with simple materials and careful finishing. In contrast, a crack that runs through a structural seam or a portion of fairing that experiences impact or flex during braking and cornering often signals the need for more robust methods—or even replacement. Second, gauge size and depth. A shallow surface crack that doesn’t penetrate the material’s core is not the same as a through-and-through split that undermines the panel’s stiffness. Third, consider the material. ABS and polycarbonate are common plastic fairings and respond well to the right repair method, but their behavior differs under heat and stress. Finally, assess the broader context—the age of the fairing, prior repairs, and the feasibility of achieving a seamless finish after repair. A repair that cannot be painted to blend into the surrounding finish will look odd and may be more difficult to waterproof and UV-protect in the long run. In short, a precise diagnosis guides the choice of repair method and whether a repair is worth pursuing at all.
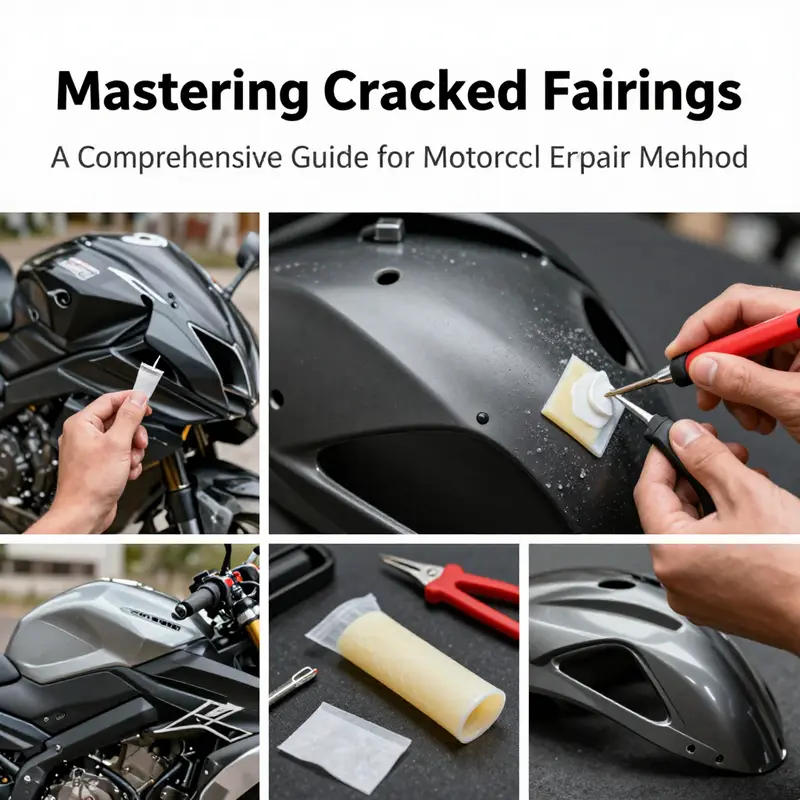
With the damage mapped, the repair method should follow a logical arc tied to severity and purpose. For minor cracks and small breaks in plastic fairings, two avenues stand out: plastic welding and a resin-based adhesive repair. Plastic welding is widely regarded as the most robust option for ABS and polycarbonate parts because it fuses the pieces into a bond that can approach the original material’s strength. It uses a plastic welder or a hot air tool with a compatible filler, effectively welding the joint as you would metal. The process requires a steady hand and practice. The repaired seam will usually reveal a weld line; it isn’t invisible, though careful sanding and color matching can minimize its visibility. The trade-off is durability. If you want a fix that lasts through vibrations and mild impacts, welding is the solid choice, provided you have the skill or access to a capable technician.
If welding feels daunting or the crack is in a less critical area, an epoxy or AB glue fix offers a simpler DIY route. A high-quality two-part epoxy or a plastic-specific AB glue can bind the crack when applied correctly. Preparation is paramount: thoroughly degrease the area with isopropyl alcohol, then lightly sand the surface to create a rough texture that improves adhesion. After mixing the resin or glue per the instructions, inject or apply it into the crack, and clamp the pieces tightly until cure time elapses. Typical epoxy cures at 24 hours, while AB glue solutions may set faster, in the range of several hours. Keep in mind that while these bonds can be remarkably strong, they generally do not rival a true weld. They are best for non-structural areas where cosmetic stability is adequate and the crack does not endure significant loading.
For dents, scratches, or minor surface damage, a filler-and-paint route helps restore aesthetics and smoothness without altering the panel’s fundamental strength. A body filler such as a light polyester-based compound can fill shallow imperfections. After drying, a careful sequence of sanding with progressively finer grits reveals a smooth contour. A primer coat, followed by color-matched paint, helps the repair disappear into the surrounding fairing. Achieving a flawless finish demands a clean, dust-free environment—a spray booth is ideal, but a clean, well-lit garage can work with patience and proper masking. The result should feel as smooth and uniform as the surrounding area, though the repair may still be noticeable upon close inspection or under certain lighting. This route is primarily cosmetic and should be reserved for non-load-bearing imperfections unless the underlying structure is intact.
When the crack is large, or the fairing is significantly deformed or exceptionally stressed, the most prudent course is often replacement. A damaged section near mounting points, air intakes, or radiative areas risks misalignment, airflow disruption, and mounting misfit if repaired beyond a critical threshold. In these cases, sourcing OEM or high-quality aftermarket fairings ensures proper fit, alignment, and finish. A replacement, while more expensive and time-consuming, preserves the bike’s aesthetics and performance and reduces the risk of hidden defects that could emerge during operation. Even when replacement is pursued, the repair mindset—thorough cleaning, careful preparation, and precise finishing—remains essential to ensure the new fairing looks and performs like the original.
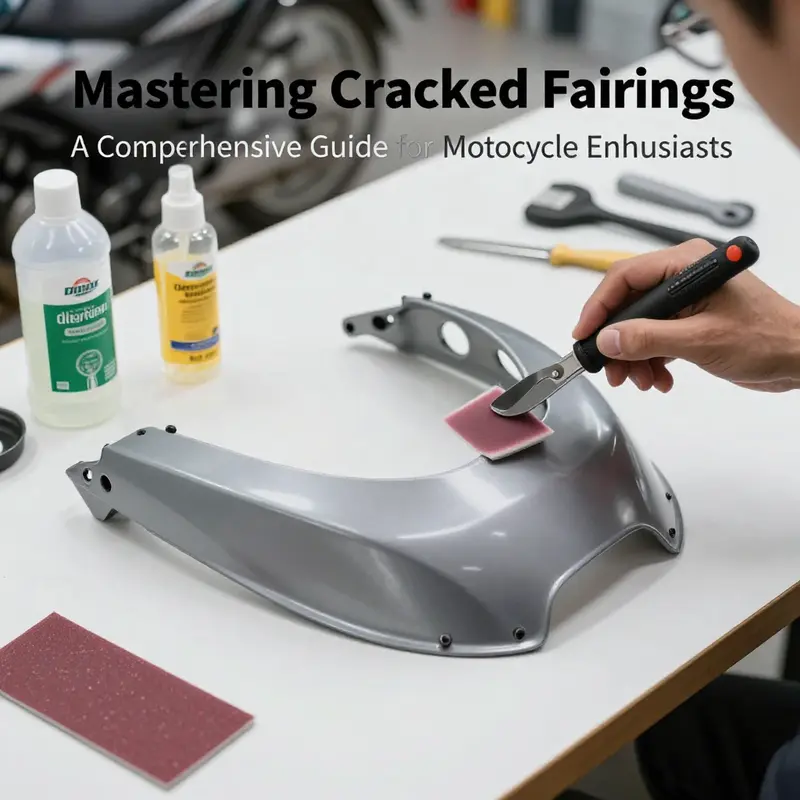
No matter the chosen method, essential preparation steps bind all approaches to success. Begin with a thorough cleaning to remove dirt, grease, wax, and oils that would compromise adhesion. Use a degreaser and a clean rag to wipe the area until it gleams. Next, lightly sand the damaged zone with fine-grit paper. This step creates a micro-roughness that the adhesive, filler, or weld can grip. After repairing or filling, re-clean the area to remove dust created by sanding. These steps may seem tedious, but they dramatically improve bond strength and help your finished repair endure exposure to weather, heat, and vibration.
Finishing follows repair and is crucial for both appearance and longevity. Regardless of method, you will likely need to sand the repaired section using progressively finer grits to a satin-smooth finish. Then apply primer to establish a uniform base, followed by color-matched paint. In a perfect world, paint in a controlled environment to minimize dust and orange-peel texture. A factory-like finish is less about raw technique and more about repeatable steps, light, and patience. If the repair is intended to be permanent and invisible, you may also consider clear topcoats, UV protection, and careful color matching. The final appearance should harmonize with the surrounding fairing, so the repaired area reads as one continuous surface rather than a patchy remnant of repairs.
The decision to pursue a repair versus a replacement also weighs cost, time, and long-term performance. A small, clean crack in a non-load-bearing location can often be addressed quickly with epoxy or a resin-based kit and paint, delivering a visible fix without breaking the bank. For a more robust, long-lasting answer, plastic welding tends to deliver the strongest bond in plastic fairings, albeit with a higher skill requirement and potential seam visibility. When the damage runs through to a structural plane or jeopardizes mounting points, or when the fairing is badly deformed, replacement becomes the safest and most reliable option. In all cases, aim to preserve smooth airflow and proper mounting alignment, since these factors influence ride quality and the fairing’s protective role.
If you decide to explore replacement options, the search can start with a broader catalog of fairing components. One practical route is to explore broader collections of compatible fairings, which can streamline finding a correct fit for your model. For those who want a straightforward reference point, a well-organized collection of options can guide your selection and comparison, ensuring you choose a part that aligns with your bike’s geometry and mounting points. This approach helps you avoid the trap of mismatched panels that look off and fit poorly, which would undermine both aesthetics and performance. For more on specific collections of fairings, you can explore a curated Honda fairings catalog, which provides a wide range of compatible panels, making the replacement process less guesswork and more precise. Honda fairings collection.
The final piece of the puzzle is to balance DIY willingness against the value of time and the risk of repeated failures. Some riders relish the hands-on challenge and learn as they go, which is commendable if you have a steady hand, patience, and the right tools. Others may prefer to rely on a professional body shop or a skilled mechanic, especially for larger or multi-part repairs where precise alignment, weather sealing, or color matching matters. A shop can provide a safety-forward assessment, ensuring that the repair will hold under real riding loads and that the finish will resist UV exposure and abrasions. In either scenario, insist on a clear plan: the chosen repair method, expected cure or drying times, steps to protect the part during curing, and a realistic timeline to reinstall and reassemble. This planning reduces downtime and helps you return to riding with confidence.
To close the loop, remember that you are not just fixing a shell; you are maintaining a functional interface between rider, aerodynamics, and the motorcycle’s core systems. The repairs that endure tap into a disciplined process: diagnose with care, choose the method that matches both the damage and the rider’s expectations, prepare meticulously, finish thoughtfully, and decide whether a replacement is warranted based on risk, fit, and long-term performance. The rider’s safety and the bike’s integrity depend on recognizing where cosmetic repair ends and structural repair begins. If in doubt, seeking a professional evaluation is a prudent step that can save time, money, and, most importantly, a potential safety risk on the road. For those who are curious about where to find compatible replacement panels, the Honda fairings collection offers a starting point to explore authentic fit and finish, helping ensure that the next repair—or the next bike—meets expectations. The road to a seamless repair is rarely a sprint; it is a careful, measured journey that honors both the machine and the rider.
External reference for deeper step-by-step guidance: BikeExif’s How to Repair a Cracked Fairing—Step by Step Guide, which provides detailed, practical steps on material selection, surface preparation, and finishing techniques, serving as a valuable reference for anyone working through a fairing repair. https://www.bikeexif.com/2023/05/how-to-repair-a-cracked-fairing-step-by-step-guide/
null
null
From Crack to Cohesion: Finishing the Repair on Motorcycle Fairings for Strength, Shine, and Longevity
Repairing a cracked fairing is only part of the job. The finish is what seals the repair against the elements and wear, and it is what makes a repair look integrated rather than patchwork. Finishing is not mere aesthetics; it locks in the structural restoration, guards against UV damage that can embrittle repaired plastic, and helps the area resist moisture and temperature cycling. A well-executed finish turns a temporary fix into a durable repair you can ride with confidence, while also preserving the bike’s lines and value. The approach to finishing should flow from the repair method you chose and the material you worked with, but the underlying discipline remains consistent: clean, protect, restore color, seal, and protect again. As you move through sanding, priming, painting, and sealing, think of each step as wrapping the repair with a shield that blends strength and appearance into one cohesive surface.
Begin with a meticulous evaluation of what’s been done. If you used plastic welding on a small crack in ABS or polycarbonate, anticipate a seam that will need gentle feathering and smoothing. If epoxy or AB glue sealed a non‑structural open crack, you may have a slightly raised line that needs contouring. The goal is not to erase history but to soften the edge so the repaired area follows the bike’s original contour. A uniform surface is essential because any irregularity will telegraph through paint and clear coat, undermining both appearance and durability. The finishing process, therefore, starts with careful surface preparation that respects the plastic’s behavior under heat and solvent exposure. Cleanliness becomes the first line of defense against adhesion failure, and surface texture becomes your ally in achieving a durable, invisible repair.
The first technical stage is sanding. Start with a medium grit to blend the repair into the surrounding material, usually around 400 to 600 grit, then progress to finer grits—800, 1000, and up to 1500 or higher. The aim is to create a uniform, slightly dull surface that will accept primer evenly. The feathering around the repair should be smooth, avoiding sharp ridges that will show through the finish. One common risk is sanding through the repair material, especially if an epoxy fill was used or if the repair sits slightly proud of the original surface. To mitigate this, frequently wipe the area with isopropyl alcohol to check your progress and keep a light touch on the sander. After you’re satisfied with the blend, wipe again to remove all dust. Dust in the pores of the plastic can ruin adhesion, so this step cannot be rushed.
Next comes priming. Choose a plastic primer formulated for the type of plastic you’re working with—ABS or polyurethane primers are common choices for motorcycle fairings. Priming serves multiple purposes: it seals the repaired surface, promotes adhesion for the top coats, and helps create a uniform base color that prevents the repaired area from taking on blotchy tones. Apply the primer in light, even coats, allowing adequate drying time between passes. Overspraying can fill the surrounding grain and make the surface stiff and brittle, while underspraying can leave areas that soak up the top coat unevenly. In a well-ventilated space, with the bike oriented as it would be on the road, practice a constant speed and distance to achieve a consistent film. If the repair involved a seam weld, this is your moment to address any visible lines by light sanding after the primer has cured, returning to the feathered edge until the seam disappears into the surrounding color under a thin primer layer.
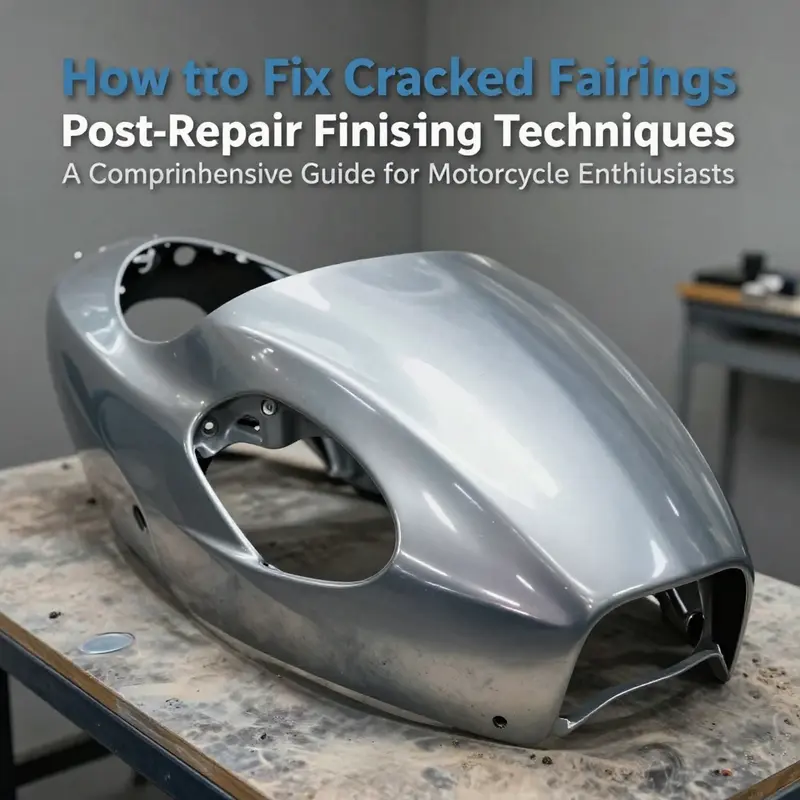
Painting is the centerpiece of the finish. Color matching is critical, especially on modern bikes where fairings are prominent. Use automotive paint that matches the original color as closely as possible. Apply several thin coats rather than a single thick layer. Thin coats reduce the risk of runs and sags, and they allow the color to cure evenly across the surface. Between coats, allow the paint to flash off according to the manufacturer’s guidelines, then recoat. If you’re working on a plain or solid color, you may still need a color blend at the edges to avoid halo effects along the repair. Temperature and humidity influence spray outcomes, so paint in a stable environment. If a small amount of color drift occurs, it’s possible to retouch only the affected zone with a precise, light spray once the preceding layer has cured. The goal is a uniform appearance that disappears at a casual glance. If the bike’s finish includes metallics, flake, or pearlescent components, you may require a more controlled technique to maintain the depth and reflectiveness that those finishes demand.
After the color dries, seal the color with a clear coat. The clear coat protects the pigment beneath from UV exposure and chemical damage, and it adds depth and gloss that helps the repaired area merge with the rest of the fairing. Like color coats, apply the clear coat in several light layers, letting each pass cure properly. For a glossy, mirror-like finish, you’ll want the final clear film to be smooth and free of orange peel and dust nibs. If you aim for a matte or satin finish, select a clear with the appropriate sheen and adjust your application technique accordingly. The thickness of the clear must be controlled to avoid crazing or peeling, particularly on repaired seams that retained a bit more flex. Remember that the primer and color layers beneath the clear influence how it finally looks. A well-executed clear coat catches color depth, hides minor texture differences, and withstands the test of road grime and weather over time.
With the paint and clear coat cured, the final polishing and protection steps bring the finish to professional quality. Begin with a gentle wet sanding using very fine grits—1200 to 2000—only if the surface exhibits any texture or dust marks that mar the gloss. The goal is to remove minor surface imperfections without cutting through the clear layer or altering the color. After this, a careful machine or hand buffing with a soft pad helps restore the high‑shine look, followed by a thorough wipe to remove any remaining compound residues. A coat of wax or a dedicated sealant can then be applied to enhance gloss and shield the finish from environmental exposure. The wax becomes an extra layer of defense against UV rays and moisture, preserving your hard work as you roll back into sun and rain. It’s worth emphasizing that you should wait for the clear to cure fully before buffing; premature polishing can heat the surface and cause microcracking or dull spots that are difficult to correct later.
A crucial mindset in finishing is to treat the repair as a whole surface. The blend should be so seamless that the eye does not distinguish repair from original material. If you started with an extreme crack in a high‑stress area or if the repair created a new line where the fairing curves meet the frame, you may need to revisit the contour with light sanding or a small amount of filler to restore the original shape. In some cases, even with the best finishing, the repair remains visible up close. If the damage is extensive or near load‑bearing junctions, cosmetic finishing alone cannot guarantee long‑term durability, and replacement may be the safer option. The finishing technique you choose should align with the repair’s scale and the fairing’s role in rider safety and aerodynamics.
If you’re restoring a particular bike model or styling line, sourcing compatible panels can simplify long‑term maintenance and aesthetics. For riders who lean toward keeping the bike’s original look, you can explore the Honda fairings collection to find OEM or aftermarket panels that align with the restored sections. This approach helps ensure that the repaired area not only looks right but fits correctly with the rest of the bike’s lines and mounting points. Honda fairings collection
For riders who want a detailed, step‑by‑step reference that complements this overview, you can consult a comprehensive practical guide on post‑repair finishing and avoid trial‑and‑error pitfalls. This external resource provides practical tips and additional checks that help ensure the finished surface stays intact through many rides. https://www.motorcycle.com/motorcycle-maintenance/repairing-cracked-fairings-step-by-step/
The finishing process culminates not just in a look that satisfies an eye but in a surface that survives the ride. A properly finished repair resists the daily stresses of weather, temperature swings, and road contaminants. It presents as part of the bike rather than a memo of a past crack. The steps described here—careful sanding, judicious priming, controlled color application, deliberate clear coating, and patient polishing—are designed to work in concert. They respect the plastic’s chemistry and the fairing’s geometry, ensuring the repair moves in harmony with the bike’s original strength and aesthetics. When in doubt, remember that the most resilient outcome combines precise technique with thoughtful material choices and a clean, dust‑free environment. If the damage is outside the scope of a cosmetic refresh, prioritize safety and consider a full replacement to guarantee proper fit and performance. And wherever you are in the process, the right finishing steps extend the life of the repair, preserve the bike’s value, and keep you looking solid on the road.
Cracked Motorcycle Fairings: Reading the Damage, Choosing Repair or Replacement, and Getting Back on the Road
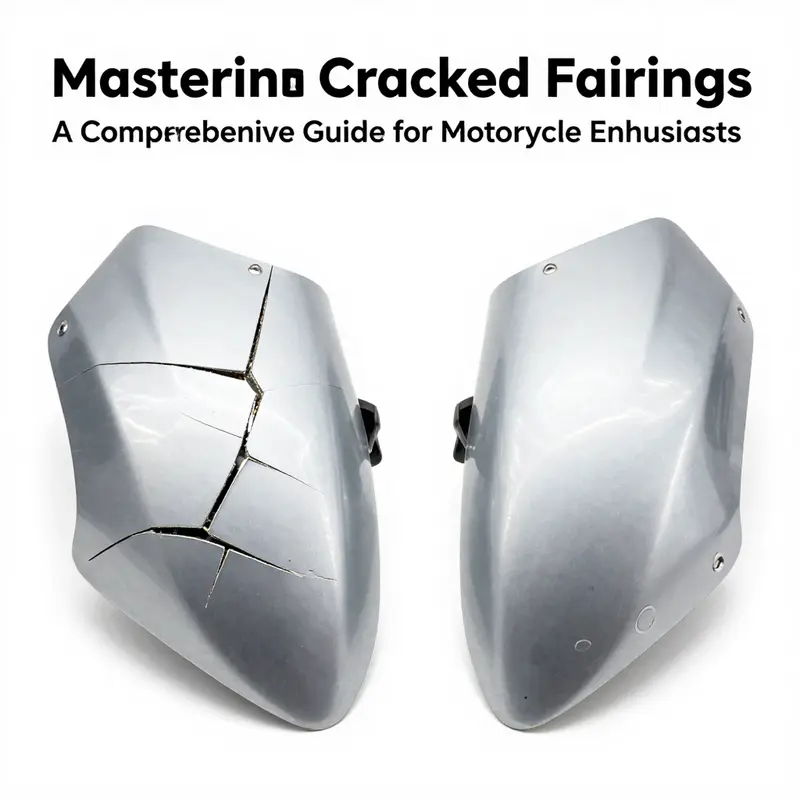
A cracked fairing is rarely just a cosmetic blemish. It changes how the bike behaves, how air flows around the chassis, and how you perceive the safety of your ride. The first step is to read the damage with clear eyes. Look at the location of the crack or fracture, note its length and depth, and determine whether it sits near a mounting point or a high-stress edge where the fairing meets the frame or the fork. Hairline cracks in non-load-bearing areas often behave like simple cosmetic fixes, while a crack that travels through a mounting boss or through a load path can compromise stiffness and integrity. The distinction matters. It governs whether you should undertake a repair with the intent to ride again or accept that a replacement fairing might be the safer choice in the long run. This reading of the damage is not a guess; it is an assessment built on a practical understanding of how plastic behaves under stress and how mounting points transfer load to the bike’s chassis.
When the damage is minor, you can pursue a repair that restores the shape and keeps the fairing secure. But the metal of the mind here is honesty: if you are repairing a part that bears load or if the damage is close to critical joints, the repair may be temporary at best. The safest bet, especially if the crack extends through structural layers or delaminates under the surface, is to consider replacement. A fairing that has suffered UV degradation, embrittlement, or multiple hairline fractures across a broad area is less predictable and more prone to future failure. In such cases, replacement—preferably an OEM or a high-quality aftermarket unit with a precise fit—often proves more economical in the long run than repeated DIY repairs that might fail at speed. If you are curious about compatible options, you can explore specific fitment and styling choices at a dedicated fairing collection such as the Honda fairings range, which provides a clear path to a match for many modern motorcycles. The decision is not simply about paint and appearance; it is about ensuring the bike’s aerodynamics, mounting accuracy, and rider safety remain uncompromised as you ride.
Understanding the repair path begins with a simple rule: match the method to the damage and the location. For minor cracks in plastic fairings made from materials like ABS or polycarbonate, plastic welding stands out as the most robust repair. The welding process melts the material at the joint, fusing broken pieces into a continuous whole. The advantage here is durability that can approach the original strength of the fairing, which makes it a preferred solution when the damage is not near a critical load path. The trade-off is precision and skill: you must master proper heat control and joint preparation to avoid warping or scorching the surface. If you are willing to invest time and practice, plastic welding can restore the fairing to functionality with a relatively resilient bond that can be sanded and painted to blend with the surrounding panel. However, even the most careful weld line will remain a visible seam, which some builders treat as a badge of repair rather than a flawless finish. The option remains attractive for those who want a long-lasting repair without replacing the entire shell.
An easier, less technical route is the two-part epoxy resin or a plastic-compatible adhesive. This approach is widely used by DIY enthusiasts who want a straightforward fix without welding equipment. The process starts with meticulous surface preparation: clean the area with a degreaser to remove oil and wax, then sand the edges around the crack to create a rough surface that helps the adhesive bite. Mix the epoxy according to the instructions and apply it generously into the crack, squeezing out any air pockets. Clamp the pieces tightly until the adhesive has cured—typically 24 hours for epoxy, though some formulations cure faster. The strength of an epoxy repair is real, but it is often more suited to non-structural areas or cosmetic cracks. The bond, while strong, does not replicate the full strength of a true weld, and it can fail under repeated impact or high-speed turbulence. As a compromise between performance and ease, this method is frequently the fastest fix for surface damage while you plan a longer-term strategy.
If the damage is cosmetic or minor—dents, shallow scratches, or small holes—the repair can focus on surface leveling rather than structural restoration. A body filler applied over the affected area, followed by careful sanding, primer, and color-matching paint, can restore the visual uniformity of the fairing. The key here is cleanliness and patience. Dust-free painting environments produce far better finishes, and color matching goes a long way toward restoring the bike’s aesthetic. Even when the repair is purely cosmetic, it is worth protecting the area with a primer coat and a clear top layer to resist future abrasions and to keep moisture from creeping into any small seams.
But when damage crosses a line—deep fractures, extensive delamination, or any crack or break that compromises mounting points—the math changes. In these situations, repair may become more of a risk than a remedy. The fairing could fail under rider or wind load, especially at highway speeds where a loose panel can generate dangerous flutter or sudden shifts in airflow. In such cases, the practical advice is to pursue replacement. An OEM fairing—engineered to fit precisely and endure the same stresses as the original—offers the longest service life. A high-quality aftermarket option can also deliver a reliable fit if matched carefully to the bike’s model and generation. Replacement eliminates the uncertainty that often accompanies repairs and delivers a finish that looks and performs like new. When contemplating replacement, it helps to consider the entire system: mounting hardware, fasteners, grommets, and the surrounding panels. A full or partial swap can preserve the aerodynamics and line integrity of the bike, which matters for handling and look as much as it does for resale value.
As you weigh repair versus replacement, a practical touchstone is the bike’s overall condition and the owner’s intent. If the goal is to part the bike out later or you want a quick, budget-friendly fix to keep riding until a replacement is found, a repair can be appropriate. If you depend on the bike daily for commuting or long rides, or if the fairing serves as a significant shield for fast-moving air and engine compartments, replacement often provides a safer, more predictable outcome. For riders who want to explore options without risking a poor fit, browsing a dedicated fairing collection can yield guidance on compatible shapes and mounting profiles. The internal link to a Honda fairings collection, for instance, can help you gauge fit and styling when replacement becomes the preferred route. While it is helpful to know these paths, the final choice should be grounded in a careful assessment of safety and reliability.
Preparation and finishing are universal to any repair route. Regardless of method, start with a thorough cleaning to remove dirt, oil, wax, and dust. Contaminants impede adhesion and can create weak points where cracks propagate. Lightly sand a small border around the damage to create a mechanical key for adhesives or filler. If you choose plastic welding, you will need a plastic welding tool or a hot air gun and the appropriate rod. If you choose epoxy or AB glue, you will need a two-part resin and clamps to hold the pieces in alignment while curing. After the material has cured, grind the joint smooth with progressively finer sanding papers, then apply primer to the repaired region. A color-matched paint will help conceal the repair and protect the surface from UV damage, but remember that the finish may never be perfectly invisible. A dedicated spray booth offers the cleanest environment for a professional result, though careful masking and dust control can also produce acceptable results at home.
The question of when to repair and when to replace is never purely technical. It is a judgment about safety, reliability, and how much you value the bike’s integrity. When the damage is confined to non-load-bearing areas and the fairing still seals properly against wind and rain, a well-executed repair can serve for a meaningful period. If the crack invades mounting points or compromises the fairing’s structural bond, replacement becomes the safer, more predictable option. In the end, the rider’s duty is to ensure that the repairs hold up under real-world riding conditions and that the appearance does not mask a hidden weakness. If you ever doubt your ability to achieve a quality repair, consider a professional assessment. A body shop with experience in motorcycle fairings can provide options, including precise OEM replacements and carefully matched aftermarket shells, ensuring that the finished result is not only surface-deep but structurally sound as well.
For readers seeking a direct path to appropriate parts, consider exploring the Honda fairings collection as a starting point for compatible options and fitment guidance. This approach can help you compare shapes, mounting interfaces, and styling to maintain the bike’s original line and aerodynamics. Of course, every repair journey benefits from a clear plan. Start by assessing the damage, select the repair method that respects both safety and the bike’s intended use, prepare meticulously, and finish with attention to color and texture. If the damage is beyond manageable repairs, do not hesitate to pursue replacement—because preserving safety on the road matters more than preserving a few aesthetic hours of work. For riders who want to expand their understanding beyond DIY steps, a comprehensive external guide offers a methodical walkthrough of repairing cracked fairings and helps set realistic expectations for durability and performance. External resource: https://www.motorcyclecruiser.com/how-to-repair-a-cracked-motorcycle-fairing/.
Final thoughts
In conclusion, fixing cracked motorcycle fairings requires keen assessment of damage, knowledge of applicable repair methods, thorough preparation, and precise finishing techniques. Always remember that safety and durability are paramount—if the damage compromises the fairing’s integrity or stability, replacement is the safer option. By mastering these skills, you not only improve your service offerings but also increase customer satisfaction and loyalty. Empower your business with the ability to deliver high-quality repairs and ensure that every ride is memorable and safe.