Introduction
Crafting fiberglass motorcycle fairings offers a valuable opportunity for businesses aiming to expand product lines with lightweight, durable, and customizable bodywork. Understanding the complete process—from mold creation to finishing—is essential for delivering high-quality products that meet customer expectations and industry standards. This guide systematically breaks down the key stages: starting with mold design and preparation, moving through material selection and resin application techniques, advancing to curing and demolding methods, and concluding with repair, finishing, and painting strategies. Each chapter equips business owners with actionable knowledge to optimize their manufacturing workflow and enhance product appeal.
Tables of Contents
Chapter 1: How to Make Fiberglass Motorcycle Fairings: Mold Creation and Preparation
- Essential Surface Preparation and Release Agent Techniques for Mold Success in Fiberglass Motorcycle Fairings
- Precision Model Crafting and Expert Fiberglass Layup for Durable Motorcycle Fairing Molds
Chapter 2: How to Make Fiberglass Motorcycle Fairings: Materials and Tools Required
- Essential Fiberglass and Resin Components for Crafting Durable Motorcycle Fairings
- Critical Tools, Materials, and Safety Practices for Effective Fiberglass Motorcycle Fairing Fabrication
Chapter 3: Mastering the Art of Fiberglass Motorcycle Fairings: The Layering and Resin Application Process
- Effective Layering and Resin Preparation Techniques for Durable Fiberglass Motorcycle Fairings
- Achieving Flawless Resin Mixing, Application, and Curing for Strong Fiberglass Fairings
Chapter 4: How to Make Fiberglass Motorcycle Fairings: Curing, Removal, and Finishing Techniques
- Mastering the Art of Fiberglass Curing and Finishing for Durable Motorcycle Fairings
- From Mold to Showroom: Expert Curing, Removal, and Surface Finishing for Fiberglass Motorcycle Fairings
Chapter 5: How to Make Fiberglass Motorcycle Fairings: Repair, Filling, Priming and Painting for Final Touches
- Restoring Strength and Surface Perfection: Expert Repair Techniques for Fiberglass Motorcycle Fairings
- Mastering the Art of Surface Refinement: From Filling Imperfections to Pristine Painting on Fiberglass Motorcycle Fairings
Chapter 1: How to Make Fiberglass Motorcycle Fairings: Mold Creation and Preparation
1. Essential Surface Preparation and Release Agent Techniques for Mold Success in Fiberglass Motorcycle Fairings
Creating high-quality fiberglass motorcycle fairings begins with meticulous surface preparation and the precise application of release agents on your mold. These steps ensure that the mold’s surface is impeccably smooth and that the cured fiberglass separates cleanly without damage or unsightly imperfections.
The process starts by thoroughly cleaning the mold or master pattern, removing every trace of dust, grease, or debris. Any contaminant left behind will imprint onto the final fiberglass part, causing flaws that compromise the finish and fit of your fairing. Often, a gelcoat layer is applied first to the mold’s surface, forming a hard, smooth barrier that precisely defines your fairing’s outer shell. After the gelcoat fully cures, a light sanding removes minor bumps or irregularities, further refining the mold’s surface to a near-perfect gloss.
Next, applying a release agent is the critical step that allows the fiberglass shell to demold cleanly. Wax-based or PVA release agents are commonly used, each forming a thin film that prevents polyester or epoxy resin from permanently bonding with the mold. This protective barrier must be applied evenly over every area that will come into contact with resin and fiberglass cloth. Multiple thin coats are recommended, with careful drying time between applications to build a consistent, effective layer. This practice not only facilitates smooth demolding but also extends the mold’s lifespan by preventing resin buildup.
When applying release agents, attention to detail around edges and corners is essential. Uneven coverage here can cause the fiberglass to catch or tear during removal. Ensuring thorough coverage means your mold remains reusable and able to produce multiple fairings with consistent quality.
Seasoned fabricators highlight the importance of periodic mold maintenance. This includes inspecting the mold surface for wear, reapplying gelcoat as needed, and regularly refreshing the release agent to maintain optimal performance. Many instructional resources, including detailed tutorials, provide visual demonstrations of these techniques, enhancing understanding and execution of these foundational steps.
For comprehensive information on the use of release agents and surface treatments in mold preparation, see the detailed guide from an industry leader.
By combining rigorous cleaning, smooth finishing, and expert release agent application, mold creators lay the groundwork for flawless fiberglass motorcycle fairings that easily separate from the mold and boast a professional-grade finish.
2. Precision Model Crafting and Expert Fiberglass Layup for Durable Motorcycle Fairing Molds
Creating high-quality fiberglass motorcycle fairings starts with crafting a precise master model, which defines the final shape and influences every step that follows. This model, often sculpted from foam or clay, must be meticulously smoothed to eliminate imperfections since any surface flaw will imprint on the mold and thus on every fairing produced. Applying a mold release agent such as specialized mold wax ensures that the fiberglass layers will not fuse permanently to the master, enabling easy separation later.
Once the master is perfected and treated, the mold fabrication begins by layering fiberglass cloth saturated with resin over its surface. Preparation of the workspace and materials is crucial: cut fiberglass pieces to manageable shapes that fit the contours precisely, mix the resin and hardener carefully following manufacturer instructions, and keep brushes and rollers ready to apply resin evenly. Starting with a thorough “wet out” saturates the master surface and provides a strong bond for successive layers.
Multiple layers—typically three to five—are applied gradually, allowing each to cure fully to build thickness and structural strength without trapping air bubbles. Proper fiber orientation during layup enhances durability and rigidity, ensuring the mold withstands repeated use. After complete curing, the mold is carefully removed from the master, preserving its surface details and integrity.
Trimming ragged edges and sanding rough areas refine the mold, while maintaining precision for an ideal fit on motorcycle frames. This process blends artistic skill in master model design with technical proficiency in composite layering, forming a foundation for producing durable, lightweight fairings tailored to any motorcycle model or custom design.
For additional insights and practical demonstrations on mold creation and fiberglass layup, exploring detailed tutorial videos can provide valuable hands-on perspectives to complement your craftsmanship.
Explore expert techniques and tips in molding and fiberglass applications at Explore the Best Motorcycle Fairings at Summit Fairings.
Further technical details and examples of motorcycle fairing molds can be found at this comprehensive external resource: Alibaba Motorcycle Fairing Mold examples.
Chapter 2: How to Make Fiberglass Motorcycle Fairings: Materials and Tools Required
1. Essential Fiberglass and Resin Components for Crafting Durable Motorcycle Fairings
Creating robust and lightweight fiberglass motorcycle fairings begins with selecting the right materials that form the foundation of the build. At the heart of this process are fiberglass fabric and resin, which together produce the structural shell characteristic of custom fairings.
Fiberglass cloth or chopped strand mat serves as the skeletal reinforcement. This woven fabric is carefully cut to fit the mold or form and laid in overlapping layers to build strength and desired thickness. Its flexibility enables it to conform to complex curves common in motorcycle bodywork while providing necessary rigidity once cured.
The choice of resin significantly affects both the workability and final quality of the fairing. Polyester resin is the most widespread option due to its balance of affordability, ease of use, and quick curing properties. It bonds well to fiberglass cloth and hardens into a firm, durable surface suited for bodywork. Alternatively, epoxy resin offers superior adhesion, mechanical strength, and resistance to environmental factors like moisture and chemicals, though it commands a higher price point and longer cure time. Both resins require a hardener or catalyst to trigger the curing reaction, enabling the resin to transition from liquid to solid.
Applying resin correctly is crucial. Tools such as brushes or rollers evenly saturate the fiberglass layers with resin, ensuring complete impregnation without trapping air bubbles, which can weaken the structure. Mixing containers and stirrers are necessary to blend resin and hardener accurately in the correct proportions, avoiding curing issues.
Additionally, mold release agents protect your silicone, wood, or other molds from resin adhesion, facilitating clean demolding of the cured fairings. Once cured, tools like sandpaper and cutting implements refine edges and smooth surfaces, preparing the piece for finishing stages.
Though carbon fiber can be integrated for enhanced strength and weight reduction, it raises material costs, making fiberglass the most practical choice for many enthusiasts.
For finishing touches, UV-resistant paints and primers ensure the fairings maintain their look and durability under sunlight exposure.
By mastering the interplay between fiberglass cloth, resin types, and the appropriate tools, you lay a solid groundwork for successfully fabricating custom motorcycle fairings. This essential combination of materials and tools unlocks possibilities for tailored styles and reliable performance.
For more insights on durable fairings and materials, explore discover affordable motorcycle fairings.
2. Critical Tools, Materials, and Safety Practices for Effective Fiberglass Motorcycle Fairing Fabrication
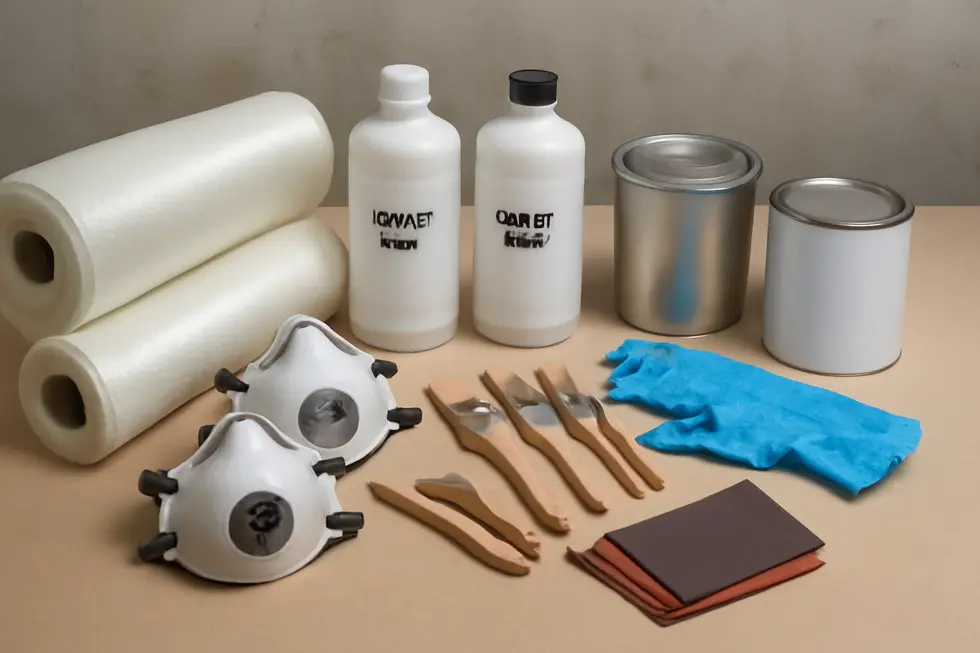
Creating fiberglass motorcycle fairings demands not only the right materials but also specialized tools and rigorous safety protocols to ensure a successful outcome and personal protection. The core materials center around fiberglass cloth or mat, which serves as the structural fabric imparting strength and form. This fabric is impregnated with resin—typically polyester or epoxy—each offering distinct benefits: polyester resin cures quickly and costs less, while epoxy resin delivers superior adhesion and durability, albeit at a higher expense and longer curing time. The resin must be combined carefully with a compatible hardener or catalyst in precise proportions, and mixing is done in dedicated containers stirred with disposable sticks to prevent contamination.
Tools include sharp scissors or shears tailored to cutting the fiberglass cloth accurately, and brushes or rollers essential for thoroughly saturating each fabric layer with resin. Sandpaper of various grits prepares and smooths surfaces before and after curing, while gloves and respirators shield the user from hazardous chemicals and irritating fiberglass particles. The work area itself must be well ventilated or located outdoors to disperse toxic fumes effectively. Protective clothing such as long sleeves and eye protection further guard against chemical exposure and sharp fiber injuries.
Using a mold release agent on the mold surface prevents unwanted adhesion of the fiberglass shell, facilitating clean demolding. Additionally, solvents like acetone are critical for cleaning tools and removing uncured resin residue, maintaining a tidy workspace. The interplay of these materials and tools establishes the foundation for fabricating robust, lightweight fairings with smooth finishes.
Adhering strictly to safety measures cannot be overstated. Fiberglass resins release volatile organic compounds (VOCs) during application and curing; continuous exposure without proper respiratory protection can result in serious health issues. Gloves and clothing prevent dermal irritation caused by direct skin contact with harsh chemicals and fiberglass fibers.
By mastering the selection and correct use of these essential components alongside comprehensive safety precautions, builders ensure durable, professional-quality fairings. For more detailed insight into available products and the full process of motorcycle fairing fabrication, exploring resources like a comprehensive motorcycle fairings blog can be invaluable for enthusiasts and professionals alike.
Chapter 3: Mastering the Art of Fiberglass Motorcycle Fairings: The Layering and Resin Application Process
1. Effective Layering and Resin Preparation Techniques for Durable Fiberglass Motorcycle Fairings
Crafting durable and lightweight fiberglass motorcycle fairings hinges on mastering the proper layering and resin application techniques. The key begins with preparing the fiberglass cloth, which should be cut approximately 2 centimeters larger than the mold or surface to ensure full coverage and adequate bonding. This slight oversize allows layers to overlap seamlessly, providing structural integrity after curing.
Before layering, the surface must be meticulously cleaned and dried to eliminate any contaminants that could compromise adhesion. Once ready, the resin and hardener are mixed in precise proportions—commonly around 100 parts resin to 4% hardener—to achieve optimal curing and strength. Thorough mixing is essential to prevent uneven hardening or weak spots.
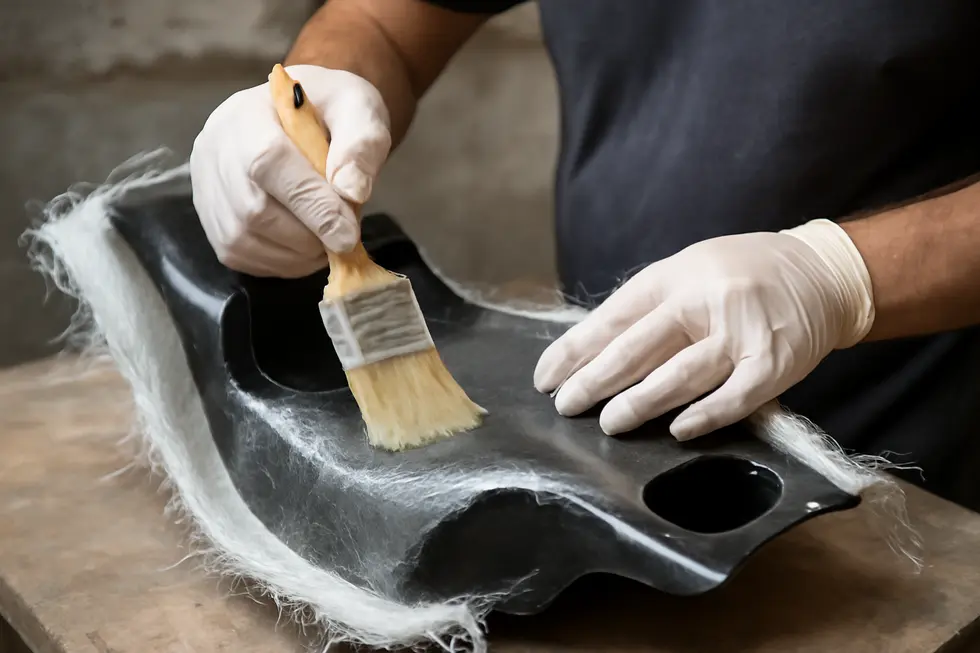
Applying the first layer involves brushing a thin, even coat of resin onto the mold. The fiberglass cloth is then carefully laid onto this wet surface and gently pressed using a brush or roller to remove trapped air bubbles. Air pockets create weak points and imperfections, so consistent pressure is vital. Successive layers are added similarly, with each fiberglass piece saturated fully with resin and pressed down firmly to build up thickness gradually and uniformly.
Rather than applying thick coats of resin at once, multiple thin layers ensure better control over curing and reduce the risk of runs or sagging. The layering count depends on the desired strength and thickness, often ranging from three to five layers for typical motorcycle fairings. Between layers, a curing period is necessary—usually around 40 minutes, depending on resin type and ambient conditions—before adding the next layer.
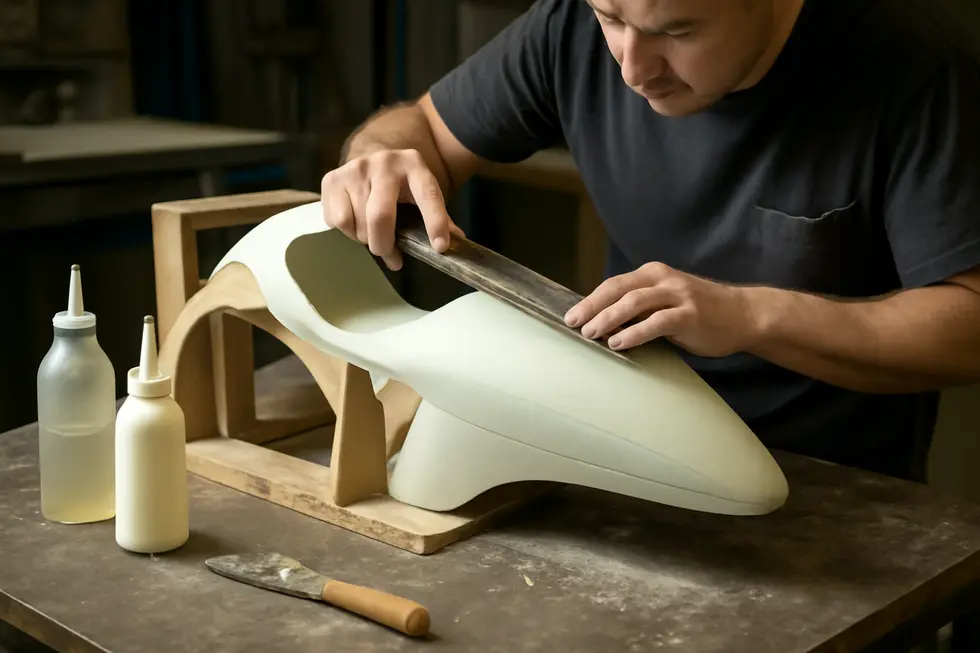
Once the final layer cures thoroughly, the laminated shell can be carefully removed from the mold for trimming and finishing. Any minor surface imperfections, such as pinholes or rough patches, are then smoothed with sandpaper and filled with polyester body filler if needed. This smooth finish provides an ideal base for priming and painting.
Safety cannot be overstated throughout this process. Wearing gloves, eye protection, and a respirator mask is essential when handling resins and sanding cured fiberglass, as fumes and dust can irritate skin and lungs. Working in a well-ventilated space also reduces exposure to harmful chemicals.
This systematic approach to layering and resin application is fundamental for fabricating high-quality motorcycle fairings. Its principles echo throughout professional and DIY projects alike, making it a cornerstone technique for enthusiasts and manufacturers. For additional expert insight and step-by-step guidance in those methods, the Maston Fiberglass Repair Kit instructions offer a comprehensive resource suited to both repairs and new fairing fabrication.
Explore more techniques and tips on custom motorcycle fairings by visiting this guide on the best motorcycle fairings.
2. Achieving Flawless Resin Mixing, Application, and Curing for Strong Fiberglass Fairings
The resin mixing, application, and curing stages are crucial to fabricating high-quality fiberglass motorcycle fairings. To start, resin must be precisely mixed with a hardener or catalyst at recommended ratios—commonly four percent hardener to total resin weight for polyester resin. Thorough mixing without introducing excess air ensures even curing and avoids weak spots that compromise strength.
Before applying resin, the mold must be free of dust, oils, or debris to ensure proper adhesion. A release agent should already be applied during mold preparation to facilitate clean demolding. When layering fiberglass cloth, cut pieces slightly larger than the mold area to allow for trimming later. Begin with a light coat of resin on the mold surface to promote bonding, then carefully lay the fiberglass cloth atop the wet resin.
Using a brush or roller, press the cloth firmly to exclude air bubbles, which can reduce mechanical integrity. Saturate the cloth thoroughly with additional resin, ensuring full impregnation of fibers without oversaturation that causes dripping or uneven curing. Multiple layers can be built up depending on the desired thickness and strength, with attention to feathering edges to create smooth transitions between layers.
After layering, the curing phase stabilizes the shape and solidifies the composite. Initial curing typically takes around 40 minutes at room temperature, permitting gentle handling and early sanding if needed. A full cure generally requires several hours and can be affected by ambient temperature and resin type. It’s important to control environmental conditions during curing to reduce resin shrinkage, which can cause warping or surface defects. Choosing resins formulated for minimal shrinkage and maintaining stable temperature and humidity help preserve the fairing’s shape and surface finish.
This method closely parallels fiberglass repair techniques seen in motorcycle bodywork, where successive wet layers build durable reinforcement. The same principles apply when constructing new fairings from scratch—proper resin ratios, thorough wetting of fiberglass layers, careful bubble removal, and controlled curing yield composites that are both lightweight and resilient.
For deeper guidance on mitigating shrinkage effects during curing, the Composite Workshop’s article on resin shrinkage offers valuable insights. To learn more about components and processes relevant to motorcycle bodywork fabrication, explore resources like Summit Fairings’ informative blog.
Chapter 4: How to Make Fiberglass Motorcycle Fairings: Curing, Removal, and Finishing Techniques
1. Mastering the Art of Fiberglass Curing and Finishing for Durable Motorcycle Fairings
The strength and durability of fiberglass motorcycle fairings depend heavily on the curing process and the finishing techniques that follow. Curing means allowing the resin within the fiberglass layup—typically epoxy or polyester—to fully harden, creating a solid, resilient shell. This phase can take about 24 hours or more, with temperature and humidity playing critical roles. For optimal curing, maintaining a stable, slightly warm environment encourages even hardening and minimizes surface flaws such as bubbles or tackiness.
During the curing stage, securing the fairing components firmly in place is essential. Clamping prevents unwanted shifts or warping, which can weaken the structural bonds between fiberglass layers. This is particularly important when working with complex shapes or bonding multiple sections, as even minor movements can compromise the integrity of the final part.
Prior to laying fiberglass and applying resin, surface preparation is a critical step. Light sanding and thorough cleaning remove surface contaminants that might inhibit resin adhesion. Properly prepared surfaces encourage a more uniform bond, enhancing the overall strength once fully cured.
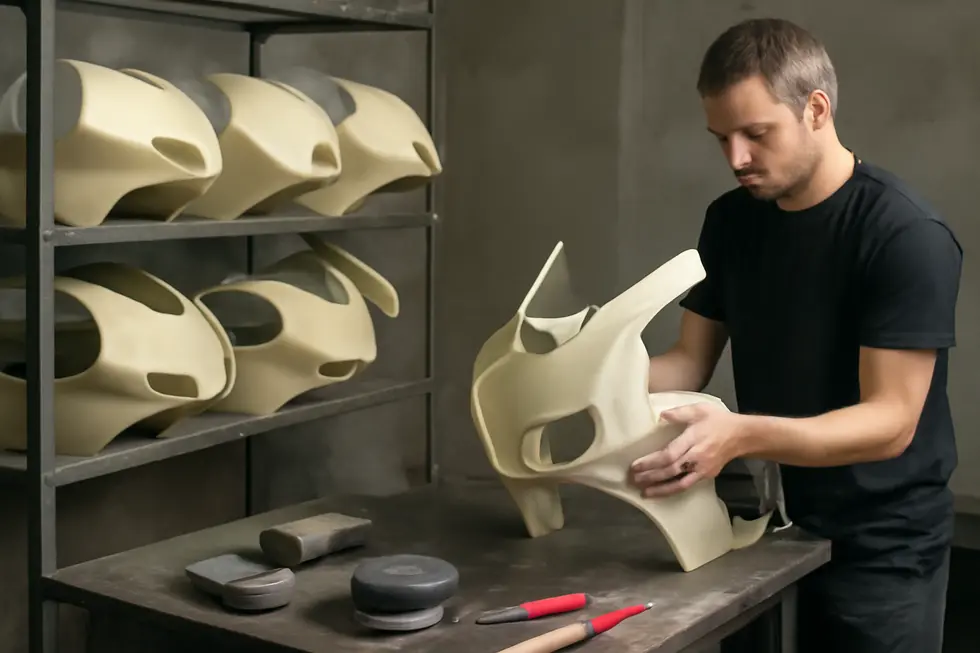
Once curing is complete, careful demolding is crucial. Excessive force or rushed removal can cause cracks or other damage to the newly hardened fairing. Taking time to gently release the shell from the mold preserves the precise shape and smooth contours created during layup.
Finishing the cured fairing involves meticulous sanding to smooth rough edges and eliminate imperfections. This process not only optimizes the aesthetic appeal but also prepares the surface for filler application. Using fairing compounds—often epoxy-based sprayable fillers—helps to level out pinholes and minor surface blemishes, ensuring a flawless base for primer and paint.
These finishing stages reinforce the fairing’s durability by sealing any weak spots and providing a professional-grade look. Combined with attentive curing practices, these methods help produce lightweight, resilient, and visually striking motorcycle fairings tailored to individual designs.
For a deeper dive into crafting quality fairings with expert techniques, consider exploring resources like Discover Affordable Motorcycle Fairings at Summit Fairings, which offers insights into both fabrication and finish.
External reference: https://www.fibreglast.com/product/fiberglass-resin-curing-guide
2. From Mold to Showroom: Expert Curing, Removal, and Surface Finishing for Fiberglass Motorcycle Fairings
How the curing process transforms fiberglass fairings serves as the essential bridge between layup and final finishing. After applying resin to each layer of fiberglass cloth on the mold, allowing sufficient time for full curing is critical to develop strength and rigidity. This hardening can take place at ambient temperature or under controlled heat, depending on the resin system and environmental conditions. Properly cured fiberglass ensures the fairing will maintain its shape under stress, a key factor for durability and fitment on your motorcycle.
Before layup, applying a high-quality mold release agent—such as wax or a specialized spray—is indispensable for freeing the cured fairing without damage. Silicone molds are ideal due to their naturally non-stick surface, but even then, release agents facilitate a smooth separation. When the curing completes, the cured fiberglass shell is carefully pried from the mold with attention to prevent warping or cracking. This delicate removal preserves both the mold’s longevity and the part’s integrity.
After demolding, refinements begin with trimming excess material using rotary tools or coarse sandpaper to establish precise edges matching your design. This step sets a clean canvas for the next phase: sanding. Progressing through increasingly fine grit sandpapers smooths the surface, eliminating irregularities and preparing it for filler application.
Surface defects like pinholes, rough spots, or minor warps are corrected by applying body filler or glazing putty. Once cured, these areas blend seamlessly after sanding, resulting in a flawless finish. The final preparation for painting involves applying a primer coat that seals the surface, enhances paint adhesion, and adds corrosion protection.
Completing the fairing involves painting and optionally clear coating to boost durability and UV resistance. Before installation, inspect thoroughly for delamination, bubbles, or warping—issues often traced back to incomplete curing or improper layup.
Attending to each of these steps with care guarantees a professional-quality fiberglass fairing that combines lightweight strength with a smooth, custom finish. For a deeper understanding of fiberglass techniques and materials, explore additional insights from expert sources like those found in this authoritative guide on fiberglass fabrication.
By focusing on proper curing, gentle removal, and meticulous finishing, you lay the foundation for long-lasting, visually striking motorcycle bodywork.
Chapter 5: How to Make Fiberglass Motorcycle Fairings: Repair, Filling, Priming and Painting for Final Touches
1. Restoring Strength and Surface Perfection: Expert Repair Techniques for Fiberglass Motorcycle Fairings
Restoring fiberglass motorcycle fairings to their original strength and flawless appearance demands meticulous attention to both structural repair and surface refinements. The process begins with a thorough assessment and careful surface preparation. Damaged areas, whether cracks, holes, or weakened spots, must first be cleaned of grease, dirt, or debris that would hinder resin adhesion. Light sanding creates a roughened texture, ensuring better bonding for the repair materials. Any fragile or loose fiberglass fragments are removed to establish a stable foundation.
Structural reinforcement centers on applying layers of fiberglass cloth or mat saturated with resin, typically polyester or epoxy. Patches cut slightly larger than the damage are carefully laid onto the prepared area—ideally on the inner surface of the fairing for improved durability—while saturating both the surface and cloth with resin to eliminate air bubbles and promote cohesion. This layering rebuilds the fairing’s strength and form, crucial for safety and longevity. Complete curing, which varies by resin type and environmental conditions, is essential before proceeding.
Once the structural foundation is sound, attention shifts to achieving a smooth, visually flawless exterior. Imperfections such as pits or unevenness are addressed with a specialized body filler designed for fiberglass applications. After drying, these areas are sanded flush, removing any irregularities that would be evident beneath paint. Applying a compatible primer next creates a uniform surface, improving paint adhesion and contributing to the finish’s durability. Light sanding after priming can further enhance surface smoothness.
Painting follows, executed in multiple thin, even coats to protect the fairing and deliver a professional, eye-catching finish. This final layer not only beautifies the motorcycle but also seals the repaired areas against moisture and wear. When damage is extensive or impacts critical structural sections, seeking professional repair ensures optimal safety and long-term reliability, but these methods empower enthusiasts to restore and revitalize their fiberglass fairings effectively.
For a comprehensive visual guide on these repair techniques, see this detailed demonstration: https://www.youtube.com/watch?v=pwe0hqwAosM
Explore more on customizing and maintaining your motorcycle’s exterior with insights from Explore the Best Motorcycle Fairings at Summit Fairings.
2. Mastering the Art of Surface Refinement: From Filling Imperfections to Pristine Painting on Fiberglass Motorcycle Fairings
Achieving a flawless finish on fiberglass motorcycle fairings demands meticulous attention to surface refinement starting with thorough preparation. Begin by cleaning the fairing’s exterior to eliminate any dirt, grease, or loose particles that could interfere with subsequent steps. A gentle wash with soap and water, or a dedicated degreaser, ensures a pristine base. Once clean, lightly sand the entire surface using fine-grit sandpaper, typically between 320 and 400 grit. This sanding not only smooths rough patches but also creates a subtle texture that encourages fillers and primers to adhere more reliably. It’s essential to inspect the fairing carefully and remove any fragile or delaminated fiberglass sections before proceeding to filling.
Filling is the next crucial phase to restore the fairing’s smooth contours and erase any blemishes such as scratches, minor dents, or uneven areas caused during molding or handling. Polyester body filler is commonly used for its easy application and sanding properties. Using a plastic spreader, apply the filler evenly across damaged spots, feathering the edges to blend into the surrounding surface seamlessly. Allow sufficient curing time as per the product instructions to ensure full hardness. After curing, sand the filled areas progressively with finer grits until perfectly flush with the rest of the fairing, eliminating visible transitions.
Priming follows to seal the surface and promote paint adhesion, significantly impacting the durability and appearance of the final finish. Automotive-grade primers formulated for plastics or fiberglass are ideal choices. Apply several thin, even coats rather than a single heavy layer, letting each coat dry thoroughly. Between coats, wet sanding with ultra-fine grit sandpaper (600–800 grit) enhances smoothness, ensuring an ultra-refined base ready for painting.
For painting, select a high-quality automotive paint compatible with your primer, such as acrylic urethane or a base coat/clear coat system. Apply paint in multiple light coats, allowing adequate drying time between them to avoid runs and uneven textures. Following the color coats, layering clear coat not only intensifies gloss but also delivers vital protection against environmental wear and UV damage.
Once all layers fully cure, a gentle polishing can bring out a showroom shine, highlighting the craftsmanship invested from mold to finish. Finally, reinstall the fairing carefully, checking alignment and fasteners to avoid stress points. This comprehensive finishing process not only revives the structural integrity but also ensures your fiberglass motorcycle fairings exhibit a smooth, durable, and visually stunning appearance. For further insights on obtaining custom fairings and enhancements, consider exploring affordable motorcycle fairings options.
Final thoughts
Comprehending the complete process of making fiberglass motorcycle fairings—from accurate mold creation through meticulous layering, curing, and finishing—empowers businesses to produce superior quality components tailored to customer needs. Attention to detail at each phase ensures not only structural integrity but also an appealing finish that elevates brand reputation and market competitiveness. By integrating these proven steps, business owners can leverage cost-effective production methods to deliver durable, customizable fairings that align with evolving market demands and customer expectations.
Ready to elevate your ride? Summit Fairings delivers premium, custom-fit fairings that blend style and durability. Whether you’re chasing speed or turning heads, we’ve got your bike covered. Don’t wait—transform your machine today. Click, customize, and ride with confidence. Your perfect fairing is just a few clicks away. Act now!
About us
undefined