Introduction
Crafting motorcycle fairings demands expertise in materials, fabrication, and precision installation—key components that businesses must master to stay competitive and profitable. Selecting the right materials sets the foundation, influencing durability and aesthetics. Fabrication techniques ensure quality production, whether through custom molding or ready-to-install kits. Preparation for installation guarantees fitment and safety, while assembly and adjustment fine-tune performance and appearance. Finally, understanding commercial options and finishing touches enables businesses to offer tailored, premium solutions that satisfy riders and elevate brand reputation. Each chapter of this guide builds on these critical steps, delivering actionable insights for business owners committed to offering superior motorcycle fairings.
Tables of Contents
Chapter 1: Selecting the Ideal Materials for Crafting Durable Motorcycle Fairings
- Why ABS Plastic Remains the Premier Choice for Motorcycle Fairings
- Choosing the Right Material: Comparing Fiberglass, Carbon Fiber, and Unique Alternatives for Motorcycle Fairings
- Balancing Performance, Cost, and Manufacturing Techniques in Motorcycle Fairing Materials
Chapter 2: Fabrication Techniques in How to Make Motorcycle Fairings
- Mastering Precision: Molding and Heat-Forming Methods for Custom Motorcycle Fairings
- Mastering Hand Shaping: Traditional Sheet Metal Fabrication for Custom Motorcycle Fairings
- Mastering Finishing and Installation: Essential Fabrication Techniques for Durable Motorcycle Fairings
Chapter 3: Installation Preparation Essentials for Motorcycle Fairings: Establishing Stability and Safety
- Creating a Secure Work Environment: Stabilizing and Safety Measures for Motorcycle Fairing Installation Preparation
- Mastering Component Removal and Handling: Safeguarding Your Motorcycle Fairings Before Installation
- Ensuring Perfect Fit: Inspecting Mounting Points and Installing Brackets for Motorcycle Fairings
Chapter 4: Assembly and Fitting Adjustments for How to Make Motorcycle Fairings
- Mastering Panel Removal and Surface Preparation for Precise Fairing Assembly
- Achieving Flawless Fit: Precision Alignment and Metal Shaping Techniques in Motorcycle Fairing Assembly
- Precision Mounting Bracket Modifications and Seamless Final Assembly for Motorcycle Fairings
Chapter 5: Commercial Options and Polished Finishes: Elevating Motorcycle Fairings to Professional Standards
- Precision Mold Fabrication and Premium Materials: The Backbone of Commercial Motorcycle Fairings
- Mastering Metal Shaping and Professional Smoothing for High-Quality Motorcycle Fairings
- Mastering Multi-Stage Painting, Custom Graphics, and Long-Term Protection for Commercial Motorcycle Fairings
Chapter 1: Selecting the Ideal Materials for Crafting Durable Motorcycle Fairings

1. Why ABS Plastic Remains the Premier Choice for Motorcycle Fairings
ABS plastic has established itself as the leading material for motorcycle fairings because it skillfully balances durability, impact resistance, and ease of fabrication. Its inherent mechanical strength and dimensional stability ensure that fairings withstand the rigors of road vibrations, moderate impacts, and heat exposure common to motorcycle riding. Unlike many plastics, ABS maintains its rigidity without becoming brittle, delivering protection and longevity while allowing manufacturers to mold intricate shapes with relative simplicity.
The material’s heat resistance, though not the highest among plastics, is sufficient for typical motorcycle environments, especially when enhanced with heat-resistant variants. This capacity enables ABS fairings to endure engine heat and sun exposure without warping or degrading prematurely. Moreover, ABS is highly receptive to finishing processes, including sanding and spraying with polyurethane paints. This ease of surface treatment facilitates professional, UV-resistant finishes that retain color and gloss over time, markedly contributing to a fairing’s visual appeal and endurance.
From a cost perspective, ABS offers an excellent value, especially when compared to alternatives like polycarbonate, which may provide improved impact and thermal resistance but at a substantially increased price point and fabrication complexity. Cheaper options such as polypropylene fail to deliver the structural integrity and heat resistance essential for fairings. Additionally, ABS’s compatibility with additives such as glass fiber enables customization for enhanced strength or surface smoothness, providing versatility for both OEM and aftermarket builds.
When installing ABS fairings, it is important to use proper paint systems, ideally polyurethane-based, to maximize durability and appearance. The widespread adoption of ABS is exemplified by its prevalent use in injection-molded fairing kits for popular sportbikes, offering lightweight construction without sacrificing robustness.
For more insights on achieving professional finishes and material handling, the resource best paint for ABS plastic offers useful guidance. To explore a wide range of motorcycle fairing options and installation tips, visit this detailed source on affordable motorcycle fairings.
In summary, ABS plastic continues to dominate motorcycle fairing fabrication due to its optimal combination of physical performance, manufacturability, finish quality, and cost-effectiveness—making it the proven choice for riders and builders seeking reliable, stylish bodywork.
2. Choosing the Right Material: Comparing Fiberglass, Carbon Fiber, and Unique Alternatives for Motorcycle Fairings
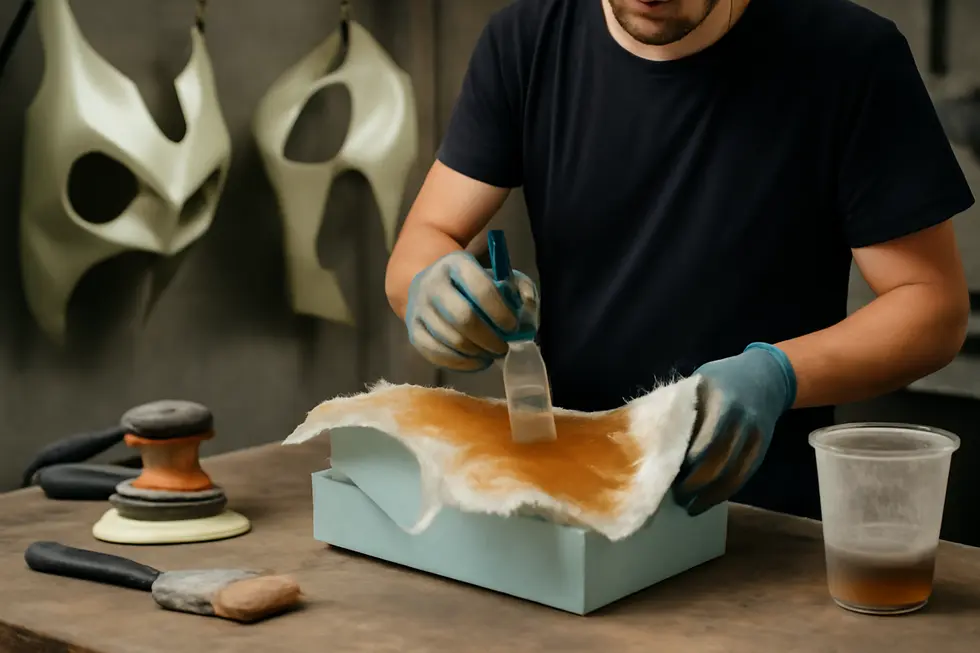
Fiberglass, carbon fiber, and less conventional materials like wood each offer distinct advantages and challenges when crafting motorcycle fairings. Fiberglass stands out for DIY builders due to its affordability, flexibility in molding complex shapes, and respectable impact resistance. It requires layering fiberglass cloth with resin, then curing and sanding to achieve a durable shell. Though heavier than carbon fiber, fiberglass strikes a practical balance between cost and strength, making it a top pick for hobbyists and custom fabricators.
Carbon fiber represents the pinnacle of strength-to-weight performance. Its ultra-light yet rigid panels significantly reduce bike weight, enhancing aerodynamics and control. However, the expense of raw fiber materials and the meticulous layup and curing process raise costs substantially. This material is ideal for high-end racing or bespoke builds where every ounce matters.
Commercial and OEM fairings frequently employ ABS plastic for its impact resilience, heat tolerance, and precision molding that ensures perfect factory fitment. Though less stiff than carbon fiber, ABS offers excellent durability and vibration damping at a moderate price point.
Exploring wood as a fairing material ventures into artistic customization rather than practical use. Wood requires thorough sealing against moisture and is heavier and more vulnerable to damage from vibration or impacts. Nonetheless, its unique aesthetic could appeal to enthusiasts seeking standout designs.
Choosing the appropriate material depends on the project’s goals: fiberglass grants hands-on versatility and cost-efficiency; ABS plastic delivers durable, ready-fit commercial solutions; carbon fiber serves premium performance needs; and wood remains an unconventional option suited for special artistic effects. For riders balancing functionality, fabrication ease, and budget, fiberglass or ABS plastic typically offer the best compromise.
For further insights on quality fairing options and material considerations, explore affordable motorcycle fairings to guide your selection process.
3. Balancing Performance, Cost, and Manufacturing Techniques in Motorcycle Fairing Materials
Selecting the ideal material for motorcycle fairings requires balancing durability, cost, and ease of fabrication, all crucial for achieving both functionality and aesthetic appeal. Among the most commonly used materials are ABS plastic, fiberglass, and carbon fiber, each presenting distinct advantages and trade-offs that influence the manufacturing process and final product quality.
ABS plastic stands out as the most practical option for many builders due to its affordability and resilience. Manufactured through injection molding, ABS allows for precise, repeatable shapes with inherent flexibility that resists cracking. This material’s impact resistance and ease of repair make it suitable for both original equipment and aftermarket fairings, especially when volume production is anticipated.
Fiberglass offers a middle ground by combining moderate weight savings with reasonable cost. It is typically hand-laid over molds, allowing custom or low-volume fabrication. While not as impact-resistant as ABS, fiberglass is easier to sculpt for unique designs. Repairs can be managed with resin kits, though the labor-intensive manufacturing and susceptibility to cracking limit its practicality for mass production.
At the high-performance end, carbon fiber delivers unmatched strength-to-weight ratios and striking aesthetics. However, its premium price, production complexity—often involving autoclave curing—and brittleness make it best suited for racing applications or enthusiasts prioritizing weight savings and exclusivity. Repairs on carbon fiber fairings are costly and technically demanding.
When selecting molds, tool steel offers durability and dimensional stability for long production runs, while carbon steel suits smaller batches at lower cost despite faster wear. Ultimately, choosing the right combination of material and mold type directly impacts the fairing’s lifespan, fit, and finish.
Balancing upfront investment against long-term benefits guides smart decisions—ABS facilitates affordable, robust builds; fiberglass caters to custom projects; and carbon fiber fulfills premium performance needs. For more insight into durable and affordable options, explore this detailed resource on quality ABS motorcycle fairings.
An external resource on mold material comparisons is available here: Beska Mold Steel Comparison.
Chapter 2: Fabrication Techniques in How to Make Motorcycle Fairings
1. Mastering Precision: Molding and Heat-Forming Methods for Custom Motorcycle Fairings
Molding and heat-forming stand as fundamental fabrication techniques for producing motorcycle fairings with both precision and adaptability.
Molding involves heating thermoplastics or resin materials and pressing them into a carefully crafted mold cavity. This process ensures the material cools and solidifies into complex, consistent shapes ideal for repeatable production runs. Custom molds, often made from foam or metal, define every contour, allowing manufacturers to create detailed fairing panels that perfectly match motorcycle designs. Compression tools or plungers assist in firmly shaping the heated material within the mold, guaranteeing sharp lines and refined geometry.
Conversely, heat-forming offers flexibility by softening plastic sheets through heat guns or ovens until pliable. These sheets are then shaped directly over forms or the motorcycle frame itself. Once cooled, the material retains the formed shape and can be trimmed or sanded for a seamless fit. This technique suits simpler or uniquely contoured parts such as seat pans or side panels, accommodating one-off customizations or low-volume production. Tools like sandbags, hammers, and trimming implements aid in shaping and finishing the surface during heat-forming.
Both methods demand meticulous preparation. Removing existing fairings and cleaning mounting points helps ensure new components integrate securely with the motorcycle’s frame. Rubber grommets often protect mounting holes from stress, while fitting adjustments require temporarily loosening fasteners to align parts correctly before final tightening. Avoiding overtightening, especially on plastic sections, preserves durability.
Together, molding and heat-forming balance efficiency and customization in fairing fabrication: molding excels for uniform, intricate shapes, while heat-forming allows tailored adaptation. For those seeking in-depth practical tips and tool requirements, external guides such as detailed metal shaping instructions for motorcycle cowls provide valuable insight into working with thermoplastic materials.
For additional resources on motorcycle fairings craftsmanship and styles, explore the comprehensive collection at Summit Fairings blog.
2. Mastering Hand Shaping: Traditional Sheet Metal Fabrication for Custom Motorcycle Fairings
Hand shaping sheet metal remains a cornerstone technique in custom motorcycle fairing fabrication, enabling craftsmen to create smooth, precise curves and tailored forms without heavy machinery. Starting with a flat metal sheet, fabricators use an array of specialized hand tools to manipulate its surface area through controlled shrinking and stretching. These fundamental actions adjust the metal’s dimensions, allowing it to conform seamlessly to the complex contours required for a perfect fairing fit.
The process begins by marking the metal, guiding where shrinking removes excess material and stretching expands areas to achieve the desired shape. Using a nylon hammer, gentle taps against a sandbag or dolly gradually coax the metal into smooth curves without causing surface damage. The sandbag acts as a flexible anvil, giving the metal room to yield naturally, while the dolly provides firm resistance to work out high spots.
Critical to shaping are the shrinker and stretcher tools, which narrow or widen the metal’s surface early in the process, allowing precise control over panel curvatures. After initial shaping, an English wheel refines the form by smoothing hammer marks and minor imperfections, producing consistent, flowing curves essential for aerodynamic aesthetics and fitment.
Advanced hand techniques like blocking—forming metal over wooden or metal bucks—and using shot bags or mallets help perfect the contours of custom fairings. Mastery of these methods results in fairings that fit flawlessly and exhibit a professional finish akin to factory-manufactured parts.
For those seeking an in-depth visual guide to these crafts, expert instructional materials reveal the step-by-step approach to blocking, shrinking, stretching, and smoothing aluminum sheet metal, especially geared toward motorcycle applications. Embracing these traditional metal shaping skills significantly expands the creative possibilities in motorcycle fairing fabrication.
For further insights into custom shaping, readers may explore detailed resources available at Explore Summit Fairings, your go-to destination for motorcycle fairings.
External source for advanced metal shaping techniques: Metal shaping techniques using nylon hammers, dollies, sandbags, shrinker/stretcher, and English wheel for motorcycle fairings fabrication.
3. Mastering Finishing and Installation: Essential Fabrication Techniques for Durable Motorcycle Fairings
Crafting motorcycle fairings extends beyond shaping materials to mastering the finishing and installation processes, which are vital for durability and aesthetic appeal. The fabrication journey often begins with shaping components from materials like 20 gauge cold-rolled mild steel or heat-formed thermoplastics tailored directly on the motorcycle frame. Tools such as nylon hammers, shrinker-stretchers, and English wheels assist in achieving smooth, precise contours, ensuring the fairings conform perfectly to the bike’s design.
Surface preparation is a meticulous step where the fabricated panels are first cleaned to remove oils and dust. Sanding smooths any imperfections, creating an ideal base for primer application. This primer layer enhances paint adhesion and seals the surface. Advanced painting techniques, including multi-step spray painting or powder coating, provide depth and resilience to the finish. The addition of clear coats boosts gloss and protects against environmental wear. For riders seeking personalized flair, custom graphics or pinstriping may be layered atop the finished surface.
Installation demands equally careful attention to detail. Fabricating secure mounting brackets often involves cutting tabs or welding small fixtures onto the motorcycle frame or subframe. Rivnuts, threaded inserts set into drilled bolt holes, create steadfast attachment points without compromising structural integrity. When bolting panels into place, alignment is crucial; initial loose fastenings allow adjustment to accommodate handlebars, wiring, and other components before full tightening. Using rubber grommets in bolt holes prevents cracking by cushioning stress on plastic fairings.
This integrated approach to finishing and installation combines precision metalworking and painting expertise, ensuring fairings not only enhance aerodynamics but also withstand the rigors of riding. Implementing these detailed fabrication steps results in a seamlessly fitted, visually striking protective shell for your motorcycle.
For deeper insights into metal shaping tools and techniques used in fairing fabrication, refer to this metal shaping guide: https://www.returnofthecaferacers.com/honda-cb750/cafe-racer-cowl-metal-shaping-guide/
Explore more about affordable and quality fairing options and installation tips at Summit Fairings’ blog.
Chapter 3: Installation Preparation Essentials for Motorcycle Fairings: Establishing Stability and Safety
1. Creating a Secure Work Environment: Stabilizing and Safety Measures for Motorcycle Fairing Installation Preparation
Creating a Secure Work Environment: Stabilizing and Safety Measures for Motorcycle Fairing Installation Preparation
Successfully preparing for motorcycle fairing installation demands a focus on stability and safety to protect both the bike and the installer. Central to this process is securely mounting the motorcycle on a stable stand or lift. This immobilizes the bike, preventing accidental tipping or shifting that could damage delicate fairing components or cause injury during alignment and attachment.
Careful handling starts with the removal of existing fairings and hardware, placing them on soft surfaces to avoid scratches. Inspect the bike’s frame mounting points meticulously; if drilling is necessary, use a magnet wrapped in cloth underneath to catch metal shavings. This simple precaution safeguards the bike’s finish and prevents debris buildup.
To protect the fairings from stress and cracking, installing rubber grommets or washers in bolt holes is essential. These act as vibration buffers and reduce pressure concentration when fastening. During initial fitting, brackets should be loosened to allow slight adjustments without forcing parts, thereby minimizing strain on mounting areas.
Safety extends beyond mechanical concerns. Avoid welding or grinding activities near stored motorcycles, as sparks risk igniting flammable materials or tires. Familiarity with fire safety, including the use of extinguishers and emergency evacuation procedures, is critical in any workshop environment.
When assembling, use appropriate tools such as screwdrivers, hex keys, and wrenches, tightening bolts securely only after ensuring perfect alignment. Double-check that installed fairings do not interfere with steering, suspension, or controls to maintain full bike functionality and rider safety.
By focusing on these stabilizing and safety practices, you create a secure workspace that protects your investment and ensures the durability of your fairing installation. For additional tips and insights on fairing choices and installation, explore this comprehensive guide on motorcycle fairings.
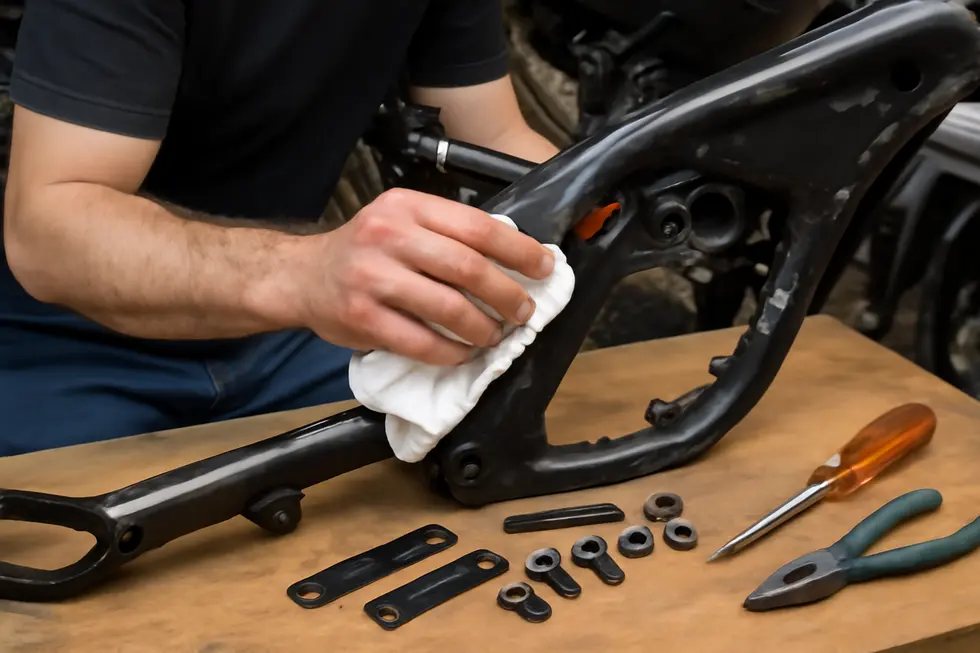
2. Mastering Component Removal and Handling: Safeguarding Your Motorcycle Fairings Before Installation
Efficient installation preparation begins with meticulous removal and handling of motorcycle fairing components to preserve their integrity and ensure flawless fitting. The process demands a systematic approach to disassembling panels by following the exact sequence of screws and clips unique to your bike model. Carefully loosening fasteners such as M5 x 14.5 mm or M5 x 17.5 mm screws in their prescribed order reduces the risk of cracks or broken clips, while gentle panel removal prevents scratches or paint damage.
Using the correct tools is paramount to safeguarding fasteners and painted surfaces. Employing Phillips or flat-head screwdrivers, Allen wrenches, and especially plastic prying tools mitigates wear on screw heads and protects delicate fairing edges. Attention to electrical connectors is crucial: connectors should be unplugged by their housings rather than pulling on the wires, preventing harness damage. Labeling each wire aids accurate reassembly and preserves electrical integrity.
Once parts are removed, handle them on padded surfaces like carpeted benches to avoid dents or scratches. Inspect mounting points and hardware thoroughly for wear or dirt build-up; cleaning these ensures proper alignment and secure fastening during installation. Keeping track of all screws, clips, and brackets avoids missing components later.
During reassembly, avoid overtightening bolts to prevent cracking plastic panels or stripping threads. Tighten fasteners sufficiently to hold parts while allowing minor alignment adjustments. Where necessary, apply fairing brackets or gentle warming (e.g., heat guns) to fit panels snugly without stress.
Documenting each removal step with photos facilitates smooth restoration and helps avoid errors like misaligned panels or incorrect wiring.
Following these thoughtful removal and handling practices preserves your motorcycle’s cosmetic and structural parts, setting a solid foundation for successful fairing installation.
For detailed step-by-step removal guides of models like the BMW S1000XR, see https://www.webbikeworld.com/bmw-s1000xr-fairing-panel-removal/.
Explore more about motorcycle fairing options and installation tips at Discover affordable motorcycle fairings at Summit Fairings.
3. Ensuring Perfect Fit: Inspecting Mounting Points and Installing Brackets for Motorcycle Fairings
A flawless installation of motorcycle fairings begins with meticulous inspection and preparation of the mounting points on your bike’s frame. Before attaching any panels, carefully remove existing fairings and hardware, placing them on soft surfaces to prevent scratches and damage. Examine each mounting location thoroughly for signs of corrosion, damage, or misalignment that could compromise fitment or durability. Some fairing kits align directly with factory bolt holes, while others require drilling new holes; if the latter, take precautions by positioning a magnet wrapped in cloth beneath the drilling area to catch metal shavings and protect your motorcycle’s finish.
Once mounting points are verified or modified, the next step is to securely install the mounting brackets. These brackets typically fasten to the bike’s frame or neck and serve as the crucial support system ensuring proper alignment and stability of the fairings. Use the mounting hardware specified for your fairing kit — bolts, washers, clips — to prevent vibration loosening and preserve structural integrity. It is essential to bolt these brackets firmly but avoid overtightening, especially when working with plastic components, to prevent cracking.
After bracket installation, routinely check all fasteners for tightness during the initial rides and periodically thereafter. Utilize rubber grommets in bolt holes to cushion and protect the fairing material from stress and damage caused by vibration and pressure. Temporarily tightening bolts before the final securing allows minor adjustments for perfect alignment around handlebars and wiring.
This thorough inspection and bracket setup provide a strong foundation for a smooth, secure, and visually appealing fairing installation that enhances both the look and aerodynamics of your motorcycle. Proper preparation minimizes future issues and contributes to lasting performance and safety.
For further insights on high-quality kits and mounting techniques, explore resources like this comprehensive guide to affordable motorcycle fairings.
1[3][6][7]
Chapter 4: Assembly and Fitting Adjustments for How to Make Motorcycle Fairings
1. Mastering Panel Removal and Surface Preparation for Precise Fairing Assembly
Successful assembly and fitting adjustments of motorcycle fairings begin with careful panel removal and meticulous preparation. This foundational phase demands a methodical approach to avoid damage and ensure the new or modified fairings align perfectly with the bike’s frame. Using the correct tools—such as Phillips and flat-head screwdrivers, Allen wrenches, and gentle pry implements—is essential to carefully detach panels without cracking paint or breaking clips. For example, models like the BMW S1000XR require removing seats initially to access hidden fasteners and then systematically unscrewing bolts before gently pulling panels free from push-pull inserts.
Photographing each step aids in seamless reassembly, particularly when handling electrical connectors integrated with headlights or instrumentation. After removal, thorough inspection of mounting points for wear or deformation is vital. Cleaning surfaces carefully creates a flawless base for any fitting adjustments. When building custom fairings, shaping edges with hand tools such as planishing hammers or bead rollers helps refine panel contours for an exact fit.
For fabrication of metal or plastic components, starting with cardboard templates tests shapes before committing to materials like 20-gauge mild steel or thermoformed plastics. This step prevents costly errors and ensures that once molded or shaped, the fairing conforms precisely. Incorporating rubber grommets in mounting holes during reassembly protects plastic panels from cracking under bolt pressure. Temporarily tightening fasteners allows fine alignment adjustments around handlebars and wiring before final securing.
This careful sequence of removal, inspection, cleaning, and shaping maximizes fit and durability, laying the groundwork for flawless fairing assembly. For practical demonstration of these techniques tailored to popular models such as the BMW S1000XR, consult detailed guides and community tutorials.
Learn more about installation techniques in this comprehensive motorcycle fairings blog.
2. Achieving Flawless Fit: Precision Alignment and Metal Shaping Techniques in Motorcycle Fairing Assembly
Precision is paramount when assembling and fitting motorcycle fairings, as tight tolerances ensure both aesthetic appeal and functional durability. Achieving flawless alignment starts with meticulous measurement and referencing, often marked directly on fairing panels using punches or fine markers. This step guides subsequent metal shaping, particularly crucial for custom or metal fairings like café racer cowls, where smooth curves and contours define the build’s character.
Specialized shaping tools enable precise adjustments: shrinkers and stretchers modify metal surfaces by compressing or expanding targeted areas, facilitating the creation of seamless curves. Larger or thicker panels benefit from power hammers, which offer controlled, consistent force to speed up shaping without sacrificing accuracy. The English wheel is an essential finishing tool for delicate, thin-sheet metal fairings, smoothing out irregularities and producing elegant, even curves.
Assembly requires repeated fitting cycles, aligning mounting points and adjusting contours so panels nest perfectly with the frame and adjacent components. Using complete bolt kits designed for fairings secures attachments firmly while preventing stress cracks or material distortion. Rubber grommets or washers protect plastic parts during fastening, and bolts should be temporarily fingertightened during alignment checks to allow fine adjustments before final torquing.
Tools originally designed for components like wheel alignment demonstrate the value of purpose-built instruments in ensuring consistent spatial relationships across parts. Their adaptation inspires equal precision in fairing installation, where uneven gaps or misaligned brackets can hinder airflow and reduce the fairing’s protective function.
For a thorough guide on assembling and fitting your fairings with expert tips, visit Explore the Best Motorcycle Fairings at Summit Fairings.
By integrating precise alignment tools, expert metal shaping techniques, and thoughtful fastening hardware, builders can guarantee that every fairing fits tightly, looks refined, and withstands the rigors of the road.
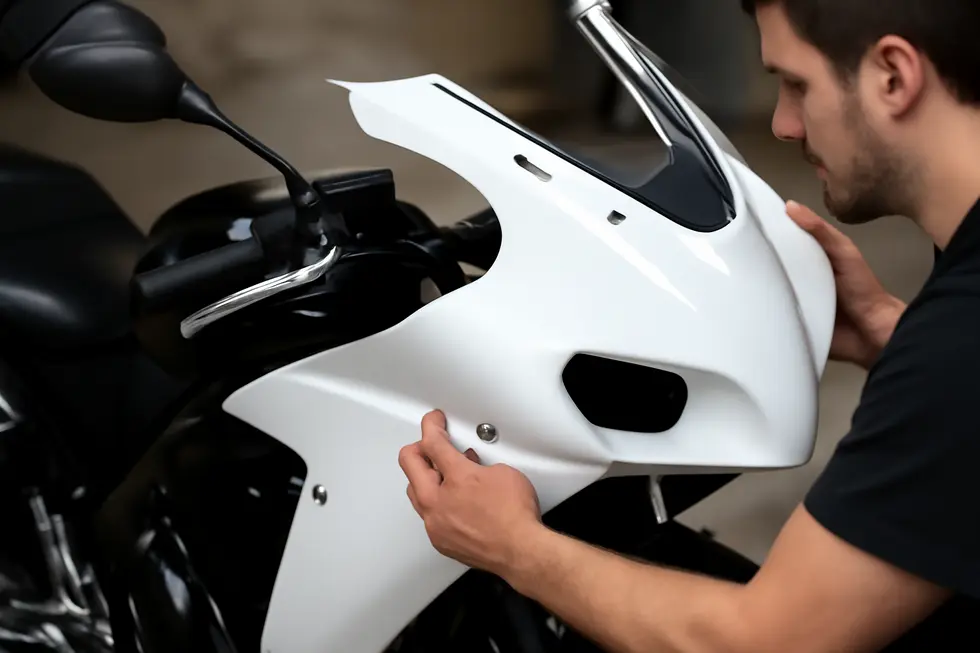
3. Precision Mounting Bracket Modifications and Seamless Final Assembly for Motorcycle Fairings
Achieving a secure, perfectly aligned fit for motorcycle fairings demands careful mounting bracket modification and meticulous final assembly. The process begins by loosely installing mounting brackets onto the motorcycle frame, allowing flexibility to adjust positioning before final tightening. This step often requires temporarily relocating or modifying surrounding components like wiring or electrical parts to create adequate clearance. While some fairings come with pre-designed brackets that align with factory holes, slight grinding or drilling may be necessary to ensure perfect fitment.
Once brackets are in place, the fairing panels are held against them to check alignment visually and by feel. Bolts are initially hand-tightened to maintain the ability to adjust clearance around critical points such as handlebars, cables, and control levers, preventing interference during riding. Protection measures are vital at this stage. Rubber grommets or washers are inserted into bolt holes to cushion the fiberglass or plastic material, preventing cracks caused by pressure or overtightening. Additional reinforcements like backing plates or rivets can be used if needed for strength.
After confirming smooth operation of steering, suspension, and controls without obstruction, all fasteners are securely tightened—but never excessively—to avoid damaging the fairing materials. The final step involves attaching ancillary components including headlights, turn signals, mirrors, and windshields. Ensuring these additions fit correctly within the assembled fairing is crucial for both aesthetics and function.
This gradual, patient approach ensures the fairings are durable, visually flawless, and operate safely. For further insight into fitting and assembly techniques and detailed installation tips, consult expert guides.
Chapter 5: Commercial Options and Polished Finishes: Elevating Motorcycle Fairings to Professional Standards
1. Precision Mold Fabrication and Premium Materials: The Backbone of Commercial Motorcycle Fairings
Commercially produced motorcycle fairings rely heavily on precision mold fabrication and premium materials to achieve durability and flawless aesthetics. The industry standard material is high-quality ABS plastic, favored for its remarkable impact resistance and longevity. Its compatibility with injection molding allows manufacturers to produce consistent, OEM-grade parts that fit perfectly and withstand daily wear and tear.
At the heart of this commercial process lies injection molding using meticulously crafted molds made from iron or alloy materials. These molds endure extensive production cycles without degradation, ensuring each fairing maintains exact dimensions and sharp detailing. This repeatability is crucial, especially for complex aerodynamic designs where every curve impacts performance.
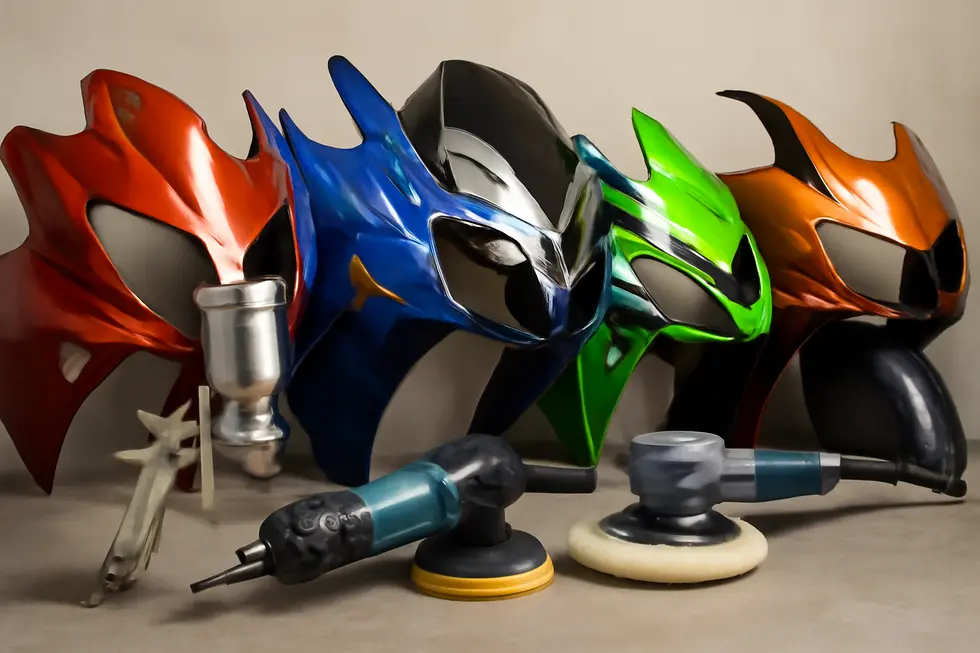
Beyond mold fabrication, final finishing techniques play a vital role in defining a fairing’s quality and appeal. Commercial fairings undergo a multi-stage painting process involving primer layers, UV-resistant paints, and clear coats that protect against environmental damage such as fading from sun exposure or abrasion from road debris. Additionally, integrated heat shielding safeguards the finish from engine heat, preventing discoloration and material fatigue.
Customization options have become a defining feature of commercial fairings. Buyers can select custom graphics, colors, and logos applied with professional-grade techniques that ensure longevity and crisp visuals. This personalization elevates both style and identity without sacrificing the rugged standards expected on the road.
The combination of robust ABS plastic, precision injection molds, and multi-step finishing culminates in motorcycle fairings with a showroom-quality look and professional-grade durability. These advances offer riders a reliable, stylish upgrade that enhances both function and form. For further insights on commercial ABS fairings and finishing techniques, visit the explore Summit Fairings blog and consult technical resources like Alibaba’s listings on motorcycle helmet molds to understand mold materials and injection molding specifics.
2. Mastering Metal Shaping and Professional Smoothing for High-Quality Motorcycle Fairings
Crafting motorcycle fairings with a commercial touch involves advanced metal shaping and professional finishing techniques that elevate both form and function. The process begins with shaping sheet metal, where specialized tools like shrinkers, stretchers, and power hammers rough out the primary contours. Hand tools such as nylon hammers and dollies provide precision where subtle curves and details demand careful attention, while sandbags offer backing support during shaping. To perfect the surface, the English wheel plays a critical role; it smooths out minute imperfections and molds sleek, continuous curves essential for an aerodynamic profile.
Fastening these expertly shaped panels requires hardware that combines strength with sleekness. Stainless steel quick release fasteners, generally grade 316, ensure a flush finish that maintains clean lines and durability under racing conditions. These allow rapid removal and installation without risking damage, a key advantage for maintenance and customization.
The final finishing phase enhances durability and visual appeal. Precision polishing restores vibrancy and removes flaws like oxidation and stains. Protective coatings or motorcycle-specific wraps often follow, defending against UV exposure, road debris, and heat while preserving the fairing’s pristine appearance. For metals, commercial plating options like nickel plating add corrosion resistance and a distinctive lustrous finish, which is especially beneficial for aluminum or steel parts.
This combination of metal shaping expertise, reliable fastening solutions, and expert finishing creates fairings that are not just functional shields but also statement pieces on a motorcycle. Those seeking inspirational examples and quality parts can explore a range of professional-grade motorcycle fairings. This approach ensures your fairings achieve commercial-grade sophistication and durability.
For further professional insights on metalforming tools like the English wheel, consult industry guides such as the English Wheel Information.
3. Mastering Multi-Stage Painting, Custom Graphics, and Long-Term Protection for Commercial Motorcycle Fairings
Commercial motorcycle fairings commonly use OEM-grade ABS plastic known for impact resistance and precise fit. These kits benefit from advanced manufacturing processes including injection molding, which ensures accurate alignment and seamless integration with your bike’s frame. A key element of their appeal is the multi-stage professional painting applied during production, typically involving up to seven steps. This layered approach begins with thorough surface preparation—cleaning and sanding—to create an ideal base. A primer coat follows to enhance paint adhesion and durability. Subsequently, several layers of base color are applied, each carefully cured, culminating in multiple clear coats that add gloss and protect the finish from UV damage and weathering. Between some layers, polishing or wet sanding is performed to achieve a flawless surface, making the fairings both striking and resilient.
Beyond initial painting, customization often involves adding vinyl decals or custom graphics. These are layered onto the painted surface and sealed with a protective clear coat, allowing riders to personalize their bikes while maintaining finish longevity. For upkeep, touch-up paints are available to repair minor chips and scratches, and professional repainting services can restore fairings after more extensive damage.
An increasing trend in finishing is the application of ceramic coatings. This protective layer enhances gloss, provides hydrophobic properties, and offers superior UV resistance lasting several years. Proper ceramic coating application requires meticulous surface preparation, sometimes including paint correction and clay bar treatment to remove contaminants.
These combined manufacturing and finishing processes create commercial fairings that are visually impressive, durable, and functional. They offer an excellent alternative to hand-fabricated options while supporting customization and long-term protection.
For more insights on selecting and caring for quality aftermarket options, explore this detailed resource on affordable motorcycle fairings.
Final thoughts
Mastering the process of making motorcycle fairings—from material selection through fabrication, installation preparation, assembly, and finishing—empowers business owners to deliver superior products that combine functionality and style. Choosing the right materials such as fiberglass or ABS plastic directly impacts the durability and appeal of fairings. Skilled fabrication techniques ensure each fairing meets performance standards, while careful installation preparation and fitting adjustments secure safety and perfect alignment. Embracing commercial options with professional finishing allows businesses to offer cost-effective, customizable solutions that satisfy diverse customer needs. By integrating these comprehensive steps, companies can enhance product quality, reduce returns, and build lasting customer trust, ensuring their competitive edge in the motorcycle accessories market.
Ready to elevate your ride? Summit Fairings delivers premium, custom-fit fairings that blend style and durability. Whether you’re chasing speed or turning heads, we’ve got your bike covered. Don’t wait—transform your machine today. Click, customize, and ride with confidence. Your perfect fairing is just a few clicks away. Act now!
About us
undefined