Introduction
Success in the motorcycle customization and repair industry increasingly depends on delivering flawless finishes that enhance both aesthetics and durability. Painting a motorcycle fairing is a specialized task requiring technical knowledge and precision to meet customer expectations. This guide explores critical steps—starting from surface preparation to finishing touches—that ensure professional results and business growth. First, it uncovers essential preparation techniques that maximize paint adhesion. Then, it examines primer application methods tailored for plastic and composite materials. Subsequently, it discusses paint selection and the art of applying multiple thin coats for a lasting finish. The guide continues with clear coating strategies to protect and polish your paintwork. Finally, it offers practical tips for touch-ups and maintenance to keep fairings looking impeccable. Together, these chapters provide a comprehensive framework for business owners seeking to elevate their motorcycle fairing painting services.
Tables of Contents
Chapter 1: How to Paint a Motorcycle Fairing: Preparation and Surface Treatment
- Mastering Surface Cleaning and Sanding: The Essential Foundation for Motorcycle Fairing Painting
- Mastering Primer and Paint Techniques for a Flawless Motorcycle Fairing Finish
Chapter 2: Mastering Primer Application for Motorcycle Fairings: Essential Preparation Techniques
- Achieving Flawless Primer Adhesion: Surface Preparation Essentials for Motorcycle Fairings
- Expert Techniques for Applying and Refining Primer Layers on Motorcycle Fairings
Chapter 3: How to Paint a Motorcycle Fairing: Paint Selection and Application
- Selecting Durable Motorcycle Paints: Balancing Longevity and Visual Impact
- Expert Techniques for Preparation, Base Coats, and Clear Coating to Achieve a Durable Motorcycle Fairing Finish
Chapter 4: How to Paint a Motorcycle Fairing: Clear Coating and Finishing Processes
- Mastering Surface Preparation and Painting Techniques for a Durable Motorcycle Fairing Finish
- Mastering Clear Coat Application and Finishing for Durable, Glossy Motorcycle Fairings
Chapter 5: How to Paint a Motorcycle Fairing: Tips for Touch-ups and Maintenance
- Essential Surface Preparation and Painting Techniques for Long-Lasting Motorcycle Fairing Finishes
- Selecting Durable Paints and Essential Care Practices for Long-Lasting Motorcycle Fairing Finishes
Chapter 1: How to Paint a Motorcycle Fairing: Preparation and Surface Treatment
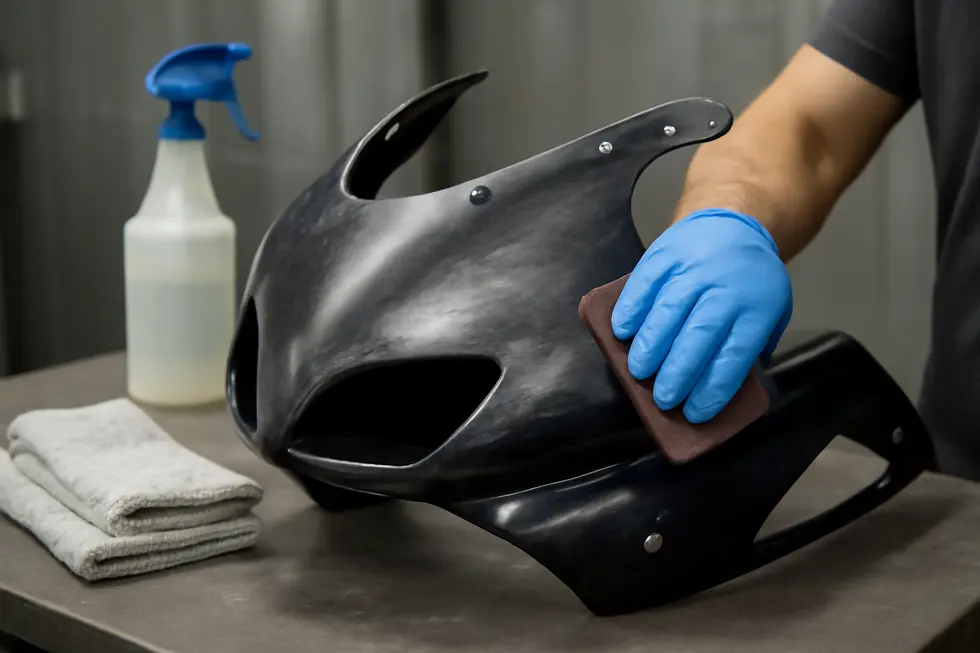
1. Mastering Surface Cleaning and Sanding: The Essential Foundation for Motorcycle Fairing Painting
Achieving a flawless and long-lasting paint finish on a motorcycle fairing hinges on meticulous surface cleaning and sanding during preparation. This foundational step eliminates contaminants and creates an ideal texture for paint adherence, setting the stage for every subsequent phase.
Initially, the fairing must be stripped of any dirt, grease, wax, or residual oils, all of which can seriously impair bonding between the paint and the surface. Using a solvent like isopropyl alcohol or a dedicated degreaser ensures that even the smallest particles and invisible residues are removed. This thorough cleaning is vital; any lingering grime risks causing uneven coverage, paint peeling, or bubbling down the line.
Once clean, sanding transforms the surface by producing a subtle, fine texture that helps primer and paint latch securely. For plastic or previously painted motorcycle fairings, sanding with fine-grit sandpaper—typically between 600 and 800 grit—provides this necessary abrasion without compromising the structural integrity of the fairing. However, when the fairing bears old, chipping paint, the process begins with coarser grit (around 320) to strip away the damaged layers, followed by progressively finer sanding to smooth the area. The sanding should be uniform, covering all surfaces to avoid patchiness. Care must be taken to avoid deep scratches; if these occur, fillers and additional primer layers are recommended to ensure a smooth final finish.
After sanding, completely removing dust is crucial. Fine dust particles can embed within the paint, causing imperfections such as rough textures or an inconsistent gloss. Vacuuming or wiping down surfaces with a tack cloth eliminates these contaminants effectively.
Preparing the surface culminates with the application of primer. Multiple thin coats, each dried fully and lightly sanded in between, create a perfectly even base that enhances paint durability and aesthetics.
This combination of careful cleaning, precise sanding, and thorough dust removal forms the backbone of professional-grade motorcycle fairing painting. For practical demonstrations of these preparation techniques, visual resources such as this expert tutorial provide invaluable guidance.
For insights into selecting the right fairings to refurbish and paint, explore our comprehensive coverage at Summit Fairings’ blog, where top-quality options meet detailed advice.
2. Mastering Primer and Paint Techniques for a Flawless Motorcycle Fairing Finish
Achieving a professional finish on a motorcycle fairing hinges on precise priming and paint application steps, which directly follow thorough cleaning and sanding. After smoothing the surface through progressive grit sandings that culminate between 180 and 320 grit, it’s crucial to eliminate every trace of dust, oil, or grease. This meticulous preparation ensures the primer bonds effectively to the plastic or composite material that most fairings are made from.
The next critical phase is priming. Opting for a high-build primer, such as a multi-layer 2K filler primer, plays a pivotal role in masking minor imperfections and establishing a uniform base. Applying two or three evenly spaced coats creates a robust foundation, which can be carefully sanded down with wet sandpaper graded between P400 and P600. This step refines the surface, preparing it for the paint layers and helping avoid any unevenness or texture issues that might mar the finish.
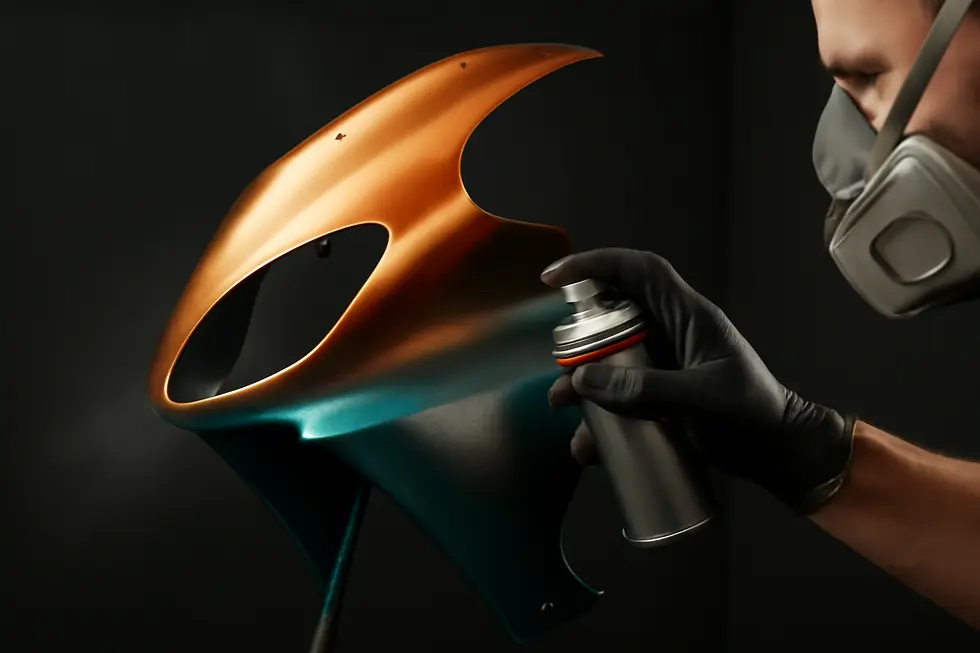
When proceeding to paint application, the strategy focuses on several thin coats rather than one thick layer. Thin layers prevent runs and pooling while promoting consistent coverage and adhesion. This approach is particularly important for plastic-based fairings, where flexibility and durability are paramount. Depending on the desired aesthetic, paint finishes can vary widely—including gloss, matte, metallic, or pearl—allowing customization for both style and environment.
Following these base color coats, clear coats are applied to protect the underlying layers and enhance the finish’s visual depth and glossiness. Several clear coats, each properly dried before the next is applied, create a resilient armor against UV damage, weather, and daily wear. The entire layered system, from primer to topcoat, needs curing time before handling or reinstallation to maximize durability.
In cases of damaged plastic, some rebuilds may require plastic welding before priming to restore structural integrity. Additionally, accurate masking of non-painted sections is vital to achieve sharp edges and a clean overall appearance. Applying these techniques with patience and precision greatly influences the enduring quality of the paintwork.
For those seeking deeper insight, this detailed tutorial on preparing plastics and panels provides practical demonstrations of high-build primer use and paint layering methods on motorcycle components. The visual guidance emphasizes the importance of each step in achieving a finish worthy of both street and show.
Chapter 2: Mastering Primer Application for Motorcycle Fairings: Essential Preparation Techniques
1. Achieving Flawless Primer Adhesion: Surface Preparation Essentials for Motorcycle Fairings
Proper surface preparation forms the foundation of a high-quality paint job on a motorcycle fairing. Without thorough cleaning and careful sanding, primer adhesion suffers, leading to premature paint failure or uneven finishes. The preparation process begins once the fairing is removed and cleaned meticulously to eliminate any residual dirt, grease, wax, or old paint contaminants. Using isopropyl alcohol or a similar solvent ensures the surface is stripped of oils that could block primer bonding. This step is indispensable to create a chemically receptive canvas for primer and paint.
Sanding follows cleaning and represents a crucial stage that sets the physical texture of the surface. Employing fine-grit sandpaper or Scotchbrite pads in the 600 to 800 grit range lightly abrades the plastic or fiberglass, breaking up the smooth surface just enough to boost mechanical adhesion. This subtle scuffing avoids damaging the fairing while providing ample grip for primer layers. For fairings with existing paint turns or slight imperfections, polishing beforehand helps remove oxidation or minor scratches, smoothing the substrate and preventing flaws from telegraphing through subsequent coats.
When applying primer, select a type compatible with plastic substrates typically used in fairings, such as ABS or fiberglass. Primer application should be executed in several thin, even coats rather than a single heavy coat. This prevents runs or pooling, which can cause surface irregularities or prolonged drying times. Each coat must thoroughly cure before the next is applied, and light sanding with fine-grit paper between coats yields an ultra-smooth surface that enhances final paint appearance.
Before transitioning to the paint phase, a final cleaning with isopropyl alcohol removes dust particles introduced during sanding, ensuring no contaminants jeopardize adhesion. Professionals sometimes use advanced steps like ceramic coatings after painting to provide long-term protection, but initial prepping remains the key determinant to a durable finish. While techniques like sandblasting can prepare metal components, they are generally avoided on plastic fairings to prevent substrate damage.
For those seeking detailed demonstrations, visual tutorials—such as those by reputable paint customizers—showcase effective sanding and prepping methods specifically tailored for plastic motorcycle parts. Embracing these disciplined surface preparation practices guarantees that primer application sets a resilient base, ensuring the paint application that follows is both visually striking and long-lasting.
For a comprehensive guide related to motorcycle fairings, you may explore this source that also highlights quality fairings and their preparation.
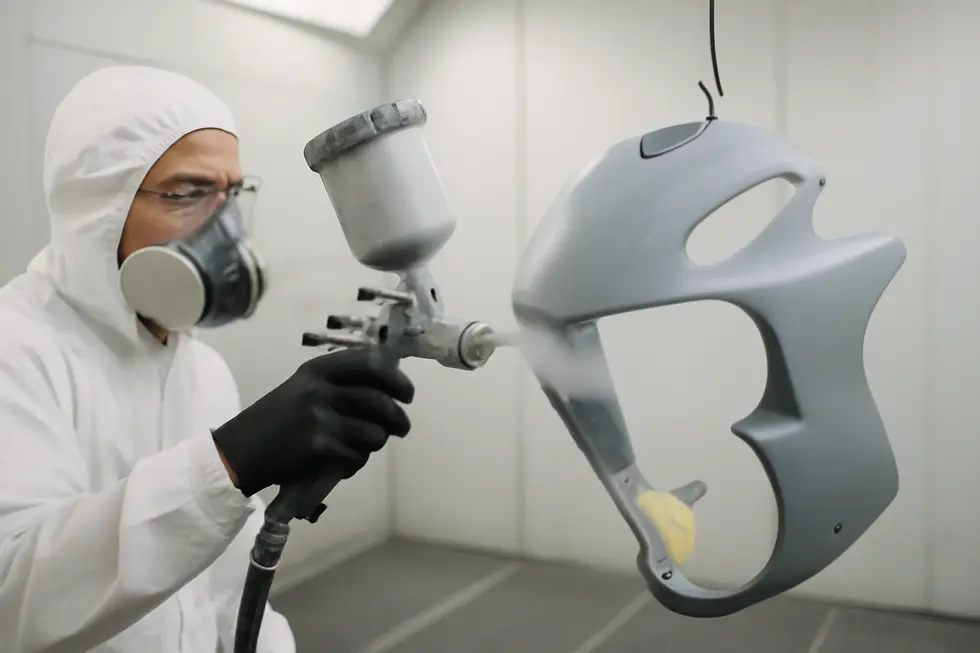
2. Expert Techniques for Applying and Refining Primer Layers on Motorcycle Fairings
Achieving a smooth and durable base with primer is essential for a professional-quality motorcycle fairing paint job. The process begins once the fairing’s surface has been meticulously cleaned and sanded to remove flaws and ensure adhesion. Selecting a high-build 2K primer designed for automotive or motorcycle plastics allows you to fill minor surface imperfections effectively. Typically, applying two to three thin, even coats creates a solid foundation that balances coverage with drying time.
Using an air spray gun with a nozzle size around 1.8 mm offers consistent atomization for smooth primer application and optimal filling of fine scratches or slight dents. Each coat should be sprayed with careful, overlapping motions and allowed ample drying time before the next layer. This gradual buildup prevents runs or uneven areas, which can compromise the final paint finish.
When the primer fully cures, careful sanding begins to refine the surface. Start with 180 grit sandpaper to level out any raised edges or slight irregularities, maintaining even pressure to avoid gouging the primer layer. Next, transition to 240 grit to smooth the surface further, removing sanding marks from coarser grits. For the best finish and to enhance adhesion of topcoats, an optional pass with 320 grit can be made, producing an exceptionally fine, uniform base.
It’s crucial that all bodywork repairs and surface refinements are completed prior to priming, as primer’s primary role is to fill small imperfections rather than correct major defects. Achieving a flawless base at this stage not only improves paint adhesion but also contributes to a visually consistent and professional result.
This methodical layering and sanding of primer ensures a resilient foundation that supports various paint finishes, whether gloss, matte, or metallic. To see step-by-step demonstrations and tips on spray gun setup and sanding plastic or tank surfaces, refer to detailed video tutorials by trusted experts in motorcycle painting.
For further insights on selecting and preparing fairings before primer application, explore comprehensive resources on motorcycle fairing preparation and product guidance at Explore the Best Motorcycle Fairings at Summit Fairings.
Visual tutorial reference: https://www.youtube.com/watch?v=MsHKbB4AJ0o
Chapter 3: How to Paint a Motorcycle Fairing: Paint Selection and Application
1. Selecting Durable Motorcycle Paints: Balancing Longevity and Visual Impact
Choosing the appropriate paint for a motorcycle fairing is pivotal to achieving both a durable finish and striking aesthetics. The ideal paint must withstand harsh outdoor conditions, from intense UV exposure to chemical spills like fuel, while maintaining its color integrity and surface protection. Typically, advanced acrylic urethane basecoats are the preferred choice among professionals and enthusiasts alike. These paints combine excellent chemical resistance with remarkable ease of application and color fidelity, ensuring a finish that lasts and looks vibrant.
Such basecoats often rely on cutting-edge pigment and pearl technologies, leading to fewer coats required to achieve full coverage and enhancing the depth and brilliance of the finish. However, the paint alone doesn’t complete the job. A compatible top coat—usually acrylic lacquer or urethane enamel—must be applied to seal the color layer, protect against environmental damage, and deliver the desired gloss level. This multi-layer approach ensures the paint endures the common rigors a motorcycle fairing faces, such as abrasions and heat fluctuations.
Heat resistance is a critical factor when selecting paint, especially on fairing sections near the engine or exhaust system. Specialized heat-resistant paints are designed to maintain adhesion and color stability despite elevated temperatures that might otherwise cause peeling or discoloration. For the majority of the fairing, which is often molded from ABS plastic, surface preparation and primer selection play an equally vital role. Primers formulated specifically for plastics significantly improve paint adhesion and longevity, making scuffing and prepping the surface beforehand essential steps.
Beyond durability, aesthetic preferences lead riders to select finishes ranging from matte and satin to high gloss or metallic effects—all achievable with the right basecoat and clear coat combination. Opting for high-quality, motorcycle-specific products from reputable brands helps ensure colors remain vibrant and resistant to UV fading over time. This commitment to quality paints, primers, and clear coats, paired with careful preparation, culminates in a professional-level finish similar to original factory standards.
For those seeking deeper insights into fairing materials and paint compatibility, including where to source reliable components, exploring affordable motorcycle fairings at Summit Fairings offers valuable guidance and options.
Further technical details on advanced acrylic urethane basecoats and their application can be found in specialized resources dedicated to automotive finishes, which emphasize the importance of matching basecoat and topcoat chemistries to achieve maximum durability and color retention under motorcycle riding conditions.
2. Expert Techniques for Preparation, Base Coats, and Clear Coating to Achieve a Durable Motorcycle Fairing Finish
Achieving a durable and visually striking finish on a motorcycle fairing hinges on mastering the art of preparation, paint selection, and the precise application of base and clear coats. The initial stage demands meticulous cleaning to eliminate all dirt, grease, and residues that might interfere with paint adhesion. Using a degreaser or specialized cleaner ensures a pristine surface, which is essential before any sanding begins. Sanding with a fine grit—typically between 600 and 800—is crucial, as it creates a slightly textured surface that allows primers and paints to bond effectively without compromising smoothness.
Before any paint touches the fairing, repairing any imperfections is necessary, especially on plastic components prone to cracking or dents. Employing plastic fillers or heat techniques ensures a flawlessly smooth base, preventing flaws from showing through the paint layers. Once fully prepared, the choice of primer becomes fundamental. Utilizing automotive-grade primers formulated for plastic surfaces guarantees excellent adhesion and enhances the longevity of the paint job.
With the primer applied and dried, base coating introduces the chosen color. This phase requires applying multiple thin, even layers rather than a few thick ones, preventing runs and uneven texture. Spray applications work best here, as they deliver consistent coverage and allow for a gradual buildup that reveals the paint’s true depth and tone. Patience is essential—each coat must dry sufficiently before the next is applied, avoiding trapping solvents that could ruin the finish.
The final transformative step is clear coating. Several layers of a compatible clear coat provide a robust shield against UV rays, scratches, and environmental factors, while enhancing the paint’s gloss and depth. Like the base coat, clear coats must be applied in thin, uniform passes with adequate drying times between coats to ensure a flawless, glass-like finish. This protective envelope not only beautifies the fairing but also fortifies its resistance to daily wear.
Adhering to this disciplined progression—from thorough cleaning and sanding, through careful primer and base coat selection, to diligently layered clear coats—results in a professional, durable finish that withstands the rigors of the road. For those seeking to refine their technique further, accessing detailed resources and visual tutorials can clarify the nuances of spray application and timing.
For a comprehensive guide showcasing these steps, including expert application techniques and finishing tips, you can explore detailed tutorials such as those featured by Wheels Of Freedom Adventures. The knowledge shared in such resources complements the step-by-step process described here, leading to exceptional results.
For additional insights on selecting and preparing motorcycle fairings, visit Explore the Best Motorcycle Fairings at Summit Fairings.
Chapter 4: How to Paint a Motorcycle Fairing: Clear Coating and Finishing Processes
1. Mastering Surface Preparation and Painting Techniques for a Durable Motorcycle Fairing Finish
Achieving a flawless and durable paint job on a motorcycle fairing heavily depends on meticulous surface preparation and refined painting techniques. The initial phase begins with a thorough cleaning to eliminate oils, wax, dust, and any contaminants that could compromise paint adhesion. Using isopropyl alcohol ensures that the surface is free from residues invisible to the naked eye, providing a clean canvas essential for lasting results.
Following cleaning, sanding plays a pivotal role. Employing fine-grit sanding pads within the 600 to 800 range gently scuffs the surface without damaging it. This scuffing process is critical to promote primer and paint adhesion, especially on plastics such as ABS, which are common materials for motorcycle fairings. The subtle texture created by sanding allows primers and paints to bond more securely, reducing the risk of peeling or flaking over time.
Selecting the right primer is the next step. Primers must be compatible with the fairing’s base material—whether plastic or metal—to build a strong foundation for paint layers. A properly applied primer enhances paint durability and provides a uniform surface that improves color consistency. It is essential to apply the primer evenly and allow sufficient drying time, preventing imperfections from affecting subsequent layers.
The painting phase follows, where multiple thin coats are preferable to a single heavy application. Thin layers minimize drips and runs, producing an even finish with rich, consistent color. This technique also accelerates drying and curing times between coats, allowing for better control and quality. Whether a gloss, metallic, pearl, or matte finish is desired, each coat contributes toward building depth and vibrancy in the final appearance.
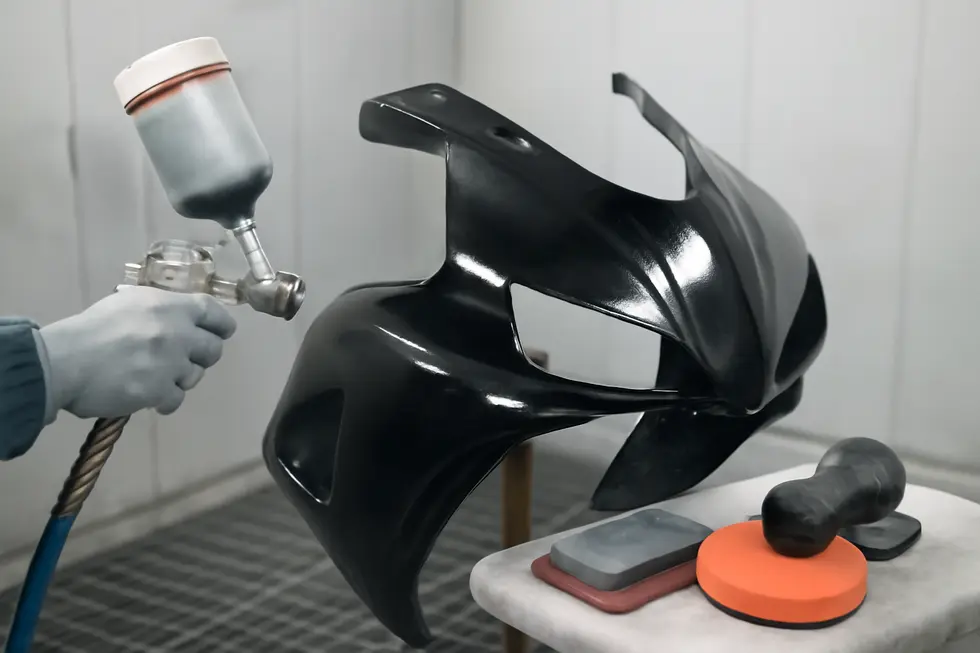
Clear coating serves as the protective barrier that seals in the colors beneath, adding gloss and shielding the surface from UV rays, weather exposure, and abrasion. Applying several layers of clear coat with adequate drying periods enhances the finish’s resilience and longevity. For an impeccable surface, wet sanding between coats can be used to remove any minor imperfections, smoothing the surface before the final coats. After curing, polishing with fine compounds reveals a deep shine that elevates the fairing’s aesthetic appeal.
Adding a protective wax after polishing not only extends the lifespan of the paint job but also provides extra defense against fading from sunlight and washing abrasion. Performing all these steps in a dust-free, well-ventilated environment with proper safety equipment ensures a professional finish and personal safety during the process.
For those seeking detailed demonstrations of these techniques, guides such as Wheels Of Freedom Adventures provide comprehensive visual walkthroughs that solidify understanding of proper preparation and painting practices. To explore a broad selection of durable and quality motorcycle fairings that complement expert painting efforts, visit Summit Fairings, a trusted source with unmatched variety and custom styling options here.
External reference: Surface preparation and painting techniques.
2. Mastering Clear Coat Application and Finishing for Durable, Glossy Motorcycle Fairings
Applying a clear coat is the essential stage that transforms freshly painted motorcycle fairings into durable, visually striking components. Once the base paint has dried thoroughly, the clear coat layers serve not only as protective armor against UV rays, weathering, and road debris but also enhance gloss and depth, creating a rich finish that highlights the fairing’s color and design. Achieving this flawless finish requires careful attention to technique, timing, and materials.
Before clear coating, the surface must be impeccably prepared. This means the underlying paint should be smooth and free of dust or imperfections, achieved through fine sanding with grit around 600 to 800 if needed. The primer and paint layers, when properly adhered, provide the foundation for the clear coat to bond effectively. Using high-quality clear coats designed for automotive or motorcycle applications ensures the finish withstands environmental stress and resists fading.
The best practice is to apply multiple thin layers of clear coat via spray. Thin coats reduce the risk of runs, sags, or uneven surfaces and allow each layer to dry and cure adequately. Between sprays, adequate drying time—usually at least 15 to 30 minutes—is critical to ensure proper adhesion and build-up. For enthusiasts seeking professional-level smoothness, wet sanding between coats with very fine wet/dry sandpaper can be employed. This step removes minor surface texture and helps subsequent layers lay down evenly, ultimately delivering a near showroom finish.
After the final clear coat is applied, the fairing must cure fully before handling or reinstalling—this can take from several hours to a few days depending on environmental conditions and the exact products used. Once cured, the fairing can undergo polishing or waxing to further amplify gloss, depth, and surface protection. Polishing compounds smooth out any residual orange peel or minor flaws, while waxing adds an additional protective barrier.
Throughout this process, it’s vital to work in a clean, dust-free environment and maintain consistent spray techniques. Proper ventilation and the use of safety gear such as masks protect health and maintain paint quality. When working on plastic fairings, commonly made from ABS, the use of compatible primers and clear coats ensures adhesion and durability, mirroring the sophisticated multi-stage processes used by professional custom painters.
For those seeking detailed visual guidance on these steps, comprehensive tutorials are available to illustrate the correct workflow from paint prep through clear coat application and finishing polish. This structured approach enhances the longevity and appearance of painted motorcycle fairings, protecting them against road conditions while providing a high gloss finish that stands out.
For more insights on selecting high-quality fairings to complement your painted and finished pieces, explore Summit Fairings’ extensive range.
External reference: https://www.autoblog.com/2020/06/17/basics-how-to-clear-coat-paint/
Chapter 5: How to Paint a Motorcycle Fairing: Tips for Touch-ups and Maintenance

1. Essential Surface Preparation and Painting Techniques for Long-Lasting Motorcycle Fairing Finishes
Achieving a flawless, durable paint finish on a motorcycle fairing begins with meticulous surface preparation. Whether addressing touch-ups or undertaking full repainting, this foundational step determines the final outcome’s quality and longevity. The process starts by thoroughly cleaning the fairing to remove all traces of dirt, grease, and old paint flakes that could interfere with adhesion. For plastic surfaces common on fairings, lightly sanding with fine-grit pads around 600 to 800 grit is critical. This creates a smooth, slightly abrasive surface, enhancing paint bonding without roughening the material excessively. Specialized sanding pads designed for plastic or painted surfaces offer consistent results and ease the task of prepping complex contours.
Before sanding, inspecting the fairing for any cracks or chips is essential. Plastic damage can be repaired by carefully melting and pressing fractured edges together, restoring structural integrity and preventing paint problems caused by surface irregularities. After sanding, another round of cleaning with a grease remover or isopropyl alcohol ensures no dust or oils remain, which could compromise primer or paint adhesion.
Using the correct primer compatible with the fairing material is a vital next step. Primers create an even base that improves paint durability and helps prevent peeling or chipping. Applying thin, uniform coats of primer and allowing each to dry thoroughly prevents bubbling or uneven surfaces. During paint application, spraying in multiple thin layers produces the best results. Thick or heavy coats risk runs and an uneven finish, so patience and steady technique are key.
For routine maintenance or touch-ups, quickly addressing scratches or chips helps prevent rust on any exposed metal beneath the paint. Maintaining the painted surface through regular cleaning and waxing preserves its protective barrier, shielding against moisture and contaminants. In harsher climates, applying rust inhibitors or sealants on vulnerable seams and joints adds extra defense where paint coverage might thin over time.
Overall, combining precise sanding, thorough cleaning, careful priming, and controlled paint layering guarantees a resilient and attractive motorcycle fairing finish that lasts. For more insights on quality fairings and related upkeep, explore comprehensive resources like Explore the Best Motorcycle Fairings at Summit Fairings.
A practical example of these preparation and painting techniques can be seen in detailed video tutorials by experts such as Adam at Time War Custom Paint, illustrating the importance of sanding and primer application for professional results[https://www.youtube.com/watch?v=85lnPyn-ofs].
2. Selecting Durable Paints and Essential Care Practices for Long-Lasting Motorcycle Fairing Finishes
Choosing the right paint for your motorcycle fairing is crucial for achieving a finish that lasts and looks professional. High-quality paints designed specifically for automotive or motorcycle use are the best choice due to their superior adhesion, flexibility, and resistance to environmental wear. These paints are typically applied through a layered system consisting of a primer coat, a base color, and a clear coat. Each layer plays its part: the primer provides a solid foundation that enhances adhesion; the base color delivers the desired shade and vibrancy; and the clear coat seals everything beneath, adding durability and a polished shine that resists scratches and fading.
To maintain these freshly painted surfaces, cleaning practices must be both gentle and consistent. Using mild soaps combined with soft cloths helps preserve the paint’s integrity without introducing scratches or dulling its gloss. Avoid harsh chemicals and abrasive cleaners, as they can erode the protective layers and accelerate wear. Beyond cleaning, applying a motorcycle-safe protective wax or ceramic coating adds an extra barrier against UV rays, moisture, and dirt accumulation. Ceramic coatings especially bond at a molecular level, providing longer-lasting protection and enhancing color depth in ways traditional waxes cannot.
Routine inspection is another key practice for fairing upkeep. Regularly scan your bike for chips, cracks, or loose fittings, as addressing these issues promptly prevents them from spreading or allowing corrosion beneath the paint. If damage is spotted, targeted touch-ups using compatible primer, paint, and clear coat materials can restore the area without repainting entire panels.
Proper storage further preserves paint quality. Keeping the motorcycle in shaded or indoor areas minimizes prolonged exposure to sunlight, which fades and degrades finishes over time. When outdoor storage is necessary, a UV-protective cover offers essential shielding from harsh environmental elements.
Supporting your fairing’s longevity through these combined efforts—careful paint selection, gentle cleaning, protective coatings, diligent inspection, and appropriate storage—ensures the finish retains its vibrancy and structural protection. This comprehensive approach helps your motorcycle maintain a show-quality look long after the paint has dried. For more insights into choosing the right fairings and accessories to complement your custom paintwork, explore Summit Fairings’ ultimate source for affordable motorcycle fairings.
For detailed guidance on painting techniques combined with maintenance tips tailored specifically to motorcycle fairings, visit this comprehensive resource: https://www.kingsmotorcyclefairings.com/blogs/news
Final thoughts
Securing superior paint finishes on motorcycle fairings demands a disciplined, stepwise approach, from meticulous surface preparation to expert primer and paint application, followed by protective clear coating and diligent finishing. Each stage plays a vital role in achieving a finish that not only captivates visually but endures aggressive wear and environmental exposure. Business owners investing in these proven techniques enhance their service quality and customer satisfaction, building reputation and profitability. Understanding maintenance and touch-up strategies further preserves the value and aesthetics of every job. Mastery in painting motorcycle fairings equips workshops to meet rising market demands and differentiate their offerings in a competitive environment.
Ready to elevate your ride? Summit Fairings delivers premium, custom-fit fairings that blend style and durability. Whether you’re chasing speed or turning heads, we’ve got your bike covered. Don’t wait—transform your machine today. Click, customize, and ride with confidence. Your perfect fairing is just a few clicks away. Act now!
About us
undefined