Introduction
Painting motorcycle fairings with spray paint is a craft that demands precision, patience, and a structured approach to achieve a flawless, professional finish. For business owners in the motorcycle aftermarket industry, mastering this process is essential to deliver superior quality products and services that attract discerning customers. This guide breaks down the painting process into three core chapters: preparation and priming, application techniques, and finishing with curing. Each chapter builds upon the previous to provide a comprehensive understanding of how to elevate the appearance and longevity of motorcycle fairings using spray paint. With this knowledge, business owners can enhance their offerings, reduce rework, and foster customer satisfaction through expert craftsmanship.
Tables of Contents
Chapter 1: Preparation and Priming Steps for How to Paint Motorcycle Fairings with Spray Paint
- Essential Cleaning and Sanding Techniques to Prepare Motorcycle Fairings for a Flawless Primer Coat
- Mastering Masking and Primer Application for Flawless Motorcycle Fairing Prep
- Achieving a Flawless, Paint-Ready Surface: Post-Priming Smoothing and Preparation
Chapter 2: Mastering Application Techniques for Spray Painting Motorcycle Fairings
- Essential Surface Preparation: Laying the Foundation for Flawless Spray Paint on Motorcycle Fairings
- Mastering Spray and Coating Techniques for a Smooth, Durable Motorcycle Fairing Finish
- Essential Drying and Clear Coating Techniques for a Flawless Motorcycle Fairing Finish
Chapter 3: Finishing and Curing Techniques for a Durable, Glossy Motorcycle Fairing Paint Job
- Mastering Clear Coat Application and Curing for a Professional Motorcycle Fairing Finish
- Mastering the Curing Environment and Process for Motorcycle Fairing Spray Paint Finishes
- Essential Post-Curing Finishing Techniques for Durable, Glossy Motorcycle Fairing Paints
Chapter 1: Preparation and Priming Steps for How to Paint Motorcycle Fairings with Spray Paint
1. Essential Cleaning and Sanding Techniques to Prepare Motorcycle Fairings for a Flawless Primer Coat
Achieving a durable and professional paint finish on motorcycle fairings begins long before the spray can touches the surface. The foundation lies in meticulous cleaning and sanding, which are indispensable steps in preparing plastic fairings for primer application. Neglecting these steps can lead to poor paint adhesion and an uneven finish that diminishes both durability and aesthetics.
The cleaning process must be thorough to eliminate all traces of dirt, grease, wax, and other contaminants. Begin by washing the fairings with mild soap and water, paying close attention to crevices where grime tends to accumulate. After the initial wash, it’s crucial to wipe down the surfaces using a dedicated wax and grease remover or automotive-grade degreaser designed for plastics. This step ensures that oily residues, often invisible to the naked eye, are fully removed. Only a pristine, contaminant-free surface can guarantee the primer will bond correctly and provide a solid base for subsequent paint layers.
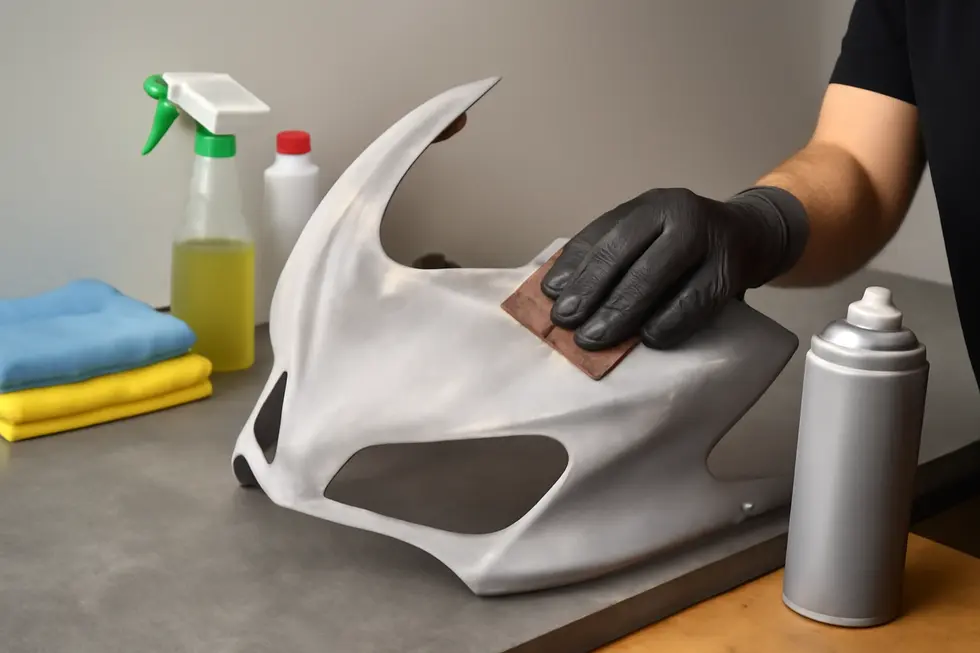
Following cleaning, the surface needs light sanding to create the optimal texture for primer adherence. Motorcycle fairings, commonly made from plastic materials, require a gentle sanding approach to avoid damage. Use a fine grit sandpaper—typically around 600 grit—or an equivalent maroon scuff pad specifically intended for plastic surfaces. This process dulls the glossy finish and removes minor imperfections without gouging the material. Importantly, this sanding creates microscopic scratches and “tooth” that improve the mechanical grip of the primer.
Sanding should be executed evenly and with care, ensuring all areas are treated uniformly to prevent patchiness in the primer stage. After completing this step, it is essential to remove the sanding dust thoroughly. Dust and debris left on the surface can easily cause bubbles or uneven primer application, which undermines the smoothness and durability of the finish.
The primer selected must be compatible with plastic substrates to enhance adhesion and flexibility. Often, plastic-specific primers or adhesion promoters are used to establish a resilient bond that accommodates the fairings’ slight flex and expansion.
Following these cleaning and sanding stages leads to a surface that is perfectly primed to accept the next steps in painting. For further advice and visual instructions on correctly preparing plastic motorcycle fairings, the Tropical Glitz paint tutorial offers an excellent reference for effective sanding and primer application techniques.
For additional insights on preparing motorcycle fairings, consider exploring detailed guides such as those found on Summit Fairings’ blog. This resource complements preparation tips and supports achieving a flawless finish.
A well-prepared surface guarantees that the primer adheres securely, forming a smooth and durable foundation critical for the final paint layers to look factory-quality and withstand the rigors of riding.
2. Mastering Masking and Primer Application for Flawless Motorcycle Fairing Prep
Achieving a professional finish when painting motorcycle fairings with spray paint demands meticulous masking and primer application. Masking is the critical first step that shields areas not intended for paint, preserving clean edges and preventing unsightly overspray. To do this effectively, use high-quality automotive masking tape combined with paper or newspapers to cover adjacent parts thoroughly. This ensures that paint lands precisely where it should, maintaining the fairings’ overall appearance and avoiding time-consuming corrections later.
Once masking is complete, the primer application can begin on a well-prepared surface. The fairness must be cleaned and sanded to promote optimal primer adhesion; without this necessary groundwork, the primer may fail to bond uniformly, risking an uneven base. Opt for a primer designed specifically for plastic or fiberglass substrates, such as automotive or epoxy primers, as these provide durability and flexibility suited to fairing materials.
Before spraying, shake the primer can rigorously to mix the components evenly. Hold the spray can approximately 8 to 10 inches from the surface and apply multiple light, even coats rather than a single heavy spray. This technique prevents runs and drips that could compromise the smoothness of the base. Allow a flash time of about 15 minutes between each coat so the primer can properly tack up. Once the primer layers are complete, a full drying period is essential—epoxy primers may require 2 to 3 days to cure thoroughly, during which they build a hard, stable base for subsequent paint layers.
After drying, assessing and perfecting the primed surface is crucial. Begin by sanding the primer with progressively finer sandpaper, starting around 320 grit and moving up to 600 grit. This step smooths out any irregularities and creates a consistent texture for the base coat to adhere to. To detect any low spots or imperfections, apply a thin guide coat in a contrasting color over the sanded primer. Sand again where the guide coat reveals flaws, then perform spot priming on those areas and repeat the sanding process until the surface is flawless.
This careful approach to masking and primer application sets the foundation for a smooth, resilient paint job. Such attention to detail minimizes errors in subsequent painting stages, aligns with best practices in motorcycle fairing preparation, and helps replicate a factory-quality finish. For those seeking detailed techniques and step-by-step visuals, a comprehensive video guide offers invaluable insights into primer application and sanding methods relevant to motorcycle fairings.
For additional guidance on achieving this professional-level preparation, explore more about the process and tools at this helpful resource on motorcycle fairings preparation and painting.
Further detailed instructions, including mixing and spray settings that can enhance primer use, are available in a dedicated automotive spray painting guide at: https://www.com-paint.com/the-complete-guide-to-spray-paint-for-cars-and-bikes/
3. Achieving a Flawless, Paint-Ready Surface: Post-Priming Smoothing and Preparation
Once the primer has been applied to motorcycle fairings, the next critical phase is creating a perfectly smooth and paint-ready surface. This process is essential to ensure that the base color adheres well and that the final finish appears professional and polished. After allowing the primer to fully dry, light sanding with fine-grit sandpaper—typically between 400 and 600 grit—is undertaken. This step, often referred to as “color sanding” or “block sanding,” eliminates minor imperfections such as dust nibs, uneven texture, or surface irregularities left from the primer application.
During this phase, attention to detail is paramount. Sanding must be performed with even, gentle strokes to avoid gouging the primer layer or exposing the underlying material. The goal is to create a uniformly smooth surface that will promote optimal paint adhesion without compromising the primer’s protective qualities. It’s important to work in a clean, dust-free environment, as contamination can embed into the primer during sanding and later show through the paint layers.
After sanding, thorough cleaning of the fairings is necessary to remove all dust and debris. Using a tack cloth or a lint-free microfiber cloth dampened with a mild solvent or surface cleaner ensures that microscopic particles do not interfere with the paint application. Any residual dust left on the surface before painting can cause unsightly bumps and weaken the bond between coats.
Masking remains a crucial consideration during post-priming preparation. All areas not intended for painting should be protected with high-quality masking tape and paper to maintain clean lines and prevent overspray. This careful attention to masking complements the earlier primer application process and sets the stage for flawless color layering.
Only when the surface is perfectly smooth, clean, and properly masked should the base color coats be applied. Multiple thin coats are preferred, as they provide solid coverage without runs or drips. Patience is key—waiting sufficient drying time between coats helps achieve excellent adhesion and a deep, uniform finish.
High-quality primers designed specifically for plastic or metal surfaces remain essential throughout this process, reinforcing durability and resilience of the paint system against environmental exposure and wear. Mastering the post-priming preparation phase profoundly impacts the final visual appeal and longevity of your motorcycle fairings.
For additional guidance on selecting the right primer and preparation techniques tailored to your needs, visit the detailed resources at Summit Fairings.
External reference for primer sanding: https://www.rustoleum.com/product-catalog/consumer-brands/automotive/automotive-primers.
Chapter 2: Mastering Application Techniques for Spray Painting Motorcycle Fairings
1. Essential Surface Preparation: Laying the Foundation for Flawless Spray Paint on Motorcycle Fairings
Achieving a professional finish when spray painting motorcycle fairings begins well before the spray can touches the surface. The foundation of any lasting, attractive paint job lies in meticulous surface preparation. This step ensures that the paint bonds properly, resists wear, and maintains a smooth, even appearance over time.
The process starts with thorough cleaning. Motorcycle fairings accumulate dirt, grease, and residues that can prevent paint from adhering correctly. Use a gentle but effective degreaser along with warm water to wipe down every panel. This removes contaminants and oils that are invisible to the eye but disruptive to paint layers. Dry the fairings completely to avoid trapping moisture under the paint.
Next comes the critical step of sanding. This not only smooths out imperfections like scratches or peeling paint but also introduces a subtle texture for the paint to grip. Employ fine-grit sandpaper, typically ranging from 240 to 800 grit, depending on the fairing material, often plastic. Sand lightly and evenly; aggressive sanding can damage the surface, while insufficient sanding leaves the paint prone to peeling. For stubborn imperfections or old decals, carefully sand these areas until smooth.
Masking is an essential aide in preserving areas not meant to be painted. Precision masking with tape and protective sheets shields mounting points, vents, or logos from overspray. This keeps the final result clean and professional, sparing the time and effort of post-paint correction.
Once cleaned, sanded, and masked, priming is the next pivotal task. Applying a suitable primer designed for plastic or metal fairings creates an ideal surface for the color coat. Primers fill micro-imperfections, boost adhesion, and enhance the durability of the paint job. High-build primers are particularly useful when filling small scratches or uneven textures. Apply thin, even coats and allow full drying between layers to avoid runs or bubbles. After the primer cures, a light sanding refines the surface further, eliminating dust nibs and ensuring impeccable smoothness.
Before progressing to paint application, inspect the surface meticulously. Use a tack cloth to gently remove any remaining dust or debris that could mar the smooth finish. Every speck avoided now saves hours in repainting or polishing later.
This disciplined preparation phase is the backbone of achieving a stunning, durable paint job on motorcycle fairings. By investing time in cleaning, sanding, masking, and priming, the fairings become a canvas ready to accept spray paint flawlessly, yielding results rivaling professional body shops.
For enthusiasts seeking a wide range of quality parts to complement their paint project, insights and options can be explored at the ultimate source for affordable motorcycle fairings.
For a comprehensive visual guide covering each preparation step, including sanding and primer application, consult detailed resources that break down these critical phases.
2. Mastering Spray and Coating Techniques for a Smooth, Durable Motorcycle Fairing Finish
Achieving a professional-looking paint job on motorcycle fairings relies heavily on mastering the spray and coating process, which begins with meticulous preparation and continues through careful application and finishing. Prior to spraying, the fairings must be thoroughly cleaned to eliminate any dirt, grease, or dust that could interfere with paint adhesion or cause defects. This cleanliness is complemented by sanding the surface with fine-grit sandpaper to smooth out any imperfections and build an ideal foundation for the paint layers to grip. Masking off areas not intended for painting ensures clean, crisp lines and prevents unwanted overspray.
Priming is the next critical step, where a primer suited for plastic surfaces or bare materials is applied in multiple thin coats. Using a high-build primer can fill minor surface irregularities, providing a uniformly smooth base. It is essential to apply these coats evenly, allowing sufficient drying time between passes, and to sand lightly between coats to maintain smoothness. This layering helps the paint adhere better and increases the longevity of the finish.
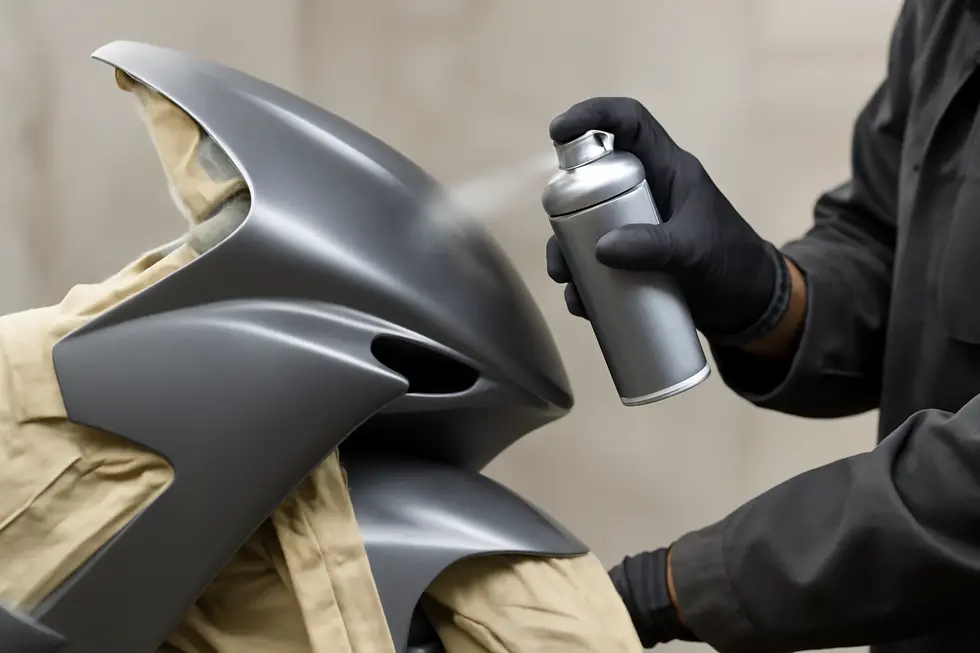
When spraying the base color, the key is to apply several light, even coats rather than one heavy layer. Shake the spray can well for at least one to two minutes before use to ensure consistent flow of paint. Maintaining a steady hand, spray from about 8–10 inches away using smooth, back-and-forth motions, beginning with the edges before covering the larger flat surfaces. This technique minimizes runs and drips and ensures an even distribution of paint. Waiting approximately 10 minutes between coats allows the paint to settle and reduces imperfections. The process of gradual buildup not only delivers deep, rich color but also prevents unwanted surface blemishes.
Following the base coats, applying clear coat layers plays a decisive role in protecting the paint and adding the high-gloss shine typical of factory finishes. A durable clear coat, preferably a two-component (2K) product, offers superior resistance to chemicals, weather, and fuel exposure, making the fairings more resilient under harsh conditions. Like the previous coats, clear coats should be sprayed in thin layers with intervals of about 10 minutes to avoid runs and to build a robust protective shell. Importantly, sanding the base coat before clear coating is not advised, as any scratches or sanding marks might become visible through the clear layers.
After the final clear coat application, curing must occur in a clean, dust-free environment. Full curing can take several days, depending on temperature and humidity, and handling the fairings prematurely increases the risk of surface blemishes. Once fully cured, polishing or buffing can be undertaken to remove minor imperfections and enhance the smoothness and gloss of the finish, bringing the fairings to a showroom-quality look.
Mastery of these spray and coating techniques ensures a smooth, uniform, and durable finish that transforms standard fairings into eye-catching, custom-styled parts. Enthusiasts can confidently achieve professional-level results at home by following these methodical steps with patience and precision.
For a comprehensive guide including professional spraying methods and tips on two-component clear coats, consider exploring the detailed 2K Clear in a Can tutorial.
For those interested in exploring the variety of motorcycle fairings to match freshly painted finishes, the resource on the best motorcycle fairings at Summit Fairings offers extensive options that complement quality paintwork.
3. Essential Drying and Clear Coating Techniques for a Flawless Motorcycle Fairing Finish
Achieving a professional, durable finish on motorcycle fairings relies heavily on the meticulous process of drying and clear coating after the base color application. Once the base coat is applied in several even, thin layers, it must be allowed to dry fully—typically around 30 minutes—before moving on to the clear coating stage. This drying phase is critical; attempting to sand or rush the process at this point can leave marks or imperfections that will become painfully visible through the final clear coat, compromising the smoothness and clarity of your paint job.
When it comes to applying the clear coat, patience and technique must guide every step. Instead of a single heavy application, multiple light coats—usually 4 to 5—should be sprayed with approximately 10-minute intervals between each. This approach ensures the protective layer builds evenly, avoiding runs, drips, or uneven gloss. Clear coating does more than just beautify; it acts as a shield against environmental damage, chemicals, and the rigors of road use, preserving your custom paint’s vibrancy and integrity over time.
Proper spraying technique is equally important during clear coating. Start by spraying the edges of the fairings before covering the broader top surfaces to maintain consistent coverage and prevent excess buildup on corners. Hold the spray can or gun flat and perpendicular to the curved surfaces, moving smoothly at an even speed and maintaining a consistent distance. Overlapping each spray pass by about 50% helps eliminate visible stripes and promotes uniform gloss.
After completing all clear coat layers, allow the fairings to cure in a dust-free, temperature-controlled indoor environment. Avoid direct sunlight or extreme temperatures as these can interfere with the curing process. The full cure time can stretch over several days, granting the clear coat its hardness, chemical resistance, and long-term durability. Handling or installing the fairings before curing is complete risks damaging the finish and undoing your careful work.
For those aiming to extend protection beyond traditional clear coats, professional ceramic coatings can be considered as an optional upgrade. These advanced coatings bond at a molecular level with the paint surface, offering lasting gloss, water repellency, scratch resistance, and easier maintenance. Though requiring additional preparation and care, ceramic coatings provide superior durability and an enhanced professional look.
By strategically balancing drying times, applying clear coat in multiple light layers, and ensuring proper curing conditions, your painted motorcycle fairings will achieve a high-quality, factory-style finish. This technique-driven approach combines patience with precise application, empowering enthusiasts to attain a sleek, resilient, and visually stunning surface without professional equipment. For more insights on selecting and working with quality motorcycle components, explore affordable motorcycle fairings and expert tips to complement your paint project.
Reference Video: https://www.youtube.com/watch?v=mpHp_Ye8j9w
Chapter 3: Finishing and Curing Techniques for a Durable, Glossy Motorcycle Fairing Paint Job

1. Mastering Clear Coat Application and Curing for a Professional Motorcycle Fairing Finish
Achieving a professional, durable finish on motorcycle fairings relies heavily on the precise application and curing of the clear coat. This final protective layer not only enhances the visual appeal with a factory-quality gloss but also shields the base paint from scratches, chemical exposure, and harsh environmental conditions such as petrol spills.
A key factor for optimal durability is using a high-quality 2K (two-component) clear coat spray. Unlike standard 1K clears, 2K clear coats provide superior chemical resistance and toughness essential for motorcycle surfaces that endure constant exposure to fuel, oils, and weather elements. Applying the clear coat must be done only after the base color coat is completely dry to avoid issues like bubbling, peeling, or uneven adhesion.
Clear coating demands a deliberate technique: multiple thin, evenly distributed layers are preferable to a single heavy coat. Spray from a consistent distance using smooth, sweeping motions to prevent runs and uneven buildup. Between each coat, allow the recommended flash-off time to ensure solvents evaporate properly; this step helps each successive layer bond seamlessly without trapping moisture or causing defects.
Environmental factors play a critical role during clear coat application and curing. Working in a well-ventilated, dust-free area with moderate temperature and humidity supports even drying and minimizes imperfections such as dust particles embedded in the finish. After applying the final clear coat, the fairings should remain undisturbed in this controlled environment for at least 12 to 24 hours, permitting the clear coat to fully cure and develop its maximum hardness and chemical resistance. Although 2K clears may dry to the touch within 1.5 hours, premature handling can compromise the finish integrity.
For enthusiasts aiming to achieve a flawless, mirror-like result, post-curing processes such as wet sanding with ultra-fine grit (around 2000 grit) followed by polishing can remove minor surface imperfections and significantly enhance glossiness. Careful buffing brings out a smooth, glassy surface that rivals factory finishes, but this should only be attempted once the clear coat has completely cured.
Adhering to these detailed steps in clear coat application and curing transforms a home spray paint project into a durable, visually striking upgrade for motorcycle fairings. For a practical demonstration that clarifies these techniques, the YouTube tutorial “2k Clear in a Can. How to Spray Paint like a Pro” provides excellent insights to complement this guidance.
For additional advice on selecting quality parts that pair perfectly with your finish, explore the comprehensive collection at Summit Fairings.
2. Mastering the Curing Environment and Process for Motorcycle Fairing Spray Paint Finishes
Achieving a flawless, long-lasting finish on motorcycle fairings painted with spray paint depends heavily on the curing process and the environment in which it takes place. Curing is not merely about waiting for the surface to feel dry—it involves a carefully managed sequence that ensures paint layers fully harden, bond, and develop the durability necessary to withstand weather, handling, and road debris.
The process starts with applying multiple thin coats rather than a few thick ones. Thin layers reduce the risk of runs, drips, and uneven drying, allowing solvents to evaporate efficiently and minimizing trapped moisture or chemical solvents between layers. A good method includes beginning with a light mist coat, which sets a smooth base for subsequent layers and promotes even adhesion. Between each coat, especially for typical spray paints on plastic surfaces, waiting around five minutes is essential to let layers become tack-free before continuing. This brief pause ensures each coat chemically and physically bonds with the previous film.
Once the base color and clear coats are applied, the curing environment plays a key role in the final outcome. A well-ventilated, dust-free workspace helps paint dry evenly and prevents airborne contaminants from embedding in the wet finish. These contaminants can cause surface imperfections like fisheyes or specks that degrade the smooth polish of the fairings. The ambient temperature and humidity also influence curing times; warmer, drier environments generally accelerate curing, while colder or very humid conditions extend it. It’s advisable to maintain moderate temperatures and avoid painting on windy days or in dusty, open areas.
Some advanced paint formulations include curing agents or hardeners that chemically boost the drying process. These additives increase the paint’s hardness and chemical resistance, helping the finish stay resilient against fuel exposure, scratches, and UV damage. When using such systems, following manufacturer instructions carefully ensures optimal results.
After allowing at least 24 hours for full curing—although this can vary based on paint type and environment—further finishing steps may enhance the look and durability. Polishing smooths out minor surface irregularities, like orange peel texture, and increases gloss depth for a near-factory appearance. Applying a protective topcoat, such as a ceramic coating, can add layers of scratch resistance and UV protection, preserving the finish’s vibrancy over time.
Throughout the curing stage, it is crucial to avoid handling or installing the fairings prematurely. Even gentle pressure or contact can mar the surface before the paint fully hardens. By diligently following these steps and managing the environment, home painters can achieve professional-grade results that endure.
For further insights on ideal drying times and surface preparation to maximize adhesion and curing quality, exploring resources like this detailed guide on painting and curing motorcycle plastic parts is highly recommended.
3. Essential Post-Curing Finishing Techniques for Durable, Glossy Motorcycle Fairing Paints
Achieving a professional finish on motorcycle fairings with spray paint requires patience and careful attention during the post-curing phase. Once the clear coat is applied, the paint needs a thorough curing period—often up to 30 days—to harden fully and attain maximum durability. During this time, the painted fairings must be protected from dust, moisture, and any physical contact, as premature handling can cause imperfections like smudges, scratches, or dust embedding into the surface.
After the paint has cured adequately, the next critical step is refining the surface to enhance both appearance and longevity. Light sanding using very fine-grit sandpaper helps smooth out common issues such as the “orange peel” texture that often results from spray application. This subtle abrading removes minor surface irregularities without compromising the clear coat’s integrity. Careful sanding, followed by polishing with a suitable compound, restores a deep, glossy shine that echoes a factory-quality finish. Polishing not only heightens visual appeal but also flushes out any sanding marks, creating a seamless, mirror-like surface.
In some cases, an additional clear coat layer is applied after initial curing and polishing to reinforce UV protection and scratch resistance. This extra coat further enriches color depth and shields the paint from environmental damage. As with the base clear coat, the supplemental layer requires its own curing time and should be applied in thin, even coats to avoid runs and ensure a smooth finish.
Proper cleaning remains vital throughout the entire process. Before and after painting, thorough cleaning removes oils, dust, and contaminants to promote optimal adhesion and prevent surface blemishes. Utilizing a tack cloth before polishing and assembly helps ensure a pristine surface free from microscopic particles that can mar the paint.
Additionally, when fairings have undergone structural repairs or assembly using adhesives, clamping during curing is essential. Maintaining stable pressure for at least 24 hours ensures solid bonding so that finishing steps can proceed on a sound foundation.
Lastly, incorporating UV protective treatments or coatings during finishing is highly recommended. These treatments combat color fading and yellowing caused by sun exposure, extending the attractive lifespan of the paint.
For detailed insights on spray painting preparation, curing, and finishing techniques, you can explore expert resources on spray paint FAQs and finishing. Additionally, to source quality replacement or custom motorcycle fairings that complement your newly painted pieces, consider checking out the broad selection available at Summit Fairings.
Final thoughts
Successfully painting motorcycle fairings with spray paint is a multifaceted process that demands attention to detail from preparation through curing. Business owners who invest in mastering each phase—starting with meticulous cleaning and priming to ensure a smooth base, advancing through disciplined application techniques, and completing with proper clear coat finishing and curing—can achieve factory-quality results at a reduced cost. This approach not only improves the aesthetic and durability of the fairings but also enhances customer satisfaction and business reputation. Embracing these steps leads to greater efficiency, fewer defects, and ultimately, more lucrative opportunities in the competitive motorcycle aftermarket industry.
Ready to elevate your ride? Summit Fairings delivers premium, custom-fit fairings that blend style and durability. Whether you’re chasing speed or turning heads, we’ve got your bike covered. Don’t wait—transform your machine today. Click, customize, and ride with confidence. Your perfect fairing is just a few clicks away. Act now!
About us
undefined