Introduction
Painting motorcycle fairings is both an art and a process that demands attention to detail, especially for business owners looking to enhance their services. This comprehensive guide provides a step-by-step approach to painting motorcycle fairings, focusing on the preparation, priming, painting techniques, finishing touches, and insightful tips for efficiency. Each chapter unpacks key elements that are crucial for achieving durable and aesthetically pleasing results, helping your business stand out in a competitive marketplace.
Tables of Contents
Chapter 1: Mastering the Art of Preparing Motorcycle Fairings for a Flawless Paint Finish
- The Crucial Role of Surface Cleaning in Motorcycle Fairing Preparation
- The Crucial Role of Scuffing and Sanding in Motorcycle Fairing Preparation
- Meticulous Alignment and Fit Verification: The Key to Seamless Fairing Installation
Chapter 2: Achieving a Flawless Finish: Essential Surface Preparation for Motorcycle Fairings
- Mastering Surface Preparation Techniques for Optimal Paint Adhesion
- Unlocking the Secrets of Effective Priming Techniques for Stunning Motorcycle Fairings
- Elevating Your Motorcycle Fairings: The Painting Process and Expert Finishing Techniques
Chapter 3: Crafting a Flawless Finish for Motorcycle Fairings: Techniques for Expert Results
- Mastering the Final Touches: Techniques to Elevate Motorcycle Fairings Painting
- Understanding Material Dynamics: Enhancing Finishing Techniques for Motorcycle Fairings
- Mastering the 7 Essential Steps to Achieve Flawless Finishing Touches on Motorcycle Fairings
Chapter 4: Mastering Preparation for a Flawless Motorcycle Fairing Finish
- Essential Preparation Strategies for Painting Motorcycle Fairings
- Mastering the 7-Step Painting Process for Motorcycle Fairings
- Achieving Professional Finishing Techniques and Longevity for Motorcycle Fairings
Chapter 1: Mastering the Art of Preparing Motorcycle Fairings for a Flawless Paint Finish
1. The Crucial Role of Surface Cleaning in Motorcycle Fairing Preparation
To achieve a professional paint job on motorcycle fairings, thorough surface cleaning is an indispensable step that lays the groundwork for successful paint adhesion and a smooth, polished finish. Each fairing must be carefully cleaned to eliminate any contaminants that could compromise the integrity of the paint. This section delves into the essential surface cleaning techniques crucial for the preparation of motorcycle fairings.
The first phase of the preparation process begins with initial cleaning. It is imperative to wash the fairings using a degreaser or a soap solution. This initial wash removes dirt, grease, and residual manufacturing oils—factors that can severely hinder paint adhesion. A clean surface is vital not only for the aesthetics of the paint but also for its durability. During this step, each nook and cranny must be scrubbed meticulously, ensuring no residue remains. After the wash, rinsing the fairings thoroughly and allowing them to dry completely is essential. Skipping this could lead to unsightly blemishes once painting begins.
Moving forward, degreasing plays a pivotal role in the cleaning regimen. Applying a dedicated cleaner such as prep solvent or isopropyl alcohol to wipe down surfaces is a good practice, especially targeting spots that might have been missed in the initial wash. This step is crucial because even microscopic oils can impede paint adhesion. To maintain the cleanliness achieved during this cleaning phase, it’s vital to handle the fairings with care. Using gloves can help prevent recontamination from accidental touch.
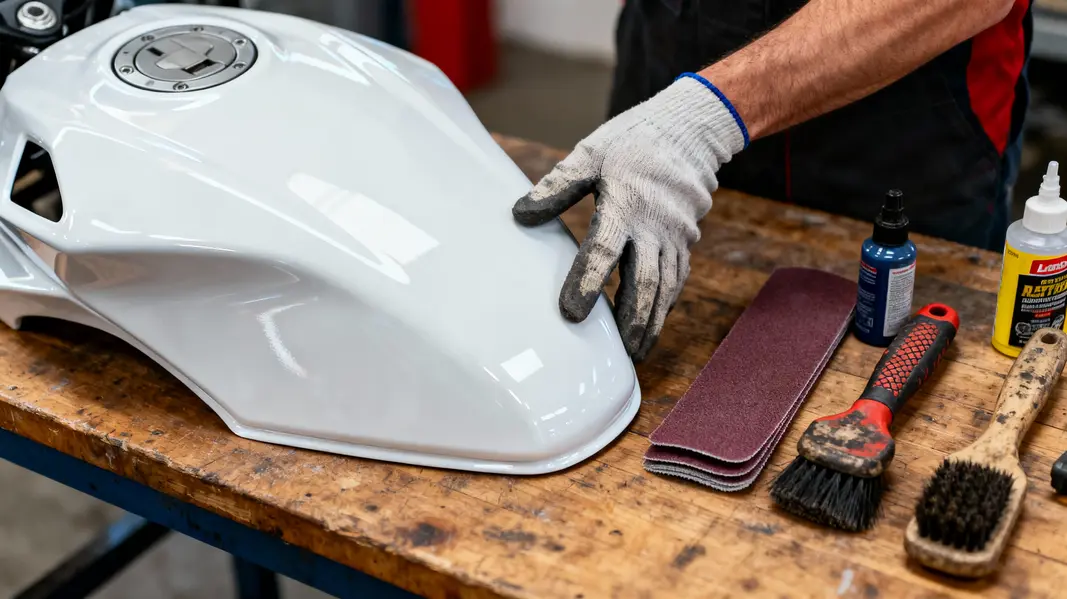
After the surfaces are prepped and cleaned, surface scuffing comes next. Once completely dried, using fine-grit sandpaper (between 400 to 600 grit) enables you to lightly scuff the surface, thereby generating a slightly roughened texture that promotes better mechanical bonding between the fairing and the paint. Scuffing is not merely about surface shaping; it’s a tactical move designed to increase the effectiveness of the paint’s grip. However, the scuffing process must be followed by a thorough re-cleaning to eliminate any dust or particles created from sanding. The importance of this cannot be overstated, as any leftover dust can result in imperfections in the final paint job.
Once sanding is complete, the final wipe-down and drying ensure that the surface is pristine. Utilizing a tack cloth or a lint-free rag soaked with solvent will give the fairing a residue-free finish. This final wipe is integral as it captures any remaining dust without introducing any new contaminants. It is advisable to orchestrate this process within a dust-free environment, as quality of the air surrounding your workspace can dramatically influence your outcome. Ensuring the fairings are completely dry before moving on to primer application is critical; hasty actions could lead to paint bubbles or peeling later on.
In summary, these surface cleaning techniques—initial cleaning, degreasing, surface scuffing, and final wipe-down—are fundamental steps that should not be underestimated. They significantly enhance the chances of achieving a professional, durable paint job that meets your expectations. By being meticulous in this preparation phase, you help create an optimal foundation for subsequent processes: the application of primer, sealer, and paint, which all hinge on how well the surface was prepped. Effectively implemented, these practices will not only save time and resources later on but foster a deeper appreciation for the artistry involved in customizing a motorcycle’s aesthetics. For more information on how to prep motorcycle fairings for paint, you can check this detailed guide on painting motorcycle fairings.
Ultimately, a well-prepared surface sets the stage for an impressive paint application, one that showcases your personal style while protecting the fairings from the elements. Remember, in the intricate undertaking of painting motorcycle fairings, meticulous cleaning is the unsung hero of the process.
2. The Crucial Role of Scuffing and Sanding in Motorcycle Fairing Preparation
Before diving into the vibrant world of color and design, the groundwork for a pristine paint job begins with the critical preparation stages of scuffing and sanding motorcycle fairings. These steps are not mere formalities; they are essential in ensuring that your paint adheres properly and delivers a smooth, durable finish. Skipping these stages can lead to disastrous results, such as peeling paint or uneven coverage, which can ruin the aesthetic and protective qualities of your finished fairings.
The process begins with scuffing, a technique that involves using pads or 320-grit sandpaper to lightly abrade the surface of the fairing. This procedure is vital as it breaks through the factory gloss on both plastic and fiberglass surfaces, significantly improving the mechanical grip needed for the paint to adhere effectively. Unlike simple cleaning, scuffing prepares the surface by creating tiny grooves, allowing the primer and paint layers to bond, thus preventing later layers from lifting or chipping.
Once you’ve successfully scuffed the surface, the next step is sanding. This phase utilizes progressively finer grits of sandpaper to refine the surface further. You typically start with 320-grit paper to tackle any rough spots or old paint. After achieving a more uniform surface, it is crucial to switch to 400-grit to smooth out any remaining imperfections and eliminate swirl marks left behind. Finally, finishing with 600-grit paper ensures a silky surface free from scratches before the priming process begins.
Integrating a systematic approach to these tasks can enhance your results substantially. Start by meticulously cleaning the fairings first, using warm soapy water or a dedicated plastic cleaner applied with a microfiber cloth. Rinse thoroughly and dry completely to remove any residue, as contaminants like grease or dust can compromise adhesion further down the line. After cleaning, it’s time to proceed with scuffing.
Apply light, circular pressure with your scuff pad or 320-grit sandpaper, maintaining an even movement across the surface. This action should only degloss the outer layer without creating deep scratches; the goal is to have a surface that is roughened adequately for primer adhesion but not damaged. Following this, move on to the sanding process: adhere to a systematic pattern when sanding, whether it’s going in straight lines or gentle circular motions. This consistency not only helps mitigate the risk of accidental gouges but also provides a uniform finish.
After all the sanding and scuffing are complete, your attention should turn to the stall in the air—the recleaning stage. Dust and debris produced during these processes can cling to the fairings, thus warranting another meticulous clean-up to eliminate any sanding residue. A damp cloth followed by a thorough dry cloth can effectively clear the surface, leaving you with a pristine canvas ready for priming.
Once your fairings are clean and smooth, the journey continues to priming, painting, and finally applying that protective clear coat. Ensuring you follow instructions for each product meticulously, particularly concerning drying times and coat layers, will contribute significantly towards achieving the quality you desire.
Additionally, the overall environment during this process cannot be overstated. Working in a dust-free area ensures that your hard work doesn’t end up compromised by particles. A well-ventilated space, paired with effective safety gear like masks and goggles, will protect you while providing a comfortable working environment.
If you find yourself daunted by these meticulous processes, remember that pre-painted kits from professionals can save hours of effort while delivering an exceptional finish. However, for those eager to embrace their creativity, mastering scuffing and sanding truly represents the foundation of a successful paint job. When done correctly, these steps not only guarantee the longevity of your paint job but also enhance the beauty and value of your motorcycle, making each ride an opportunity to showcase your hard work.
With the essential steps of scuffing and sanding integrated into your preparation routine, you can approach the next phases of painting with the confidence that your fairings are primed for a stunning transformation. For more insight into preparing motorcycle fairings for painting, visit how to prep motorcycle fairings for paint.
3. Meticulous Alignment and Fit Verification: The Key to Seamless Fairing Installation
When embarking on the journey to paint motorcycle fairings, the importance of a meticulous alignment and fit verification process cannot be overstated. This step is crucial not only for achieving an aesthetically pleasing finish but also for ensuring that the components fit correctly during reassembly. An improper fit can lead to gaps, misaligned body lines, and even operational issues after painting—making this process an indispensable part of preparation.
The initial phase begins with disassembling the fairings from the motorcycle. This allows for a thorough inspection and cleaning. Once removed, the fairings should be cleaned with a degreaser to eliminate any residual dirt, grease, or oils that may compromise paint adhesion. After cleaning, ensure that the parts are dried completely before proceeding to the next steps.
With the fairings cleaned and inspected, it is time to lightly scuff the surfaces using fine sandpaper, typically in the range of 400 to 600 grit. This creates the necessary mechanical bond for the paint to adhere properly. It is crucial to avoid excessive sanding, which could weaken the structure of the fairings. Following this, a thorough cleaning with a tack cloth is essential to remove any dust or debris left from the sanding process, ensuring a pristine surface for priming and painting.
Priming and sealing the fairings is the next logical step. Applying a suitable primer not only helps in smoothing any imperfections but also prepares the surface for the paint. It’s important to choose a primer designed specifically for plastic and fiberglass materials; using the wrong type can lead to cracking under stress. After the primer application, a sealant can block any minor imperfections that may have been missed, resulting in a flawless finish.
However, before diving into the painting phase, the alignment and fit verification becomes essential. The process starts with a dry fit test, where all fairings are temporarily placed on the bike without any hardware. This allows for an initial assessment of how well the components align with each other and with the motorcycle’s frame. Pay attention to any gaps between the fairings, particularly at the edges where they meet other parts of the bike. Using painter’s tape can be helpful to mark high spots or interferences that may need further adjustment.
Next, closely examine all mounting points, such as bolt holes, tabs, and clips. Ensuring these features align perfectly is vital to avoid any misalignment when the fairings are reapplied. Adjustments can be made using a Dremel tool or similar device, but caution is essential to avoid over-sanding, which could compromise the structural integrity of the fairings.
Once all necessary adjustments are made, conducting a mock assembly is an excellent way to verify that everything fits as intended. This involves temporarily installing fairings with clips but avoiding the application of torque at this stage. During this step, take the time to confirm that the body lines of the fairings match seamlessly with the motorcycle’s frame and tank. Capturing photographs from multiple angles during this process can also serve as a useful reference later in the project.
After completing these thorough preparation steps, you can confidently proceed to the painting process. This involves applying multiple thin base coats in a controlled, dust-free environment, followed by three or more layers of clear coat for added durability and protection. Allowing ample curing time is crucial; typically, a full 24-48-hour wait is advisable to prevent any smudges or fingerprints from diminishing the hard work already devoted to painting.
By spending adequate time on alignment and fit verification, you’re not only setting the stage for a flawless painting outcome but also ensuring that the final installation results in a bike that looks as good as it performs. Skipping this step can lead to unnecessary frustration after the painting is complete, as aligning and fitting painted fairings can become a delicate and potentially damaging process. Ultimately, a well-prepared foundation is what allows your creativity to shine through when you unveil your beautifully painted motorcycle fairings.
For additional insights on this journey, you can explore more on painting techniques and fairing specifics through resources like this comprehensive guide.
Chapter 2: Achieving a Flawless Finish: Essential Surface Preparation for Motorcycle Fairings
1. Mastering Surface Preparation Techniques for Optimal Paint Adhesion
Surface preparation is a crucial aspect of the painting process for motorcycle fairings, as it lays the foundation for a durable and visually striking finish. Every stage of this preparation is designed to ensure that paint adheres effectively and maintains its aesthetic appeal over time. Let’s explore the steps involved in preparing motorcycle fairings before applying primer and paint, focusing on cleaning, inspecting for damage, sanding, priming, and final cleaning.
Initial Cleaning is the starting point of the preparation process and cannot be overlooked. Using warm, soapy water, thoroughly wash the fairings to remove any dirt, grease, or contaminants present on their surface. This is critical because residues can prevent the primer and paint from bonding properly, leading to peeling or an uneven finish later on. After washing, rinse the fairings with clean water and dry them completely with a lint-free cloth. Ensuring a clean slate is essential for the success of your paint job, as any remaining debris could mar the integrity of the outer layers.
Once the fairings are cleaned and dry, it’s time to inspect for damage. Take a close look at the surface, checking for scratches, dents, or cracks. Any imperfections found must be addressed before moving on to further steps. Repairing these damage spots is vital; for instance, fiberglass fairings may need patches of fiberglass cloth and resin, while cracks in plastic fairings can be effectively repaired with ABS cement. This meticulous attention to detail ensures that the final paint application achieves a smooth, unblemished finish.
The next step is to embark on the sanding process. Utilizing 400-600 grit sandpaper, begin sanding the fairings to remove old paint and gloss. This not only helps to eliminate the existing finish but also creates a micro-textured surface, enabling the new primer and paint to grip better. Sanding can be performed with an orbital sander or by hand, depending on the intricacies of the fairings’ design. After an initial sanding, it is prudent to switch to finer grit sandpaper or to perform a wet sanding technique, using water to lubricate the surface. This not only reduces the risk of creating new scratches but also enhances the smoothness of the surface, preparing it appropriately for the next layers.
Once the sanding is complete, cleaning the surface again with mild soap and a soft cloth is important to eliminate any residual dust or particles that may have settled during the sanding process. Following this, you’ll be ready to proceed to the priming stage, but not before undertaking the application of the primer. Choosing the right type of primer is essential; it’s crucial to select a plastic-specific primer rather than a generic automotive one, as the latter can crack on flexible fairing plastics.
Applying primer should be done in multiple thin coats rather than one thick layer. This approach helps ensure even coverage and allows for better adhesion. Always read manufacturer guidelines for drying times, as rushing the drying process can lead to issues with the subsequent paint application. After the primer has adequately dried, a light wet sanding can help remove any roughness or imperfections such as the ‘orange peel’ effect. This step is vital in achieving a surface that is ideally smooth and uniform, setting the stage for the painting phase.
Finally, the last step in surface preparation is the final cleaning with a tack cloth. This cloth effectively picks up any dust or debris that may have accumulated on the surface during the previous processes. A clean surface is crucial before the primer and paint are applied, as any particles left behind could cause significant flaws in the paint finish, ruining the hours of work put into the preparation.
In conclusion, masterful surface preparation for motorcycle fairings is not just an ancillary task but a fundamental component of ensuring excellent adhesion and longevity of the paint job. By following a systematic approach that includes thorough cleaning, detailed inspection, careful sanding, appropriate priming, and diligent final cleaning, you lay the groundwork for an outstanding finish that will not only look great but stand the test of time. For more insights on effective techniques, consider exploring resources that might provide additional tips for prepping motorcycle fairings, such as the blog on the best ways to paint motorcycle fairings from Summit Fairings.
2. Unlocking the Secrets of Effective Priming Techniques for Stunning Motorcycle Fairings
Priming motorcycle fairings is not merely a preparatory step; it’s a crucial phase that significantly influences the longevity, adhesion, and overall appearance of your paint job. To achieve a stunning finish, one must master the principles of effective priming tailored specifically to the common materials used in fairing construction, primarily ABS plastic and fiberglass.
The journey begins with surface preparation, a decisive factor that dictates how well the primer will adhere to the fairing surface. This involves a multi-step process that starts with cleaning. Use a plastic-safe degreaser to remove any grease, dirt, and contaminants. This step is critical, especially with ABS plastic, which can repel paint if not adequately cleaned. Following the cleaning, you will want to assess the fairing for any existing imperfections such as scratches or cracks. Addressing these flaws before priming is vital; use fiberglass cloth and resin for fiberglass fairings or ABS cement for any repairs on plastic.
Once prepared, the next phase is sanding, an essential practice that creates a textured surface for the primer to grip. Using sandpaper with a grit of 400-600 will efficiently scuff the surface, improving the bond between the primer and fairing. This textured surface is particularly significant for flexible ABS, which requires extra care to ensure even adhesion, whereas fiberglass can tolerate a smoother finish. Take your time with this process; the quality of the sanded surface can prevent future peeling.
With a clean, sanded, and repaired fairing ready for priming, choosing the right type of primer is the next critical decision. The ideal primer should enhance adhesion while addressing the specific needs of ABS plastic or fiberglass. Epoxy-based primers are excellent for bare fiberglass and metal edges due to their superior adhesion and chemical resistance, making them perfect for harsh environments. On the other hand, urethane primers are often favored for ABS plastic due to their quick drying time and smooth finish. If working with OEM plastics, consider using an adhesion promoter spray to boost bonding before applying your main primer, ensuring a solid base for the succeeding paint layers.
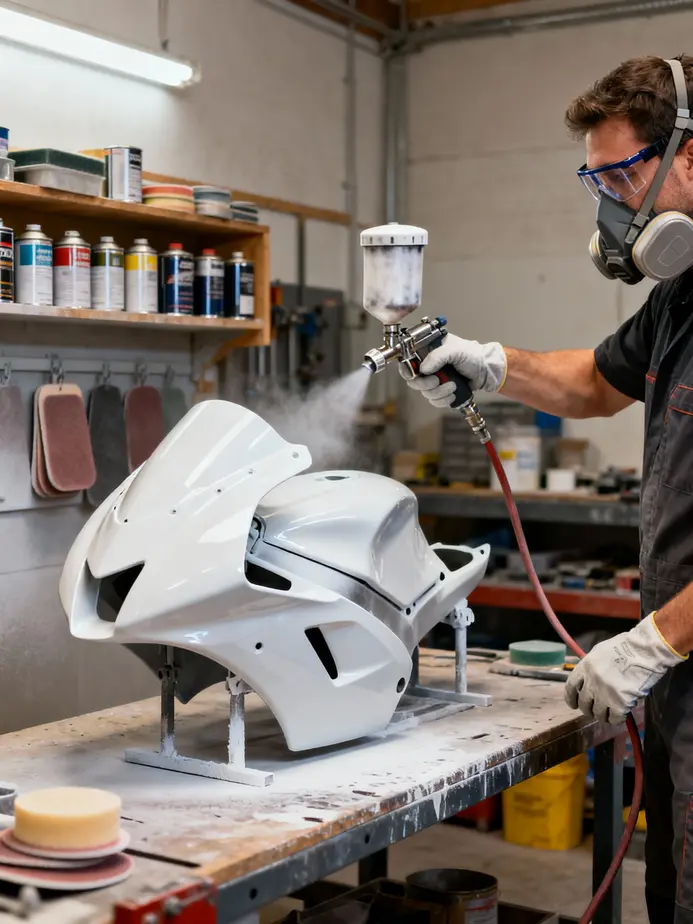
When it comes time for application, utilizing the right tools is essential. Many professional painters prefer an HVLP (High Volume Low Pressure) spray gun, which allows for fine control and less overspray. Aim for a consistent distance of about 6 to 12 inches from the surface while applying the primer to ensure an even coat. It’s recommended to apply two to three light, overlapping coats, allowing a flash time of about 10-15 minutes between coats. This strategy minimizes the risk of runs, which are especially troublesome on intricately shaped fairings. If you’ve encountered areas that require extra attention, feel free to touch them up between the layers.
Creating an optimal priming environment can significantly impact your results as well. Aim for a warm and dry space, typically around 70°F with low humidity, as high humidity might lead to defects such as the dreaded orange peel effect. Good ventilation is equally important for the applicator’s safety and for a smooth finish.
As for drying and curing, one must pay careful attention to the specifications provided by the manufacturer of the primer. Generally, you can expect the primer to become tack-free within 30 to 60 minutes, but a full cure might take 24 to 48 hours. Rushing this process will often result in failed adherence and an unsatisfactory final appearance. After curing, you might need to sand lightly again to eliminate any texture from the primer, creating a smoother surface for the topcoat.
Finally, it’s essential to troubleshoot any potential issues proactively. Peeling may occur if the surface preparation was inadequate, in which case, you will need to revisit the sanding and cleaning steps. Likewise, if you notice cracks due to overly thick coats of primer, a lighter application is in order. Testing adhesion on scrap pieces of ABS or fiberglass before tackling the fairings can provide a crucial understanding of how the materials respond to your chosen primer system.
By investing the time and effort into mastering these priming techniques, you set the stage for achieving vibrant and long-lasting paint finishes on motorcycle fairings, ultimately enhancing both the aesthetics and functionality of your motorcycle. For additional guidance on preparing motorcycle fairings for paint, check out pertinent resources here.
3. Elevating Your Motorcycle Fairings: The Painting Process and Expert Finishing Techniques
Painting motorcycle fairings is an intricate journey that demands not only skill but a structured approach. This seven-step process guarantees a transformation that looks as impressive as it performs. Starting with a meticulously prepped surface is paramount; thorough cleaning ensures that dirt, grease, and other contaminants do not compromise paint adhesion. Once the fairings are scrubbed free of impurities, inspecting them for any physical damage such as scratches or cracks comes next. For fiberglass fairings, specialized repair techniques like the use of fiberglass cloth and resin are essential, while plastic fairings can be mended with ABS cement. The primary goal at this stage is to create a smooth foundation that will allow the subsequent layers to adhere correctly.
Surface preparation continues with sanding, commencing with a coarser grade of 400-600 grit sandpaper. This initial sanding sheds old paint and gloss, but it’s important to gradually progress to finer grits, ultimately achieving a silky finish by wet sanding. By the end of this phase, a thorough cleaning with a tack cloth is essential to rid the surface of any dust particles that might ruin an otherwise flawless paint application.
With the surface now ready, the next step in this meticulous process is applying a suitable primer. Here, it is critical to use a plastic-specific primer designed for the fairings, steering clear of standard automotive primers that can lead to cracks when applied to flexible surfaces. The application of multiple thin coats allows for an even surface and optimal adhesion for the color layers to follow. Each layer needs adequate drying time, typically a few minutes, and a light wet sanding can polish the primer in between each application, enhancing the smoothness of the base.
Transitioning to paint, high-quality spray paint that is specifically formulated for motorcycle applications is vital. Careful application of several thin layers prevents drips and ensures an even finish; allowing the paint to build up gradually is key. This phase also invites creativity, whether you opt for traditional gloss, sleek matte, or eye-catching metallic finishes. Each choice broadcasts a unique character of the motorcycle; metallic paints, for instance, can lend a reflective depth that highlights the fairing’s curves beautifully, while matte finishes exude a modern aesthetic. The versatility continues with options like pearl and candy finishes—these involve more complex layering that can create stunning visual effects through color-shifting or added vibrancy.
Once the desired paint layers are achieved, the time has come to apply decals, stickers, or any graphics you envision on your bike. Precision in placement is crucial, as misplaced graphics can impair the aesthetic appeal of your fairings. Following this, at least three clear coat layers must be uniformly applied. The clear coat serves as the ultimate shield against potential hazards such as UV rays, chipping, and more. It’s a protective layer that not only enhances the finish but prolongs the life of the paint job, preventing fading that can happen over time.
Finishing techniques play a significant role in achieving that high-end, professional look. After the clear coat is applied, the fairings require sufficient curing time—often ranging from 24-48 hours, or following manufacturer instructions—to ensure the paints adhere properly. Once cured, you may choose to wet sand the surface and progress to polishing. This final touch helps to smooth out any imperfections like the common ‘orange peel’—a texture that can detract from an otherwise stunning paint job.
Throughout this elaborate journey, maintaining a dust-free and well-ventilated workspace is essential to avoid contamination during painting and finishing. Equally important is ensuring adequate safety measures are in place, including proper safety gear to protect your health. For those unsure about tackling such a detailed task, consider purchasing pre-painted fairings from professionals. These kits often utilize advanced layered processes designed for enhanced durability and aesthetic appeal, allowing you to enjoy a beautifully finished motorcycle without the hassle. If you’re interested in mastering these techniques further, a guide on the preparation steps for painting motorcycle fairings can provide additional insights. Learn to transform your motorcycle with care, creativity, and confidence!
Chapter 3: Crafting a Flawless Finish for Motorcycle Fairings: Techniques for Expert Results
1. Mastering the Final Touches: Techniques to Elevate Motorcycle Fairings Painting
The intricacies of painting motorcycle fairings lie not just in the application of color but in the meticulous attention to finishing techniques that define the ultimate aesthetic and protective qualities of the fairings. As any seasoned painter will tell you, the preparation and application stages are merely a prelude to the finishing touches that ensure durability and vibrancy. This subchapter delves into a seamless process, emphasizing the critical techniques essential for achieving truly professional results.
First and foremost, surface preparation plays a pivotal role in the painting process. It is essential that the fairings are cleaned thoroughly to remove any contaminants, including dirt, grease, and residue from previous paint jobs. A simple wash with warm, soapy water, followed by rinsing and drying, sets the foundation. After cleaning, take time to inspect the fairings for any imperfections. Be it scratches, dents, or cracks, repairing these flaws is necessary before moving forward. For fiberglass fairings, this might mean utilizing fiberglass cloth and resin along with sandpaper to smooth out imperfections. Plastic fairings can be mended using ABS cement, ensuring the surface is adequately prepared to receive paint.
The next phase, sanding, creates a smooth canvas, which is vital for both adhesion of paint and the overall finish. Starting with a coarser sandpaper in the range of 400 to 600 grit is advisable, moving to finer grits for a seamless surface finish. Cleaning the surface afterward with a tack cloth eliminates any dust particulates, preventing them from marring the final appearance.
Once the surface is primed and prepped, acetone or a plastic-specific primer should be evenly applied, creating a uniform base for the color layers to follow. Unlike conventional automotive primers that may crack under flexible conditions, a suitable primer will enhance paint adhesion and vibrancy, elevating the final finish. Following the drying time recommended by the manufacturer is crucial; rushing this step could lead to disastrous paint results.
With the primer cured, it’s time for the base coating. Apply your color paint in thin, even layers, allowing proper drying time between layers to avoid unsightly runs. The quality of paint you choose significantly affects the outcome, and options abound, from high-gloss to matte, and even eye-catching metallic or candy finishes. Each layer of paint should not only enhance color vibrancy but also contribute to the protective barrier over the fairings. To achieve an ultra-smooth result, you can lightly sand between layers, ensuring the surface remains even.
If personalized designs or details are desired, the application of decals should occur right after the base coat. Precision in placement is paramount; air bubbles trapped underneath can undermine the aesthetic and longevity of the finish. It’s critical to allow ample time for decals to adhere properly, which sets the stage for the subsequent clear coat.
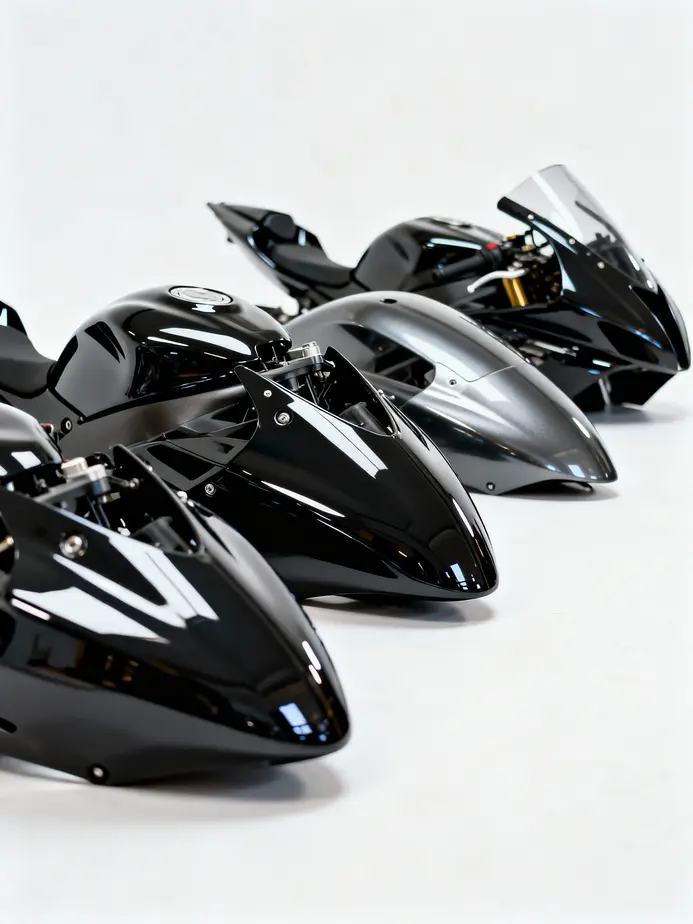
The clear coat layers are arguably the linchpin of the finishing process. A minimum of three coats should be applied to form a robust protective shell over the paint and decals. Selecting the right type of clear coat is essential, as various options exist—gloss for shine, metallic for sparkle, pearl for shimmer, and matte for an understated aesthetic. Each coat must cure properly before applying the next; failing to do so might lead to issues such as peeling or bubbling in the finish.
Finally, after the last clear coat has dried completely, a period of final curing is necessary. This ensures that the fairings can withstand environmental factors, from UV rays to moisture, while maintaining a polished appearance. Once cured, light polishing removes any imperfections, enhancing shine and depth of color. Regular maintenance is key following completion; using gentle cleaners suitable for the finish type can help preserve its appeal.
In sum, mastering the finishing touches when painting motorcycle fairings is an art form—one that combines technique, patience, and precision. By adhering to these crucial steps, from fundamental preparation to the application of final clear coats, motorcycle enthusiasts can achieve not just a visually striking finish but also a high degree of protection for their fairings. Such diligence effectively safeguards your investment in custom motorcycle fairings, ensuring that their brilliance stands the test of time. For deeper insights into the painting process, refer to guides such as how to paint plastic motorcycle fairings for tips on optimal techniques and materials.
2. Understanding Material Dynamics: Enhancing Finishing Techniques for Motorcycle Fairings
The material composition of motorcycle fairings is more than an aesthetic choice; it fundamentally impacts every step in the painting process. Whether they are constructed from carbon fiber, ABS plastic, or fiberglass, each material presents unique characteristics that dictate how well paint adheres and how resilient the final surface will be against the elements. As we delve deeper into the nuances of material selection and its influence on finishing techniques, we uncover the essential practices that can elevate a paint job from average to exceptional.
ABS Plastic Fairings
For many motorcycle enthusiasts, ABS plastic is the go-to choice for fairings due to its lightweight nature and flexibility. However, working with ABS requires particular attention to surface preparation and paint selection to ensure optimal adhesion. Before applying any primer or paint, it is critical to clean the fairings thoroughly to remove any oils, residues, or contaminants that can hinder paint adhesion. Using an adhesion promoter is often recommended when preparing ABS surfaces, especially if they are high-gloss or have been treated with release agents. These compounds can significantly enhance paint bonding, reducing the likelihood of peeling or flaking over time.
When applying paint, several thin coats should be favored over a single thick one. This technique allows each layer to bond properly while minimizing the risk of runs or uneven surfaces. The luxurious depth of a high-gloss finish is achievable on ABS, yet it requires diligence to avoid the common pitfalls associated with this plastic. Failing to sand and prepare the surface adequately can lead to a finish that, while initially stunning, may deteriorate as it is exposed to the motorcycle’s operating environment.
Fiberglass Fairings
Fiberglass, renowned for its strength and lightweight properties, is another popular choice among performance-oriented riders. Yet, this material demands meticulous preparation to maximize its compatibility with paint. The initial steps involve sanding away any existing paint and imperfections, leaving a clean and smooth surface. Properly done, this groundwork enables fiberglass fairings to accept multiple paint coats and protective layers effectively.
One advantage of fiberglass is its ability to retain color and durability after painting, especially when combined with high-quality clear coats designed to withstand UV exposure and environmental damage. The application of several thin layers, just as with ABS, promotes better adhesion and a striking finish. It also allows craftsmen to incorporate graphics or decals seamlessly, injecting a personal touch into the fairing’s design. However, the same care must be taken with fiberglass, as the risks associated with insufficient preparation can lead to delamination or paint failure under stress.
Durability of Paint Finishes
Across all materials, the choice of paint finish plays a pivotal role in how well the final product holds up over time. Gloss and metallic finishes are generally preferred for their resilience and ease of maintenance, while matte and pearl finishes can offer unique aesthetics but require more vigilant care to prevent scratches or surface inconsistencies. For those considering the longevity of their motorcycle fairing paint, investing in a high-quality clear coat is non-negotiable. This final layer acts as a shield, providing enhanced durability to even the most delicate finishes.
Moreover, an effective painting process follows a systematic approach: preparation, primer application, multiple layers of paint, graphic placement, and finishing with at least three coats of clear coat. Additionally, using protective overlaminates adds an extra layer of defense against abrasions and environmental exposure, preserving the dive into creativity that is important for custom paint jobs.
Application Environment
The environment where painting occurs is equally vital. Factors such as temperature and humidity can dramatically influence how well each paint layer settles and adheres. Ideal conditions usually hover around moderate temperatures with controlled humidity levels to ensure proper film flow and reduce any risk of edge lifting, which can be particularly problematic on curved surfaces found in motorcycle fairings.
For those looking to deepen their understanding of these processes and enhance their skills, a wealth of information is available. Engaging with expert guidance not only improves the technical aspects of painting but also fosters a deeper appreciation for the artistry inherent in this trade. For further insights into preparation techniques and paint application methods, consider checking out related resources like this detailed overview of how to prepare motorcycle fairings for paint.
When painting motorcycle fairings, understanding the material dynamics is crucial to achieving flawless finishes and ensuring lasting durability. Armed with the right techniques and knowledge about various substrates, any enthusiast can turn a simple fairing into a masterpiece, revolutionizing not only the look of their motorcycle but also elevating their riding experience to new heights.
3. Mastering the 7 Essential Steps to Achieve Flawless Finishing Touches on Motorcycle Fairings
Achieving a stunning finish on motorcycle fairings is not merely about painting; it’s an art form that involves meticulous attention to detail and a step-by-step approach. After preparation and priming, the finishing touches are crucial in transforming your painted fairings from a simple job to a professional masterpiece. This process not only enhances the aesthetics of the motorcycle but also secures the longevity of your paint job. The following seven essential steps detail how to master the finishing touches effectively.
Step 1: Clear Coating
The first vital step in this finishing process is the application of a clear coat. A UV-resistant clear coat should be applied in multiple thin layers—typically, at least three are recommended for extensive protection. This clear layer not only enhances the depth of color but also shields the painted surface from environmental damage. Utilizing a spray gun ensures an even application across the entire fairing, facilitating smooth coverage. It’s important to allow 24-48 hours for full curing, adhering to the manufacturer’s guidelines to achieve the best results.
Step 2: Curing and Initial Smoothing
Before moving forward, allowing the clear coat ample time to cure is critical. A fully cured clear coat hardens the surface significantly, making it easier to work with. After this curing period, take 2000-3000 grit wet sandpaper to remove any imperfections like the undesirable ‘orange peel’ texture. This process should be performed delicately—enough to smooth the surface without consuming layers of the clear coat beneath.
Step 3: Polishing
Once the surface is smooth, the next step involves polishing. Utilizing a quality polishing compound with a buffer will significantly enhance the gloss of the clear coat. Take extra care during this step to avoid over-polishing, which may burn through the clear coat. A recommended approach is to test out the compound on a small, inconspicuous area first to gauge the effect and ensure optimal shine without risking damage.
Step 4: Final Inspection
An exhaustive inspection under bright lighting is crucial at this stage. Look for any runs, dust particles, or areas of uneven gloss. Marks that can mar an otherwise perfect finish should be addressed immediately. If any small blemishes or flaws are found, they can be remedied with matching paint, followed by a careful re-clear coating. Leveraging sharp lines from the previous masking tape can help reinstate clean edges, making touch-ups initially easier.
Step 5: Wet Sanding Refinement
In case minor imperfections persist post-polishing, a second round of wet sanding may be necessary. Using ultra-fine grit sandpaper will yield a mirror-like finish. Sand gently around contoured edges and complex shapes of the fairings—this attention to detail ensures that even the smallest areas receive a professional-quality shine. After sanding, polish again to bring the reflective quality back up.
Step 6: Waxing Application
To protect your new finish further, applying automotive wax acts as a sealant. This step is essential to enhance UV protection and make cleaning and maintaining the fairings more straightforward. Regular waxing helps prolong the shine and reduces the risks associated with environmental damage such as fading or chipping. This simple yet impactful measure helps maintain the brilliance of your paint job for a longer duration.
Step 7: Ongoing Maintenance
Finally, maintaining the pristine condition of your fairings requires commitment. Regular washing with a mild soap and water solution will remove contaminants without damaging the clear coat. Steer clear of abrasive cleaning agents that could erode the protective layers over time. When not in use, it’s advisable to store the motorcycle in a garage or covered area, shielding it from harsh weather conditions. Conduct annual inspections to address any wear and tear proactively, ensuring your painted fairings remain in tip-top shape.
Following these steps methodically will ensure that you not only achieve an impressive finish on your motorcycle fairings but also prolong the life of both the paint and the fairings themselves. Each step complements the last, culminating in a spectacular and long-lasting finish. For more insight into the preparation and painting process, refer to how to prep motorcycle fairings for paint.
Chapter 4: Mastering Preparation for a Flawless Motorcycle Fairing Finish
1. Essential Preparation Strategies for Painting Motorcycle Fairings
Successfully painting motorcycle fairings demands a focused approach to preparation. This phase is the bedrock upon which a beautiful and durable paint job rests. The right techniques ensure that the paint adheres flawlessly, providing both aesthetic appeal and protection from the elements. Understanding the specific properties of the materials involved and adhering to an efficient process can streamline the effort.
Material Assessments and Their Importance
Before diving into any preparatory work, it’s essential to identify the type of fairings you are dealing with. Fairings are commonly constructed from thermoplastics, ABS plastics, or reinforced materials like carbon fiber. Each of these materials has unique qualities that influence how you should handle them during painting. For instance, carbon fiber, while lightweight, is sensitive to UV radiation, necessitating a robust protective clear coat. Conversely, ABS plastics found in many belly or undertail panels are relatively flexible yet can be prone to cracking if not properly prepped.
Another critical aspect is the condition of the fairings themselves. Before embarking on any painting project, inspecting for cracks, scratches, or any form of damage is paramount. If you find such imperfections, addressing them early on, perhaps by using flexible fillers or adhesives specific to plastics, saves time in the long run and guarantees a smoother application of paint.
Thorough Cleaning Procedures
Cleaning surfaces is a vital precursor to a successful paint job. Begin by washing the fairings with warm soapy water to rid them of dirt and grease. This initial cleaning is crucial, but it should be followed by a more specialized approach using plastic-safe degreasers such as isopropyl alcohol or dedicated prep solvents. Standard automotive cleaners can adversely affect the integrity of plastics, creating an unsound base for adhesion. After cleaning, you may also consider using an adhesion promoter, especially for thermoplastics, to enhance bonding with the upcoming layers of primer and paint.
Strategic Surface Preparation
Once clean, the surface of the fairings requires meticulous preparation through sanding. This process should utilize a range of sandpapers, starting from around 320 to 400 grit to scuff the glossy areas lightly. This scuffing provides a textured surface that encourages better mechanical adhesion of the paint. However, caution is necessary; particularly with flexible fairings, over-sanding them may lead to warping, which can negatively impact both the fit and appearance.
Before moving on to the primer stage, any minor imperfections, such as dents, should be filled with plastic filler designed for flexibility. Sand these filled areas to a smooth finish, followed by careful masking of any regions where paint should not touch, such as mating edges and vents, ensuring that the final paint job maintains clean lines.
Priming for Optimal Adhesion
Priming is an indispensable step that lays the foundation for paint adhesion. For plastics, it’s vital to choose a primer specifically formulated for these materials. Use a flexible adhesion promoter designed for thermoplastics or polycarbonate materials. Applying two to three light coats of primer allows the surface to develop a secure bonding interface for paint. Each coat should have a flash time of about 10-15 minutes between applications. Full curing of the primer, typically lasting 24 to 48 hours in a controlled, dust-free environment (ideally at temperatures of 60-80°F), is crucial to prevent issues such as fisheyes or peeling, which can nullify all preceding efforts.
Efficiency in the Workspace
Setting up your workspace properly can enhance efficiency drastically. A well-ventilated area equipped with dust control measures, like tack cloths and suitable hanging systems for the fairings, minimizes imperfections in your paint job from dust particles and drips. Working in batches is another productivity booster; preparing and priming multiple fairings simultaneously reduces the time taken to switch between tasks.
Lastly, safety should be prioritized throughout the process. Always don a respirator, gloves, and protective eyewear, and facilitate good airflow in your workspace to deal with hazardous solvents effectively.
By understanding the materials involved and executing each preparatory step with diligence, you’ll lay a resilient foundation for the painting phase of your motorcycle fairings, ultimately leading to a finish that stands up to the test of time and the rigors of the road. For a deeper exploration into the specifics of fairing preparation, including in-depth details about surface treatment and material compatibility, check out the guide on how to paint plastic motorcycle fairings.
2. Mastering the 7-Step Painting Process for Motorcycle Fairings
To achieve a flawlessly painted motorcycle fairing that withstands the test of time, adopting a 7-step layered approach can significantly improve efficiency and end results. This process emphasizes the importance of preparation, precision, and multi-coat technique, providing not only aesthetic appeal but also a protective layer that defends against harsh environmental factors.
First and foremost, the foundation of any successful paint job lies in prep and sanding. This initial stage involves thoroughly cleaning the fairing surface to remove dirt, grease, and residues from previous finishes. Using warm, soapy water is ideal; once washed, it’s critical to rinse and dry the fairings completely. During this stage, examine the fairings for any signs of wear, such as scratches, dents, or cracks. Found imperfections should be adequately repaired prior to proceeding. For fiberglass fairings, utilize fiberglass cloth, resin, and filler as necessary to create a smooth surface. In the case of plastic components, a reliable ABS cement can do wonders in rectifying any cracks or breaks.
Next, get to sanding. Begin with 400-600 grit sandpaper to remove any lingering gloss or old paint that might impede the adhesion of new layers. As you sand, remember to utilize finer grits or opt for wet sanding to further achieve that silky-smooth texture. Cleaning the surface with a tack cloth post-sanding is essential; this will help eliminate any dust, ensuring a pristine surface for optimal paint adhesion.
The third step is the primer application. Using a plastic-specific primer is vital, as standard automotive primers often crack under the flex of flexible fairings. The primer acts as a bridge, filling minor imperfections in the surface while ensuring an even base for subsequent layers. Apply a thin coat of primer uniformly, and allow it to dry as per the manufacturer’s recommendations.
Moving onto the base coat, this step is where you really allow your creativity to shine. Utilize high-quality motorcycle-specific spray paint, applying multiple thin layers rather than a single thick one. Not only does this promote a consistent finish, but it also quickens the drying time between coats, allowing for more efficient layering. Choose from a variety of finishes—gloss, metallic, matte, candy, or pearlescent—keeping in mind that gloss and metallic tend to yield the most durable results. In fact, natural light can be a useful ally when inspecting your metallic finish for coverage anomalies.
Once the base color has established a satisfactory layer, it’s time to bring your fairings to life by adding decals and other details. Be precise during application; whether you’re placing logos, stripes, or custom designs, work carefully to avoid wrinkles or misalignment. Additionally, applying decals before the clear coat ensures they have a seamless and integrated appearance.
After detailing, the final stage involves applying at least three layers of clear coat. This protective finish is paramount, as it guards your paint job against scratches, UV damage, and general wear and tear from the elements. Similar to the base coatings, multiple thin layers work far better than a thick single application. Use matte finishes judiciously, as these can wear unevenly if not applied correctly. Be patient; critical curing time must be followed to guarantee a superior finish.
To further enhance efficiency, work within a dust-free, well-ventilated environment, minimizing the risk of particles marring your paint job. Always wear the appropriate safety gear, including a mask and goggles, to safeguard your health throughout the process. For those looking to save time or minimize risk, considering a pre-painted kit from professionals may be wise; many such kits come ready-to-apply with proven durability.
The results achieved by investing ample time in each of these stages will not only give your motorcycle fairings a professional finish but will also ensure they endure over the long haul. Your motorcycle is an extension of your personality and investment—treat it with the care it deserves through every meticulous application and layering technique, thus enjoying a ride that is as visually stunning as it is exhilarating. For more on the specifics of sanding and prepping motorcycle fairings, see our detailed guide on how to prep motorcycle fairings for paint.
3. Achieving Professional Finishing Techniques and Longevity for Motorcycle Fairings
When embarking on the journey to paint motorcycle fairings, understanding the significance of finishing techniques is paramount. A well-finished fairing not only enhances the aesthetic appeal of the motorcycle but also ensures durability against various environmental elements. To achieve a robust protective layer and a striking look, opt for gloss or metallic paint finishes, which are known for their longevity and easy maintenance compared to their matte or pearl counterparts. These finishes can endure scratches and resist degradation better, making them the preferred choice for any motorcycle enthusiast.
An efficient multi-layer painting process can elevate the results significantly. Start with thorough surface preparation, ensuring that the fairings have been sanded uniformly and cleaned to remove any contaminants. This foundational stage is critical. Following that, apply a specialized plastic primer before moving on to the paint application. A professional recommended practice is the 7-step paint process: 1. Sand and prep the surfaces meticulously. 2. Apply a suitable primer suitable for plastics. 3. Lay down multiple coats of the paint of your choice to build depth. 4. Add any desired decals or graphics at this stage. 5. Finish with at least three layers of clear coat to provide essential UV protection and guard against the harsh elements.
Selecting the right materials plays a pivotal role in achieving longevity in your motorcycle fairings. For those looking towards high-performance applications, carbon fiber emerges as a material of choice, boasting an impressive strength-to-weight ratio alongside enhanced stiffness. However, be aware that carbon fiber requires UV protection and may need specialized repairs to avoid degradation over time. Conversely, if the application leans more toward impact resistance, reinforced thermoplastics or polycarbonate are excellent alternatives, especially for windscreens and panels that are more susceptible to damage. Their robustness makes them ideal for riders seeking a balance between cost and performance; hybrid composites often provide an effective middle ground, ensuring a good compromise without the premium price tag.
To enhance the durability of a motorcycle’s metal components, consider adopting surface treatments like powder coating or electroplating. Powder coating offers a thick, tough layer of protection, effectively safeguarding against corrosion and wear while enhancing aesthetic appeal. Alternatively, electroplating can imbue components with a hard, shiny finish perfect for those seeking additional glamor and protection. For fiberglass fairings, applying chemical conversion coatings can significantly improve paint adhesion, ensuring a long-lasting finish that withstands the elements.
Regular maintenance is essential for preserving the quality of painted fairings. Cleaning the fairing surfaces with pH-neutral products after rides is crucial for maintaining the integrity of the finish. Additionally, applying wax or sealants quarterly can effectively enhance water repellency and resistance to scratches, allowing the paint to maintain its vibrancy over the years.
Working in a carefully controlled environment is another aspect worth noting. A dust-free setting with proper ventilation ensures that paint application occurs without contaminants that could mar the finish. Utilizing electrostatic spray technology in powder coating applications can lead to a more even distribution and appearance. For the less experienced painter, opting for pre-painted kits from reputable suppliers can also yield impressive results, as these products are manufactured under quality control processes to ensure both fitment and color accuracy, saving time and minimizing DIY pitfalls.
Testing small areas when experimenting with custom finishes is a wise strategy to mitigate risks. Furthermore, consider modular design for individual components to allow for straightforward replacements without the need for a complete overhaul of the motorcycle. This approach not only saves time but also facilitates the maintenance of the motorcycle’s aesthetics without substantial investment.
In the broader scope of motorcycle fairing preparation and painting, understanding the intricacies of finishing techniques can greatly influence both the longevity and appearance of the bike. By adhering to these tips, utilizing high-quality materials, and engaging in regular upkeep, riders can protect their investment while showcasing a vibrant and appealing fairing that will endure road conditions for miles to come. For further insights into the preparation needed before painting, explore resources on prep techniques at the Summit Fairings Blog.
Final thoughts
Completing high-quality paint jobs on motorcycle fairings requires meticulous preparation, skilled application of paint, and thoughtful finishing techniques. By implementing the methods outlined in this guide, business owners can enhance their service offerings, ensure customer satisfaction, and cultivate a reputation for excellence. Remember, every detail counts when it comes to fairing customization and repair—adopting best practices not only beautifies but also adds value to the motorcycle they adorn.
Ready to elevate your ride? Summit Fairings delivers premium, custom-fit fairings that blend style and durability. Whether you’re chasing speed or turning heads, we’ve got your bike covered. Don’t wait—transform your machine today. Click, customize, and ride with confidence. Your perfect fairing is just a few clicks away. Act now!
About us
We are one of the leading motorcycle fairing export sites, with over 3,000 styles across almost all motorcycle models. Buy from summitfairings.com, and pay 10-40% less than the prices on other sites. If you have any questions, we promise we will have your answer within six hours.