Introduction
Repainting motorcycle fairings is a critical service that can significantly elevate the appeal and value of customers’ bikes. For business owners, mastering this process means delivering superior results that combine longevity with flawless aesthetics. Achieving such quality requires a deep understanding of each phase—from meticulous surface preparation and expert repair techniques to precise paint application and robust finishing. This guide breaks down the essential steps you need to refine your repainting workflow and satisfy discerning clients. Chapter one covers how to properly prepare and repair fairings to ensure a strong paint bond and maintain structural integrity. Chapter two dives into best practices for applying primer and paint layers effectively to prevent common defects. Finally, chapter three reveals finishing and protection strategies that safeguard the paintwork and yield a polished, professional look. Together, these insights empower your business to stand out in the competitive motorcycle restoration and customization market.
Tables of Contents
Chapter 1: Surface Preparation and Repair Techniques for How to Repaint a Motorcycle Fairing
- Mastering Surface Cleaning and Paint Removal for Flawless Motorcycle Fairing Repainting
- Mastering Damage Repair: Essential Steps to Restore Motorcycle Fairings Before Painting
- Mastering Primer Application and Sanding to Perfect Your Motorcycle Fairing Surface
- Mastering Paint and Clear Coat Application for a Flawless Motorcycle Fairing Finish
- Maximizing Longevity: Protecting and Maintaining Your Repainted Motorcycle Fairing
Chapter 2: Mastering the Paint Application Process for Motorcycle Fairings
- Essential Surface Preparation Techniques for a Flawless Motorcycle Fairing Paint Job
- Mastering Primer Application: The Foundation for a Durable Motorcycle Fairing Paint Job
- Mastering the Art of Layering and Drying for a Flawless Motorcycle Fairing Finish
- Mastering Clear Coats and Advanced Protection to Preserve Your Motorcycle Fairing’s Finish
- Mastering Curing and Finishing for a Durable, Glossy Fairing Paint
Chapter 3: Finishing and Protection Strategies for a Durable Motorcycle Fairing Repaint
- Mastering Multiple Clear Coat Applications to Preserve and Enhance Your Motorcycle Fairing
- Mastering Protective Waxing: Enhancing Finish and Longevity in Motorcycle Fairing Refinishing
- Shielding Your Motorcycle Fairing: Effective UV Protection and Environmental Defense
- Choosing Robust Base Materials for Enhanced Finishing and Long-Term Protection
- Essential Care and Maintenance Techniques to Preserve Your Repainted Motorcycle Fairing
Chapter 1: Surface Preparation and Repair Techniques for How to Repaint a Motorcycle Fairing
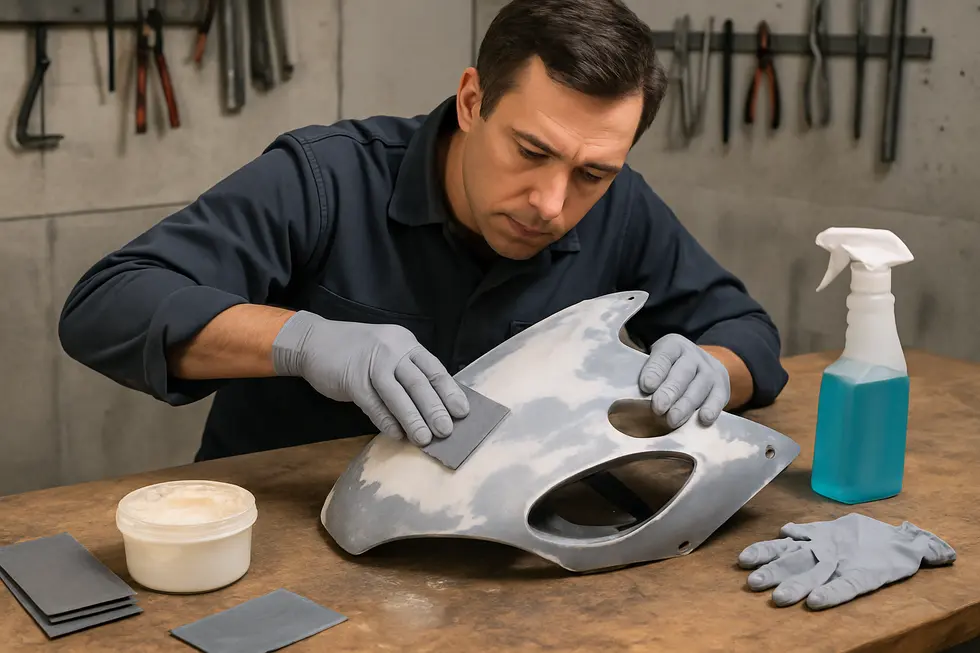
1. Mastering Surface Cleaning and Paint Removal for Flawless Motorcycle Fairing Repainting
Properly preparing a motorcycle fairing’s surface begins with meticulous cleaning and old paint removal, both critical for achieving a durable, smooth new finish. Start by thoroughly washing the fairing with warm water and a mild detergent to eliminate dirt, grease, and any wax residues. For stubborn oils or contaminants, applying a degreaser or isopropyl alcohol enhances effectiveness by ensuring a contaminant-free surface, vital for paint adhesion.
Once clean, attention turns to removing the existing paint layer. Sanding is the preferred method, beginning with a coarse grit like 320 to efficiently strip away old paint without damaging the plastic substrate. Gradually progress to finer grits (600 to 800) to smooth the surface and feather edges, preparing it for the subsequent primer layer. When sanding plastic fairings, gentle pressure and consistent motions help prevent gouging or warping. Alternatively, chemical paint strippers formulated specifically for plastics may be employed but require careful ventilation and protective gear due to their harsh nature.
After paint removal, inspect the surface closely for any imperfections such as minor scratches or surface irregularities. Cleaning the fairing again removes residual dust and sanding debris; using a tack cloth or microfiber towel with a surface prep solvent ensures the area is completely free of particles that could interfere with the primer. Applying a plastic-compatible primer follows, improving paint adhesion and durability by creating an ideal bonding layer.
This comprehensive approach to cleaning and paint removal lays the foundation for a professional-grade repaint. For additional visual guidance on handling fairing cleaning, paint removal, and preparation, informative tutorials demonstrate step-by-step techniques that respect the fairing’s material integrity and optimize results. For further insights on sourcing quality fairings or refreshing your motorcycle’s look, explore the detailed information at Explore the Best Motorcycle Fairings at Summit Fairings.
See the comprehensive repainting tutorial here: https://www.youtube.com/watch?v=OpXwXk-Fh08
2. Mastering Damage Repair: Essential Steps to Restore Motorcycle Fairings Before Painting
Repairing damages on a motorcycle fairing before repainting is a critical step that lays the foundation for a smooth, lasting finish. To begin, the affected area must be thoroughly cleaned to remove all dirt, grease, and residue that could interfere with paint adherence. Using gentle soap or a plastic-safe degreaser ensures no harmful chemicals degrade the fairing’s surface.
Once clean, lightly sanding the edges around scratches or cracks with fine-grit sandpaper helps feather the damaged zones into the surrounding surface. This gradual transition is vital for a seamless repair. For deeper gouges or holes, applying a plastic or epoxy filler designed for ABS or plastic materials creates a robust repair that can withstand future stress.
After the filler cures fully, careful sanding smooths the repaired area until it is flush and uniform with the rest of the fairing. This step removes any excess filler and refines contours, eliminating unevenness that would otherwise show through paint layers. Using a primer formulated for plastic surfaces at this stage further enhances paint adhesion and protects the repair from moisture or environmental wear.
Meticulously carried out repairs prevent issues such as paint peeling, cracking, or uneven texture once the paint is applied. Employing high-quality fillers and primers compatible with ABS plastics significantly improves durability and appearance. This repair process not only strengthens the fairing structurally but also prepares an ideal canvas for the repainting that follows.
For enthusiasts looking to explore quality plastic fairings and additional guidance, visiting a trusted source such as Explore the Best Motorcycle Fairings at Summit Fairings can provide valuable insights and options.
This careful approach to repairing all imperfections before painting is essential to achieve a professional finish that enhances your motorcycle’s aesthetics and longevity.
3. Mastering Primer Application and Sanding to Perfect Your Motorcycle Fairing Surface
Priming and sanding the primer are critical steps that create the foundation for a flawless repaint on a motorcycle fairing. Once any repairs or filling of scratches and dents are complete, the next phase is to apply a carefully controlled medium coat of primer. This base layer serves a dual purpose: it enhances paint adhesion and smooths minor surface irregularities that might detract from the finish.
After applying the primer, it must be allowed to dry thoroughly before proceeding. The drying time is crucial to avoid lifting or uneven sanding. Once dry, the primered surface is sanded with a sanding block using medium to fine grit paper (starting around 80 grit or finer) to remove dust nibs, runs, and rough spots. This sanding refines the surface texture, creating a subtle roughness that promotes excellent bonding with the subsequent paint layers while ensuring a uniform surface free of imperfections.
It’s often necessary to repeat the primer application and sanding cycle multiple times to achieve an impeccably smooth canvas, especially where filler was used. After each sanding session, meticulously clean off all dust particles to prevent them from embedding into the paint or primer.
This cycle of priming and sanding is indispensable to obtaining a professional-quality, durable finish. Skipping or rushing these steps can lead to uneven paint, peeling, or premature wear. Working patiently and precisely here sets up every following stage for success.
For practical demonstrations and additional tips on this crucial process, you can explore comprehensive guides and videos demonstrating primer application and sanding on specialized platforms. For more insights about preparing your fairing and selecting the right materials, visit your ultimate source for affordable motorcycle fairings.
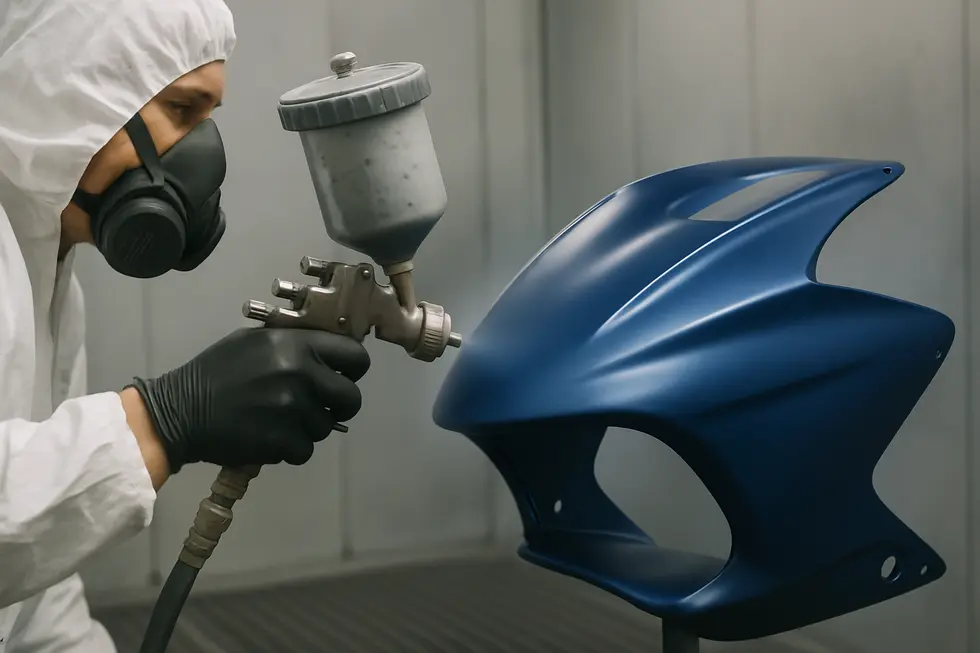
4. Mastering Paint and Clear Coat Application for a Flawless Motorcycle Fairing Finish
Achieving a durable, professional finish on a motorcycle fairing hinges on the precise application of paint and clear coat following meticulous surface preparation. After thoroughly cleaning and sanding the fairing, applying paint correctly is essential to build a rich, even color. This involves spraying multiple light, even coats of paint from approximately 6 to 8 inches away. Each layer should be allowed to dry completely before the next is added, preventing runs or an uneven texture. Typically, five thin layers of base paint produce a uniform and vibrant finish.
Following the base coat, the clear coat provides crucial protection and glossy appeal. Applying five or more light coats ensures the paint beneath is sealed from environmental factors like UV exposure, moisture, and abrasion. Each clear coat layer must dry fully before continuing to avoid clouding or bubbling. The clear coat also smooths minor surface imperfections and enhances depth and shine, contributing to a showroom-quality look.
Using quality automotive paints and clear coats designed for plastic surfaces guarantees better adhesion and longevity. Tools such as airbrushes or spray guns help achieve consistent, controlled coverage that brushes or rollers cannot replicate. Careful masking prevents overspray on unwanted areas, and working in a dust-free, temperature-controlled environment improves finish quality.
This methodical approach to painting and clear coating preserves the structural and aesthetic integrity of the fairing, making it ready for final polish and maintenance. For enthusiasts seeking further guidance, resources demonstrating detailed spray techniques and custom paint jobs provide valuable insights. More information on premium fairing materials and styles can be explored at Summit Fairings’ blog.
This step smoothly leads into final protection and maintenance, ensuring your motorcycle fairing retains its flawless appearance and durability over time.
5. Maximizing Longevity: Protecting and Maintaining Your Repainted Motorcycle Fairing
After investing effort into properly preparing and repainting a motorcycle fairing, ensuring its durability requires diligent final protection and maintenance. Applying a protective layer is critical, with options such as ceramic coatings or motorcycle-safe waxes offering different advantages. Ceramic coatings form a durable chemical bond with the paint, creating a semi-permanent barrier that resists dirt, water, and minor scratches. In contrast, wax provides a glossy finish while adding a protective film that guards against environmental elements, although it requires more frequent reapplication.
Maintaining the fresh paint finish begins with gentle and regular cleaning. Use mild soaps and soft microfiber cloths to avoid introducing scratches or eroding protective layers. Harsh chemicals, abrasive brushes, or high-pressure water near vulnerable edges should be avoided to prevent lifting or damaging the finish. If paint protection films are applied beneath or over the paint, waxing or polishing should be done cautiously or avoided altogether, as these actions may degrade the film’s integrity.
UV exposure can accelerate paint fading and surface degradation, so it is wise to park motorcycles in shaded areas or invest in UV-resistant covers whenever possible. This simple practice significantly extends the vibrancy and life of the new paint.
For enthusiasts seeking optimal longevity, scheduling periodic professional inspections and maintenance for ceramic coatings or paint protection films ensures the protective layers retain their effectiveness and appearance over time.
Integrating these final protective steps with routine care safeguards your motorcycle fairing’s refreshed surface, preserving its glossy appeal and structural integrity for miles ahead. For more practical insights on maintaining vinyl and painted motorcycle fairings, explore this informative resource on effective fairing care and protection.
Additional professional advice on maintaining ceramic coatings and paint protective films contributes valuable know-how to extend the life of your refined finish.
Chapter 2: Mastering the Paint Application Process for Motorcycle Fairings
1. Essential Surface Preparation Techniques for a Flawless Motorcycle Fairing Paint Job
Achieving a flawless paint finish on a motorcycle fairing begins long before the brush or spray gun touches the surface. The foundation of any durable and visually striking repaint lies in meticulous surface preparation, a step that demands attention to detail and the right techniques to ensure proper adhesion and longevity.
The process starts with thorough cleaning to eliminate every trace of dirt, grease, old wax, or residual contaminants. Using specialized degreasers or water-based wax removers ensures that no oily residue remains, which might otherwise cause paint to peel or blister. This cleansing phase creates a pristine canvas essential for bonding the primer and subsequent paint layers.
Following cleaning, sanding plays a crucial role in refining the surface texture. Light sanding with fine- to medium-grit sandpaper not only smooths imperfections but also introduces microscopic abrasions that promote mechanical adhesion. This step also helps remove any flaking or damaged old paint, preventing bubbles or peeling under new coats. Careful sanding around attachment points reinforces structural stability and ensures paint consistency across curves and edges.
Priming is the next vital stage, where a tailored plastic primer designed for ABS or similar substrates establishes a uniform base. Applying several thin, even coats with adequate drying time between each ensures full coverage and helps fill minor surface irregularities. A well-applied primer enhances the vibrancy of the base color and shields the plastic from environmental stresses.
Before applying paint, a final wipe with a clean cloth and suitable solvent removes dust and oils accumulated during sanding and priming. This last step guarantees an immaculate surface ready to accept paint without blemishes.
Taking these precise preparation steps in a controlled, dust-free environment while avoiding direct sunlight will significantly elevate the quality and durability of the paint finish. Skilled enthusiasts often reference detailed guidance from specialized painting sources to refine their approach. For additional insights on motorcycle fairing preparation and painting, exploring comprehensive guides such as those on summit fairings blog can prove invaluable.
2. Mastering Primer Application: The Foundation for a Durable Motorcycle Fairing Paint Job
Primer application stands as a pivotal stage in the paint application process when repainting a motorcycle fairing. Once the surface has been meticulously prepped and sanded, applying primer creates a crucial foundation that directly influences the durability, adhesion, and overall finish quality of subsequent paint layers. The primer’s role extends beyond simply serving as a base coat; it effectively seals the plastic surface, preventing uneven absorption of paint that can cause blotchy or inconsistent coloration.
Using a primer formulated specifically for plastic substrates like ABS ensures optimal compatibility, improving adhesion to the fairing’s surface. This adhesion minimizes the risk of peeling or chipping, which can commonly occur if the primer is neglected or incorrectly applied. Moreover, primer helps to smooth out minor imperfections that remain even after careful sanding, creating a uniform surface that supports a sleek and flawless paint finish.
Applying multiple light coats of primer rather than heavy layers is essential to avoid runs or drips. Each layer should be sprayed evenly with adequate drying times between coats. After the primer has dried thoroughly, blocking and fine sanding refine the texture, enhancing paint adherence and final gloss. This preparatory step allows the base color to showcase its true vibrancy and depth, crucial for restoring the fairing’s aesthetic appeal.
Whether working with factory original or aftermarket plastic fairings, this step markedly boosts the longevity and resistance of the paint against environmental elements and mechanical wear. Incorporating this stage within a detailed, multi-step paint process—as practiced by professional refinishing techniques—yields results that stand the test of time and handling.
For enthusiasts seeking comprehensive guidance on achieving professional finishes, resources detailing multi-step refinishing processes provide invaluable insights. More information on selecting the right types of plastic primers and paint products can be found through expert sources like Kings Motorcycle Fairings.
Additionally, for those exploring fairing options before repainting, seeing a range of choices at affordable motorcycle fairings can help in planning the restoration or customization project.
3. Mastering the Art of Layering and Drying for a Flawless Motorcycle Fairing Finish
Achieving a professional-grade repaint on a motorcycle fairing depends heavily on precise layering and careful drying during paint application. After properly preparing the surface by cleaning, sanding, and repairing, the first crucial step is applying the primer layer. This primer adheres to the fairing’s plastic substrate and creates an optimal foundation for paint adhesion. It must be applied evenly in light coats to avoid runs and allow thorough drying. Once dry, gentle sanding smooths the primer to eliminate imperfections, ensuring the next coats lay flat.
Following primer preparation, the base coat demands a methodical approach. Each layer of color should be sprayed thinly and evenly, allowing the paint to partially dry but remain tacky—known as the flash-off period—before adding the next coat. This tactic prevents dripping and uneven coverage, essential for uniform color depth and vibrancy. Multiple thin coats build a robust, smooth color finish that enhances the fairing’s look and longevity.
The final protective stage involves clear coats, which are equally applied in multiple thin layers. This glossy barrier defends the paint from UV rays, moisture, and abrasions, while imparting a lustrous shine that completes the fairing’s refreshed appearance. Like previous stages, each clear coat must be given adequate drying time before the next application or handling, allowing the finish to cure properly and avoid defects.
Environmental factors such as temperature and humidity affect drying times, typically requiring 10 to 30 minutes of flash-off between coats, and significantly longer curing time after the last clear coat before polishing or reinstallation. Maintaining these disciplined layering and drying intervals ensures a resilient, smooth, and visually striking finish.
For enthusiasts seeking to deepen their skills, exploring detailed guides like this explore the best motorcycle fairings at Summit Fairings can offer additional insights into materials and finishing techniques, reinforcing the value of patience and precision throughout the repainting process.
4. Mastering Clear Coats and Advanced Protection to Preserve Your Motorcycle Fairing’s Finish
Applying a clear coat is a vital step in the paint application process when repainting a motorcycle fairing. Beyond simply enhancing aesthetics with a glossy shine, the clear coat functions as a durable shield that safeguards the base color from environmental hazards. Exposure to UV rays, moisture, and minor abrasions can degrade painted surfaces over time, making a resilient protective layer essential. To ensure proper adhesion and longevity, the clear coat should be applied in several thin, even layers, allowing ample drying time between coats. This method prevents defects such as runs or uneven gloss, resulting in a uniform finish that complements the underlying color.
In addition to traditional clear coats, modern techniques include applying ceramic coatings, which provide a hydrophobic layer that repels water and reduces staining from dirt and contaminants. This hard, glass-like finish resists scratching and allows for easier cleaning, extending the lifespan of the paintwork. Proper surface preparation and curing conditions are crucial when applying ceramic coatings to maximize their protective qualities.
For riders seeking even greater defense, paint protection films (PPF) offer a nearly invisible polyurethane barrier that shields the fairing from chips, scratches, and UV damage. PPF’s self-healing properties allow minor imperfections to fade over time, maintaining a pristine appearance. Although its installation requires precision, combining paint with PPF delivers long-term resilience without compromising the fairing’s aesthetics.
Integrating these layers of protection, from clear coating to ceramic or film treatments, is essential for maintaining a freshly repainted fairing’s look and durability. This comprehensive approach ensures your motorcycle’s fairing not only gleams but withstands the rigors of everyday riding. For a deeper dive into paint protection film options, explore this detailed resource on paint protection film benefits and application. Further insights about fairing selection and care can be found at Explore the Best Motorcycle Fairings at Summit Fairings.
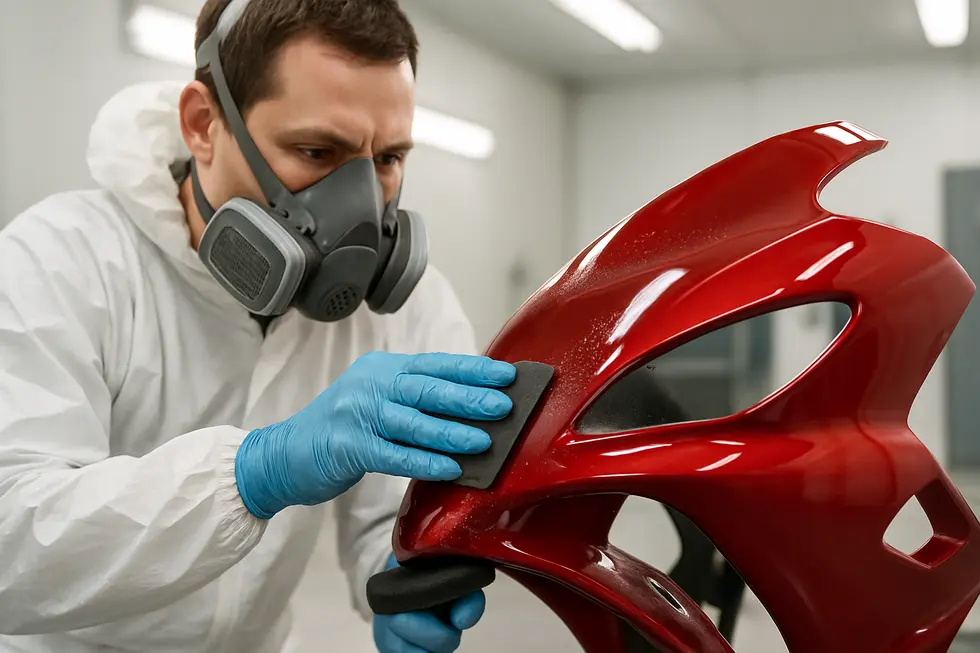
5. Mastering Curing and Finishing for a Durable, Glossy Fairing Paint
Achieving a stunning, long-lasting finish on a motorcycle fairing hinges on meticulous curing and finishing techniques. Once the base and custom paint layers are flawlessly applied, the protection and enhancement come from clear coats—usually five to six light layers. Each layer must dry thoroughly before the next is added. This step-by-step buildup ensures protection from UV rays, chemicals, and daily wear, while deepening the paint’s vibrancy.
The curing phase is paramount. While many allow paint to cure at room temperature, using heat lamps or a baking spray booth accelerates solvent evaporation, hardening the clear coat more effectively and reducing the risk of surface imperfections like runs or orange peel texture. Proper curing not only locks in the paint’s visual brilliance but also fortifies its resistance to environmental stress.
After the clear coats have cured, wet sanding with very fine grit sandpaper (ranging from 1500 to 2500 grit) gently removes minor flaws and smooths the surface without damaging the paint layers underneath. This delicate sanding refines the texture, preparing it for polishing. Polishing compounds then remove sanding marks and restore a mirror-like gloss, providing the fairing with a professional, showroom-quality finish.
Important to note, waxing immediately after painting can interfere with the full curing process. Instead, advanced protective solutions like Paint Protection Film (PPF) or ceramic coatings are recommended after full cure. These offer long-term defense against scratches and environmental damage while maintaining the fresh gloss.
Following such a disciplined curing and finishing routine not only enhances the aesthetic appeal but significantly extends the life of your motorcycle fairing’s paint. For enthusiasts seeking expert tips and optimal fairing options, exploring comprehensive resources like Explore the Best Motorcycle Fairings at Summit Fairings can be invaluable.
Chapter 3: Finishing and Protection Strategies for a Durable Motorcycle Fairing Repaint
1. Mastering Multiple Clear Coat Applications to Preserve and Enhance Your Motorcycle Fairing
Applying multiple clear coats serves as a crucial finishing technique that both protects and enriches a repainted motorcycle fairing. This layered strategy builds a resilient, glossy shield over the base paint, significantly extending its lifespan and enhancing resistance to UV damage, moisture, and everyday wear. Each additional clear coat deepens the finish’s visual clarity, contributing a mirror-like gloss that elevates the fairing’s appearance while providing essential defense against environmental hazards.
The key to a flawless finish begins with thin, even layers of high-quality clear coat applied only after the base color is fully dry. Patience is critical—each coat must cure adequately before the next is sprayed, preventing runs, bubbling, or uneven textures that can undermine the final look. Opting for advanced clear coat formulas designed specifically for plastic surfaces, such as multi-component options, offers superior hardness and chemical resistance, which is vital for the varying stress a motorcycle fairing endures.
Applying multiple clear coats also mimics factory-quality finishes, where multi-layer UV protection maintains color vibrancy over time. Ensuring that final curing happens in a controlled, low-humidity environment allows the coating to harden completely, resulting in increased durability and a long-lasting glossy appearance. After curing, very fine wet sanding followed by polishing can refine the surface to a professional sheen, though this should be handled delicately to avoid compromising the protective layers.
By embracing a methodical clear coating approach, enthusiasts can achieve a showroom finish that enhances both the beauty and protection of their repainted motorcycle fairings. For further insights on maintaining and customizing your motorcycle’s exterior, consider exploring this comprehensive guide to motorcycle fairings.
2. Mastering Protective Waxing: Enhancing Finish and Longevity in Motorcycle Fairing Refinishing
Achieving a durable, high-gloss finish on a repainted motorcycle fairing extends beyond paint application; it crucially depends on proper protective waxing techniques. After repainting, the fairing’s surface must first be impeccably clean, free from dust, oils, or residues that can diminish wax adhesion. Using a specialized wash that combines cleansing with a wax-infused formula streamlines preparation by removing grime while laying down a subtle protective base.
Applying wax requires attention to detail and technique to ensure even coverage and effective protection. Employing a soft applicator pad or microfiber cloth, spread the wax in small, manageable sections using gentle circular or back-and-forth motions. This method guarantees that every inch of the fairing receives a thin, consistent layer without streaks or uncoated spots. Allow the wax to haze into a dull film—this drying phase is essential before buffing.
Buffing enhances both the depth of shine and the uniformity of the wax layer. Use a clean, soft microfiber towel to gently polish the surface, removing excess wax and unveiling a brilliant gloss that highlights the quality of your repaint job. Regular waxing maintenance after the initial application is key to preserving the finish. Periodic reapplications reinforce protection against UV rays, water, and road contaminants, ensuring the paint remains vibrant and resilient.
For prolonged durability, consider sealants or waxes containing advanced hydrophobic components, which repel moisture and dirt more effectively. Always apply wax in shaded, cool environments to prevent streaking and uneven drying that direct sunlight can cause. Selecting waxes specifically formulated for motorcycle plastics and painted surfaces safeguards against damage and prolongs the life of your restored fairings.
Integrating these waxing strategies completes the finishing process with a professional-grade protective barrier, enhancing both aesthetics and longevity. For practical advice on post-paint protection steps closely related to these waxing methods, explore detailed guidance from expert manuals and trusted sources like the Keewor Motorcycle Fairing Kit Instruction Manual. For additional insights into motorcycle fairing options and maintenance, visit the Summit Fairings blog.
3. Shielding Your Motorcycle Fairing: Effective UV Protection and Environmental Defense
Ensuring the longevity and vibrancy of a freshly repainted motorcycle fairing hinges not only on the paint application but also on robust protection against UV exposure and environmental damage. Ultraviolet rays from the sun gradually break down paint pigments and clear coats, leading to fading and a dull appearance. To counter this, applying a UV-resistant clear coat specifically formulated for plastic surfaces acts as a vital barrier, preserving color depth and gloss over time. Many premium carbon fiber fairings incorporate such protective layers to maintain their finish under prolonged sunlight.
Beyond clear coats, a subsequent layer of protective wax enhances resistance to UV rays while imparting additional shine. This wax layer helps shield the surface from contaminants like dirt and moisture that can degrade the paint. Regular reapplication is essential to sustain this barrier’s effectiveness.
For enhanced defense, paint protection films (PPF) offer a nearly invisible shield that not only blocks harmful rays but also guards against physical abrasions such as scratches and stone chips. These self-healing polyurethane films act as sacrificial layers, absorbing impacts that would otherwise mar the fairing’s paint. Their durability makes them an excellent choice for riders frequently exposed to challenging environments.
Proactive lifestyle choices further extend paint life. Parking the motorcycle in shaded or indoor areas significantly limits direct sun exposure, reducing UV stress on the finish. When cleaning, using mild soaps with soft cloths avoids abrasive wear and prevents premature dulling.
Together, these strategies form a comprehensive defense system that protects your fairing’s fresh paint from environmental hazards, maintaining a high-quality finish reflective of careful repaint work. For those interested in exploring specialized options and detailed techniques on fairings, valuable information is available at Explore the Best Motorcycle Fairings at Summit Fairings.
Source: [Urban Werks Garage – Paint Protection Film][5]
4. Choosing Robust Base Materials for Enhanced Finishing and Long-Term Protection
Selecting the right base material for a motorcycle fairing is fundamental to achieving a durable, resilient repaint that withstands the rigors of riding and environmental exposure. Common substrates like ABS plastic, impact-resistant acrylic, and carbon fiber composites each bring unique properties that directly influence finishing techniques and protective strategies.
ABS plastic is prevalent due to its notable balance of strength, lightness, and resistance to UV rays and corrosion. These qualities provide a reliable foundation that readily accepts primers and paint when properly prepared, making it ideal for most aftermarket fairings. Its surface stability helps maintain paint adhesion and finish integrity over time, reducing the likelihood of peeling or cracking under stress.
Impact-resistant acrylic is primarily used for transparent parts such as windscreens. Its toughness supports durable painted layers while dealing with impacts and abrasions inherent to high-speed riding. This material’s inherent resilience ensures that finishes on acrylic components remain intact and vibrant longer, making specialized primers and clear coats vital to protect these critical sections.
For premium applications, carbon fiber composites offer an exceptional strength-to-weight ratio coupled with aesthetically appealing textures, whether matte or glossy. However, their complex structure requires meticulous sealing and coating processes to safeguard against environmental aging effects unique to composites. Application of plastic powder coatings followed by silk matte clear coats exemplifies advanced finishing methods that preserve both the structural integrity and visual depth of carbon fiber fairings.
In all cases, the choice of substrate informs the preparatory steps and types of primers, paints, and clear coats needed to maximize protection and longevity. Protective topcoats with UV inhibitors and abrasion resistance layer crucial defenses that shield the finish from sun damage, corrosion, and mechanical wear during rides.
Understanding these material differences allows enthusiasts and professionals alike to tailor repainting approaches, ensuring a finish that not only looks striking but endures. This knowledge also complements detailed guidance on sanding and priming steps for surface preparation, further elevating the final result.
For more insights on quality materials and finishing, explore detailed tips on motorcycle fairings here.
Source illustrating material application in elite designs: Ilmberger Carbon BMW M1000RR Matte Carbon Side Fairing.
5. Essential Care and Maintenance Techniques to Preserve Your Repainted Motorcycle Fairing
Achieving a flawless repaint on a motorcycle fairing is only part of the process; preserving that finish requires dedicated care strategies. The foundation to long-lasting results lies in using quality materials from the start, including durable ABS plastic fairings and paints formulated specifically for plastics. Proper surface preparation and application techniques establish a resilient base that can better withstand daily wear.
Once the paint and clear coats have cured, protecting the fairing from environmental factors significantly extends the life of the finish. UV rays pose a constant threat, causing fading and degradation. Parking your motorcycle in shaded areas or indoors is the simplest and most effective way to minimize this exposure. When parking outdoors is unavoidable, employing a UV-resistant cover shields the fairing against sun damage and environmental pollutants alike.
Routine cleaning also plays a critical role in maintenance. Regular washing with mild soap and warm water, combined with soft cloths or sponges, helps remove dirt without abrading the clear coat. Avoid harsh chemicals or abrasive materials that can prematurely dull or scratch the surface. To enhance protection, applying a motorcycle-safe wax adds an extra barrier against minor scratches, contaminants, and weather effects, while keeping the gloss and color depth vibrant.
Integrating these maintenance practices complements the initial repainting effort rooted in thorough cleaning, sanding, priming, and use of robust clear coats. Repairs such as crack filling or smoothing imperfections before painting ensure a flawless finish that responds well to ongoing care.
For enthusiasts looking for further insights on repainting preparation and routine upkeep, resources like the Kings Motorcycle Fairings blog offer comprehensive guidance tailored specifically to aftermarket plastic fairings.
By combining high-quality materials, proactive protection from UV and the elements, gentle cleaning habits, and protective waxing, your motorcycle fairing’s renewed finish will maintain its professional-level shine and durability for years to come.
Final thoughts
Providing expert-level motorcycle fairing repainting services demands mastery of each step from start to finish. Careful surface preparation and repair establish a reliable foundation while paint application techniques ensure flawless, consistent coverage. Finishing and protective measures then elevate the work to a level that withstands environmental challenges and meets demanding customer expectations. For business owners, integrating these structured methods optimizes operational efficiency and enhances brand credibility in a competitive marketplace. By investing in quality materials, controlled environments, and skilled workmanship, your business can confidently offer repaint services that transform motorcycles into vibrant, durable expressions of their owners’ style and pride. This comprehensive approach will ultimately lead to increased customer loyalty, referrals, and long-term growth.
Ready to elevate your ride? Summit Fairings delivers premium, custom-fit fairings that blend style and durability. Whether you’re chasing speed or turning heads, we’ve got your bike covered. Don’t wait—transform your machine today. Click, customize, and ride with confidence. Your perfect fairing is just a few clicks away. Act now!
About us
We are one of the leading motorcycle fairing export sites, offering over 3,000 styles across almost all motorcycle models. Buy from summitfairings.com, and pay 10-40% less than prices on other sites. Our knowledgeable team promises to respond to any questions within six hours, ensuring you receive expert support whenever needed.