Introduction
Repainting motorcycle fairings is a valuable service that can boost your business by offering customers high-quality, visually appealing finishes. Understanding the step-by-step process ensures durable results and satisfied clients. This guide unpacks the essential stages business owners must master: first, the critical preparation and surface treatment that set the foundation for paint adhesion; next, the techniques for priming, painting, and finishing to achieve flawless coverage and durability; and finally, options for repairing damaged fairings and exploring alternative finishes like vinyl wraps. Together, these chapters provide a clear roadmap to consistently deliver professional repainting services that enhance both aesthetics and protection of motorcycle fairings.
Tables of Contents
Chapter 1: How to Repaint Motorcycle Fairings: Preparation and Surface Treatment
- Mastering Surface Readiness: Essential Cleaning and Preparation for Motorcycle Fairings Repainting
- Mastering Sanding for Smooth, Durable Motorcycle Fairing Repaints
- Mastering Surface Repair: Filling Imperfections for Smooth Motorcycle Fairings
- Mastering Primer Application: The Foundation for Durable Motorcycle Fairing Paintwork
- Mastering the Painting and Clear Coating Techniques for Durable Motorcycle Fairings
Chapter 2: How to Repaint Motorcycle Fairings: Priming, Painting, and Finishing Techniques
- Mastering Surface Preparation for a Flawless Motorcycle Fairing Repaint
- Creating the Perfect Foundation: Expert Techniques for Applying Primer to Motorcycle Fairings
- Mastering Primer, Paint, and Clear Coat Application for Motorcycle Fairings
- Mastering Clear Coating: The Final Protective Layer to Perfect Your Motorcycle Fairings
- Long-Lasting Brilliance: Essential Maintenance and Care After Repainting Motorcycle Fairings
Chapter 3: How to Repaint Motorcycle Fairings: Repair and Alternative Methods
- Mastering Repair and Surface Preparation for Flawless Motorcycle Fairing Paintwork
- Selecting Essential Materials and Tools for Effective Fairing Repairs and Customization
- Mastering the Repair and Painting Process for Durable, Flawless Motorcycle Fairings
- Balancing Cost and Ecology: Economic and Environmental Insights on Repainting and Alternatives for Motorcycle Fairings
- Cutting-Edge Techniques and Sustainable Innovations in Motorcycle Fairing Repainting
Chapter 1: How to Repaint Motorcycle Fairings: Preparation and Surface Treatment
1. Mastering Surface Readiness: Essential Cleaning and Preparation for Motorcycle Fairings Repainting
Mastering Surface Readiness: Essential Cleaning and Preparation for Motorcycle Fairings Repainting
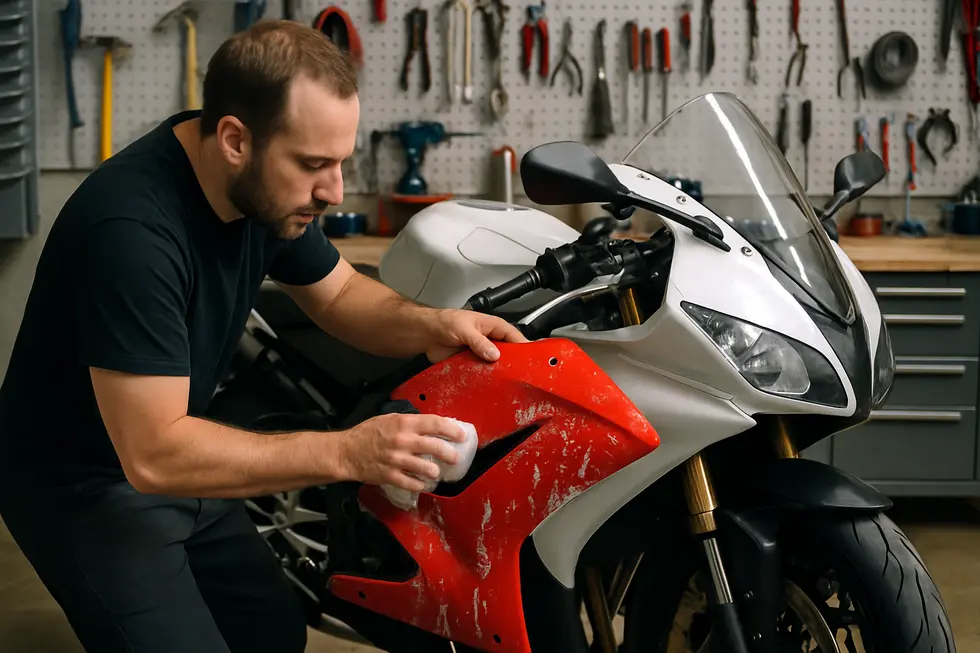
The foundation of a flawless repaint lies in meticulous surface preparation. Motorcycle fairings, often composed of ABS or similar plastics, require a clean, well-prepared surface to ensure the paint bonds securely and the finish remains durable. Begin by removing all dirt, grease, and residues using a mild automotive soap with a soft cloth, carefully avoiding harsh abrasives that could damage the plastic. For more stubborn contaminants such as oils or waxes, applying a dedicated degreasing agent is crucial to prevent adhesion issues later.
Once clean, the surface must be refined by sanding. Wet sanding with extremely fine grits—typically between 1500 and 2000—is recommended to subtly roughen the surface, enhancing primer and paint grip without creating noticeable scratches. This step also removes any previous clear coat layers or minor blemishes, smoothing imperfections that would otherwise affect the final aesthetic. After sanding, thorough dust removal is vital; any lingering particles can compromise the paint integrity, so wiping down with a microfiber cloth ensures a contaminant-free canvas.
Address any existing damage before painting. Small scratches, chips, or cracks should be filled and polished to blend seamlessly with the surrounding surface. Neglecting repairs can cause flaws to be visible through paint layers or even lead to premature finish failure.
Finally, a primer formulated specifically for plastics must be applied. This primer acts as an adhesion bridge between the non-porous plastic and paint layers, increasing durability and creating a uniform base for color coats.
For those interested in exploring quality components before painting, discover unmatched choices in motorcycle fairings at Summit Fairings, which can inspire and complement your paint project.
This attention to cleaning and preparation sets the stage for a professional, long-lasting repaint outcome.
2. Mastering Sanding for Smooth, Durable Motorcycle Fairing Repaints
Sanding is a critical step in preparing motorcycle fairings for repainting, directly influencing paint adhesion and the final finish’s quality. After thoroughly cleaning the fairings to remove all dirt, grease, and residues, begin sanding with a medium grit sandpaper, typically between 320 and 400 grit. This initial sanding removes old paint layers and surface imperfections, creating an even base. Progressively move to finer grits—usually 600 to 800 grit—to smooth the surface further before applying primer.
Using sanding blocks or pads is vital to maintain consistent flatness on the fairings’ curved and contoured surfaces, preventing uneven spots that could disrupt the paint application. Sand evenly with gentle, circular or back-and-forth motions, avoiding excessive pressure that could gouge or damage the plastic or fiberglass material.
Once the primer is applied, performing wet sanding with very fine grit sandpaper enhances surface smoothness. Wet sanding reduces dust, minimizes static buildup, and refines the primer coat, promoting better paint layering and a professional finish. After each sanding phase, thoroughly clean the fairings to remove dust and particles that might interfere with subsequent steps.
If any scratches or dents are present, fill them with an appropriate plastic or fiberglass filler and sand smooth before priming to ensure a flawless surface. Skipping proper sanding or primer application risks poor paint adhesion and visible imperfections, which can compromise durability and aesthetics.
By following these sanding guidelines, you prepare the fairings to accept paint evenly and adhere strongly, setting the foundation for a long-lasting, visually striking repaint. For more insight on sourcing quality fairings or replacement parts for your repaint project, explore comprehensive options at Summit Fairings – your go-to destination for motorcycle fairings.
External Reference: For detailed techniques on wet sanding after priming, see Paint Preparation and Sanding Tips.
3. Mastering Surface Repair: Filling Imperfections for Smooth Motorcycle Fairings
Achieving a flawless repaint on motorcycle fairings begins with meticulous repair of any surface imperfections. Before any filler is applied, the fairing must be thoroughly cleaned to remove dirt, grease, or residues that could compromise adhesion. During this inspection phase, scratches, dents, and cracks become clearly visible and must be addressed to ensure a seamless finish.
The area surrounding each imperfection should be sanded lightly with fine-grit sandpaper to smooth edges and provide a receptive surface for filler application. It’s crucial to use fillers explicitly formulated for plastic, as motorcycle fairings are typically made from ABS or similar materials. These fillers are flexible enough to prevent cracking and adhere well to plastic substrates.
When applying filler, work in thin layers, allowing each to cure fully before adding another. This controlled build-up helps avoid uneven surfaces and potential peeling. After curing, sanding should be performed progressively with coarser to finer grits until the repair blends flawlessly with the surrounding panel. Maintaining this gradual sanding approach makes it easier to attain a smooth, unified contour.
Following filler sanding, a primer coat tailored for plastic surfaces is essential. Primer seals the filler and creates a uniform base, enhancing paint adhesion and durability. Light sanding of the primer afterward ensures the repaired spots meld invisibly with the rest of the fairing, eliminating any remaining minor imperfections.
Working in a clean, dust-free environment throughout this process is vital to prevent contamination that can mar the final paint job. Consistent attention to detail during filling and smoothing sets the foundation for a durable, showroom-quality repaint.
For more guidance on choosing fairings and related parts, explore the comprehensive resources available at Summit Fairings’ motorcycle fairings blog.
4. Mastering Primer Application: The Foundation for Durable Motorcycle Fairing Paintwork
Achieving a flawless and long-lasting finish when repainting motorcycle fairings hinges significantly on the application of primer. Primer serves as the vital bridge between the fairing’s plastic surface and the paint, ensuring optimal adhesion while enhancing durability. Before primer application, the fairings must be meticulously cleaned to eliminate all dirt, oils, and residues that could impede bonding. Sanding the surface with fine-grit paper creates the ideal texture—slightly rough yet even—to help the primer grip the plastic effectively.
Choosing the right primer is crucial; epoxy or high-build primers formulated specifically for plastics or fiberglass provide excellent sealing and build a smooth base that fills minor surface imperfections. Applying the primer in thin, consistent coats is key to avoiding runs and uneven textures. Each layer should be allowed to dry fully before the next coat is applied, often requiring two or more layers for repaired or heavily sanded areas. Once primed, wet sanding with 600 to 800 grit paper refines the surface to a near-perfect smoothness, eliminating any orange peel effect or brush marks.
Thorough cleaning after sanding removes dust and helps prevent paint defects. Beyond adhesion, primer protects the fairing material itself—especially important with fiberglass components—by sealing the surface against moisture and environmental factors. This also extends the lifespan of the paint job, maintaining both appearance and structural integrity. Properly primed fairings showcase enhanced paint vibrancy and gloss after the subsequent basecoat and clear coat stages.
Adopting this structured primer application process is an essential step toward a factory-quality finish and professional durability. For further insights, an informative tutorial on priming automotive plastics demonstrates the importance of controlled spray techniques and primer types to achieve superior results.
Explore more on achieving expert results in motorcycle fairing preparation and enhancements at Summit Fairings.
External resource: https://www.youtube.com/watch?v=A-XaG2jkAMU
5. Mastering the Painting and Clear Coating Techniques for Durable Motorcycle Fairings
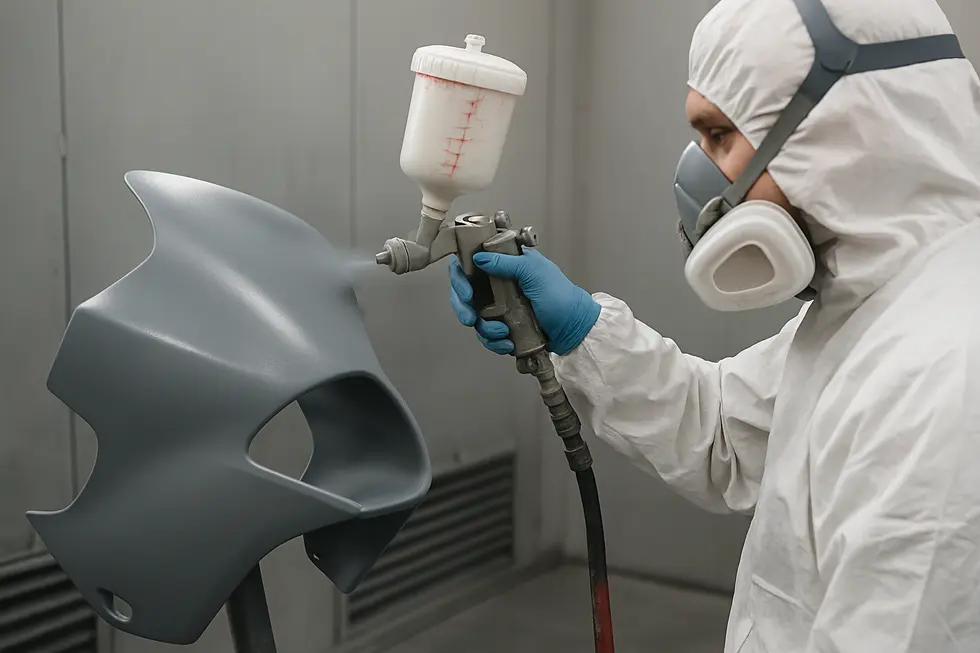
Achieving a professional-quality repaint on motorcycle fairings hinges on a meticulous painting and clear coating process, built upon thorough preparation and surface treatment. Once the plastic fairings are cleaned, sanded, and primed, painting begins with the application of multiple thin, even layers of base color. Typically, about five coats of paint are sprayed to build a rich, uniform finish. This layered approach not only secures solid coverage but also allows incorporation of special effect paints like metallic or pearlescent finishes, enhancing the aesthetic depth and uniqueness of the fairings.
Using spray equipment ensures the paint settles evenly over the complex curves and contours of motorcycle plastics, avoiding runs or uneven spots. Between coats, sufficient drying time is critical to maintain adhesion and prevent surface imperfections. After base painting, applying a clear coat is highly recommended—even if optional—as it dramatically extends the life and vibrancy of the paintwork. Usually, five to six layers of clear coat are carefully sprayed to lock in color and add a glossy, protective shield.
This clear finish guards against UV rays which cause fading, guards the fairings from scratches and environmental damage, and visually deepens the color while masking slight flaws or decal edges beneath the surface. For especially smooth, show-quality results, post-paint wet sanding and polishing can be performed to eliminate any texture irregularities like orange peel, refining the finish to a mirror-like gloss.
Consistent attention to layering, drying times, and surface refinement yields motorcycle fairings that are not only visually stunning but retain durability through weather and wear. For comprehensive tips on achieving optimal paint adhesion and flawless finish, detailed guides on primer application and paint layering can be found in dedicated resources such as this expert source on motorcycle fairings.
Chapter 2: How to Repaint Motorcycle Fairings: Priming, Painting, and Finishing Techniques
1. Mastering Surface Preparation for a Flawless Motorcycle Fairing Repaint
Surface preparation is the foundation for achieving a durable and professional repaint on motorcycle fairings. The process begins with meticulous cleaning to remove all grease, dirt, oils, and old wax residues that compromise paint adhesion. Solvents like acetone or isopropyl alcohol effectively eliminate contaminants, leaving the plastic or fiberglass surface pristine and ready for the next step.
Following cleaning, sanding plays a crucial role in smoothing imperfections and enhancing primer adhesion. Starting with medium grit sandpaper around 400 grit, the goal is to gently level out scratches, surface roughness, or previous irregularities without damaging the fairing. Any pinholes or cracks should be carefully filled with appropriate body filler or spot putty, then sanded down to a seamless finish using finer grit sandpaper of 600 or above. This gradual refinement ensures an even base for priming.
Priming the surface with a plastic-specific or direct-to-metal primer is essential for strengthening the bond between the substrate and subsequent paint layers. A smooth, even application of primer, typically sprayed in light coats, not only improves paint durability but also provides a uniform base color that enhances the richness of the final paint. Allowing each primed layer to dry sufficiently before any light sanding or painting ensures a flawless surface.
Once primed, the stage is set for painting. Applying multiple thin coats of spray paint designed specifically for plastics prevents runs and promotes even coverage. This layering technique, paired with careful drying times, results in vibrant, long-lasting colors. To protect and enhance this finish, a clear coat seals the surface, offering UV resistance and glossy appeal while safeguarding against wear.
Careful surface preparation is a critical step toward a finish that looks and lasts like a professional job. For more insights on quality parts and finishes, explore the extensive range available at Summit Fairings.
For detailed expert tips on primers and clear coats, refer to the comprehensive guides found here.
2. Creating the Perfect Foundation: Expert Techniques for Applying Primer to Motorcycle Fairings
Applying primer to motorcycle fairings is a pivotal step that significantly impacts the durability and visual appeal of the paint job. This stage demands precision and patience, as the primer not only enhances paint adhesion but also helps smooth out the surface for a professional finish. Choosing a high-quality primer designed specifically for automotive plastics, such as epoxy or high-build formulations, is crucial because these bind effectively to common fairing materials like ABS.
Before application, ensure that the surface is impeccably clean and free of any dust or oils. Primer is best applied using a spray gun set at about 20 psi, delivering thin, even coats that build coverage without runs or drips. Multiple layers may be necessary, particularly over repaired spots or surface imperfections, to produce a consistent base. Between coats, allowing adequate drying time is essential to maintain a smooth surface that’s ready for the next step.
Once the primer has hardened, wet sanding with fine grit sandpaper (600-800 grit) refines the texture and eliminates any tiny irregularities. This sanding also helps create an optimal profile for paint adhesion, improving the bond between primer and paint layers. Thorough cleaning after sanding is equally important to remove all residues and dust particles that could mar the finish.
For areas requiring extra refinement, filling minor dents or scratches with glazing putty prior to priming can yield a remarkably smooth surface. This attention to detail prevents imperfections from showing through the paint, ensuring a flawless outcome.
By adhering to these expert techniques during the priming stage, the fairings gain a robust and visually appealing foundation. This prepares them perfectly for subsequent painting and clear coating, resulting in a finish that stands up beautifully to wear and UV exposure.
For additional insights on optimizing primer application methods, see Finishing Nose Components | A Long EZ Push.
Explore comprehensive guidance on surface preparation and primer tips in our detailed guide to motorcycle fairings.
3. Mastering Primer, Paint, and Clear Coat Application for Motorcycle Fairings
Achieving a flawless repaint on motorcycle fairings hinges on meticulous primer, paint, and clear coat application tailored specifically for plastic surfaces. After thorough cleaning and sanding, applying a plastic-specific primer is crucial. This primer forms a strong bond with the fairing’s surface, enhancing adhesion and extending the lifespan of the paint job. Light, even coats prevent runs and provide a smooth base to showcase the paint’s depth and vibrancy.
When painting, multiple thin layers of spray paint designed for plastics are preferred over thick coats. Each coat should dry completely before the next is applied, with 2 to 3 coats generally sufficient for coverage, though more may be needed for deeper color and to mask existing graphics or discoloration. Maintaining a consistent spray distance and sweeping motion ensures uniform coverage and prevents drips or uneven spots.
The finishing stage seals and protects the work beneath. Applying several layers of clear coat not only adds a glossy shine but also defends against UV rays, chips, and environmental wear. Similar to painting, clear coats require patience—allowing proper drying between coats preserves their protective integrity. Once fully cured, wet sanding with ultra-fine grit sandpaper smooths imperfections, while polishing compounds restore a mirror-like finish. This final step elevates the repaint to professional quality, making surfaces smooth to the touch and visually radiant.
Working in a clean, dust-free environment and wearing protective gear during spraying guards the finish and your health. Moderate surface warming before painting can aid in curing and bonding, further enhancing durability.
For a comprehensive visual demonstration of these techniques, refer to the custom paint techniques for motorcycle fairings guide by a reputable source.
Additional expert insights on plastic paint preparation and application are available at Motorcycle Fairings – Custom Paint Techniques by Gunslinger Speedshop.
4. Mastering Clear Coating: The Final Protective Layer to Perfect Your Motorcycle Fairings
Applying a clear coat is the essential final step in repainting motorcycle fairings, effectively sealing the paint while enhancing durability and appearance. Once your color coats have fully dried, it’s crucial to prepare the surface properly before clear coating. A light scuff sanding with around 600 grit sandpaper promotes strong adhesion of the clear layer and helps eliminate subtle imperfections. If decals or graphics have been applied, they too should be lightly sanded to ensure the clear coat bonds uniformly, preserving design integrity beneath the finish.
When spraying the clear coat, patience and technique are key. Applying multiple thin coats rather than a single heavy layer prevents runs, drips, and uneven gloss. Allow each coat to flash off—meaning the solvents briefly evaporate—before proceeding with the next layer. This approach builds a smooth, even film that protects the underlying paint from UV rays, scratches, and chemical exposure. Depending on your aesthetic goal, you can choose between glossy clear coats that deliver a vivid shine or matte finishes that offer subtlety and can be enhanced with ceramic coatings for extra resilience.
After completing the clear coat application, proper curing is vital. Store the coated fairings in a clean, dust-free environment and avoid moisture or handling while the finish hardens. Typical curing times may range from several hours to days, depending on product and conditions. This curing phase ensures the clear coat fully develops its protective qualities and durability.
By dedicating proper attention to clear coating and curing, your motorcycle fairings will boast a professional-grade finish that both beautifies and shields the surface for long-lasting performance. For additional guidance on clear coat techniques and decal sealing, see detailed tutorials such as instructional videos on matte finish application and decal preparation.
Explore detailed insights and resources for motorcycle fairings at Summit Fairings.
5. Long-Lasting Brilliance: Essential Maintenance and Care After Repainting Motorcycle Fairings
Maintaining the fresh, vibrant finish of repainted motorcycle fairings requires careful attention beyond the initial priming, painting, and clear coating process. Once the clear coat has fully cured, ongoing preservation efforts are crucial to protect the paint from everyday wear and environmental damage. Begin with gentle regular cleaning using mild detergents and soft cloths or sponges to avoid scratching or dulling the surface. Avoid harsh chemicals or abrasive materials that can deteriorate the paint and clear coat prematurely.
Periodic application of a high-quality wax or protective sealant creates a resilient barrier against UV rays, moisture, and dirt buildup. This protective layer not only enhances the shine but also helps prevent fading and cracking caused by sunlight exposure. Storing the motorcycle in a covered, sheltered environment or using a breathable cover significantly reduces exposure to rain, dust, and extreme temperatures, all of which can accelerate paint degradation.
For seasonal storage, especially during winter, a thorough cleaning followed by a wax application helps shield the fairings during periods of inactivity. Additional winter preparation, such as lubricating metal components and topping off fluids, complements the protection of both mechanical parts and painted surfaces.
In cases where minor chips or scratches appear, prompt repair with precision sanding and touch-up paint can prevent further damage and maintain a consistent appearance. Maintenance sprays designed specifically for motorcycles can also assist in preserving the paint finish and overall condition.
By combining meticulous surface preparation during repainting with disciplined aftercare practices, your motorcycle fairings will retain their showroom-quality appearance and durability over time. For more detailed guidance on choosing the right fairing products and care tips, explore this comprehensive resource.
Chapter 3: How to Repaint Motorcycle Fairings: Repair and Alternative Methods

1. Mastering Repair and Surface Preparation for Flawless Motorcycle Fairing Paintwork
Achieving a fresh, professional finish when repainting motorcycle fairings depends heavily on meticulous repair and surface preparation. This process begins by carefully removing the fairings from the motorcycle, allowing unobstructed access and protecting other components from overspray. Once detached, the fairings require thorough cleaning to eliminate any dirt, grease, or old wax residues that might compromise paint adhesion. Start with a gentle wash using mild soap and water, then follow with a degreaser or isopropyl alcohol to ensure a completely grease-free surface.
Sanding plays a crucial role in refining the fairings’ surface. Begin with coarser sandpaper, typically around 320 to 400 grit, to strip away old paint and address imperfections. Progressing to finer grit, such as 600 to 800, provides a smooth texture ideal for primer and paint bonding. It’s equally important to inspect the fairings for scratches, cracks, or dents at this stage. Repair these issues using plastic fillers or epoxy specifically formulated for motorcycle plastics. After the filler cures, sand the area gently to blend it seamlessly with the surrounding surface.
Priming ensures the paint adheres properly and creates an even base color. Apply one or two coats of a plastic-specific primer, then lightly sand the primer with fine grit paper to eliminate any unevenness. To protect areas that should remain paint-free, mask off edges and mounting points carefully using painter’s tape and masking film.
When ready to paint, apply spray paint or use an airbrush for thin, even coats, allowing drying time between each pass. The final step in surface preparation is applying a clear coat, which safeguards the paint against UV exposure, weathering, and abrasion while lending a durable gloss to the finish. Allow sufficient curing time after the clear coat before reinstalling the fairings on the motorcycle to preserve the integrity of the new paint.
Executing these preparation and repair techniques thoroughly is essential for a lasting, high-quality repaint. For more in-depth insights on body repairs and paint preparation, visit this detailed guide.
2. Selecting Essential Materials and Tools for Effective Fairing Repairs and Customization
Achieving a professional finish when repainting motorcycle fairings starts with carefully selecting the right materials and tools, as well as considering alternative customization methods. Surface preparation requires quality sandpapers in the 400 to 600 grit range to smooth the plastic substrate, ensuring the paint adheres properly. Priming with a plastic-specific high-build primer fills minor imperfections and creates an ideal base for paint layers. Multiple thin coats of automotive-grade spray paint designed for plastics yield the most even coverage and prevent runs, while allowing flexibility to build the desired color vibrancy.
For precision work, such as detailing or blending repairs, an airbrush system paired with a small compressor offers outstanding control over paint application, enabling fine gradients and sharp pinstripes that spray cans cannot achieve. A respirator mask is vital for safety when handling solvent-based products, complemented by gloves and appropriate protective gear to maintain a clean working environment.
After applying color coats, sealing with several layers of clear coat is indispensable to guard against UV rays, scratches, and the wear of everyday use. Repairing dings or cracks before painting involves fillers compatible with plastic, which can be sanded smooth to restore the surface’s integrity.
Beyond painting, vinyl wrapping presents a versatile alternative. This method allows for intricate designs and a reversible finish, enabling riders to customize fairings without permanent alteration. Proper cleaning and preparation remain crucial to ensure vinyl adhesion and durability.
By thoughtfully combining these materials and tools, and choosing between traditional painting or vinyl wrapping, motorcycle owners can achieve durable, personalized finishes that enhance both aesthetics and protection. For more on selecting fairings and accessories, consider exploring comprehensive resources like Discover affordable motorcycle fairings at Summit Fairings.
[Source: Motorcycle fairing painting techniques and tool recommendations]
3. Mastering the Repair and Painting Process for Durable, Flawless Motorcycle Fairings
Repainting motorcycle fairings demands careful attention to each step, ensuring a finish that is both aesthetically appealing and long-lasting. The process begins with the meticulous removal of the fairings, taking care to unscrew bolts and clips without causing damage to either the plastic surfaces or underlying motorcycle components. This cautious detachment allows for thorough access and treatment of each piece.
Once removed, the fairings require a comprehensive cleaning to eliminate dirt, grease, and wax residues. Using mild soap or degreasers guarantees a pristine surface that promotes paint adhesion. Any existing damage such as cracks or scratches must be addressed with plastic-specific repair techniques, including plastic welding or filler putty. This creates a smooth, structurally sound base, vital for achieving an even paint coating.
Sanding follows, starting with medium grit to smooth repaired areas and roughen glossy surfaces, progressing to finer grit (400-600) for a uniform texture. This step enhances primer adhesion and removes surface imperfections. A plastic-formulated primer is then applied evenly, providing a bonding layer that strengthens paint durability. After drying, a light sanding with ultra-fine grit refines this base further.
Painting uses spray paint designed for plastics, applied in multiple thin coats to prevent runs and ensure rich, even color coverage. Each coat must dry fully before the next application. Optionally, a clear coat can be added to protect the paint from UV rays and physical wear, while imparting a glossy finish. After all layers cure completely, polishing with cutting and finishing compounds can elevate the surface to a mirror-like gloss, enhancing the final appearance.
Finally, careful reinstallation of the fairings ensures proper fit and maintains the motorcycle’s structural integrity. This comprehensive process, detailed in this guide on motorcycle fairings, results in a professional-quality repaint that preserves both the look and the function of your motorcycle’s fairings.
4. Balancing Cost and Ecology: Economic and Environmental Insights on Repainting and Alternatives for Motorcycle Fairings
Repainting motorcycle fairings is a meticulous process that involves careful preparation to achieve a professional finish. Economically, choosing to repaint rather than replace fairings often presents a more budget-friendly option, especially when the damage is primarily cosmetic. The cost largely depends on factors such as design complexity and paint selection, with detailed or multi-color schemes requiring more labor and materials. Nonetheless, repainting extends the life of existing components, which can enhance overall value for motorcycle owners.
From an environmental perspective, traditional repainting methods carry a significant impact. The solvents and volatile organic compounds (VOCs) found in many primers and paints contribute to air pollution and pose health risks during application. However, advances in materials now offer more eco-conscious alternatives, such as water-based paints and primers designed specifically for plastic surfaces like ABS. These options reduce hazardous emissions and promote safer working conditions while maintaining quality and durability.
An increasingly popular alternative to repainting is vinyl wrapping. Vinyl wraps require no solvents or paints, cutting down on chemical usage and waste. They also provide versatility, allowing riders to change the bike’s appearance frequently without committing to a permanent finish. While the initial cost of wrapping can be competitive with painting, the reduced environmental footprint and ease of replacement make it an attractive choice for many.
Ultimately, selecting between repainting and alternatives depends on budget, desired aesthetics, and environmental considerations. For those seeking more on professional fairing painting processes and eco-friendly approaches, insights can be explored in resources dedicated to motorcycle fairings and detailing,learn more here. Additionally, detailed professional methods that ensure durability and finish quality can be found at Kings Motorcycle Fairings.
5. Cutting-Edge Techniques and Sustainable Innovations in Motorcycle Fairing Repainting
Repainting motorcycle fairings today seamlessly blends time-honored craftsmanship with modern innovation, offering enthusiasts a wide spectrum of customization options. Beyond traditional primer and base coat applications, advanced surface preparation now often involves sanding with finer grit papers, such as 800 grit, to ensure impeccable smoothness and superior paint adhesion. While professional spray booths remain ideal for controlling overspray and environmental conditions, many modern DIY approaches replicate these conditions through home setups, enabling high-quality finishes without requiring a full studio.
One of the most captivating advances is hyper-realistic airbrushing, which allows detailed, intricate artwork on fairings, ranging from lifelike textures to elaborate design motifs inspired by digital art or nature. This technique elevates personal expression on motorcycles by adding a uniquely artistic dimension impossible to achieve with conventional spray painting.
Furthermore, textured paints that mimic materials like satin bronze, rusted metal, or color-shifting chameleon finishes have transformed how riders visualize their bikes. These paints react dynamically to light and angle changes, producing visually striking effects that change with movement, enhancing aesthetic impact while retaining durability.
Eco-conscious riders benefit from emerging sustainable paint formulations. These environmentally friendly coatings reduce volatile emissions and waste without sacrificing finish quality or longevity, aligning repainting with growing green design trends for 2025 and beyond.
Candy finishes remain a coveted technique, layering translucent colors over metallic bases to achieve luminous depth and vibrancy. This method demands precise control of paint thickness and curing but offers rewards in visual richness unmatched by standard coatings.
Together, these innovations enrich the repainting process, making it both a creative canvas and a technical endeavor. For those who wish to dive deeper into detailed techniques such as sanding preparation or candy finish application, video tutorials available on popular platforms provide invaluable visual guidance.
Explore more about choosing the right fairings and styles to complement your personalized paint job at Explore the Best Motorcycle Fairings at Summit Fairings.
External Reference: https://www.autoevolution.com/news/paint-techniques-for-motorcycle-fairings-innovations-and-trends-2025-184872.html
Final thoughts
Delivering top-tier motorcycle fairing repainting is a multi-step process grounded in precision and quality controls at every stage. From the essential preparation and surface treatment that lay the groundwork for paint adhesion, through skillful priming, painting, and finishing techniques, to advanced repair and alternative finishing methods, mastering each phase ensures a superior, long-lasting finish. For business owners, aligning technical expertise with attention to detail directly translates into customer satisfaction, brand reputation, and competitive advantage. By adopting these proven practices, your service can consistently restore and elevate motorcycle fairings, meeting customer demands for both style and durability.
Ready to elevate your ride? Summit Fairings delivers premium, custom-fit fairings that blend style and durability. Whether you’re chasing speed or turning heads, we’ve got your bike covered. Don’t wait—transform your machine today. Click, customize, and ride with confidence. Your perfect fairing is just a few clicks away. Act now!
About us
We are one of the leading motorcycle fairing export sites, with over 3,000 styles across almost all motorcycle models. Buy from summitfairings.com, and pay 10-40% less than the prices on other sites. If you have any questions, we promise we will have your answer within six hours.