Introduction
Motorcycle fairings not only shape the bike’s appearance but also impact aerodynamics and rider protection. For business owners in the motorcycle service industry, understanding the precise techniques involved in replacing fairings is crucial to delivering superior workmanship and ensuring customer satisfaction. Mastery of this process can enhance your shop’s reputation, reduce product damage risks, and streamline workflow. This guide unfolds in four crucial chapters: starting with the delicate removal of old fairings, progressing through proper alignment and fitting methods, detailing the essential tools and parts selection, and concluding with final reassembly and adjustments. Each chapter builds on the previous, providing a cohesive framework tailored for professional settings aiming to perfect their fairing replacement services.
Tables of Contents
Chapter 1: Removing old fairings carefully in the process of how to replace fairings for motorcycles
- Mastering the Technical Precision of Removing Motorcycle Fairings Without Damage
- Economic Benefits of Meticulous Fairing Removal: Saving Costs and Preserving Value
Chapter 2: Ensuring Flawless Fitment: Mastering Alignment and Fitting Techniques for Motorcycle Fairings
- The Art of Loose Fitting and Fine-Tuned Alignment for Precision Fairing Installation
- Ensuring Secure Fastening and Flawless Fit: Torque Mastery and Final Inspection in Motorcycle Fairing Replacement
Chapter 3: Tools and Parts Selection for How to Replace Fairings for Motorcycles
- Mastering the Essential Toolkit: Metric Hand Tools, Torque Wrenches, and Epoxy Resins for Fairing Replacement
- Mastering Fasteners and Material Choices for Reliable Motorcycle Fairing Replacement
Chapter 4: Final Reassembly and Adjustments in How to Replace Fairings for Motorcycles
- Precision Alignment and Secure Fastening Techniques for Flawless Fairing Reassembly
- Streamlining Electrical Connections and Fastener Strategy for a Flawless Motorcycle Fairing Reassembly
Chapter 1: Removing old fairings carefully in the process of how to replace fairings for motorcycles
1. Mastering the Technical Precision of Removing Motorcycle Fairings Without Damage
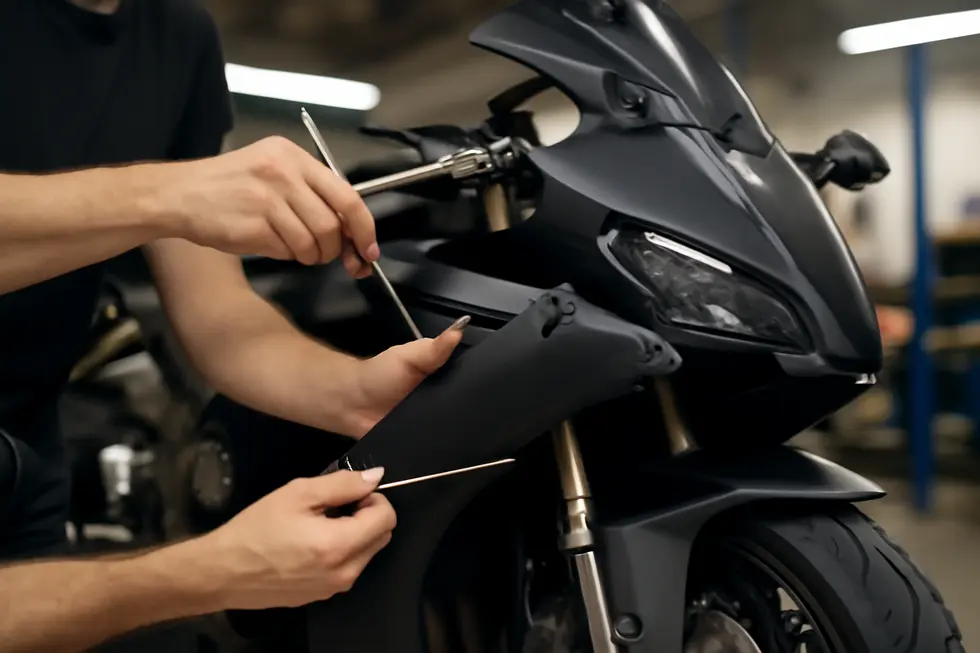
Removing old motorcycle fairings with precision demands a blend of patience, the right tools, and keen attention to the mechanical and electrical details involved. The process begins with stabilizing the motorcycle securely on a stand, ensuring the engine is completely cool, and disconnecting the battery to eliminate any risk of electrical shorts during removal. This foundation sets the stage for a safe and damage-free disassembly.
Fasteners play a central role in the careful removal of fairings. Utilizing the appropriate screwdrivers, hex keys, or wrenches matched to the motorcycle’s specific bolts, screws, and nuts ensures that screws loosen gradually without exerting undue pressure. This slow, methodical approach minimizes the risk of cracking or stripping threads in the plastic panels or metal mounting points. Fasteners are often located in hard-to-see areas, which requires thorough inspection before attempting removal to avoid unexpected binding or hidden clips.
Integral to the removal phase is managing the fairing’s electrical components such as headlights, turn signals, and mirrors that may be attached or wired through the panels. Disconnecting these connectors carefully without pulling on wires safeguards the delicate pins and prevents costly damages. Labeling all disconnected wiring harnesses and plugs proves invaluable for seamless reassembly later. In some cases, plastic clips or rubber grommets secure wiring and tubing; these should be gently pried free using plastic or metal tools designed specifically to release clips without breaking them or damaging the fairing plastics.
Handling clips and grommets requires incremental prying rather than a forceful tug, as these fasteners are specifically engineered to maintain tight fitment and absorb shocks during operation. Breaking or losing these parts can lead to poor alignment or rattling post-installation, underscoring the importance of a patient and careful approach. Organizing all parts and fasteners systematically—grouping bolts, screws, clips, and rubber inserts by their location—prevents confusion and expedites the subsequent replacement procedure.
Finally, the technological finesse of this removal process preserves the structural integrity of the mounting points, ensuring the new fairings will align perfectly without stress concentrations that often cause cracking or warping. Following these detailed steps optimizes both the longevity of the new fairings and the aesthetic finish of the motorcycle’s bodywork.
For enthusiasts seeking additional support, detailed tutorials and model-specific videos highlight nuances for popular bikes, illustrating proper handling of fuel tanks, wiring harnesses, and bracket adjustments. This visual assistance enriches understanding and confidence, transforming a complex task into a manageable project.
Such expertise in the removal phase lays a solid groundwork for effective replacement, balancing the artistry of craftsmanship with the exactness of mechanical technology. For more comprehensive options on quality fairings to complement your efforts, explore a wide range of choices at Summit Fairings, your go-to destination for premium motorcycle parts.
2. Economic Benefits of Meticulous Fairing Removal: Saving Costs and Preserving Value
The economic advantages of removing old motorcycle fairings carefully extend well beyond the immediate task of disassembly, greatly influencing overall maintenance costs and long-term value. When fairings are detached with precision and care, the potential for incidental damage—such as broken clips, cracked panels, or stripped fasteners—is significantly reduced. This reduction in damage safeguards against costly repairs or replacement parts, which often exceed the expense of the original fairing itself.
Avoiding damage during removal directly translates to fewer purchases of new components and less labor required to fix mistakes. Since fairing panels and associated hardware can be costly, preserving their integrity lowers expenses substantially. Moreover, a careful removal process often streamlines the entire replacement workflow. Mechanics spending less time troubleshooting damaged parts or struggling with broken mounting points complete tasks more efficiently, reducing labor hours and associated bills.
Another important economic factor is the preservation of the fairings’ resale or reuse value. Intact fairings can be sold or swapped, supporting a circular market where riders can affordably upgrade or maintain their motorcycles. This sustainable approach not only benefits the environment by minimizing waste but also aids riders in managing maintenance budgets over time. By handling old fairings carefully, motorcyclists contribute to a more responsible and cost-effective maintenance culture.
Beyond the immediate repair and replacement considerations, careful removal reflects an investment in the motorcycle’s overall market value. Vehicles with well-maintained, undamaged bodywork naturally command higher resale prices. Preventing scratches, cracks, or structural weakening during fairing removal helps sustain the bike’s appearance and function, enhancing its appeal to prospective buyers.
Strategic use of the right tools and adherence to recommended disassembly techniques are key to these economic benefits. While taking extra time initially may seem slower, it ultimately shrinks the risk of costly setbacks. For those interested in detailed guidance and affordable options for fairing replacement components, exploring expert resources on motorcycle fairings can provide valuable insights and support efficient budgeting.
Embracing a careful removal approach thus balances upfront labor with downstream savings. It fosters an affordable and sustainable motorcycle maintenance routine that preserves both parts and value, ensuring riders get the most out of their investment throughout the fairing replacement process.
For additional information on sourcing quality and affordable motorcycle fairings, consider visiting Discover Affordable Motorcycle Fairings.
Chapter 2: Ensuring Flawless Fitment: Mastering Alignment and Fitting Techniques for Motorcycle Fairings
1. The Art of Loose Fitting and Fine-Tuned Alignment for Precision Fairing Installation
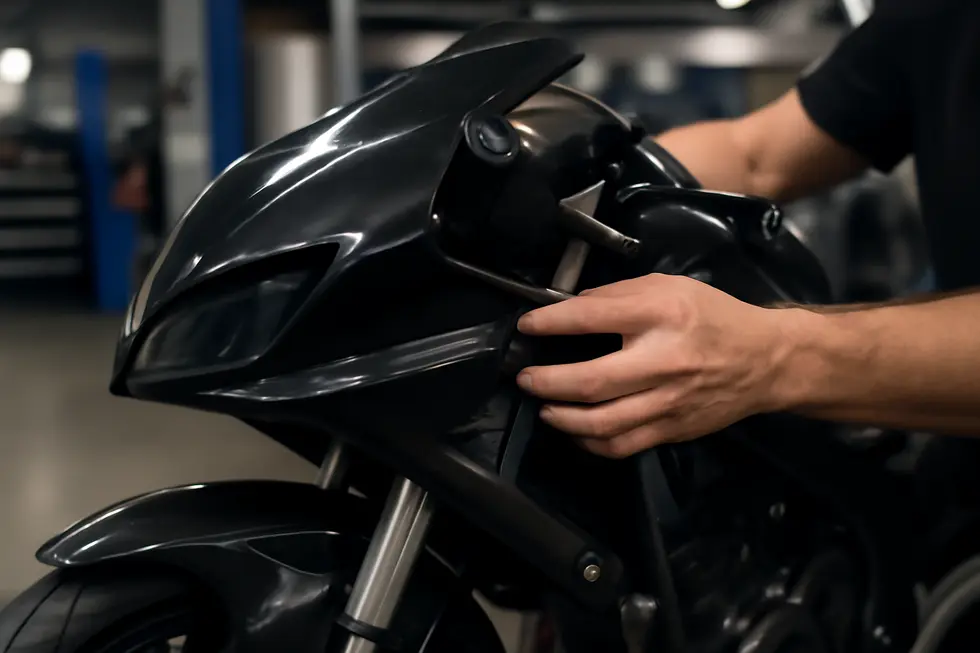
When approaching the replacement of motorcycle fairings, establishing an effective method for alignment is essential to achieve a seamless and durable fit. The process begins with an initial loose fitting phase that sets the foundation for precise, stress-free installation. During this phase, all major fairing panels—typically starting with larger upper pieces—are carefully positioned on the motorcycle without fully tightening any bolts or fasteners. This preliminary step is crucial because it allows room to adjust each panel’s angle and placement, ensuring mounting points align accurately and the gaps between panels remain uniform.
Loose fitting prevents forced alignment that often leads to cracks or warping of the fairing material. As you loosely fit each piece, it’s important to regularly check how adjacent panels meet, confirming smooth transitions without overlap or excessive spacing. Mounting surfaces should be clean and free from debris to promote proper seating. Occasionally, minor bracket adjustments or shifting of rubber grommets may be necessary to accommodate slight variations in the motorcycle frame or the panels themselves.
Once the panels have been adjusted into an optimal configuration, the process moves into the precise alignment phase. This involves systematically tightening fasteners in a controlled pattern, gradually increasing torque to secure the panels without stressing the material. Starting from central attachment points and working outwards helps maintain even pressure and prevents pulling or misalignment. Employing washers or rubber inserts during this step also absorbs vibration and distributes force evenly, protecting the fairings from cracking.
Visually inspecting the entire assembly after tightening is indispensable. Aside from aesthetic appeal, consistent panel fitment impacts the motorcycle’s aerodynamics, rider comfort, and component longevity. Pay close attention to how mirrors, headlights, and other components integrated with the fairings fit, adjusting if necessary to avoid interference with controls or steering.
Following manufacturer-specific guidelines for your fairing kit is highly recommended, as mounting systems and materials can vary greatly. For additional clarity and confidence in these steps, exploring a comprehensive source on motorcycle fairings can provide valuable insights and exemplify fitting best practices.
This disciplined approach of combining initial loose fitting with meticulous alignment ensures the replacement fairings not only look professionally installed but also deliver durable performance, preserving the motorcycle’s structural integrity and style.
2. Ensuring Secure Fastening and Flawless Fit: Torque Mastery and Final Inspection in Motorcycle Fairing Replacement
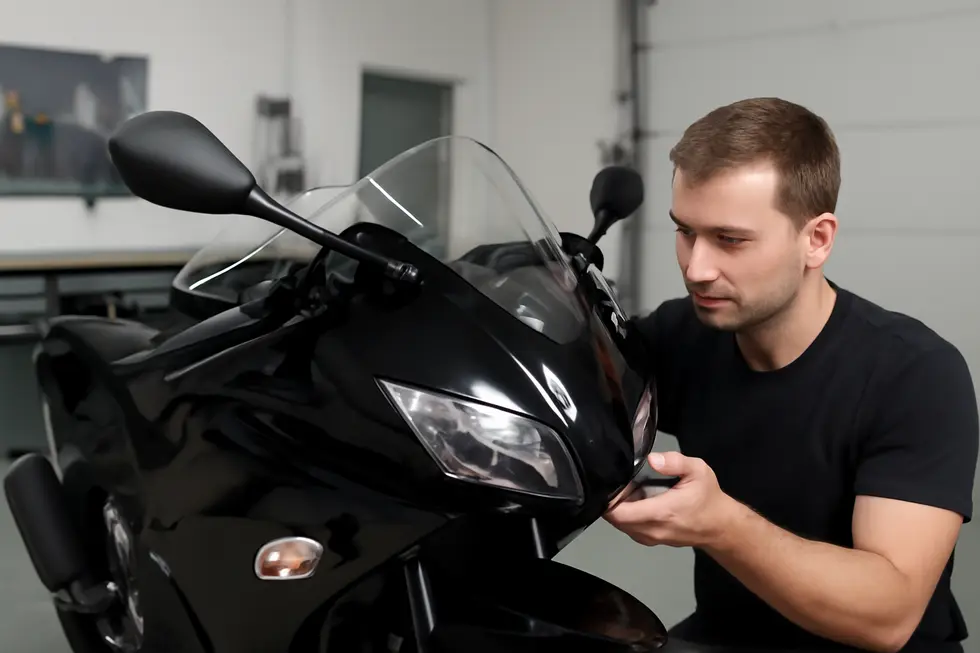
When replacing motorcycle fairings, achieving a flawless fit depends heavily on meticulous torque application and thorough final inspections. Using a torque wrench to tighten all fasteners precisely to manufacturer specifications is crucial. Over-tightening can crack delicate fairing panels or strip threaded holes, while under-tightening risks loosening parts during riding, potentially compromising both safety and aesthetics.
The process begins with loosely fitting all bolts and screws, starting from the upper fairing. This approach allows slight adjustments to align grooves, slots, and brackets perfectly before fully securing the panels. Sequentially fitting lower, side, and rear fairings ensures consistent alignment across the entire assembly. Utilizing tools such as heat guns or dedicated fairing brackets can assist in molding panels snugly against the motorcycle frame, minimizing gaps and preventing stress points.
Before final tightening, a walk-around inspection helps detect any inconsistencies in fit, such as uneven panel edges or misaligned mounting holes. Once satisfied with the alignment, systematically tightening bolts using a calibrated torque wrench guarantees that each fastener is secured according to specific torque values outlined in the motorcycle’s service manual or the fairing kit instructions. These values vary based on bolt size, location, and model, so referring to accurate documentation is essential.
After torqueing, a second comprehensive visual check confirms that all fasteners remain tight and that no fairing piece exhibits undue strain or distortion. At this stage, reinstallation of any ancillary components originally mounted on the fairings (mirrors, headlights, gauges) can proceed, ensuring nothing impedes steering or controls. Proper fitting techniques coupled with disciplined torque adherence not only preserve the integrity and longevity of the new fairings but also uphold the motorcycle’s overall functionality and style.
For those seeking detailed torque specifications and protocol tailored to their motorcycle, consulting the model’s service manual or authoritative fairing resources provides indispensable guidance. Careful attention during final inspection and fastening will make the difference between a flawless, durable installation and costly damage caused by improper fitting.
Explore further tips and guidance on optimizing your motorcycle fairing replacement technique through specialized resources available at Explore the Best Motorcycle Fairings at Summit Fairings.
Chapter 3: Tools and Parts Selection for How to Replace Fairings for Motorcycles
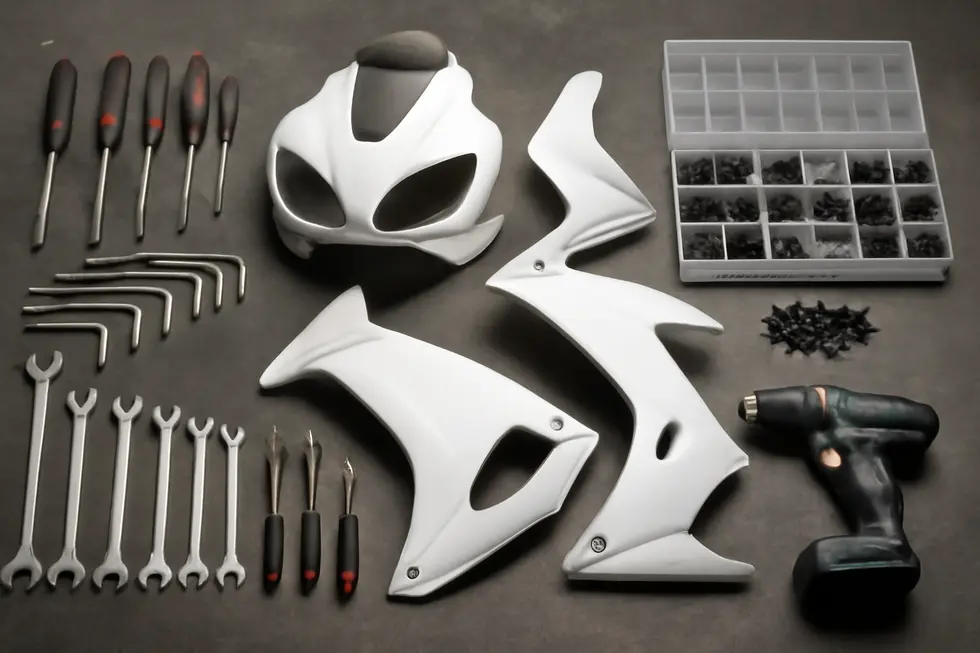
1. Mastering the Essential Toolkit: Metric Hand Tools, Torque Wrenches, and Epoxy Resins for Fairing Replacement
A successful motorcycle fairing replacement depends heavily on having the right tools that ensure both precision and care throughout the process. At the core of this toolkit lies a comprehensive set of metric hand tools, a torque wrench, and epoxy resins—each playing a vital role in efficiently removing old panels, securing new ones, and addressing any incidental damage.
Motorcycle fairings almost exclusively use metric bolts, typically spanning sizes from 4mm to 17mm. This makes a quality metric socket and wrench set indispensable. These tools not only allow you to loosen and tighten bolts without stripping heads but also ensure smooth access to the various fasteners hidden beneath the bodywork. Additionally, having Torx and Allen screwdrivers on hand guarantees compatibility with specialized fasteners often found on fairing panels. Without the correct sizes, attempts to remove bolts risk damaging screws or the fairing panels themselves.
Equally important is the torque wrench, a tool that balances firmness with caution. Over-tightening plastic or fiberglass fairings can result in cracks or stress fractures, undermining integrity and appearance. The torque wrench helps adhere to manufacturer torque specifications, delivering consistent, controlled tightening. This not only preserves the physical condition of the new fairings but also supports their aerodynamic and safety functions. Consistent torque application during reassembly prevents uneven panel seating, which could lead to vibrations or wind noise.
Despite careful handling, fairings occasionally sustain minor cracks or chips. This is where epoxy resins become invaluable. Suitable for fiberglass and composite materials, these resins provide robust, lasting bonds that restore structural strength to compromised panels. Applied before repainting or final installation, epoxy resins ensure the integrity and longevity of repairs. Their use reduces the need for costly panel replacements and maintains the overall aesthetic of the motorcycle.
Complementary tools, such as trim removal tools, help detach panels without damaging clips or paint, while socket wrench extensions give easier access to bolts in tight spaces. Selecting high-quality OEM or well-reviewed aftermarket fairings enhances installation ease and durability, especially when paired with the recommended toolkit.
For those seeking additional guidance or part options, authoritative resources like reputable motorcycle fairing suppliers offer extensive information and product choices. Insightful guides and blog posts can provide helpful installation tips tailored to specific models.
With this core toolkit of metric hand tools, a torque wrench, and epoxy resins, alongside thoughtful preparation and attention to detail, replacing motorcycle fairings becomes a manageable and precise task that safeguards both form and function. For a closer look into various fairing selections and their benefits, exploring this comprehensive resource on motorcycle fairings can be highly informative.
2. Mastering Fasteners and Material Choices for Reliable Motorcycle Fairing Replacement
Selecting the proper fasteners and materials is crucial when replacing motorcycle fairings, directly impacting the durability, appearance, and safety of the installation. Fairing bolt kits must be chosen with care, favoring corrosion-resistant metals like stainless steel in standard sizes such as M5 or M6. These ensure a secure hold without rusting over time, maintaining the integrity of the attachment points.
Special consideration is necessary when working with delicate or advanced materials such as carbon fiber. Unlike ABS or fiberglass, carbon fiber fairings are prone to cracking if overly stressed by rigid fasteners. Using nylon or rubber-lined bolts and washers mitigates this risk by absorbing vibrations and distributing pressure evenly. This approach prevents damage during both installation and normal riding conditions.
The fairing material itself significantly influences fastener choice and installation technique. ABS plastic, popular for OEM panels, offers a lightweight and flexible option that resists minor impacts and simplifies repair. Fiberglass provides increased strength and customization potential but demands careful handling due to its brittleness. Carbon fiber stands out with its unmatched strength-to-weight ratio and high-end finish but requires more expensive fasteners and precise torque control to avoid fractures.
During installation, maintaining alignment is essential to preserve aerodynamics and reduce unnerving stress points. It is advisable to loosely fit all panels and brackets first, allowing adjustments before tightening fasteners incrementally. Over-tightening is a common cause of surface cracks and should be avoided by following manufacturer-specified torque values.
Equipping yourself with a comprehensive set of tools—such as Allen wrenches, Phillips and Torx screwdrivers, and a stable motorcycle stand—enhances precision and safety throughout the process. Keeping track of original screws, bolts, and push pins during disassembly also streamlines reassembly and ensures each fastener fits its corresponding hole or clip perfectly.
For those seeking a wide range of reliable fasteners suitable for various fairing types and motorcycle models, there are bolt kits offering extensive selections of corrosion-resistant pieces. These kits simplify the replacement process by providing compatible hardware that balances strength and protection against wear.
Careful selection of both fasteners and fairing materials ultimately supports a secure, professional finish that retains the motorcycle’s visual appeal and improves ride quality. For further insights into fairing options and installation advice, exploring detailed resources at Summit Fairings offers valuable guidance to complement these fundamental considerations.
Chapter 4: Final Reassembly and Adjustments in How to Replace Fairings for Motorcycles
1. Precision Alignment and Secure Fastening Techniques for Flawless Fairing Reassembly
Achieving perfect alignment and secure fastening marks the critical final phase in replacing motorcycle fairings. This stage demands a nuanced approach to ensure the panels fit seamlessly, maintaining both the bike’s aerodynamic profile and aesthetic appeal without risking damage to the components.
Initially, the new fairings should be loosely positioned to align naturally with the motorcycle’s mounting points. These include fork tubes, frame brackets, and any pre-existing holes or slots designed for the panels. Starting with a gentle fit allows for visual inspection and tactile adjustment, ensuring that each curve and edge matches the original contours. Many fairing kits benefit from pre-drilled alignment holes tailored to the motorcycle’s frame, significantly simplifying this step by guiding precise placement and reducing the chance of misalignment or undue stress on the panels.
Securing the fairings requires a careful balance between firm attachment and cautious tightening. Fasteners, ideally provided in a high-quality or OEM-specific bolt kit, should be installed progressively and tightened evenly, avoiding excessive force that could crack or warp fragile plastic or fiberglass surfaces. Incorporating washers or rubber grommets where appropriate buffers the panels against vibration and stress, which can prolong their lifespan and maintain a pristine finish.
Minor adjustments often follow the initial assembly. It’s common to find slight misfits that call for gentle repositioning, bracket readjustments, or subtle reshaping of internal supports such as foam inserts on gear fairings. These refinements improve both the physical fit and the overall integrity of the reassembled setup. Throughout this phase, using specialized alignment tools or temporary clamps helps keep the panels steady, allowing the installer to focus on precision without struggling to hold components in place.
Before fully committing to the final torque on all fasteners, comprehensive checks verify that no panel exerts pressure on moving parts including wheels, exhausts, or steering mechanisms. Ensuring unobstructed operation is vital for safety and optimal performance. The panels should be flush, with no gaps or overlaps that could cause wind resistance or detract from the bike’s style.
Following manufacturers’ installation guides can provide model-specific insights that streamline the alignment and fastening process. For those uncertain about complex fairing assemblies, seeking professional assistance facilitates a flawless finish and avoids costly mistakes.
This meticulous approach to final reassembly not only preserves structural integrity but also enhances the motorcycle’s appearance and functionality. For more insights on selecting quality panels and accessories that complement your bike’s design, explore a trusted source for motorcycle fairings.
2. Streamlining Electrical Connections and Fastener Strategy for a Flawless Motorcycle Fairing Reassembly
The final reassembly phase when replacing motorcycle fairings demands a meticulous approach to electrical connections and fastener management to ensure both functionality and durability. Electrical wiring within the fairings often includes critical components such as lighting, heated grips, audio systems, and navigation devices. To maintain the integrity of the motorcycle’s electrical system, it is important to rely on OEM or vehicle-specific power connection kits. These kits eliminate the need to cut into the factory wiring harness, preserving the original CAN/Bus system’s performance and preventing potential electrical faults.
For installations involving multiple accessories inside the fairing, harness management is simplified by employing Y-connectors, which allow sharing a single power source among several devices and reduce wire clutter. Additionally, power extension harnesses facilitate the addition of front fairing accessories without complex rewiring, ensuring a neater appearance and easier troubleshooting. Before disconnecting any existing electrical plugs, documenting each connection—either by photographs or labeling—helps guarantee accurate reinstallation and prevents miswiring that could damage components or create short circuits.
In parallel with electrical considerations, fastener management plays a crucial role in the final fit and safety of the replaced fairings. Reassembling should follow a logical sequence, typically starting from the outermost panels and progressing inward. Tracking each fastener by type and origin is essential; using labeled containers or notes ensures no bolt or clip is misplaced. All fasteners must be inspected for wear or damage—rusted or stripped bolts should be replaced to maintain structural integrity.
Applying the proper torque when tightening bolts is non-negotiable. Over-tightening can crack delicate fairing plastics or deform mounting brackets, while under-tightening risks parts loosening during operation. Utilizing washers or rubber grommets where appropriate helps distribute pressure evenly and dampens vibration. Throughout reassembly, frequent alignment checks prevent warping or gaps between panels, which could compromise aerodynamics and aesthetics.
Combining tidy, plug-and-play wiring solutions with an organized fastener strategy culminates in a professional and safe fairing replacement. This method preserves the motorcycle’s electrical reliability and mechanical soundness while restoring its sleek, factory-quality appearance. For further insights into choosing and fitting superior quality fairings that facilitate such smooth reassembly, exploring dedicated resources on affordable motorcycle fairings can provide valuable guidance.
Final thoughts
Replacing motorcycle fairings involves a meticulous sequence of carefully removing old panels, aligning and fitting new ones, selecting the right tools and parts, and performing thorough final reassembly. For business owners, mastering these steps translates to delivering consistent, high-quality service that satisfies customers and sustains operational efficiency. Investing time in training technicians on damage prevention during removal, alignment precision, and using authentic or appropriate aftermarket parts sets your shop apart in a competitive market. Ultimately, adopting this structured approach enhances your reputation for expert craftsmanship, reduces costly mistakes, and builds lasting customer trust. Harnessing these insights paves the way for growing your business while keeping motorcycles looking and performing at their best.
Ready to elevate your ride? Summit Fairings delivers premium, custom-fit fairings that blend style and durability. Whether you’re chasing speed or turning heads, we’ve got your bike covered. Don’t wait—transform your machine today. Click, customize, and ride with confidence. Your perfect fairing is just a few clicks away. Act now!
About us
undefined