Introduction
Vinyl wrapping motorcycle fairings represents a lucrative opportunity for business owners in the automotive customization and repair industry. This process goes beyond aesthetic upgrades; it demands precision and expertise to ensure durability and a premium finish that customers value. From meticulous preparation to the final steps of reinstallation, every phase impacts the overall quality and longevity of the wrap. This guide breaks down essential stages: starting with cleaning and prepping surfaces to promote adhesion; precise measurement and cutting for a perfect fit; mastering application techniques with the right tools; leveraging heat gun techniques to conform vinyl to intricate curves; and completing the job with clean finishing touches and expert reinstallation. Understanding and executing these steps effectively can enhance your service offerings, reduce errors, and increase profitability.
Tables of Contents
Chapter 1: Preparation and Cleaning Techniques for How to Vinyl Wrap Motorcycle Fairings
- Mastering Surface Cleaning: Essential Steps for Flawless Vinyl Wrapping of Motorcycle Fairings
- Mastering Environmental and Handling Factors for Flawless Motorcycle Fairing Vinyl Wraps
- Essential Tools and Step-by-Step Application for Perfect Motorcycle Fairing Vinyl Wraps
Chapter 2: Precision in Measurement, Cutting, and Sizing for Motorcycle Fairing Vinyl Wraps
- Mastering Exact Measurements and Cutting Techniques for Flawless Motorcycle Fairing Wraps
- Mastering Precision and Margin Strategy for Flawless Motorcycle Fairing Vinyl Wraps
- Precision Sizing and Material Efficiency: Optimizing Measurement and Cutting for Motorcycle Fairing Wraps
Chapter 3: Application Methods and Tools for How to Vinyl Wrap Motorcycle Fairings
- Mastering Essential Techniques and Tools for Vinyl Wrapping Motorcycle Fairings
- Key Materials and Precision Tools for Flawless Motorcycle Fairing Vinyl Wraps
- Mastering the Step-by-Step Technique for Flawless Motorcycle Fairing Vinyl Wraps
Chapter 4: Mastering Heat Gun Techniques for Perfect Curves in Motorcycle Fairing Vinyl Wraps
- Precision Heat Gun Control and Curve Handling Strategies for Seamless Motorcycle Fairing Wraps
- Preparing Surfaces and Materials for Optimal Heat Gun Application and Curve Wrapping in Motorcycle Fairings
- Enhancing Adhesion and Finishing Touches: Post-Application Heat Gun Use and Curve Handling
Chapter 5: Finishing Touches and Reinstallation: Perfecting Your Vinyl Wrap on Motorcycle Fairings
- Mastering Trimming and Edge Finishing for a Flawless Vinyl Wrap on Motorcycle Fairings
- Mastering Heat and Adhesion: Essential Techniques for a Durable Vinyl Wrap Finish
- Ensuring Durability and Precision: Expert Reinstallation and Final Inspection Techniques for Vinyl Wrapped Motorcycle Fairings
Chapter 1: Preparation and Cleaning Techniques for How to Vinyl Wrap Motorcycle Fairings

1. Mastering Surface Cleaning: Essential Steps for Flawless Vinyl Wrapping of Motorcycle Fairings
Achieving a smooth, durable vinyl wrap on motorcycle fairings starts with meticulous surface cleaning. Proper preparation ensures the vinyl adheres firmly, preventing issues like peeling, bubbling, or uneven edges. The process begins with a thorough wash to remove dirt and loose grime. Using a gentle water spray or a two-bucket wash method helps eliminate surface contaminants without scratching the fairings. Once cleaned, the surface must be completely dry before moving to solvent-based cleaning.
Isopropyl alcohol or a dedicated prep cleaner plays a central role in removing oils, wax, and other residues invisible to the naked eye. These substances can critically interfere with vinyl adhesion, causing bubbles or premature peeling. Applying the solvent with a clean, lint-free microfiber towel ensures no dust or particles remain. For stubborn oils or sealants, a specialized degreaser or all-surface prep product provides deeper cleansing, preparing the fairings for optimal vinyl bonding.
Maintaining a controlled environment with temperatures between 60°F and 80°F is equally vital. This range preserves the vinyl’s flexibility and maximizes adhesive strength during installation. Lower temperatures can make vinyl rigid and prone to cracking, while excessive heat may cause it to stretch unevenly.
The final wipe-down removes any lingering dust or fibers, setting the stage for a seamless installation. Employing professional-grade cleaning materials and exercising patience during these initial steps directly influences the quality and lasting appearance of the wrap.
For comprehensive insights on preparing fairings for vinyl wrapping, enthusiasts can explore detailed guides available at reputable sources such as Summit Fairings, offering valuable tips tailored to motorcycle customization.
2. Mastering Environmental and Handling Factors for Flawless Motorcycle Fairing Vinyl Wraps
Achieving a smooth and durable vinyl wrap on motorcycle fairings requires meticulous attention to both environmental conditions and careful handling throughout preparation and cleaning. Before application, the fairings must be free of every trace of dirt, oil, wax, and residue—as even minor contaminants can compromise adhesion and cause bubbles or peeling over time. Using solvents like isopropyl alcohol ensures the surface is impeccably clean and ready to bond with the vinyl.
Equally important is controlling the workspace environment. Wrapping should take place in a dust-free area with stable temperature and humidity, ideally around 20–25°C. Within this range, vinyl remains pliable and stretches easily without drying too fast or becoming brittle. Applying heat using a heat gun set to low or medium settings helps the vinyl conform flawlessly to the fairing’s contours; overheating risks damaging both the vinyl and the underlying paint.
Disassembling the fairings is strongly advised to enable complete coverage and avoid edges peeling from stress or incomplete adhesion. Special attention is needed when working with plastic trims, which often suffer oxidation or degradation. Treating these areas beforehand with restorers and UV protectants not only smooths the surface for better vinyl adhesion but also prolongs the final appearance.
After installation, avoid harsh cleaning such as steam or pressure washing, which can cause lifting or damage. Instead, use mild shampoos and soft sponges with water below 25°C to maintain the wrap’s integrity. Additional protective layers like ceramic coatings can further shield the vinyl from UV rays, dirt, and moisture, significantly extending its lifespan.
Implementing these handling and environmental strategies is essential for ensuring a professional-quality vinyl wrap that stands the test of time while enhancing the motorcycle’s aesthetics. For detailed insights into choosing quality fairings before wrapping, explore this resource on discovering affordable motorcycle fairings.
3. Essential Tools and Step-by-Step Application for Perfect Motorcycle Fairing Vinyl Wraps
Successfully vinyl wrapping motorcycle fairings hinges on using the right tools and following a methodical application process. The core tools—such as a squeegee, heat gun, utility knife, masking tape, and quality cleaning supplies—are indispensable. Each plays a crucial role in preparing the fairings and ensuring flawless vinyl adhesion. Prior to application, fairings must be meticulously cleaned and dried using pH-neutral cleaners and microfiber cloths to eliminate dirt, grease, and residues that could undermine the wrap’s durability. A pre-rinse or gentle soak helps loosen stubborn grime, especially on previously used parts, while thorough drying prevents moisture from becoming trapped beneath the vinyl, which could cause bubbles or peeling.
Once the surface is pristine and inspected for scratches or imperfections, measuring and cutting the vinyl with an allowance for trimming ensures a bespoke fit. The application should begin at one edge, gradually laying down the vinyl while smoothing it out with the squeegee to push out air and prevent wrinkles. Controlled warming of the vinyl with a heat gun increases flexibility, allowing it to conform seamlessly to complex curves and edges typical of motorcycle fairings. After securing the vinyl on, carefully trimming excess material with a sharp utility knife finalizes the edges for a clean appearance. A final pass with the heat gun activates the adhesive fully and helps the wrap settle into tight contours.
Patience and attention to detail during these stages are key, as rushing can cause bubbles and uneven adhesion. Avoid vinyl application in extreme temperatures to maintain optimal pliability and bonding. Employing high-grade vinyl materials also enhances longevity and finish quality. For a deeper understanding of selecting and preparing components, the resource on explore the best motorcycle fairings at Summit Fairings offers valuable insights into compatible fairing materials suitable for wrapping projects.
Chapter 2: Precision in Measurement, Cutting, and Sizing for Motorcycle Fairing Vinyl Wraps
1. Mastering Exact Measurements and Cutting Techniques for Flawless Motorcycle Fairing Wraps
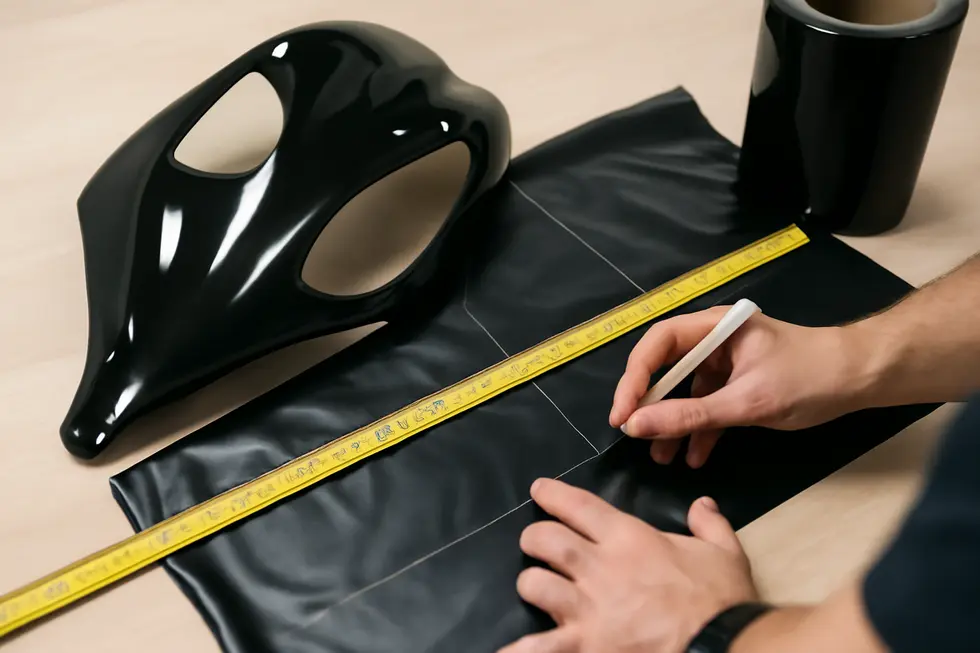
Achieving a professional vinyl wrap on motorcycle fairings starts with mastering precise measurement and cutting techniques. Accurate dimensions are vital because even slight miscalculations can lead to wrinkles, bubbles, or excessive waste. Using a flexible measuring tape to capture every length, width, and contour is essential. Pay close attention to curves and edges, as these shapes demand additional vinyl for clean coverage and smooth application.
To accommodate the complex shapes on motorcycle fairings, always cut the vinyl larger than the measured area. Adding an extra 5 to 15 feet is recommended to allow for adjustment, stretching, and repositioning during installation. This buffer guards against mistakes and ensures ample material for trimming, critical when wrapping curves and hard-to-reach spots.
Breaking down the fairings into smaller, manageable sections simplifies handling and fitting. Pre-cut these sections on a clean cutting mat with sharp blades for precise edges. Using a felt-tip pen to lightly mark guidelines helps maintain accuracy without damaging the vinyl. Before full application, pre-fitting the vinyl pieces on the fairing ensures that the wrap covers all surfaces properly and allows fine-tuning measurements.
When calculating total vinyl requirements, rounding up to the nearest roll size prevents running short mid-project, especially important given the irregular shapes involved. Typically, motorcycles need about 5 feet in width and between 10 to 15 feet in length of vinyl, depending on the bike’s size and fairing complexity.
These careful steps in measurement, cutting, and sizing form the foundation for a smooth, bubble-free finish, setting the stage for successful application and long-lasting results. For enthusiasts seeking high-quality fairings, exploring options at Summit Fairings can provide excellent products to wrap with confidence.
2. Mastering Precision and Margin Strategy for Flawless Motorcycle Fairing Vinyl Wraps
Achieving a seamless vinyl wrap on motorcycle fairings hinges on meticulous measurement and thoughtful margin planning. The process begins with measuring not just the obvious flat surfaces but also the complex curves and edges characteristic of fairings. Multiple measurements across width, height, and curvature points capture the true shape, avoiding surprises during application. To protect the integrity of the wrap and prevent visible gaps or “white edges,” a deliberate margin or bleed area—usually between 0.125 to 0.25 inches—is added to each dimension. This allowance provides room for adjustments and trimming, ensuring the wrap can be stretched and aligned precisely.
Selecting a vinyl material with high conformability is vital; such vinyl stretches up to 30% when heated, allowing it to hug contours and recesses without tearing or bubbling. Using precision cutting tools, such as vinyl plotters or sharp blades, is essential to produce clean, exact cuts that match the measured templates and margin allowances. These tools prevent jagged edges that compromise the look and can cause premature vinyl failure.
Considering vents, sharp curves, and complex shapes during measurement and cutting allows installers to plan vinyl placement thoughtfully, reducing wrinkles and lifting over time. The combination of detailed measurement, safe margin inclusion, and careful cutting tailored to the fairing’s unique geometry delivers a professional, smooth finish that lasts. For those seeking further expertise, exploring comprehensive motorcycle fairing resources can deepen understanding of these techniques, supporting a successful vinyl wrap project from start to finish.
3. Precision Sizing and Material Efficiency: Optimizing Measurement and Cutting for Motorcycle Fairing Wraps
Precision Sizing and Material Efficiency: Optimizing Measurement and Cutting for Motorcycle Fairing Wraps
Effective vinyl wrapping of motorcycle fairings hinges on meticulous measurement and smart material use. Accurate sizing begins with carefully measuring each fairing component using precise tools such as rulers or measuring tapes. Recording exact dimensions prevents underestimating material needs, avoiding costly shortages during the wrap. However, it’s equally important to factor in extra material—typically a generous margin of a few inches or more—to accommodate the complex curves and edges characteristic of motorcycle fairings. This allowance ensures sufficient vinyl for tucking and stretching around contours, reducing the risk of weak adhesion or tearing.
Typically, wrapping a motorcycle requires about 5 feet by 10 to 15 feet of vinyl, depending on the bike’s style and fairing complexity. Multiplying length by an approximated coverage factor can help calculate an adequate amount, accounting for all visible surfaces. Cutting techniques should follow a strategy of leaving slight oversize pieces before carefully trimming away excess after application. This approach minimizes waste while allowing the installer flexibility for any adjustments during wrapping.
Material selection plays a crucial role in optimization. High-quality vinyl with excellent flexibility and durability conforms easily to curves, reducing cuts or patches needed. For novice installers, ordering additional material safeguards against common mistakes, while experienced wrappers can reduce waste through precise calculation. Tools like heat guns and infrared thermometers enhance vinyl pliability, allowing cleaner cuts and better adhesion with less risk of damage.
Balancing these strategies results in both cost-effective use of material and a polished, professional finish on motorcycle fairings. To dive deeper into quality fairings suited for your customization projects, explore affordable motorcycle fairings options.
Chapter 3: Application Methods and Tools for How to Vinyl Wrap Motorcycle Fairings
1. Mastering Essential Techniques and Tools for Vinyl Wrapping Motorcycle Fairings
Successfully vinyl wrapping motorcycle fairings demands meticulous attention to fundamental application methods and the right selection of tools, ensuring a flawless, durable finish. The process begins with thorough surface preparation—cleaning the fairings meticulously using isopropyl alcohol or specialized contact cleaners removes all dirt, grease, and wax. This step is crucial as contaminants can compromise vinyl adhesion and lead to bubbling or lifting. Once the surface is pristine, handling the vinyl wrap carefully is paramount; peeling away the protective backing without creating creases or fingerprints helps maintain material integrity. Using vinyl equipped with air-release technology further aids in preventing bubbles during application.
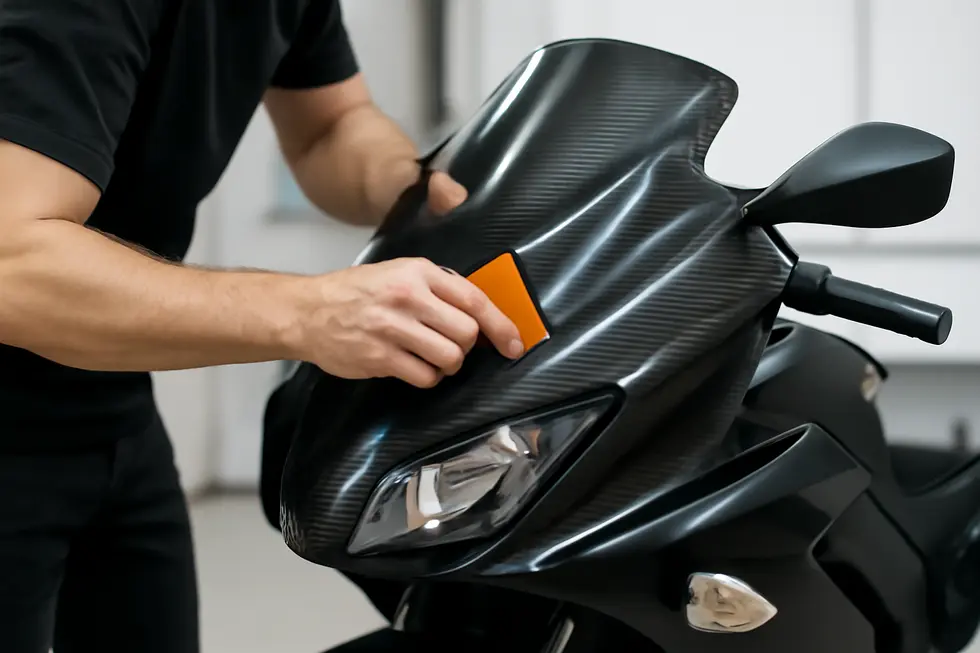
When applying the vinyl, choosing between wet and dry methods depends on the fairing’s complexity. Wet application, involving a slip solution, allows repositioning and bubble reduction but is less common on curved motorcycle fairings. Instead, dry application paired with controlled heat is preferred. A heat gun softly warms the vinyl, enhancing its flexibility to stretch over challenging curves and activating the adhesive beneath for stronger bonding. Concurrently, using a soft squeegee to press the vinyl from center outwards expels trapped air and smooths wrinkles, applying steady, even pressure to secure full adhesion.
Once in place, precision trimming with a sharp blade removes excess vinyl while leaving a small edge margin for rolling over seams. This sealing technique locks the vinyl in place to prevent peeling and creates a professional edge finish. Maintenance-wise, vinyl wraps shield fairings from scratches and UV damage and are easier to clean than paint, requiring only gentle washing with mild soap and water—waxing is discouraged to avoid damage.
Equipped with these essential methods and tools, enthusiasts can achieve impressive, lasting results that rival professional installations. For those seeking comprehensive options on motorcycle fairings to complement their wraps, exploring premium selections can enhance both aesthetics and functionality, as detailed in this source.
2. Key Materials and Precision Tools for Flawless Motorcycle Fairing Vinyl Wraps
Achieving a professional vinyl wrap on motorcycle fairings depends heavily on using the right materials and tools. At the foundation is a high-quality vinyl wrap film, chosen for its durability, flexibility, and heat resistance. Professional-grade vinyl, such as cast or polymeric calendered types, is ideal because it offers medium stretchability that conforms to the complex curves and contours of motorcycle fairings without compromising longevity.
Proper surface preparation requires thorough cleaning with isopropyl alcohol or a degreaser and lint-free cloths to remove every trace of dirt, grease, or wax. This step is critical for ensuring the vinyl adheres securely to the surface. Removing the fairings from the motorcycle when possible allows for easier handling and thorough inspection for any damage that could impede adhesion.
For application, a combination of squeegees—plastic or felt-edged—are indispensable for pressing down the vinyl, smoothing out bubbles, and ensuring a tight bond. Heating tools, specifically heat guns, play a vital role by softening the vinyl, making it more pliable for precise stretching around curves and edges. Cutting tools such as sharp precision knives with angled blades allow for clean trimming of excess vinyl. Knifeless tape offers a damage-free method to slice vinyl edges accurately without risking scratches.
Measuring tools ensure the vinyl is cut slightly larger than each fairing piece, allowing room for proper fitting and trimming later. The ideal workspace is dust-free with moderate temperature to maintain vinyl flexibility and avoid contamination.
This carefully selected toolkit and materials form the backbone of a smooth, bubble-free, and visually stunning wrap that revitalizes motorcycle fairings. For insights on sourcing quality fairings, consider exploring premium options available here.
3. Mastering the Step-by-Step Technique for Flawless Motorcycle Fairing Vinyl Wraps
Mastering the Step-by-Step Technique for Flawless Motorcycle Fairing Vinyl Wraps begins with meticulous preparation, precise application, and careful finishing. The process starts by removing the fairings from the motorcycle, allowing access to flat, manageable surfaces. Cleaning the fairings thoroughly with an automotive-grade cleaner or isopropyl alcohol removes contaminants like dirt, grease, and wax, ensuring optimal vinyl adhesion. After drying, inspecting each piece for damage or imperfections is crucial; smooth surfaces provide the best foundation for wrapping. Warming the fairings lightly with a heat gun can help the vinyl conform more easily during installation.
The right tools are essential. Use high-quality vinyl film to guarantee durability and finish longevity. A felt-edged squeegee aids in gently pressing the vinyl down without scratching while eliminating air bubbles. A heat gun softens the film, allowing for seamless stretching over the fairings’ intricate curves and edges. Sharp knives or vinyl cutters help trim excess material precisely, and gloves protect the wrap from fingerprints and improve handling.
When measuring, cut the vinyl slightly larger than each fairing panel to allow for stretching and trimming. Begin application by peeling back a small section of the backing and aligning the vinyl with the fairing edge. Gradually smooth the wrap down while applying heat to soften it, carefully working out bubbles and wrinkles. This slow, deliberate approach is vital to conform the material flawlessly to complex contours.
After full coverage is achieved, trim away excess vinyl with precision. Reheat edges and press firmly to secure adhesion and prevent lifting. Any remaining bubbles can be punctured gently and smoothed out carefully. Finally, allow the vinyl to cure for several hours before reinstalling fairings, avoiding moisture or stress. This methodical approach ensures a smooth, durable finish that enhances both aesthetics and protection.
For detailed guidance and helpful tips, consult resources like the explore the best motorcycle fairings at Summit Fairings blog, which provides expert insight into preparation and application techniques.
Chapter 4: Mastering Heat Gun Techniques for Perfect Curves in Motorcycle Fairing Vinyl Wraps
1. Precision Heat Gun Control and Curve Handling Strategies for Seamless Motorcycle Fairing Wraps
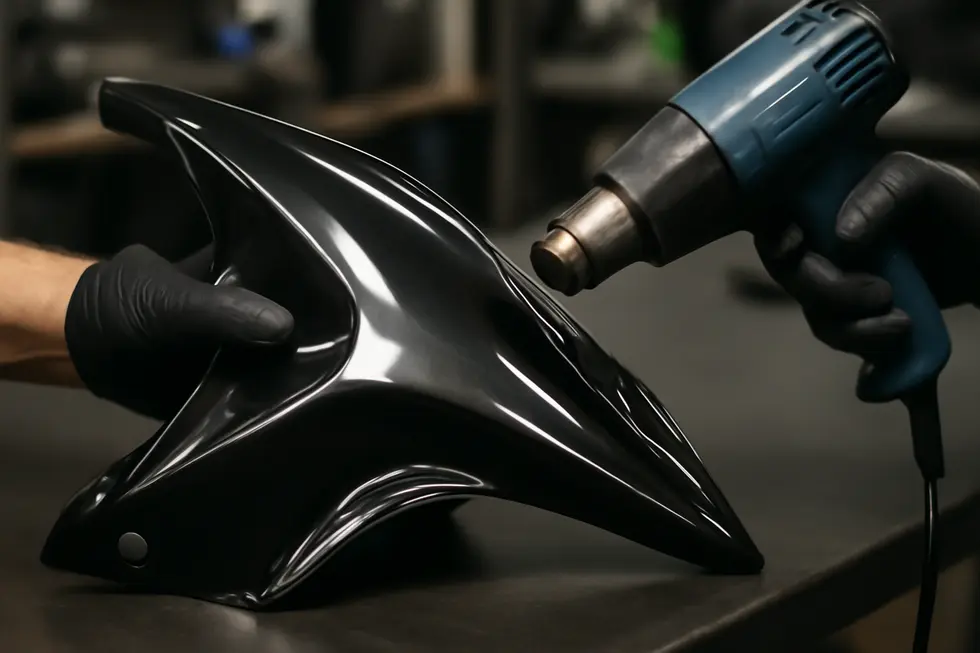
Achieving a flawless vinyl wrap on motorcycle fairings hinges on expertly managing heat gun usage and mastering the handling of curves. The most crucial aspect is applying controlled, moderate heat to soften the vinyl without risking damage to its surface or the paint beneath. Optimal heat levels differ by surface type: flat areas respond well to temperatures near 110°C (230°F), which promote strong adhesion, while curves and overlapped sections benefit from a slightly higher heat around 130°C (266°F) to allow gentle stretching. Excessive heat should be avoided to prevent warping or discoloration.
The vinyl’s inherent flexibility permits it to stretch up to about 30%, a feature maximized by warming the material incrementally as it is guided over complex 3D shapes. Gradually heating the vinyl while applying steady, gentle tension prevents tears or unsightly distortions. Beginners often prefer hairdryers for their gentler heat output, reducing the likelihood of overheating and simplifying control.
Before heat application, fairings must be meticulously cleaned with alcohol-based solutions to remove oils and residues, ensuring optimal vinyl bonding. Cutting the vinyl backing into manageable strips allows precise placement and better control during layout. As the vinyl is applied, a squeegee helps smooth it onto the surface while pushing out air bubbles, aided by special air channel technology integrated into quality vinyl films.
Post-installation care includes avoiding harsh chemicals and optionally applying vinyl-safe ceramic coatings to protect the finish and maintain gloss. This attentive approach to heat application and curve handling ensures a smooth, durable, and visually striking wrap.
For those seeking further insight, Summit Fairings offers a comprehensive blog resource packed with expert tips and detailed techniques to enhance your wrapping success.
2. Preparing Surfaces and Materials for Optimal Heat Gun Application and Curve Wrapping in Motorcycle Fairings
Proper preparation and surface treatment are the foundation for expertly using a heat gun and handling the complex curves of motorcycle fairings when vinyl wrapping. Before applying heat, disassembling the fairings provides full access and simplifies maneuvering the vinyl. Each panel must be meticulously cleaned to remove dirt, grease, and residue that compromise adhesion. Isopropyl alcohol is the preferred cleaning agent, leaving a spotless, dust-free surface critical for vinyl to grip firmly.
When using a heat gun, it is vital to operate at low to medium heat settings. This controlled warmth softens the vinyl, activating the adhesive while making the material pliable enough to stretch around contours without damage. Careful, even heating prevents wrinkles and bubbling by allowing the vinyl to relax and conform. The heat gun should be kept moving steadily and held at a safe distance to maintain a consistent temperature and avoid overheating the wrap or fairing.
During application, the vinyl is first lightly tacked in place. This initial positioning allows for adjustment before commitment. Using a squeegee, press the vinyl from the center toward the edges to push out air bubbles and encourage adhesion. Applying heat during this stage enhances flexibility, helping the vinyl snugly fit every curve and corner. Stretching carefully while warming the vinyl ensures a smooth, clean finish without tearing.
Allowing the adhesive adequate curing time — ideally 48 hours without exposure to washing or harsh weather — secures the wrap’s durability. These preparation and heating techniques collectively enable a professional, long-lasting vinyl finish that embraces even the most intricate motorcycle fairing shapes.
Explore additional insights about motorcycle fairings at your ultimate source for affordable motorcycle fairings.
3. Enhancing Adhesion and Finishing Touches: Post-Application Heat Gun Use and Curve Handling
The success of vinyl wrapping motorcycle fairings hinges not only on proper application but also on the crucial post-application steps that ensure lasting adhesion and flawless conformity around complex curves. After carefully cleaning and preparing the fairing surfaces, the heat gun plays an indispensable role in both shaping the vinyl and solidifying its bond.
During application, applying steady, moderate heat softens the vinyl, increasing its elasticity to stretch smoothly over tight bends and recessed areas typical of motorcycle fairings. This gentle warming helps avoid over-stretching that can weaken the material or cause distortions. Strategic heating focuses first on flat or mildly curved sections before gradually addressing more intricate contours, enabling precise control that minimizes wrinkles or bubbles.
Once the vinyl is positioned and smoothed, a post-heating phase is essential. This step involves evenly warming the applied vinyl to fully activate the adhesive underneath, locking the film in place. Post-heating enhances the wrap’s durability by securing edges and seams, which are carefully tucked and sealed to protect against peeling, moisture, and debris intrusion. It’s important to avoid applying vinyl over damaged or coated surfaces without proper preparation, as contaminants or incompatible finishes can undermine adhesion.
Final inspections after cooling help spot any lingering bubbles, wrinkles, or edges requiring touch-ups. Proper maintenance, including gentle cleaning and avoiding harsh chemicals, preserves the wrap’s appearance and adhesion over time. Employing the heat gun thoughtfully throughout the wrapping process, from initial shaping to final adhesion setting, ensures a high-quality finish perfectly tailored to the complex geometry of motorcycle fairings.
For enthusiasts seeking deeper insights and technical advice on vinyl wrap techniques and fairing care, exploring specialized sources such as the Summit Fairings blog offers valuable guidance and inspiration.
Chapter 5: Finishing Touches and Reinstallation: Perfecting Your Vinyl Wrap on Motorcycle Fairings
1. Mastering Trimming and Edge Finishing for a Flawless Vinyl Wrap on Motorcycle Fairings
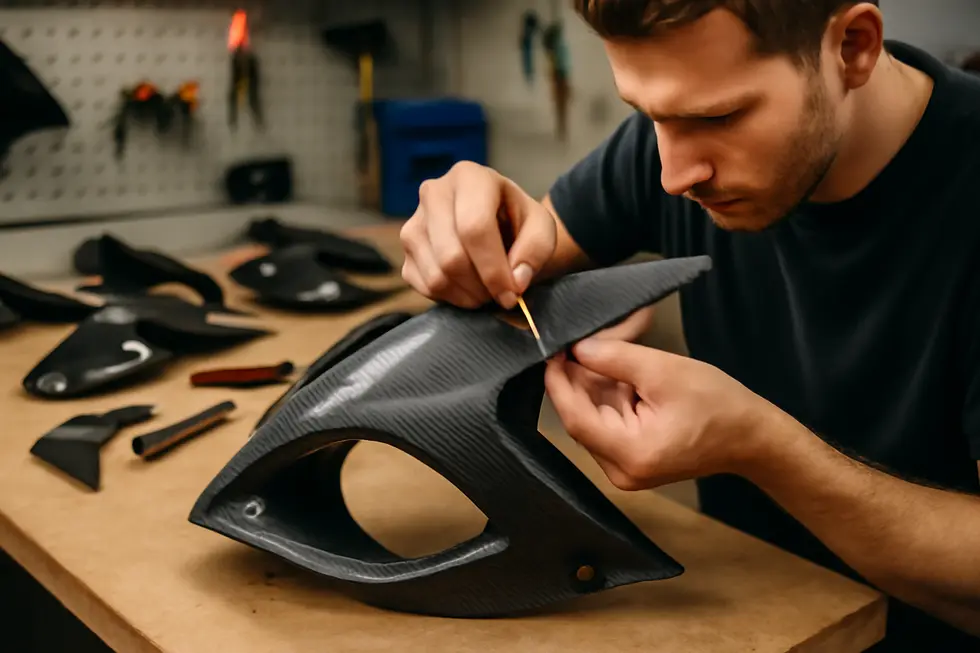
Achieving a professional, durable finish when vinyl wrapping motorcycle fairings hinges on meticulous trimming and edge finishing. After carefully applying and heat-softening the vinyl to conform to all curves and edges, the next essential step is trimming the excess material. Using a razor-sharp blade, trim very close to the fairing’s edges to prevent peeling or bubbling that can compromise both appearance and longevity. Clean, precise cuts are critical; uneven or jagged edges risk lifting over time and can undermine the seamless look sought after in a quality wrap.
Edge finishing involves more than just trimming—it’s about securing the vinyl to ensure it adheres tightly along all contours. This process often includes gently tucking the vinyl into crevices, seams, or under trim pieces, which helps the wrap blend naturally with the fairing’s shape. Applying heat again at these points sets the vinyl firmly, improving its flexibility and bonding strength. Properly finished edges not only boost the wrap’s resilience against weather and wear but also prevent dirt and moisture from infiltrating beneath the vinyl.
When reinstalling the wrapped fairings, handling them carefully is paramount. Avoid any contact that might scratch or stretch the vinyl, and use the original mounting points to maintain a secure fit without damage. This careful reattachment preserves the sleek factory appearance and protects the underlying paintwork.
By combining precision trimming, strategic edge finishing, and cautious reinstallation, you ensure a bubble-free, long-lasting wrap that elevates both form and function. For additional insight into sourcing and maintaining quality motorcycle fairings, explore comprehensive resources at Summit Fairings to complement your customization efforts.
2. Mastering Heat and Adhesion: Essential Techniques for a Durable Vinyl Wrap Finish
Achieving a flawless vinyl wrap on motorcycle fairings hinges on precise heat application and adhesion techniques during the finishing stages. Using a heat gun properly softens the vinyl, making it more flexible and responsive to the intricate curves and edges typical of fairings. This flexibility prevents wrinkles and allows the vinyl to conform snugly without overstretching or damage. For flat panels, heating to around 110°C provides ideal pliability. More complex curves and overlap areas benefit from slightly higher heat, near 130°C, which ensures the vinyl bonds tightly while maintaining structural integrity.
Alongside heat, smooth adhesion is critical. During application, a squeegee is used to press the vinyl firmly onto the surface, methodically working out air bubbles to maintain a clean, wrinkle-free appearance. When repositioning is necessary, tack reducers can facilitate adjustments before the wrap fully bonds. Once adhered, trimming excess material is done carefully, leaving a minimal 3mm margin. Edges are then rolled or tucked to prevent peeling, reinforce the bond, and provide a seamless transition that stands up to wear.
The heat applied not only aids in shaping the vinyl but also activates its adhesive properties, helping it set securely. Proper heat and adhesion methods enhance the film’s resistance to scratches, UV degradation, and environmental stresses, preserving both the wrap’s aesthetic and the underlying fairing’s condition. Reinstalling the fairings demands gentle handling to protect the wrap’s finish.
Opting for high-grade cast vinyl and rigorously following manufacturer guidance on heat limits and adhesion improve longevity and appearance. For additional tips and expert insights into vinyl wrap care and customization, exploring resources such as this source on motorcycle fairings can be invaluable.
3. Ensuring Durability and Precision: Expert Reinstallation and Final Inspection Techniques for Vinyl Wrapped Motorcycle Fairings
Completing a vinyl wrap on motorcycle fairings demands meticulous care during the reinstallation and final inspection stages to guarantee a flawless, lasting finish. After application, allowing the vinyl to cure for at least 1 to 2 hours is essential. This curing period lets the adhesive fully bond to the surface, reducing the risk of peeling when the parts are handled.
When reattaching fairings, mirrors, handles, and badges, it’s crucial to do so gently and carefully, preventing any tension or stress on the vinyl. Misalignment or rushed handling during this phase can create lifts or wrinkles that compromise both aesthetics and durability. Before reassembling, take time to inspect each panel closely, checking for air bubbles, edge lifting, or surface imperfections. Using a heat gun softly on edges and curves helps re-activate the adhesive, smoothing wrinkles and sealing the vinyl snugly around contours.
Trimming excess vinyl accurately around mounting points is key to avoiding bulk that may catch or peel during regular use. Sharp blades should be used cautiously to avoid damaging the fairing or the wrap itself. Once reinstalled, verify that all bolts and screws are tightened to maintain structural integrity without overtightening, which might deform the fairings.
This careful approach to reinstallation not only preserves the clean appearance but also extends wrap longevity under the rigors of riding conditions. For those exploring customization options and seeking quality fairing components, discover affordable motorcycle fairings at Summit Fairings provides excellent resources and choices that complement professional vinyl wrapping results.
Final thoughts
Successfully vinyl wrapping motorcycle fairings hinges on the seamless integration of preparation, precise measurement, skilled application, expert use of heat guns, and meticulous finishing. For business owners, mastering each step not only enhances the product quality but also builds client trust and drives competitive advantage. Investing time and resources into these techniques ensures vinyl wraps offer durability, flawless aesthetics, and an efficient workflow, ultimately delivering superior customer value. With these insights, service providers can confidently expand their offerings and position themselves as leaders in motorcycle customization and repair sectors.
Ready to elevate your ride? Summit Fairings delivers premium, custom-fit fairings that blend style and durability. Whether you’re chasing speed or turning heads, we’ve got your bike covered. Don’t wait—transform your machine today. Click, customize, and ride with confidence. Your perfect fairing is just a few clicks away. Act now!
About us
undefined