Introduction
Successfully wrapping motorcycle fairings combines precision craftsmanship with an understanding of materials and techniques. For business owners aiming to expand or refine their service offerings, mastering this process ensures enhanced product quality and stronger client trust. The journey starts with meticulous preparation to achieve a perfect surface for adhesion, followed by expert application and heating techniques that adapt the vinyl to complex shapes. Finally, careful trimming and finishing secure and elevate the wrap’s durability and aesthetic appeal. Together, these chapters provide a complete framework for delivering premium motorcycle fairing wraps that appeal to diverse customers and build lasting business value.
Tables of Contents
Chapter 1: Preparation Techniques for How to Wrap Motorcycle Fairings
- Mastering Surface Cleaning and Preparation for Flawless Motorcycle Fairing Wraps
- Mastering Sanding and Heat Application for Seamless Motorcycle Fairing Wraps
- Mastering Measurement, Alignment, and Finishing for Flawless Motorcycle Fairing Wraps
Chapter 2: Mastering Application and Heating Techniques for Flawless Motorcycle Fairings Wraps
- Essential Surface Preparation and Gentle Initial Application for Motorcycle Fairings Wraps
- Precision Heat Activation and Expert Wrapping Methods for Flawless Motorcycle Fairings
- The Crucial Role of Post-Heating in Securing and Enhancing Motorcycle Fairing Wraps
Chapter 3: Trimming and Finishing Methods in How to Wrap Motorcycle Fairings
- Mastering Surface Preparation: The Crucial Foundation for Flawless Trimming and Finishing of Motorcycle Fairings
- Mastering Heat Application and Edge Sealing for Durable, Visual Excellence in Motorcycle Fairing Wraps
- Achieving Seamless Precision: The Art of Cutting and Edge Tucking in Motorcycle Fairing Wraps
Chapter 1: Preparation Techniques for How to Wrap Motorcycle Fairings
1. Mastering Surface Cleaning and Preparation for Flawless Motorcycle Fairing Wraps
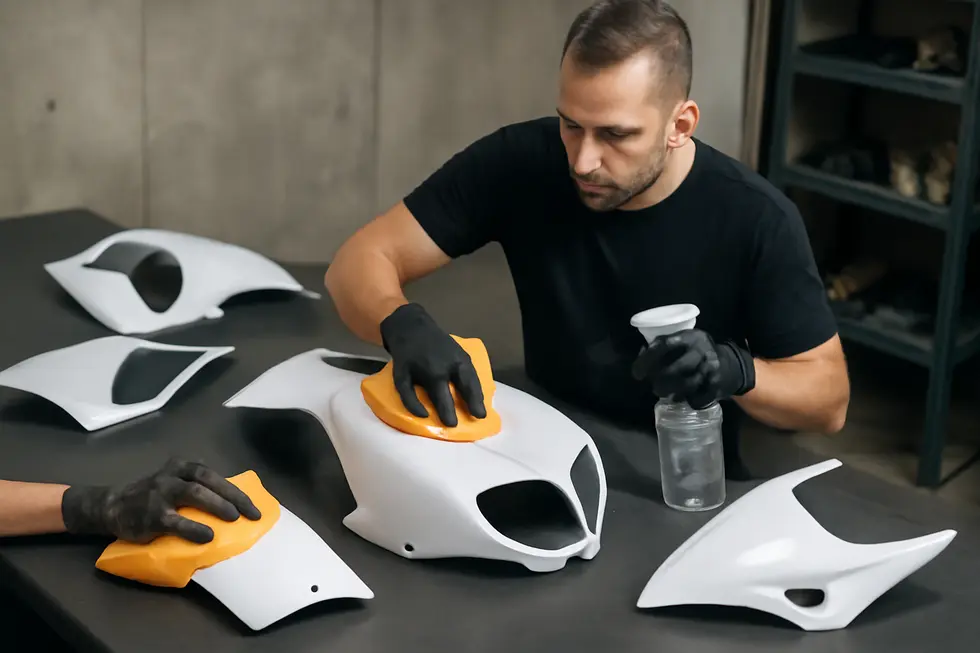
Achieving a flawless vinyl wrap on motorcycle fairings begins with meticulous surface cleaning and preparation. This crucial stage directly impacts the adhesion, durability, and final appearance of the wrap. Any dirt, oils, waxes, or surface imperfections left untreated can cause bubbling, peeling, or uneven finishes once the vinyl is applied.
The process starts with a comprehensive cleaning regimen designed to eliminate all contaminants. Removing oils, grease, and wax residues requires specialized water-based prep solvents that dissolve and lift substances which traditional cleaners cannot remove. Before this stage, a gentle pre-rinse helps wash away loose dirt, and a thoughtfully executed two-bucket wash method prevents recontamination. Using separate mitts and carefully working from top to bottom ensures that grime from wheels or lower parts does not transfer back onto the fairings.
For motorcycle fairings with painted or clear-coated surfaces, surface uniformity plays a pivotal role. Over time, minor scratches or imperfections can develop. Wet sanding with fine-grit sandpapers, typically progressing from 1000 to 3000 grit, smoothes these irregularities while maintaining the integrity of the finish. Keeping the surface wet during sanding prevents deep scratches and helps achieve an even texture that maximizes vinyl adhesion.
Older or weathered fairings often suffer from oxidation or embedded dirt trapped in the paint’s microscopic crevices. Addressing these requires a clay bar treatment following the wash, which physically lifts contaminants that washing alone cannot remove. Polishing afterward restores surface clarity, delivering a clean, receptive base for the wrap. Neglecting this step risks uneven adhesive bonding and short-lived results.
Prior to applying the vinyl, a final wipe-down with isopropyl alcohol or a dedicated cleaning solvent removes any lingering polishing agents, oils, or dust particles. This crucial finishing touch creates an impeccably clean surface that allows the vinyl’s adhesive to form a strong, lasting bond.
Preparing the workspace complements surface readiness. Masking tape protects sensitive areas such as vents, emblem edges, and seams from accidental adhesive contact. Ensuring a dust-free, well-lit environment reduces contamination risks throughout the application process.
Following this structured cleaning and preparation routine lays the foundation for a professional-grade wrap that enhances your motorcycle’s aesthetics and safeguards its fairings. For those seeking further insight into surface preparation techniques paired with painting tips applicable to fairings, exploring expert resources such as the vast selection of motorcycle fairings and preparation advice available at Summit Fairings blog can be invaluable for both novices and seasoned enthusiasts.
By investing time and care in this initial stage, you ensure the vinyl wrap adheres smoothly, remains durable, and perfectly compliments the bike’s design before moving on to the next steps of sanding and heating preparations.
2. Mastering Sanding and Heat Application for Seamless Motorcycle Fairing Wraps
Proper surface preparation through precise sanding and controlled heating is essential when wrapping motorcycle fairings. These techniques ensure the vinyl adheres firmly and contours impeccably to the complex shapes typical of motorcycle fairings, delivering both durability and a flawless finish.
Before sanding begins, the fairings must be cleaned thoroughly to eliminate any dirt, grease, or wax, as residues can hinder adhesion. Sanding achieves two critical goals: it removes surface gloss and minor imperfections while providing a subtle texture to which the vinyl can bond reliably. Start with a medium-coarse sandpaper between 320 and 400 grit, effectively dulling glossy paint and smoothing small flaws that would otherwise show through the wrap. This initial abrasion also helps remove any residues left from prior cleaning or repairs.
Progressively move to a finer grit sandpaper to refine the surface, ensuring it remains smooth without losing the slight roughness needed for adhesion. When dealing with fiberglass fairings or repaired cracks, sanding must be especially meticulous. After resin repairs cure, sanding blends the repaired area seamlessly with the original surface, establishing a consistent texture. Following sanding, wipe the surface with isopropyl alcohol to remove all sanding dust and oils, creating a clean, primed canvas ready for the vinyl.
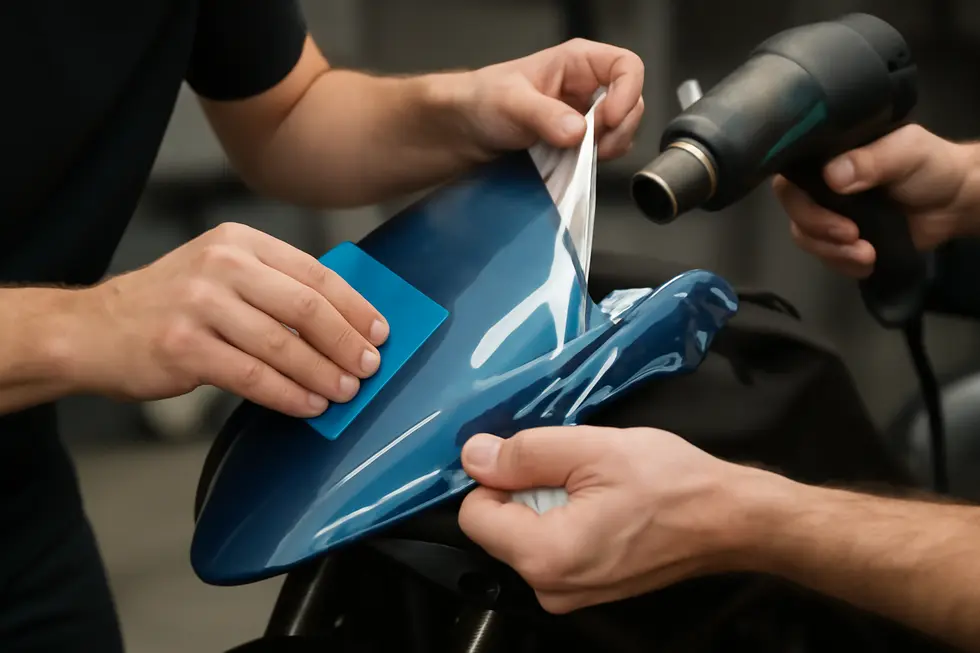
Heating plays an equally vital role during vinyl application. Using a heat gun or specialized vinyl heater, gently warm the vinyl and fairing surfaces to increase the film’s pliability. This flexibility allows the vinyl to conform effortlessly around curves, edges, and intricate contours without wrinkling or tearing. Heating also activates the adhesive’s bonding agents, enhancing long-term adhesion and resistance to lifting.
It’s crucial to apply heat evenly and avoid overheating. Excessive heat can warp the fairings or damage the vinyl, compromising the wrap’s integrity. Applying heat combined with pressure—using a squeegee—helps push out air bubbles and wrinkles, securing the vinyl firmly along seams and curves. Controlled heating during this step enhances the wrap’s endurance to environmental wear and contributes to a polished look.
Additional preparation strategies improve results further. Applying a vinyl wrap primer to plastics or any repaired sections enhances adhesive grip, reducing the risk of peeling. Performing all work in a dust-free environment minimizes contaminants trapped under the vinyl, which would otherwise cause bumps or imperfections.
Together, sanding and heating form the foundation of expert motorcycle fairing wrapping. Their careful execution bridges the gap between a standard wrap and a lasting, professional-grade finish. For detailed insights into fairing options and assembling your project, explore resources on affordable motorcycle fairings at Summit Fairings.
3. Mastering Measurement, Alignment, and Finishing for Flawless Motorcycle Fairing Wraps
Accurate measurement, careful alignment, and meticulous finishing are critical to achieving a professional vinyl wrap on motorcycle fairings. The process begins with measuring the contours and surface areas precisely to estimate how much vinyl is required. Since motorcycles vary widely in size, typical vinyl lengths range from about 5 feet for smaller bikes up to 10 to 15 feet for larger touring models. Utilizing a flexible tape measure ensures the dimensions follow every curve and angle of the fairings, preventing shortages or excess that could complicate application.
Once measurements are taken, preparing the surface and aligning the vinyl correctly take center stage. A thorough cleaning regimen is essential: washing to remove surface dirt, degreasing to eliminate oils or wax, and applying a clay bar to lift embedded contaminants. Any overlooked residue will cause adhesion failures or bubbles. With the fairing pristine, the vinyl wrap is positioned loosely to check fit and alignment without yet applying pressure. This dry-fitting step helps identify if the vinyl properly covers each section without excessive stretching or gaps.
The flexible nature of vinyl allows it to conform closely to curves when softened with gentle heat. Using a heat gun to warm the vinyl makes it more stretchable, reducing creases and enabling a snug fit around complicated shapes. As the wrap adheres from one edge, a squeegee presses out air pockets and wrinkles, maintaining a smooth, clean surface. Tackling the largest sections first helps manage the application logically, then smaller overlapping sections are handled with care.
Finishing requires keen attention to detail. Excess material is trimmed cleanly using a sharp blade, leaving edges that tuck neatly into seams or beneath trim elements for a seamless, factory-like result. A final round of heating activates the vinyl’s adhesive fully, especially around edges and tight curves, locking the wrap in place. Any stubborn bubbles or wrinkles can be resolved by pricking with a pin to release trapped air, followed by smoothing again with the squeegee. Allowing the wrap to cure several hours undisturbed ensures its durability and long-lasting adhesion.
These combined techniques—measuring precisely, aligning with heat-assisted accuracy, and finishing with sharp trims and air-release—form the foundation of a flawless motorcycle fairing wrap. The process not only revitalizes the bike’s aesthetics but also preserves the original paintwork, functioning as a protective shield. For riders looking to explore vinyl wrapping further, detailed guides such as those available at Summit Fairings blog offer valuable insights into fairing selection and care, complementing these preparation steps with expert advice.
Understanding and applying these measurement, alignment, and finishing principles enable anyone to achieve a customized, professional-quality wrap that enhances the motorcycle’s look and longevity.
Chapter 2: Mastering Application and Heating Techniques for Flawless Motorcycle Fairings Wraps
1. Essential Surface Preparation and Gentle Initial Application for Motorcycle Fairings Wraps
Achieving a flawless vinyl wrap on motorcycle fairings begins with thorough surface preparation and a careful initial application process that sets the foundation for durability and visual appeal. The first crucial step is to ensure every inch of the fairing is immaculately clean. Dirt, grease, dust, or wax residues must be completely removed to prevent adhesion problems and air bubbles from forming beneath the vinyl. This cleaning often involves using a dedicated degreaser, followed by wiping with a lint-free cloth. For optimal smoothness, a clay bar treatment can be applied to strip away microscopic contaminants invisible to the naked eye. This meticulous cleaning step not only enhances adhesion but also guarantees a uniform surface that the vinyl wrap can firmly bond to.
The environment where you work plays a subtle yet important role. A clean, dry space with controlled temperatures between 60°F and 80°F (15°C to 27°C) creates ideal wrapping conditions. Vinyl film itself should be tempered to about room temperature, roughly 20°C, before handling. When vinyl is cold, it becomes stiff and harder to conform, and when too warm, it risks overstretching or adhesive issues.
With preparations complete, the initial layout of the vinyl begins. Positioning the film precisely from one edge of the fairing requires patience and a steady hand. Starting from a fixed point helps avoid trapping air beneath the vinyl. Gradually peeling back the backing paper while smoothing the wrap down with a squeegee or similar tool is essential to push out any air bubbles or wrinkles immediately. This process demands a controlled pace to maintain tension without overstretching.
The application phase is tightly integrated with gentle heating to enhance vinyl pliability and adhesion. A heat gun or hairdryer is used to warm the vinyl evenly, making it more elastic and able to conform to complex curves and contours of the fairings without creasing. The heat also activates the adhesive, helping the vinyl bond securely to the surface. Applying heat moderately is key—overheating risks shrinking or damaging the wrap, while insufficient heat can result in poor adhesion and bubbling.
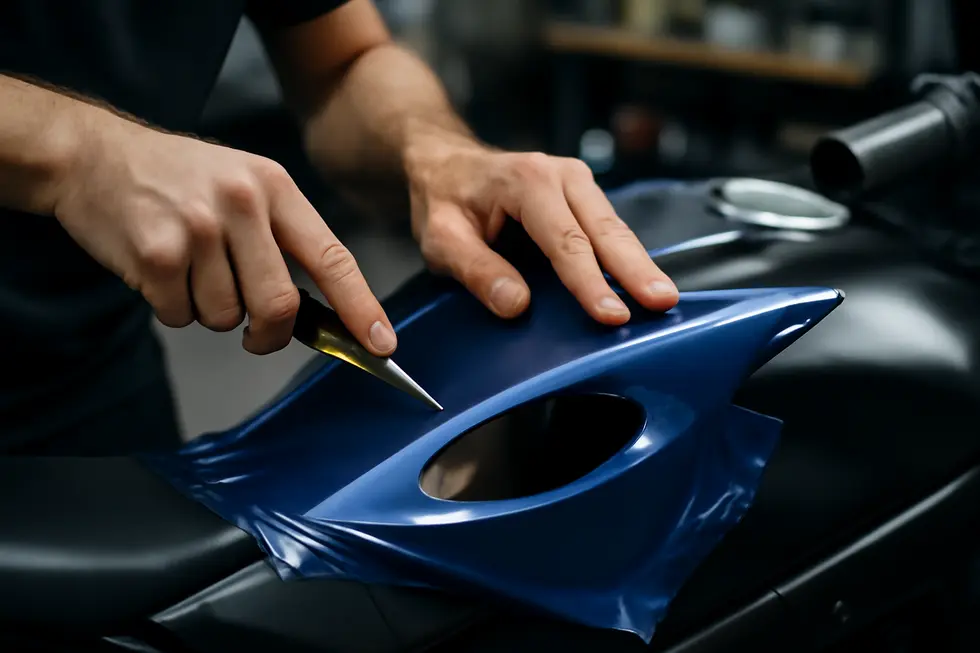
After the vinyl is firmly applied and shaped, excess material is trimmed carefully with a sharp blade. Precise trimming follows the edges and recesses of the fairings to achieve a clean, factory-finished look. Tucking the edges neatly helps prevent peeling over time and ensures the wrap stays firmly secured even through exposure to wind and cleaning.
Following these detailed surface preparation and initial application steps creates a strong foundation for the subsequent heating and finishing techniques that secure the vinyl wrap’s long-lasting durability and pristine appearance. For those seeking more practical visual guidance and tips on these preparation and heating steps, exploring detailed tutorials can provide valuable insights and enhance results.
For additional insights on motorcycle fairings and customization options, visit this detailed resource on explore the best motorcycle fairings at Summit Fairings.
2. Precision Heat Activation and Expert Wrapping Methods for Flawless Motorcycle Fairings
Heat activation is the cornerstone of applying vinyl wraps to motorcycle fairings, transforming the vinyl into a supple, adhesive-ready material that molds seamlessly to complex surfaces. Using a heat gun to gently warm the vinyl increases its flexibility, allowing it to stretch and conform to the fairing’s intricate curves, edges, and recesses without creating unwanted bubbles or wrinkles. This heating process also triggers the adhesive backing, securing a firm, enduring bond that helps the wrap withstand daily wear and environmental exposure.
The application begins by carefully positioning the vinyl on the fairing’s surface. Utilizing air-release channels embedded within quality vinyl, installers can slide and slightly reposition the wrap to align it perfectly before final adhesion. This careful placement minimizes trapped air pockets, dramatically improving the finish’s smoothness.
Heat guns are employed at controlled, moderate temperatures to avoid overheating or damaging the vinyl or underlying fairing material. As the vinyl softens under the warm air, a squeegee or a soft cloth is pressed firmly across the surface. This simultaneous heating and smoothing action expels trapped air bubbles and disperses wrinkles, promoting a continuous, flawless layer.
Critical attention is given to edges and corners where peeling or lifting is most likely to develop over time. After the vinyl is fully applied and carefully smoothed, reheating these vulnerable areas makes the material more pliable and activates the adhesive for a deeper seal. By pressing edges down firmly during this final pass, the wrap gains increased durability and resilience.
A proper curing period of at least 24 hours is essential before riding or exposing the motorcycle to moisture. This waiting time ensures the adhesive sets completely and the wrap adheres with long-lasting strength. Skipping this step can result in premature lifting or bubbling under stress.
Advanced vinyl finishes, such as matte or metallic wraps, sometimes incorporate multi-layer casting. These designs often require less heat due to their specialized coatings, which balance conformability with surface texture to minimize damage risk while preserving aesthetic impact.
Mastering heat activation coupled with precise wrapping techniques delivers a professional-grade, visually stunning motorcycle transformation. Controlled heating softens the wrap, activates its strong adhesive, and enables perfect conformity to irregular shapes. The consistent use of squeegee pressure during heating ensures bubbles and wrinkles are eliminated, while thorough edge sealing guarantees lasting adherence and protection against the elements.
For those interested in deepening their practical know-how, reviewing visual demonstrations focused on heat gun use for vinyl application offers invaluable guidance. Additionally, exploring expert advice on explore the best motorcycle fairings at Summit Fairings can enhance understanding of compatible materials and finishes.
In summary, meticulous heat management paired with skilled wrapping techniques is vital to achieving a durable, flawless vinyl finish that not only personalizes a motorcycle but also protects its fairings from scratches and wear over time.
3. The Crucial Role of Post-Heating in Securing and Enhancing Motorcycle Fairing Wraps
Applying vinyl wrap to motorcycle fairings demands more than just careful placement—it requires a specialized post-heating technique that secures the wrap and significantly amplifies its durability. Once the vinyl is positioned and squeegeed to eliminate initial bubbles and wrinkles, dedicated heating with a heat gun becomes vital in activating the adhesive and allowing the wrap to mold tightly around complex curves and edges. By gently warming the vinyl to approximately 110°C (230°F), the material softens and becomes more pliable. This flexibility ensures that it conforms perfectly to the fairing’s three-dimensional shapes without stretching or tearing, which is key to achieving a professional, factory-like finish.
The controlled heat application also seals the bond between the vinyl and the motorcycle surface, preventing future lifting or peeling often caused by exposure to wind, vibration, and temperature fluctuations during rides. Targeting edges, seams, and tight curves with consistent warmth encourages the adhesive to flow and bond deeply into all contours, creating a smooth, resilient surface that resists environmental stressors.
Crucially, post-heating eliminates trapped air pockets that can compromise adhesion and mar the appearance. Although modern vinyl films often incorporate air-release channels to let bubbles escape during initial installation, heat enhances this effect by helping any lingering microbubbles to dissipate, ensuring flawless uniformity.
This step also contributes significantly to the wrap’s long-term endurance against ultraviolet rays, engine heat, moisture, and road debris. Vinyl exposed to sun and heat can degrade prematurely if not properly bonded, but the post-heating phase stabilizes the film’s position and protects the underlying fairing. Some fairing materials are naturally heat-tolerant, which complements the post-heating benefits by reducing the risk of damage during both application and daily riding.
After the vinyl cools naturally, which further solidifies the adhesive bond, trimming of excess material refines the wrap’s edges for a clean, sleek look. For additional protection and enhanced gloss, some wrappers apply a wax or protective layer as a finishing touch. This layer guards against scratching and fading, preserving the fairings’ vibrant appearance and extending the visual appeal over many miles.
By integrating meticulous post-heating into the wrapping process, enthusiasts ensure their motorcycle fairings are wrapped with precision and resilience. The combined effects of controlled heat application and high-quality materials result in a finish that not only looks immaculate but also withstands the rigors of the road. For those seeking expert tips on vinyl applications tailored to motorcycles, resources such as dedicated fairing specialists provide valuable guidance to optimize every stage from preparation through final finish, ultimately enhancing both aesthetics and durability.
For further insights on comprehensive fairing customization and wrapping techniques, explore detailed information at Explore the Best Motorcycle Fairings at Summit Fairings.
Chapter 3: Trimming and Finishing Methods in How to Wrap Motorcycle Fairings
1. Mastering Surface Preparation: The Crucial Foundation for Flawless Trimming and Finishing of Motorcycle Fairings
Mastering Surface Preparation: The Crucial Foundation for Flawless Trimming and Finishing of Motorcycle Fairings
The key to a professional and durable finish in wrapping motorcycle fairings lies in meticulous surface preparation. Before any trimming or finishing work begins, the fairing must be flawlessly clean and properly conditioned to ensure the vinyl wrap adheres seamlessly and remains intact over time. Every detail in this stage affects the longevity and aesthetic integrity of the final result.
The initial step involves a thorough cleaning process to remove all contaminants such as dirt, grease, oils, and wax residue. These elements are common on motorcycle fairings but detrimental if left untreated, as they cause poor vinyl adhesion and visible imperfections under the wrap. Using specialized automotive plastic cleaners or solvent-based detergents targets these residues without damaging the surface. It’s essential not to overlook corners, crevices, and edges where dirt can accumulate, as any imperfection will create bubbles or peeling once wrapped.
Following cleaning, a light sanding is often applied to gently roughen the surface. This may seem counterintuitive, but introducing fine abrasions enhances mechanical bonding by increasing the surface area for the adhesive. Sanding also helps to smooth out minor scratches or glaze that could inhibit adhesion. Sandpaper of a fine grit is recommended to avoid excessive abrasion that could weaken or deform the fairing material.
Precise trimming and edge preparation, including techniques like V-grooving, are crucial for achieving neat lines and proper fitment once the wrap is applied. This step involves removing any damaged, uneven, or rough sections around edges to prevent loose vinyl flaps and ensure the wrap conforms snugly to contours. A clean, sharply trimmed edge promotes a tight seal and prevents dirt ingress beneath the vinyl.
Once sanding and trimming are complete, polishing and decontamination target microscopic residues and subtle imperfections. This provides a uniform, smooth surface that allows the wrap to lie flat and consistent. The result is a pristine canvas that ensures the final finish looks seamless, without any bumps or shadows.
In certain cases, applying a primer or adhesion promoter is recommended. These products chemically enhance the bond between the fairing plastic and the vinyl wrap, increasing durability and resistance to peeling. The choice of primer depends on the specific plastic type and the environmental conditions the motorcycle will face, such as extreme temperatures or moisture exposure.
Failing to invest attention in surface preparation risks premature wrapping failure and marred appearance. Cleanliness, texture, and edge precision form the backbone of successful trimming and finishing, safeguarding the wrap’s lifespan and visual appeal. For practical insights on cleaning agents, sanding methods, and primer selection, instructional tutorials can provide step-by-step guidance.
Optimizing this preparatory phase complements subsequent sanding and heating techniques, creating a smooth workflow that culminates in a flawless, long-lasting finish. For enthusiasts seeking reliable fairing solutions alongside expert advice, explore the best motorcycle fairings available to match your custom wrapping projects.
2. Mastering Heat Application and Edge Sealing for Durable, Visual Excellence in Motorcycle Fairing Wraps
Achieving a professional and lasting finish when wrapping motorcycle fairings largely depends on the expert use of heat application and precise edge sealing. These techniques are crucial in transforming the vinyl wrap from a flat film into a contour-hugging, resilient skin that complements the bike’s design while providing protection.
Heat application plays a dual role in the finishing process. Initially, it softens the vinyl, making the material pliable enough to conform seamlessly around the intricate curves and sharp lines of motorcycle fairings without overstretching. This pliability helps eliminate wrinkles and air pockets, resulting in a smooth, bubble-free surface. Beyond shaping, heat also activates the adhesive properties of the vinyl, ensuring it bonds securely to the fairing substrate. Careful and uniform heating prevents issues like vinyl distortion or weakening of the adhesive, underscoring the importance of controlled technique rather than applying excessive heat.
The role of edge sealing is equally vital. After the vinyl has been applied and shaped, excess material along the fairing edges must be trimmed precisely with a sharp blade to avoid ragged or uneven borders. These edges are often the most vulnerable points where peeling or lifting can begin, especially due to regular exposure to moisture, dirt, and mechanical wear. To counter this, the trimmed edges are gently heated again to soften the vinyl, allowing it to be folded or tucked neatly into recesses or creases. Pressing down firmly with a tool such as a squeegee ensures a tight, weather-resistant seal that resists peeling or damage.
This combination of heating and sealing not only extends the longevity of the wrap but also enhances its visual appeal by producing clean lines and a uniform finish. The attentive reheating during trimming helps finalize the bond between the vinyl and the surface, securing areas prone to stress and movement.
A smooth application process also integrates ongoing bubble removal with a squeegee and cautious blade work to maintain the wrap’s integrity and aesthetics throughout the trimming phase. Each stroke of the squeegee during and after heating pushes out trapped air, reducing the risk of bubbles reappearing after the wrap cures.
Ultimately, these techniques—careful heat control and meticulous edge treatment—are fundamental in providing a durable, attractive wrap that withstands environmental and mechanical challenges. For those seeking expert guidance, detailed installation instructions can be found in leading vinyl wrap resource guides, offering valuable insights into the nuanced use of heat and edge finishing.
For further exploration of motorcycle fairing solutions that complement wrapping efforts, consider visiting Summit Fairings’ extensive blog collection on discovering unmatched choices in motorcycle fairings, where design and customization techniques align with advanced finishing strategies.
3. Achieving Seamless Precision: The Art of Cutting and Edge Tucking in Motorcycle Fairing Wraps
The final stages of wrapping motorcycle fairings demand skillful precision, especially when it comes to cutting the vinyl and tucking its edges. These steps transform a raw application into a professional, long-lasting finish that accentuates the bike’s contours and protects its surfaces.
Precision cutting is fundamental to the trimming and finishing process. Since motorcycle fairings feature intricate curves and sharp angles, vinyl must be trimmed with exactness to prevent unwanted folds or wrinkles. Using sharp, fine-tipped cutting tools, installers carefully trim the excess vinyl, always mindful to preserve the integrity of the fairing beneath. Steady hands and patience are crucial to avoid any accidental gouges or uneven edges that could mar the wrap’s appearance.
To allow for bending and edge treatment, the vinyl is initially cut with extra margin. This reserve material ensures flexibility during the heat-assisted application phase. When heated gently, the vinyl softens and stretches, conforming smoothly to complex shapes. Once positioned correctly, the excess vinyl fringe is trimmed away with precision. This level of control avoids any bunching that might cause premature lifting or surface blemishes once the bike is exposed to wind and weather.
Edge tucking complements cutting by concealing raw vinyl edges within the fairing’s natural seams, crevices, or under trim components. This step is not merely aesthetic; it reinforces the wrap’s adherence and prevents peeling along vulnerable borders. By tucking edges discreetly, the wrap’s finish appears seamless, with no visible cuts disrupting the motorcycle’s sleek lines. The vinyl gains added protection from environmental factors such as moisture and abrasion.
This delicate tucking is achieved by carefully folding and pressing the warmed vinyl into corners or beneath trims using specialized tools like edge rollers. The use of heat is integral here as well—softening the vinyl improves pliability and ensures it bonds firmly in tight recesses. When needed, an edge sealer or adhesive can be applied to enhance durability, helping the wrap withstand the rigors of riding.
Together, precise cutting and meticulous edge tucking elevate the wrap’s appearance and performance. These techniques reflect a balance of technical mastery and practical foresight, turning protective vinyl into a tailored skin that clings perfectly to the motorcycle’s form. They underscore why wrapping fairings requires more than just material—it demands craftsmanship.
For enthusiasts seeking further knowledge on high-quality motorcycle fairing treatments, exploring resources like this guide’s detailed insights proves invaluable. For inspiration on fairing designs and materials, visit Summit Fairings’ comprehensive blog, a rich source of information on customizing your motorcycle’s exterior with confidence and style: https://blog.summitfairings.com/explore-summit-fairings-your-go-to-destination-for-motorcycle-fairings/.
Final thoughts
Mastering the art of wrapping motorcycle fairings is essential for business owners dedicated to delivering exceptional customization and protection solutions. Starting with detailed preparation guarantees an optimal surface that promotes strong adhesion and smooth finishes. Applying and heating the vinyl enhances its flexibility, allowing it to perfectly conform to intricate fairing shapes and ensuring longevity. Finally, precise trimming and solid finishing lock in durability and style, completing a professional wrap that satisfies customers and sets a business apart. By embracing these techniques, businesses can confidently offer high-quality fairing wraps that boost reputation and customer loyalty in the competitive motorcycle market.
Ready to elevate your ride? Summit Fairings delivers premium, custom-fit fairings that blend style and durability. Whether you’re chasing speed or turning heads, we’ve got your bike covered. Don’t wait—transform your machine today. Click, customize, and ride with confidence. Your perfect fairing is just a few clicks away. Act now!
About us
undefined