Introduction
Motorcycle fairings play a vital role in a bike’s aerodynamics, protection, and aesthetic appeal. For businesses specializing in motorcycle maintenance, repair, or customization, mastering fairing repair techniques can significantly enhance service offerings and customer satisfaction. Understanding the intricacies of fairing removal, preparation, and repair—whether dealing with fiberglass or plastic materials—enables professionals to restore damaged components efficiently while ensuring durability and visual appeal. This guide breaks down the process into four critical chapters: starting with safe and precise fairing removal and surface preparation, then exploring specialized repair methods for fiberglass and plastic fairings, followed by expert finishing and painting techniques, and concluding with best practices for careful reinstallation. Each chapter builds on the last, delivering a clear roadmap that supports business owners in elevating their repair capabilities and maintaining high standards of quality.
Tables of Contents
Chapter 1: Mastering Removal and Preparation: Essential Techniques for Motorcycle Fairing Repair
- Precision Fairing Removal: Tools, Techniques, and Tips for Safe Disassembly
- Thorough Surface Cleaning and Damage Evaluation: Foundation Steps for Motorcycle Fairing Repairs
- Mastering Fiberglass Reinforcement and Structural Prep for Motorcycle Fairing Repairs
- Essential Tools, Safety Practices, and Tailored Tips for Efficient Motorcycle Fairing Removal and Preparation
Chapter 2: How to Repair Fairings on Motorcycles: Fiberglass Repair Methods
- Thorough Damage Evaluation and Preparation for Fiberglass Fairing Restoration
- Mastering Fiberglass Application to Restore Motorcycle Fairings Seamlessly
- Mastering Finishing and Painting Techniques to Restore Fiberglass Fairings
- Mastering Material Choices and Techniques for Durable Motorcycle Fiberglass Fairing Repairs
Chapter 3: Mastering Plastic Fairing Repairs on Motorcycles: Essential Removal and Preparation Techniques
- Careful Extraction and Surface Preparation for Durable Plastic Fairing Repairs
- Surface Cleaning and Adhesion Preparation: Building a Solid Foundation for Plastic Fairing Repairs
- Mastering Plastic Welding and Resin Repairs to Restore Motorcycle Fairings
- Strengthening and Refinishing Plastic Motorcycle Fairings for Lasting Repairs
Chapter 4: How to Repair Fairings on Motorcycles: Finishing, Painting, and Reinstallation Processes
- Careful Removal and Thoughtful Preparation: The First Steps to Perfect Fairing Repairs
- Mastering Fiberglass and Plastic Fairing Repairs: Materials and Techniques for a Flawless Finish
- Achieving a Flawless Finish: Expert Painting and Precise Reinstallation for Motorcycle Fairings
- Ensuring Secure and Precise Reinstallation of Motorcycle Fairings After Repair
Chapter 1: Mastering Removal and Preparation: Essential Techniques for Motorcycle Fairing Repair
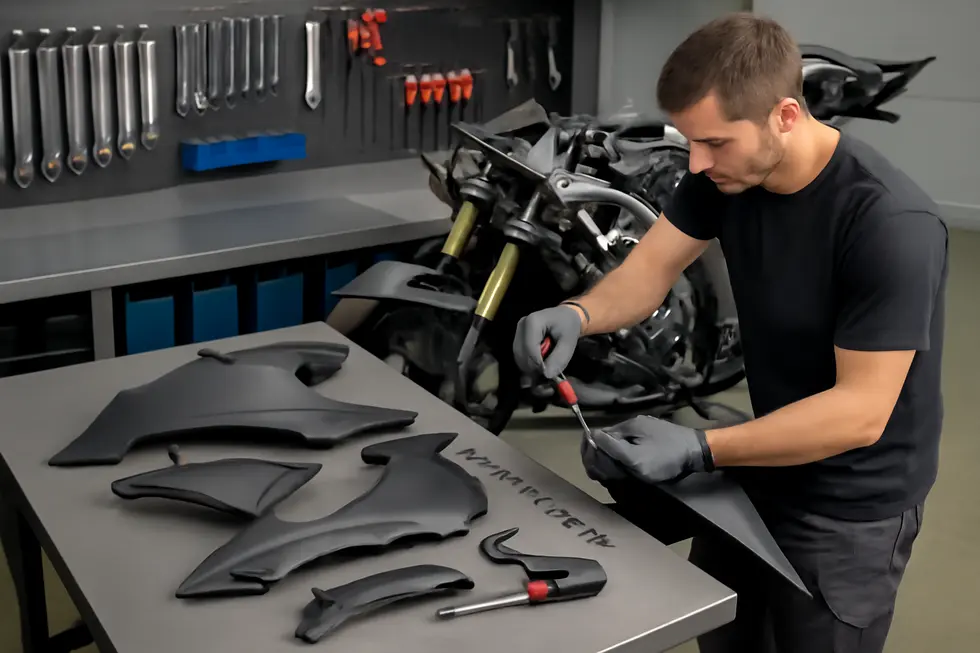
1. Precision Fairing Removal: Tools, Techniques, and Tips for Safe Disassembly
Removing motorcycle fairings demands a careful approach to prevent damage and ensure a smooth repair process. Begin by stabilizing the bike on a level surface and disconnecting the battery to avoid electrical hazards. Using the right tools—such as Phillips and flat-head screwdrivers, Allen wrenches, and plastic prying tools—allows you to access and release fasteners without scratching or breaking clips. Each fairing panel should be detached in the correct order, referencing your motorcycle’s service manual for model-specific fastener locations and sequences. Take particular care when disconnecting any electrical connectors integrated into fairings, handling wiring gently to avoid damage. Documenting the disassembly with photos supports accurate reassembly later. After removal, place the parts on a soft surface to prevent scratches. Finally, thoroughly clean the damaged sections, preparing the surface for further repair steps. For detailed guidance, exploring expert tutorials can provide valuable visual support during removal. For more insights on selecting fairings and repair techniques, visit the motorcycle fairings blog.
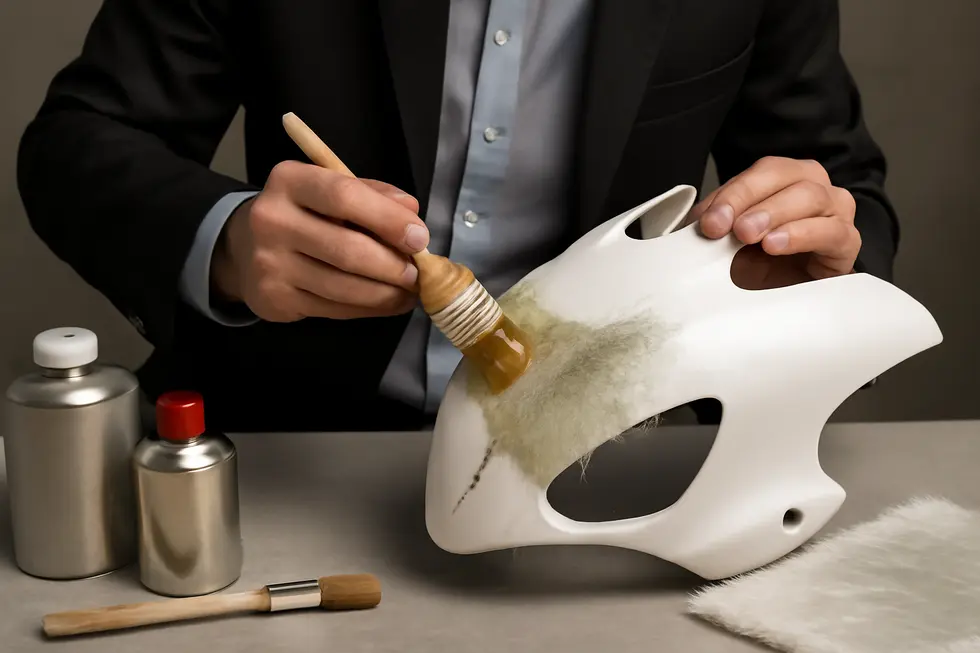
2. Thorough Surface Cleaning and Damage Evaluation: Foundation Steps for Motorcycle Fairing Repairs
Achieving a successful motorcycle fairing repair begins with meticulous cleaning and detailed damage evaluation. Removing all dirt, grease, and debris from the surface ensures that adhesives, fillers, or resins bond effectively. Use mild detergents paired with microfiber cloths to clean without scratching, avoiding harsh chemicals that might degrade fairing materials. Once spotless, a careful inspection under bright light reveals cracks, chips, and scratches that could compromise the repair’s durability. Employing tools like flashlights or magnifiers helps identify hidden damage, especially critical for carbon fiber parts whose structural integrity can be easily impaired. Beyond visual assessment, preparing the surface by gently sanding the damaged zones roughens the area, promoting stronger adhesion of repair compounds. Techniques such as V-grooving cracks can further stabilize the fix by increasing mechanical grip. Ensuring the substrate is dry and clean before applying any resin or filler layers crowns this preparation phase. This deliberate process of cleaning, assessing, and prepping forms the essential groundwork on which all effective fairing repairs are built. For those seeking detailed guidance, exploring expert resources on motorcycle fairings can provide valuable insights.
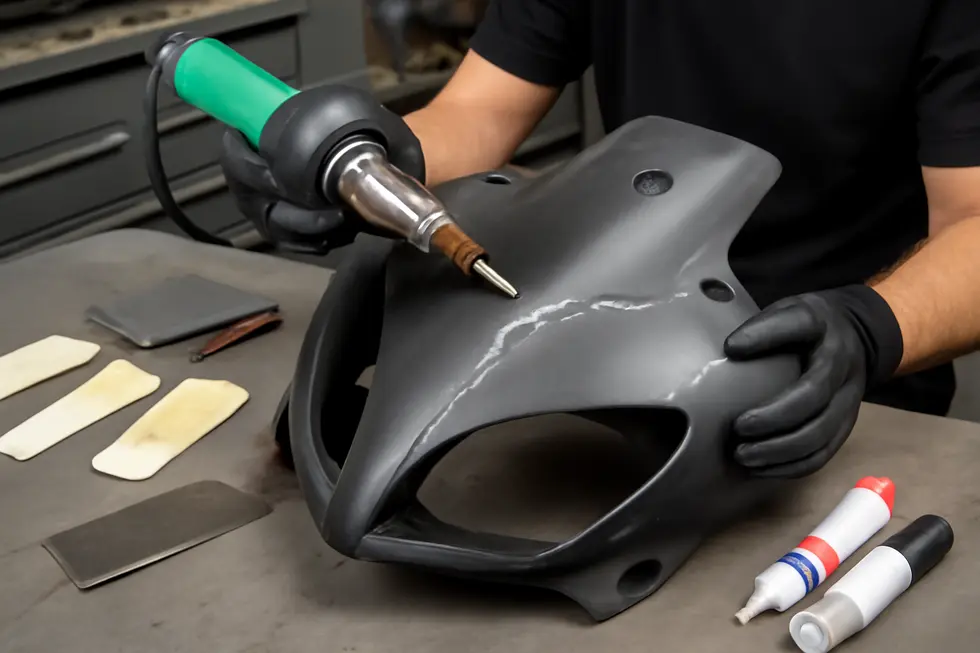
3. Mastering Fiberglass Reinforcement and Structural Prep for Motorcycle Fairing Repairs
Repairing motorcycle fairings with fiberglass reinforcement begins with precise removal and detailed surface preparation to ensure a durable finish. After carefully detaching the fairing, the damaged area must be thoroughly cleaned to eliminate dirt, grease, and old paint residues that can hinder adhesion. Sanding the surface follows, roughening it and removing any loose or weakened material, which creates a stable foundation for repair. The key step is applying fiberglass cloth or mat saturated with polyester or epoxy resin over the prepared section. This composite layer restores structural strength, with multiple resin-soaked layers added if necessary for increased durability. Once cured, the resin solidifies into a resilient patch that outperforms simple fillers in longevity and impact resistance. Final sanding refines the surface smoothness, preparing it for priming and painting to match the original finish. This method preserves the integrity of fiberglass-based fairings and ensures the repairs withstand regular riding stresses. For insights on sourcing quality fairings suitable for effective repairs, explore detailed options available at Summit Fairings.
4. Essential Tools, Safety Practices, and Tailored Tips for Efficient Motorcycle Fairing Removal and Preparation
Successfully repairing motorcycle fairings starts with having the right tools and following strict safety protocols. Essential tools include a variety of screwdrivers, Allen wrenches, socket sets, and needle-nose pliers, all constructed from durable materials to ensure reliability. Stabilizing the bike using a center or motorcycle stand provides a secure workspace. Safety measures are equally critical: always park on a level surface and disconnect the battery to avoid electrical hazards, while wearing eye and hand protection to prevent injuries or damage. During disassembly, gentle handling and photographic documentation help avoid harming clips or wiring and ease reassembly later.
Preparation involves thoroughly cleaning damaged surfaces to improve adhesive bonding and applying V-grooving to cracks for stronger repairs. Model-specific considerations play a vital role—certain motorcycles, like Yamaha YZF-R6 or Kawasaki ZX-14R, demand precise removal sequences and cautious handling of connectors. Always consult the service manual for accurate torque settings and procedures, as these details ensure the integrity of the repair and help prevent future issues. For further insights on managing fairings, explore comprehensive resources such as this ultimate source for affordable motorcycle fairings.
Chapter 2: How to Repair Fairings on Motorcycles: Fiberglass Repair Methods
1. Thorough Damage Evaluation and Preparation for Fiberglass Fairing Restoration
Repairing fiberglass motorcycle fairings begins with a precise evaluation of the damage. Inspect the area carefully to identify cracks, holes, or surface imperfections that compromise the fairing’s strength and appearance. Once identified, clean the damaged section thoroughly to remove all dirt, grease, and loose particles. This step ensures proper adhesion for repair materials. Next, lightly sand the affected area to create a rough texture, which enhances bonding with fiberglass cloth and resin. Remove any weak or flaking fiberglass to form a stable foundation for restoration.
Preparation also includes gathering essentials like fiberglass cloth or mat, polyester or epoxy resin, sandpaper, and cleaning agents. If the fairings are still attached, removing them carefully prevents accidental damage and provides better access to mounting surfaces for cleaning and inspection. A well-organized, brightly lit work environment is crucial to maintain focus and avoid losing small hardware.
This comprehensive approach to damage assessment and preparation is vital for a durable repair that restores both form and function. For more insights on quality motorcycle fairings, explore the detailed guides at Summit Fairings’ blog.
2. Mastering Fiberglass Application to Restore Motorcycle Fairings Seamlessly
Repairing motorcycle fairings with fiberglass requires precise techniques to restore both strength and appearance. Begin by thoroughly inspecting the damaged area, cleaning away dirt and grease, and sanding the surface to improve resin adhesion. Remove all weakened fiberglass fragments to ensure a solid foundation. Next, cut fiberglass cloth or mat pieces slightly larger than the damage; this overlap adds essential reinforcement. Apply a base layer of polyester or epoxy resin, then lay the cloth on the surface, saturating it fully with more resin. Epoxy is favored for its superior durability, especially on structural parts. Carefully apply multiple resin layers and allow complete curing; maintaining pressure during this phase strengthens the bond. Once cured, sand the repair smooth, blending it with the fairing’s contours. Additional filler and primer can prepare the surface for painting, returning the fairing to its original look while ensuring durability. For detailed guidance on these techniques, you can explore informative resources at Discover affordable motorcycle fairings at Summit Fairings.
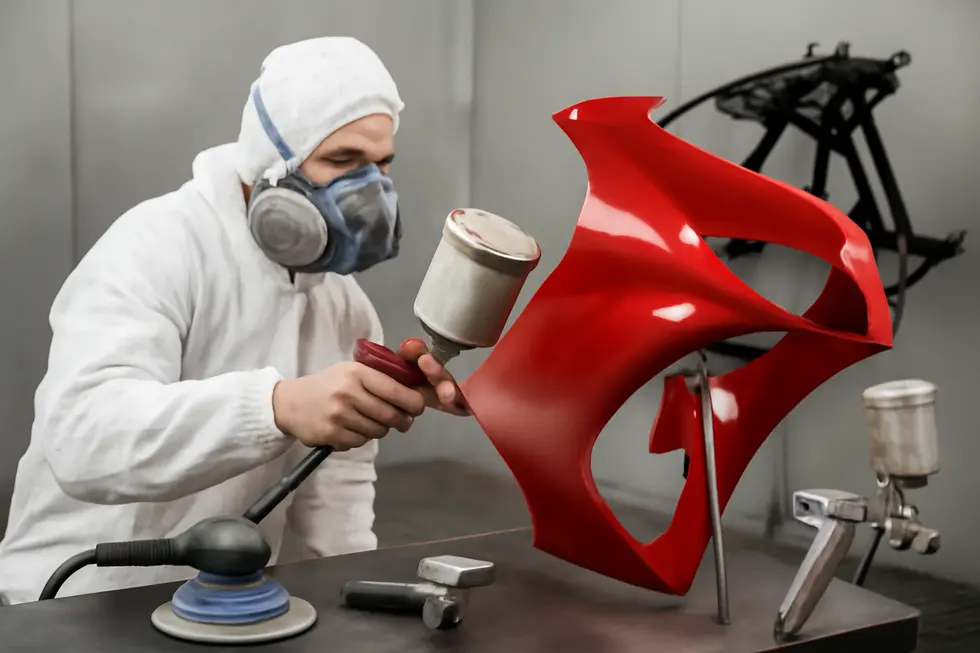
3. Mastering Finishing and Painting Techniques to Restore Fiberglass Fairings
After completing the structural repair of fiberglass fairings with resin and cloth layers, achieving a flawless finish is essential. The process begins by sanding the repaired area smoothly using fine-grit sandpaper (400–600 grit), which not only blends the patch seamlessly but also creates an ideal surface for paint adhesion. Prior to priming, the surface must be meticulously cleaned to eliminate dust, grease, and contaminants that could affect the coating’s durability.
Applying a plastic-specific primer or adhesion promoter designed for fiberglass ensures the paint adheres firmly and lasts over time. Drying time is crucial here to prevent imperfections.
Using high-quality automotive paints tailored for plastic or fiberglass, multiple thin coats of color-matched base paint should be sprayed evenly. This approach avoids runs and guarantees coverage over complex curves typical of motorcycle fairings. A clear coat follows to provide UV resistance and protect against scratches, with appropriate drying intervals between each layer. Where necessary, wet sanding can refine smoothness.
This meticulous finishing process restores the fairing’s strength and achieves a professional appearance, completing the repair with durability and style. For further insights on choosing the right fairings and finishing options, explore resources like the comprehensive Summit Fairings blog.
4. Mastering Material Choices and Techniques for Durable Motorcycle Fiberglass Fairing Repairs
Achieving long-lasting fiberglass repairs on motorcycle fairings hinges on selecting optimal materials and mastering precise application techniques. Fiberglass cloth, favored for its superior strength and smooth finish, is preferred over mat when repairing visible areas, while layering multiple cloth pieces with high-quality resin restores critical structural integrity. Epoxy resin offers significant advantages over polyester, providing greater adhesion, flexibility, and durability, which is crucial for repairs exposed to stress. Thorough surface preparation—including meticulous cleaning and sanding—ensures proper resin bonding and repair longevity. Repairing from the inside of the fairing enhances strength, with tools like heat guns aiding in precise patch fitting. Clamping during curing prevents air pockets, which weaken the repair’s resilience. Environmentally, controlling temperature and humidity is essential to achieve optimal resin curing. For specialized fairings such as carbon fiber, two-part epoxy adhesives designed for composites maintain performance without compromising integrity. Finally, secure refastening with appropriate hardware reduces stress points and prevents recurring damage. Embracing these advanced considerations elevates both the durability and appearance of fiberglass motorcycle fairing repairs. For further insights, explore a variety of quality motorcycle fairings at Summit Fairings.
Chapter 3: Mastering Plastic Fairing Repairs on Motorcycles: Essential Removal and Preparation Techniques
1. Careful Extraction and Surface Preparation for Durable Plastic Fairing Repairs
Successfully repairing plastic motorcycle fairings begins with a meticulous removal process to prevent further damage to clips, paint, or wiring. Using the right tools, such as screwdrivers and hex keys, ensures gentle detachment of panels. Once removed, cleaning the surface thoroughly to eliminate dirt and grease is critical, as contaminants hinder adhesion. Light sanding follows, which roughens the plastic and promotes a stronger bond with repair materials. When addressing cracks or breaks, carving a shallow V-groove along the damage strengthens the repair by increasing surface area for bonding agents. Throughout this stage, preserving the integrity of mounting points and avoiding stress concentration is vital to a durable restoration. Attention to detail in extraction and preparation not only streamlines the repair but directly impacts the fairing’s resilience and finish quality. For more insights into quality fairing parts that complement your restoration efforts, explore the extensive options available through this comprehensive motorcycle fairings resource.
2. Surface Cleaning and Adhesion Preparation: Building a Solid Foundation for Plastic Fairing Repairs
Effective plastic fairing repair begins with meticulous surface cleaning to remove all dirt, grease, and residues that could undermine adhesion. Use a dedicated cleaner or degreaser suitable for motorcycle plastics, ensuring the damaged area is spotless and fully dry before proceeding. Next, carefully sand the region around the damage using fine-grit sandpaper to create a slightly roughened texture, which promotes a stronger mechanical bond with adhesives or fillers. Remove any loose or brittle plastic fragments to build a stable repair base. For cracks, shaping a shallow V-groove along the damage line increases the surface area for bonding, significantly improving repair durability. Once sanding is complete, applying a specialized plastic primer designed for fairing materials further enhances adhesion and ensures the repair materials form a lasting bond. These carefully executed preparation steps form the crucial groundwork for successful plastic fairing restoration, supporting both strength and longevity. For insights into related repair tasks, explore the extensive range of motorcycle fairings available at Summit Fairings.
3. Mastering Plastic Welding and Resin Repairs to Restore Motorcycle Fairings
Repairing plastic motorcycle fairings demands precision and the right approach to restore strength and appearance. Two primary techniques—plastic welding and resin repair—address common damage effectively. Plastic welding suits thermoplastics like ABS and polypropylene. After removing and thoroughly cleaning the fairing, the crack edges are aligned then carefully melted using a plastic welding tool and compatible welding rods. This fusion process solidifies the structure by bonding the plastic back into one seamless piece. For fiberglass or composite fairings, resin repair involves sanding the damaged area to remove weak fragments and roughen the surface. Layers of fiberglass cloth saturated with polyester or epoxy resin reinforce the damaged section, filling holes and cracks. Once cured, the surface is sanded smoothly to prepare for repainting. Both methods require patience and meticulous preparation to ensure adhesion and durability. Properly executed, these repairs can restore the fairing’s original integrity and cosmetic finish. For deeper insights into selecting the right fairings and materials, explore detailed resources at Summit Fairings, your trusted source for affordable motorcycle fairings.
4. Strengthening and Refinishing Plastic Motorcycle Fairings for Lasting Repairs
Effective repair of plastic motorcycle fairings hinges on restoring both their strength and visual appeal through careful reinforcement and finishing. Initially, inspect and clean the damaged area, sanding it lightly to improve adhesion. Small cracks are best addressed with plastic welding, which fuses the plastic back together at a molecular level, while larger breaks often require fiberglass reinforcement from the inside, applying cloth saturated with resin to reestablish structural integrity. After the repair material cures, sanding with progressively finer grit smooths imperfections and blends the repair seamlessly. Applying plastic filler corrects minor surface defects, which is then sanded to a flawless finish. A primer designed for plastics prepares the surface for painting. Multiple thin coats of matching paint restore color uniformity, followed by a clear coat to protect the finish and add gloss. When reinstalling the fairing, using rubber grommets or washers helps distribute stress evenly, preventing future cracks. This method ensures your plastic fairing is both durable and visually restored, combining reliable reinforcement with meticulous finishing. For additional guidance, explore our detailed resources on affordable motorcycle fairings.
Chapter 4: How to Repair Fairings on Motorcycles: Finishing, Painting, and Reinstallation Processes
1. Careful Removal and Thoughtful Preparation: The First Steps to Perfect Fairing Repairs
Successful fairing repair begins with the delicate removal of panels to avoid damage to clips, paint, and wiring. Using the right hand tools, such as screwdrivers and Allen wrenches, ensures fasteners come off smoothly without breakage. It is crucial to disconnect any electrical connectors carefully to protect wiring harnesses. Documenting each removal step with photographs aids in accurate reassembly later. Positioning the motorcycle on a level surface and disconnecting the battery helps prevent electrical shorts during the process. Different models require attention to specific fasteners—some use push pins or rubber grommets that must be handled gently to avoid stress damage. Once removed, the fairings undergo thorough cleaning and light sanding to prepare surfaces for repair materials, improving adhesion and ensuring lasting results. This meticulous approach to detachment and surface preparation lays the foundation for structural restoration and seamless finishing. For those interested in expanding their fairing knowledge, the blog’s comprehensive resources offer detailed insights into choosing quality motorcycle fairings and repair techniques.
2. Mastering Fiberglass and Plastic Fairing Repairs: Materials and Techniques for a Flawless Finish
Repairing motorcycle fairings requires precise handling of both fiberglass and plastic components to restore their strength and appearance. After carefully removing the fairings without damaging clips or wiring, inspecting and cleaning the damaged areas is crucial. For fiberglass, applying polyester or epoxy resin with fiberglass cloth, preferably from the inside, rebuilds structural integrity. Plastic fairings need expert plastic welding or specialized adhesives to mend cracks and broken tabs effectively. Once the repair materials cure, progressive sanding smooths the surface, preparing it for priming. Applying a compatible primer ensures optimal paint adhesion, followed by multiple thin coats of color-matched paint and a protective clear coat to restore gloss and durability. During reinstallation, aligning and loosely fastening mounting points first allows adjustments to prevent stress cracks. Using washers or rubber grommets further protects fasteners from causing damage. This methodical approach secures a professional finish, blends repairs seamlessly, and maintains the fairing’s functional fit. For more insights on choosing and working with fairings, explore this comprehensive resource on affordable motorcycle fairings.
3. Achieving a Flawless Finish: Expert Painting and Precise Reinstallation for Motorcycle Fairings
After completing repairs on motorcycle fairings, achieving a smooth, professional finish is essential for both durability and aesthetics. Begin by sanding the repaired area progressively with finer grit sandpapers until it blends seamlessly with the surrounding surfaces. This careful smoothing ensures paint adheres uniformly. Next, apply a primer designed for plastic or fiberglass, enhancing paint adhesion and protecting the fairing beneath. Once the primer dries fully, a light sanding readies the surface for multiple thin coats of color-matched automotive paint. Allowing adequate drying time between coats prevents runs and builds a rich, even layer. Finish with clear coat layers that shield from UV exposure and provide a glossy finish. When reinstalling, use original or model-specific clips and fasteners to avoid damage and ensure fitment precision. Gentle alignment and fastening prevent undue stress that may cause future cracks. Working in a clean, dust-free environment and consulting your motorcycle’s manual for torque settings optimizes the outcome. For detailed guidance on fairing options, explore affordable motorcycle fairings at Summit Fairings. This approach guarantees a durable, attractive restoration that stands up to road conditions and maintains your bike’s visual appeal.
4. Ensuring Secure and Precise Reinstallation of Motorcycle Fairings After Repair
Reinstalling repaired motorcycle fairings demands careful attention to detail to preserve both function and appearance. Begin only after all finishing—sanding, priming, painting, and clear coating—is thoroughly complete, ensuring the surface is durable and visually restored. Accurate alignment with the motorcycle frame and original mounting points is crucial; this prevents stress concentrations that may lead to damage or rattling while riding. Use the correct fasteners—screws, bolts, or clips—and replace worn hardware with new components such as rubber grommets to cushion stress. Tighten bolts to manufacturer torque specifications and revisit these after initial road tests to catch any loosening early. Reconnect electrical elements carefully, securing wiring to avoid pinching or damage. Test all functional devices like lights and mirrors to confirm correct operation, then perform a final inspection for gaps or misalignments. Riding cautiously at first helps identify any unexpected noises signaling a loose or uneven fit. Adhering to these steps guarantees the repaired fairings return to their optimal strength and appearance, ready for dependable road use. For more detailed guidance and tips, exploring dedicated tutorials can be invaluable, especially for specific motorcycle models.
Final thoughts
Effective repair of motorcycle fairings requires a comprehensive understanding of each stage—from precise removal and preparation through to tailored repair techniques for fiberglass and plastic materials, culminating in expert finishing and careful reinstallation. Business owners who invest in mastering these steps unlock the potential for enhanced service quality, customer trust, and operational efficiency. By applying structured processes and employing the right tools and materials, shops can confidently restore the structural integrity and visual appeal of fairings, ensuring motorcycles look and perform at their best. Ultimately, these capabilities not only improve repair turnaround times but also position businesses as leaders within the motorcycle maintenance and customization industry.
Ready to elevate your ride? Summit Fairings delivers premium, custom-fit fairings that blend style and durability. Whether you’re chasing speed or turning heads, we’ve got your bike covered. Don’t wait—transform your machine today. Click, customize, and ride with confidence. Your perfect fairing is just a few clicks away. Act now!
About us
undefined