Introduction
Motorcycle fairing repair is a vital service for business owners in the motorcycle industry, combining aesthetic restoration with mechanical reinforcement to preserve both the visual appeal and structural integrity of bikes. Properly addressing fairing damage—from superficial paint cracks and scratches to compromised mounting tabs—not only enhances vehicle appearance but significantly impacts customer satisfaction and retention. This comprehensive approach ensures that repairs are durable, cost-effective, and visually seamless. The first chapter details cosmetic techniques focused on restoring paint cracks and scratches, essential for maintaining a showroom finish. The second chapter explores structural reinforcement strategies, emphasizing brass insert and mounting tab solutions critical for ensuring long-lasting durability without compromising fairing alignment. The final chapter examines professional and DIY service offerings, highlighting paint matching, surface smoothing, and practical home restoration methods that empower business owners to provide tailored repair options that meet market demands. Together, these chapters equip business operators with the knowledge to deliver superior motorcycle fairing repair services that combine quality workmanship with enhanced operational efficiency.
Tables of Contents
Chapter 1: Cosmetic Techniques in Motorcycle Fairing Repair: Paint Crack and Scratch Restoration
- Mastering Surface Preparation for Flawless Motorcycle Fairing Paint Restoration
- Effective Filling and Smoothing Approaches for Flawless Motorcycle Fairing Cosmetic Repairs
- Mastering Sanding for Smooth, Flawless Finishes in Motorcycle Fairing Cosmetic Repairs
- Mastering Priming and Painting: Essential Steps for Flawless Motorcycle Fairing Cosmetic Repair
- Refining Minor Scratches: Effective Sanding, Filling, and Polishing Strategies for Motorcycle Fairings
Chapter 2: Structural Reinforcement Strategies in Motorcycle Fairing Repair: Brass Insert and Mounting Tab Solutions
- Enhancing Fairing Durability with Brass Inserts: Precision Threaded Reinforcement for Motorcycle Repairs
- Optimizing Load Distribution Through Mounting Tabs and Brass Inserts in Motorcycle Fairing Repairs
- Enhancing Fairing Longevity Through the Combined Use of Brass Inserts and Mounting Tabs
- Optimizing Material Selection and Installation Techniques for Durable Motorcycle Fairing Reinforcements
- Balancing Cost Efficiency and Longevity: Economic and Maintenance Benefits of Brass Insert and Mounting Tab Reinforcements
Chapter 3: Professional and DIY Services for Motorcycle Fairing Repair: Paint Matching, Smoothing, and Home Restoration
- Mastering Motorcycle Fairing Restoration: Professional Paint Precision and Structural Repair Expertise
- Mastering Step-by-Step DIY Paint Matching and Custom Styling for Motorcycle Fairings
- Essential Techniques and Tools for Surface Smoothing and Preparation in Motorcycle Fairing Home Restoration
- Balancing Accessibility and Expertise: Economic and Social Dimensions of Professional and DIY Motorcycle Fairing Repairs
- Cutting-Edge Paints and Restoration Materials Revolutionizing Motorcycle Fairing Repair Techniques
Chapter 1: Cosmetic Techniques in Motorcycle Fairing Repair: Paint Crack and Scratch Restoration
1. Mastering Surface Preparation for Flawless Motorcycle Fairing Paint Restoration
Achieving a professional, durable finish when repairing paint cracks and scratches on motorcycle fairings hinges greatly on meticulous surface preparation. The process starts with a thorough cleaning, removing all dirt, grease, and loose paint. This step is essential to ensure that no contaminants interfere with paint adhesion or cause imperfections in the final finish. Once cleaned, carefully sanding the damaged area smooths out cracks and scratches while creating a slightly rough texture that optimizes the bonding of primers and paints.
For plastic fairings, an additional step involves applying an adhesion promoter after sanding. This crucial layer enhances the primer’s grip, preventing peeling or flaking later. Following this, a two-component primer is applied in even, controlled sprays which establish a strong base coat. Letting the primer dry completely before continuing is vital to avoid trapping moisture or producing uneven layers.
Painting the restored surface requires patience and precision. Instead of heavy applications, applying multiple thin coats allows each layer to dry fully, reducing the risk of drips or runs, and ensuring uniform color coverage. After these paint layers cure, two to three coats of clear coat are sprayed to protect the paint while adding a glossy sheen. Consistency during clear coating delivers a smooth texture, and sufficient curing time ensures toughness and durability.
Post-repair care is equally important. Avoiding harsh cleaning agents and abrasive materials prolongs the finish, as does using gentle soaps and soft cloths. Regular application of a motorcycle-safe protective wax further guards against environmental damage and preserves the freshly restored appearance.
For enthusiasts seeking deeply detailed guidance, a variety of tutorial videos offer step-by-step visual support to refine surface preparation techniques. This foundational stage sets the tone for all subsequent repair steps, making it indispensable for long-lasting, visually appealing fairing restoration.
Learn more about quality fairing options and repair methods at the Summit Fairings blog.
Source: https://www.youtube.com/watch?v=yk3ANq82BWM
2. Effective Filling and Smoothing Approaches for Flawless Motorcycle Fairing Cosmetic Repairs
Addressing paint cracks and scratches on motorcycle fairings begins with selecting the right filling materials to restore surface integrity. Deeper scratches often demand more than a simple touch-up; specialized fillers like UV-curable putty provide the precision needed to mold and fill imperfections accurately. When applied, this putty conforms to the scratch’s profile and hardens quickly under UV light, creating a robust base that is ready for finishing. This method enhances durability and ensures a uniform surface for subsequent paint application.
Once the filler has been applied and cured, the crucial process of smoothing transforms a coarse repair into a virtually invisible restoration. This involves carefully sanding the area with progressively finer grit sandpapers, typically moving towards ultra-fine grits, to eliminate any raised filler edges or inconsistencies. Such a gradual approach not only refines the texture but also prevents damage to the surrounding original paint. A clean, dust-free surface is paramount before moving onto primer application, which acts as a bonding agent improving paint adhesion and concealing minor surface imperfections.
In cases of paint cracks, filling requires even greater care. Minor cracks may respond well to a touch-up paint, but when cracks penetrate deeper, filling followed by precise sanding becomes necessary to prevent recurring damage. Maintaining a dry, contaminant-free surface prior to repair maximizes adhesion and finish quality. Although many repairs can be accomplished by enthusiasts using detailed guides and video tutorials, complex cracks might benefit from professional refinishing to achieve a flawless outcome.
For enthusiasts eager to explore these cosmetic techniques further, detailed visual guides are invaluable. DIY Motorcycle Fairing Repair (Denting & Painting Techniques) offers step-by-step demonstrations, enhancing confidence and skill in executing these filling and smoothing methods. For a wide range of affordable, high-quality motorcycle replacement parts that complement repair efforts, explore reliable sources such as those available at Summit Fairings. These resources collectively empower riders to restore their fairings with both lasting structural integrity and aesthetic finesse.
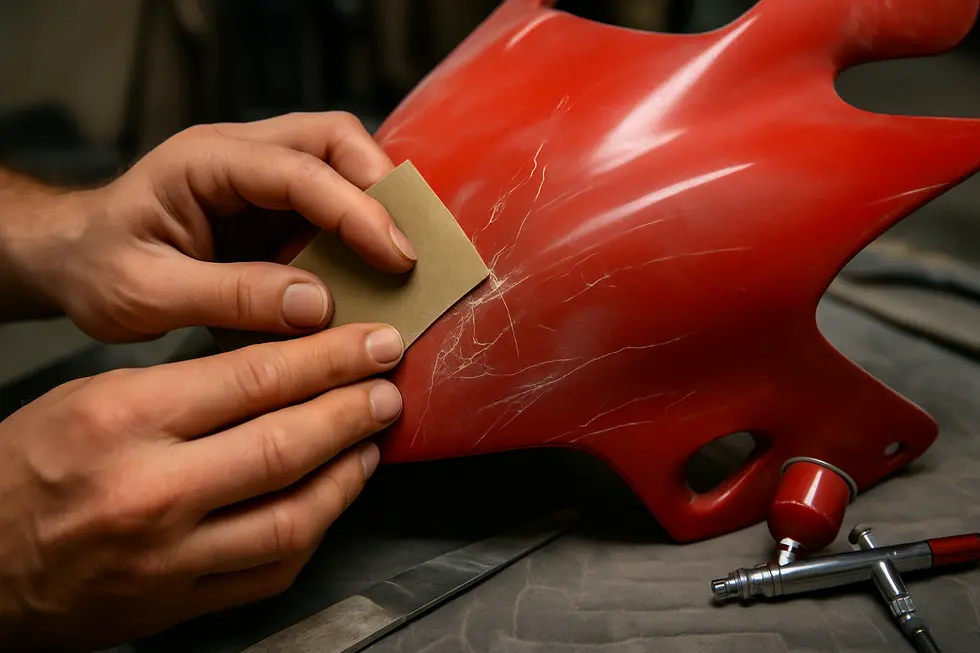
3. Mastering Sanding for Smooth, Flawless Finishes in Motorcycle Fairing Cosmetic Repairs
Achieving a pristine finish when repairing paint cracks and scratches on motorcycle fairings hinges on mastering the art of sanding. This critical process begins with coarser grit sandpapers, typically between 320 and 400 grit, which effectively strip away damaged paint layers and level out deep imperfections. By carefully removing these inconsistencies, you prepare the surface for filler or primer applications, ensuring a uniform foundation. Progressing to finer grits from 600 to 800 is essential for feathering the edges of the repaired zone into the surrounding paint. This blending technique softens visual transitions, preventing the repair from standing out after painting. The final and most delicate step involves wet sanding with ultra-fine grit sandpapers between 1000 and 1500. Wet sanding serves a dual purpose: it reduces dust and friction, while gently polishing the surface to an exceptionally smooth finish that greatly improves paint adhesion and gloss. For fairings featuring clear coats or crystal paint finishes, wet sanding between paint layers can also enhance gloss and remove minor blemishes without compromising the underlying paint. Throughout the sanding process, maintaining consistent pressure and thorough cleaning between each grit change are vital to avoid unevenness and contamination. These meticulous sanding steps culminate in a surface as smooth and flawless as factory-finished fairings, setting the stage for flawless priming and painting. For enthusiasts seeking detailed visual guidance and product advice, external video tutorials on motorcycle restoration offer step-by-step demonstrations that complement these techniques perfectly. Additionally, exploring expert insights and resources on motorcycle fairings can enrich one’s understanding and approach to fairing repair.
4. Mastering Priming and Painting: Essential Steps for Flawless Motorcycle Fairing Cosmetic Repair
Achieving a flawless finish during motorcycle fairing repair demands meticulous attention to the priming and painting stages, especially for treating paint cracks and scratches. The process begins with extensive sanding to smooth out any rough edges surrounding the damaged area. Proper surface preparation is crucial; for plastic fairings, the application of an adhesion promoter ensures the primer adheres firmly, creating a solid foundation for subsequent layers. Next, a two-component primer is evenly sprayed to fill minor surface imperfections and provide a uniform base, which enhances paint durability and smoothness.
When painting, applying multiple thin coats is key. Properly mixing the paint with a reducer optimizes flow and prevents runs, while allowing thorough drying or curing between coats builds a rich, consistent color depth. This careful layering avoids patchiness and color mismatches that could detract from the repair’s overall appearance. For areas with deeper gouges, fillers or hot glue mixtures may precede priming to restore the surface contour.
The finishing touch involves applying two to three clear coat layers, which protect the paint from environmental exposure and add a glossy shine that revitalizes the fairing’s aesthetics. Similar to paint coats, curing time between clear coats is vital to prevent peeling and achieve a durable, high-quality finish. Essential tools like respirators enhance safety during spraying, while sanding blocks and polishing pads help perfect the final surface texture and gloss.
This structured approach not only ensures lasting adhesion and protection but also restores the fairing’s cosmetic appeal to near-original condition. Enthusiasts aiming for professional-level results should consider detailed tutorials and visual guides to complement these techniques. For broader insights on motorcycle fairings and repair practices, exploring reliable sources like Summit Fairings’ blog can provide valuable information and inspiration.
5. Refining Minor Scratches: Effective Sanding, Filling, and Polishing Strategies for Motorcycle Fairings
Minor scratches on motorcycle fairings, while often superficial, require careful attention to restore the surface’s original smoothness and shine. The process begins with thorough cleaning, typically using isopropyl alcohol, to eliminate oils and contaminants. This ensures that fillers and paints adhere properly and prevents imperfections in the finish. Light sanding follows, delicately abrading the lacquer to diminish the visibility of fine scratches without thinning the clear coat excessively. When scratches are deeper, sanding extends until the edges of the damaged area are smooth enough to receive filler.
Applying an appropriate filler is critical for filling gouges or cracks that penetrate beneath the paint layers. The filler must be shaped and leveled to blend with the surrounding contours before curing. Once solidified, a primer is introduced to create a suitable base for paint adhesion and to support color consistency. Matched paint—applied often via airbrush for precision on small repairs—then rejuvenates the original hue, preserving the fairing’s aesthetic integrity.
The finishing phase leverages ultra-fine sanding, typically using 2500 grit sandpaper, to create an even surface transition that melds repaired areas flawlessly with undamaged sections. Polishing afterward revives the gloss, restoring the fairing’s showroom appeal without risking damage to neighboring paint. Adopting protective measures like wearing gloves during cleaning and handling prevents contamination, and care is taken to avoid putting stress on cracked sections during repair.
While household remedies like toothpaste can mildly reduce very fine scratches, professional-level sanding and polishing remain superior for durable results. Seamlessly integrating these steps balances cosmetic enhancement with structural preservation, ultimately extending the life and beauty of motorcycle fairings. For step-by-step visual instruction, enthusiasts can refer to expert tutorial videos such as those by MIKE’S BUILDZ on YouTube, which detail sanding, filling, and airbrush painting techniques.
For more on motorcycle fairing options and accessories, explore Summit Fairings to discover quality components that complement expertly restored fairings.
Chapter 2: Structural Reinforcement Strategies in Motorcycle Fairing Repair: Brass Insert and Mounting Tab Solutions
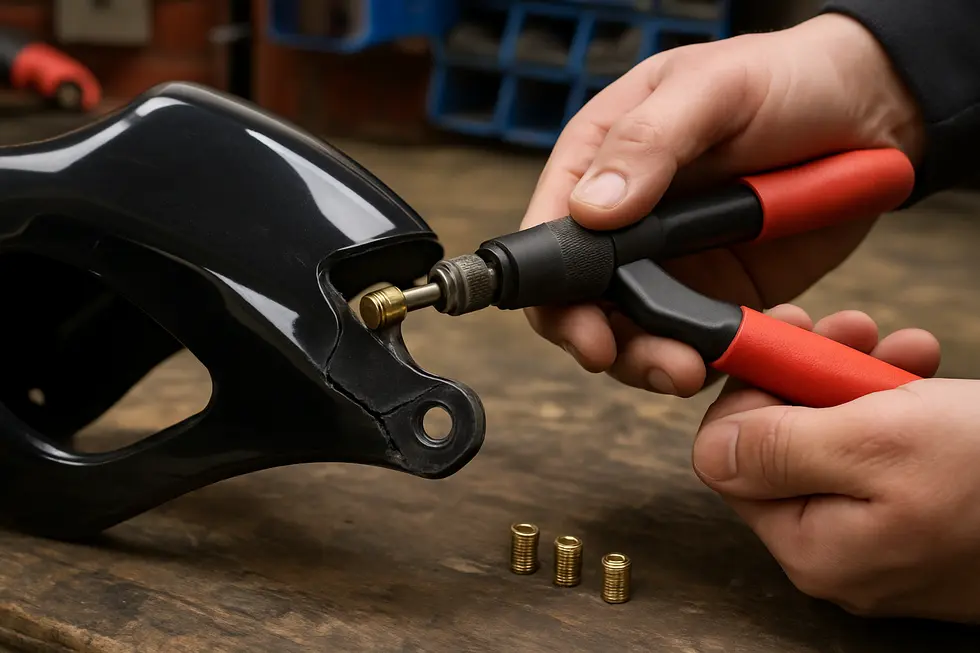
1. Enhancing Fairing Durability with Brass Inserts: Precision Threaded Reinforcement for Motorcycle Repairs
Brass inserts have become a fundamental solution in the structural reinforcement of motorcycle fairings, addressing common issues like stripped threads and weakened mounting points. These inserts replace damaged factory sleeves by providing precision-cut, threaded anchors embedded directly into plastic or composite materials. Their design ensures a secure, vibration-resistant fit, critical in maintaining stability for components such as windshields and primary fairing panels.
Unlike adhesive-based fixes, brass inserts rely on self-tapping mechanisms to form a mechanical bond within the fairing. This method distributes the load across a broader area compared to the original mounting tabs, significantly enhancing the strength and longevity of repairs. The corrosion-resistant nature of brass also offers durability unmatched by softer metals or plastic threads, making it ideal for enduring the stresses and environmental exposure typical in motorcycling.
Repair kits featuring brass inserts often include installation tools like T-handles and specialized screws designed for confined spaces, enabling precise placement without damaging surrounding areas. This ease of installation combined with robust results makes brass inserts a preferred choice among enthusiasts and professionals alike. Moreover, these kits facilitate straightforward replacement of fasteners without compromising original alignment, preserving both the functionality and aesthetic integrity of the fairing.
Particularly in popular models with intricate fairing designs, such as certain touring motorcycles, brass insert reinforcement ensures the fairings remain tightly secured while retaining a clean, factory-quality appearance. By integrating these inserts, riders can avoid costly full-panel replacements and instead achieve repairs that are both structurally sound and visually seamless.
For further insights into brass insert repair applications and installation guidance, see detailed resources such as Evo Precision’s Batwing Fairing Insert Repair Kits with Self-Tapping Brass Inserts.
2. Optimizing Load Distribution Through Mounting Tabs and Brass Inserts in Motorcycle Fairing Repairs
Mounting tabs serve as vital components in the structural reinforcement of motorcycle fairings by effectively distributing mechanical loads that occur during riding. These tabs function as reinforced anchor points, often integrated with brass inserts, to securely fasten fairing parts while reducing stress concentrations that otherwise risk cracking or breakage. Brass inserts provide durable, threaded connections embedded within plastic or composite fairing materials, enabling reliable screw engagement without damaging the softer substrates.
The synergy between mounting tabs and brass inserts ensures forces from vibrations, impacts, and fastening torque are spread more evenly over a broader area rather than isolated at a single vulnerable spot. This uniform load distribution preserves the structural integrity and alignment of critical fairing sections such as vents, headlight assemblies, and outer panels, which must maintain aerodynamic precision and rider safety throughout varied conditions.
In repair scenarios, specialized mounting tab kits—often incorporating varied tab sizes matching original specifications—restore broken or worn attachment points. These kits, paired with corrosion-resistant hardware like stainless steel bolts, reestablish correct load paths and secure fairing components firmly. For example, aligning bezel tabs on vents prior to fastening ensures proper load transfer and fitment, preventing premature failure or misalignment.
By reinforcing the attachment system through brass inserts and strategically designed mounting tabs, riders and repair technicians can achieve durable repairs that sustain mechanical stresses while preserving the fairing’s appearance and function. This approach reduces stress risers common in brittle plastics, ultimately enhancing the longevity and performance of the motorcycle’s bodywork.
For further insights on durable fairing components and repair strategies, explore resources like the blog section at Summit Fairings.
3. Enhancing Fairing Longevity Through the Combined Use of Brass Inserts and Mounting Tabs
Brass inserts and mounting tabs form a powerful partnership in reinforcing motorcycle fairings, addressing critical weaknesses that often result from riding vibrations and mechanical stresses. Brass inserts, crafted from corrosion-resistant and durable brass, are precision-fit threaded sleeves that replace worn or missing factory threads in fairing mounting points. Their self-tapping design allows installation without adhesives, providing a secure, vibration-resistant connection that prevents loosening and rattling of components like windshields and fairing panels. This inherent strength makes brass inserts an ideal choice for maintaining thread integrity in plastic or composite materials prone to wear.
Complementing brass inserts, mounting tabs serve as reinforced structural supports attached or integrated with fairings. They redistribute mechanical stresses that would otherwise concentrate on fragile areas vulnerable to cracking or fatigue under continuous vibration and impact. By spreading forces more evenly, mounting tabs reduce material fatigue and help protect the fairing’s overall integrity. When used alongside brass inserts, mounting tabs significantly boost both the mechanical durability and lifespan of the fairing components.
This integrated approach not only secures fairing pieces more reliably but also streamlines future maintenance. Replacement or removal of parts becomes easier and less damaging to the fairing material, preserving its functional and aesthetic qualities. Such reinforcement strategies are especially pivotal in high-vibration environments found in touring motorcycles, where durability at windshield mounts and batwing fairings is crucial.
Repair kits that combine self-tapping brass inserts with compatible mounting hardware simplify the restoration or strengthening of fairings. These solutions enhance resilience against common fairing damage, maximizing structural soundness without resorting to full replacements. Enthusiasts can refer to guided resources for effective installation, ensuring the fairing withstands demanding riding conditions while maintaining its sharp, neat appearance.
For detailed repair kit options designed for fairing reinforcement, visit this external resource. Additionally, for a broad selection of motorcycle fairings and related repair insights, explore Summit Fairings as a comprehensive resource here.
4. Optimizing Material Selection and Installation Techniques for Durable Motorcycle Fairing Reinforcements
Motorcycle fairing repairs demand materials and techniques that bolster structural strength while ensuring longevity. Selecting the right components, such as brass inserts and mounting tabs, plays a pivotal role in restoring both function and durability. Brass inserts serve as reliable anchor points in fragile substrates like fiberglass or carbon fiber, resisting corrosion and enduring repeated torque without deforming or stripping. Their copper alloy composition allows them to integrate securely when pressed or heat-set into pre-drilled holes, providing a robust threaded socket for mounting screws.
Mounting tabs complement this by distributing mechanical stress from fasteners uniformly across the fairing. Typically fabricated from chromoly steel or aluminum, these tabs combine high tensile strength with low weight, ensuring the reinforcement does not add unnecessary mass. The metal’s resilience guards against fracture and fatigue, especially where fairings experience vibration and impact forces.
Installation precision significantly impacts the repair’s effectiveness. Drilling exact holes matching brass insert dimensions avoids damaging the surrounding material and ensures a snug fit. Specialized insertion tools or heat-based methods create a secure bond without adhesives, preserving the fairing’s integrity. Meanwhile, mounting tabs require meticulous alignment to avoid uneven load distribution, often attached using mechanical fasteners or high-strength adhesives depending on substrate compatibility.
Balanced application of these components addresses common issues like broken mounting points or stripped threads, preventing recurring failures. The combination of corrosion-resistant inserts and engineered mounting tabs provides a cost-effective, durable alternative to replacing entire fairing sections.
For enthusiasts seeking further insights into fairing material properties and repair techniques, exploring expert resources on polymer fabrication can be valuable. Additionally, explore the best motorcycle fairings at Summit Fairings to understand material options that impact repair approaches.
For a deeper dive into fabrication and material innovations, the Journal of Applied Polymer Science offers comprehensive discussion on advanced repair methods and material performance.[1]
5. Balancing Cost Efficiency and Longevity: Economic and Maintenance Benefits of Brass Insert and Mounting Tab Reinforcements
Integrating brass inserts and mounting tabs in motorcycle fairing repairs delivers notable economic advantages and maintenance improvements that extend the fairing’s useful life. While these reinforcement methods add a modest upfront cost through materials and labor, their impact on reducing recurring damage and maintenance downtime provides substantial overall savings. Brass inserts serve as durable, wear-resistant anchor points within often fragile plastic fairings, preventing thread stripping and mounting damage caused by repeated bolt installation and removal. This durability significantly lowers the frequency of costly repairs or premature replacements that otherwise diminish the fairing’s lifespan.
By distributing mechanical stress from vibration and bolt tightening more evenly, brass inserts and mounting tabs strengthen fairings against cracking and deformation near attachment points. This structural robustness simplifies routine maintenance, protecting the panels from accidental damage during removal or reassembly and reducing the risk of hardware failure. Consequently, motorcycles equipped with these reinforcements spend less time sidelined for repairs, which is especially advantageous for high-performance or frequently serviced bikes.
Though initial repair efforts increase slightly, this small investment improves the fairing’s longevity and preserves its resale value by maintaining structural integrity. The combined use of brass inserts with specialized mounting tabs creates a resilient mounting system that withstands the wear of regular use better than unreinforced setups. For riders and repair enthusiasts alike, adopting such structural reinforcements offers a cost-effective strategy that balances early expenses with long-term durability and reduced ownership costs.
For further insight on selecting quality repair materials and strategies for lasting results, exploring expert advice on affordable motorcycle fairings and repair tips can provide valuable guidance.
Chapter 3: Professional and DIY Services for Motorcycle Fairing Repair: Paint Matching, Smoothing, and Home Restoration
1. Mastering Motorcycle Fairing Restoration: Professional Paint Precision and Structural Repair Expertise
Mastering the intricacies of motorcycle fairing restoration demands professional expertise to achieve flawless results that merge aesthetic appeal with durable functionality. Skilled technicians utilize advanced color-matching technology to custom blend paints that exactly replicate factory finishes, ensuring repaired or replaced fairings harmonize seamlessly with the original bodywork’s tone and gloss. This precision in paint matching eliminates visible color disparities, which are often a telltale sign of amateur repairs.
Beyond perfecting color, professionals focus extensively on surface preparation. They employ meticulous sanding techniques to smooth out scratches, dents, or cracks on plastic and fiberglass fairings. Where surface imperfections are significant, specialized fillers are carefully applied and feathered to restore the fairing’s original contours. Subsequent primer coats create a pristine base that guarantees even paint adherence and longevity.
Structural restoration capabilities elevate professional services beyond cosmetic repairs. Common methods include plastic welding or resin applications that heal cracks and fractures without compromising integrity. When damage is too severe, precise installation of replacement parts such as reinforced mounting tabs ensures continued protection of vital motorcycle components. These restoration processes maintain the fairing’s robustness while avoiding reliance on fragile adhesives.
Some repair shops also extend their offerings to full bodywork refinements, including polishing and detailing to revive the fairing’s showroom shine. Protective measures like vinyl wrapping enhance both aesthetics and durability by safeguarding the paintwork against future scratches and UV exposure.
Choosing professional repair services means entrusting your motorcycle fairings to experts capable of balancing high-quality paint finishes with solid structural repairs. This combination restores your bike’s original allure and functionality, whether it’s a sportbike or cruiser, making it road-ready and visually flawless.
For an insightful resource on selecting premium replacement fairings that complement professional restoration, explore unmatched choices in motorcycle fairings.
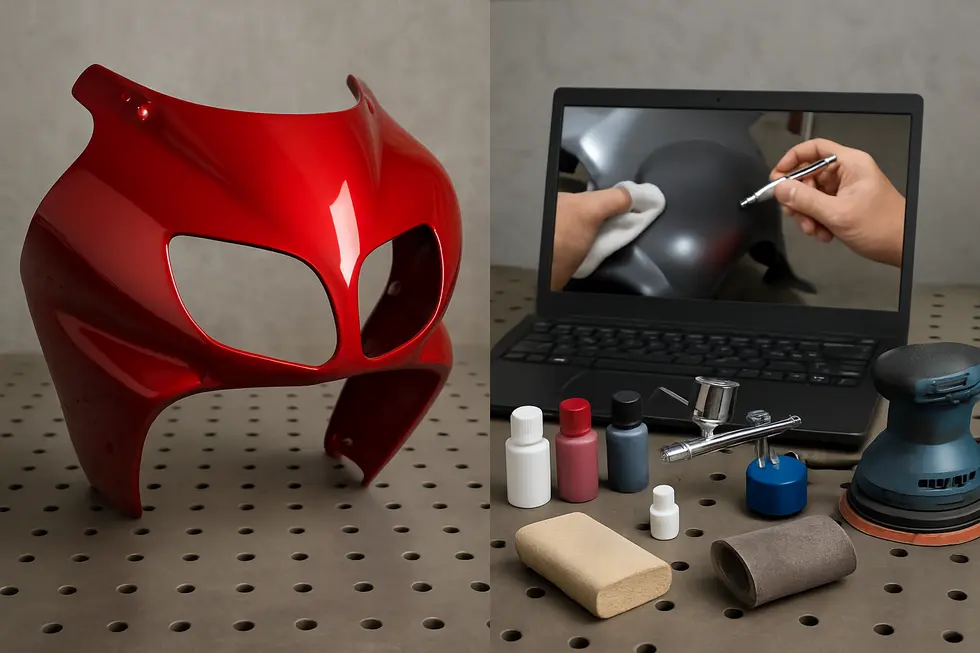
2. Mastering Step-by-Step DIY Paint Matching and Custom Styling for Motorcycle Fairings
Achieving a seamless motorcycle fairing repair at home requires a disciplined approach to paint matching and custom design that balances practicality with professional finish quality. The process begins with addressing any physical damage, often using accessible materials like hot glue combined with paper fillers to mend cracks. Smoothing these repairs with shaping tools such as a soldering iron helps restore the original contours before any painting. Surface preparation follows, involving meticulous sanding to strip old paint and smooth out imperfections, thus creating an ideal base. Applying a primer layer then ensures the subsequent paint adheres effectively and uniformly.
Paint matching is pivotal. DIY enthusiasts typically rely on spray paints or airbrushes matched closely to manufacturer color codes or visual samples. Applying multiple thin coats evenly prevents visible layer buildup and aids color consistency. A clear coat finish seals the paint, offering protection and a gloss that approximates factory standards. Beyond restoration, creative custom design techniques like vinyl wrapping emerge as versatile options. This alternative allows riders to personalize their motorcycles through a range of textures and patterns without permanent paint alterations—offering both protection and easy future modifications.
For those aiming to elevate their work to a near-professional level, specialized pigments and crystal clear paints can replicate the original factory finish with remarkable precision. Such refined methods complement the traditional DIY steps, bridging the gap between home repair and expert outcomes. For further guidance, visual resources including restoration tutorials for plastic surfaces, such as ATV painting videos, provide valuable insight into sanding, priming, and painting plastics. Enthusiasts can also draw inspiration from motorcycle restoration videos highlighting crystal finishes and before-and-after transformations.
This step-by-step DIY workflow offers an accessible path to restoring and customizing motorcycle fairings effectively. For riders seeking high-quality components to complement their efforts, exploring the wide selection of affordable motorcycle fairings and restoration materials can make the process smoother and more satisfying. Discover more about these options at your ultimate source for affordable motorcycle fairings.
External reference: ATV plastic painting tutorials provide additional in-depth techniques for working with plastics in automotive paint projects.
3. Essential Techniques and Tools for Surface Smoothing and Preparation in Motorcycle Fairing Home Restoration
Successful motorcycle fairing repair hinges on meticulous surface preparation and smoothing, whether performed by professionals or dedicated DIY enthusiasts. The restoration journey begins with a thorough cleaning of the damaged area to remove dirt, grease, and residual paint, ensuring a clean canvas. This step is crucial to promote proper adhesion of fillers and paints later in the process. Sanding follows, starting with medium-grit sandpapers (typically 180–220 grit) to smooth out cracks, scratches, or gouges. Gradually, finer grits up to 600 are used to feather the edges and prepare the surface for filler or primer application, creating a level foundation.
For filling imperfections, plastic-specific fillers or epoxy resins designed for motorcycle plastics are applied. After curing, these materials are sanded flush with the surrounding surface, restoring the fairing’s smooth contour. More advanced DIY kits may include resin infusion components to strengthen internal damage, while professionals might reinforce critical sections with carbon fiber patches and specialized resins to regain structural integrity.
Once the surface is even and reinforced, a flexible plastic primer is applied to ensure optimal paint adhesion on the fairing’s often pliable material. Additional wet sanding post-priming refines the finish before the final painting step. Spray paints formulated for ABS or polycarbonate plastics are then applied in multiple thin layers, followed by a clear coat that protects and restores the fairing’s gloss.
Common tools span sanding papers, plastic fillers, primers, spray paints, and rotary tools such as Dremels with sanding attachments. While professionals have access to more precision materials, DIY repair kits balance effectiveness with affordability. This combination of cleaning, sanding, filling, reinforcement, priming, and painting forms the core workflow that empowers motorcycle riders to revive their fairings effectively.
For further insights into quality restoration materials, explore affordable motorcycle fairings and repair tips.
4. Balancing Accessibility and Expertise: Economic and Social Dimensions of Professional and DIY Motorcycle Fairing Repairs
Motorcycle fairing repair exists at the intersection of economic realities and community empowerment, where choices between professional and DIY services reveal broader societal impacts. Professional repair, with its reliance on skilled labor and advanced tools, delivers superior quality and safety assurances but often at significant cost. These services elevate local economies by providing specialized jobs and supporting supply chains, yet their price can limit accessibility for many riders.
In contrast, DIY repair offers a cost-effective alternative, empowering riders to maintain their motorcycles independently. This approach fosters a deeper technical understanding of fairing materials and repair methods, thereby cultivating valuable skills transferable beyond motorcycle maintenance. Such experiences can spur entrepreneurial ventures centered on parts fabrication and tool provision. Moreover, DIY culture encourages knowledge-sharing communities and online forums where enthusiasts exchange insights and innovations, further democratizing access to motorcycle care.
However, the DIY path demands meticulous attention to proper materials and techniques, especially when working with composites like fiberglass or carbon fiber. Without adequate skill, safety and durability may be compromised, underscoring the critical balance between accessibility and quality. Professional services mitigate these risks by adhering to rigorous standards.
The rise of community repair models mirrors those in bicycle maintenance, highlighting how shared expertise enhances both safety and social connection. This collective dynamic promotes sustainable motorcycling through prolonged equipment life and reduced waste.
By understanding these economic and societal factors, riders can make informed decisions aligned with their budgets, skills, and safety requirements. For a comprehensive perspective on the challenges of DIY composite fabrication and the benefits of community repair initiatives, consider resources like Rock West Composites’ insights on DIY carbon fiber projects and the broader bicycle maintenance community frameworks.
Explore how these dynamics shape the motorcycle fairing market further in a detailed discussion about available fairing options and repair approaches at Summit Fairings’ blog.
5. Cutting-Edge Paints and Restoration Materials Revolutionizing Motorcycle Fairing Repair Techniques
Advances in paint chemistry and restoration materials have significantly elevated both professional and DIY motorcycle fairing repair. Modern high-performance paints now boast superior adhesion, flexibility, and resistance to UV damage and harsh chemicals. These enhanced formulations enable smoother finishes and longer-lasting protection, whether applied through professional spray systems or sophisticated home kits. Clear coats have also evolved to provide additional durability and gloss without compromising the underlying paint’s resilience.
Equally transformative are epoxy-based fillers and adhesives, which deliver exceptional bonding strength and structural integrity. Unlike older brittle compounds, these epoxies accommodate vibrations and impacts common to motorcycle use. Their reliability is acknowledged even in professional racing settings, where structural repairs and fastener reinforcements require materials that withstand intense stress. This approach extends the lifespan of repaired fairings and ensures that necessary mounting points remain durable and secure.
Innovations in paint application techniques further enhance restoration quality. Airbrushing and multi-layer paint systems allow for intricate custom designs, including vibrant and artistic finishes. These methods, once exclusive to professionals, are increasingly accessible to enthusiasts through advanced DIY kits incorporating primers, paints, and quick-drying clear coats. This democratization of technology empowers home restorers to achieve results that rival commercial workshops.
Safety and durability improvements, notably the strategic use of epoxy for securing bolts and fittings, contribute to the overall durability of repaired components. This combination of advanced materials and application methods forms a foundation for comprehensive fairing restoration that balances aesthetic refinement with structural soundness.
For enthusiasts seeking complementary parts and accessories to support repair projects, exploring a wide selection of components tailored to various motorcycle models can be invaluable. Resources such as Summit Fairings offer an extensive range of affordable and custom fairing options to enhance restoration success and style. More details on innovative parts and repair components can be found at RevZilla’s parts section.
For further insights on affordable and quality motorcycle fairings that support repair and customization efforts, consider visiting this ultimate source for affordable motorcycle fairings.
Final thoughts
Understanding motorcycle fairing repair from both cosmetic and structural perspectives is essential for business owners aiming to provide comprehensive service solutions. Cosmetic restoration techniques, including precise sanding and airbrushing, restore the fairing’s visual appeal. Meanwhile, structural reinforcement using brass inserts and mounting tab repairs ensures long-term durability, preventing costly rework and customer dissatisfaction. Offering professional-grade paint matching and effective DIY repair options further differentiates your business by appealing to a broader client base and optimizing repair workflows. By integrating these strategies, businesses can deliver superior quality repairs, enhance customer trust, and maximize operational efficiency in a competitive market.
Ready to elevate your ride? Summit Fairings delivers premium, custom-fit fairings that blend style and durability. Whether you’re chasing speed or turning heads, we’ve got your bike covered. Don’t wait—transform your machine today. Click, customize, and ride with confidence. Your perfect fairing is just a few clicks away. Act now!
About us
We are one of the leading motorcycle fairing export sites, with over 3,000 styles across almost all motorcycle models. Buy from summitfairings.com, and pay 10-40% less than the prices on other sites. If you have any questions, we promise we will have your answer within six hours.