Introduction
Painting motorcycle fairings using spray cans offers an accessible way to customize and rejuvenate bike aesthetics without the high costs of professional body shops. For business owners in motorcycle retail, repair, or customization, understanding the precise steps to prepare surfaces, apply primer, base colors, and clear coats, as well as the correct techniques and safety protocols, can greatly improve service quality and customer satisfaction. This guide unfolds in three focused chapters, beginning with essential preparation and surface treatment to ensure adhesion and durability, followed by detailed application of primers and paints to build a flawless finish, and concludes with vital painting techniques and safety measures designed to optimize results while protecting health and workspace integrity.
Tables of Contents
Chapter 1: Preparation and Surface Treatment in How to Paint Motorcycle Fairings with Spray Can
- Essential Cleaning and Surface Preparation for Spraying Motorcycle Fairings
- Essential Sanding and Priming Techniques for Flawless Motorcycle Fairing Finishes
- Mastering Paint and Clear Coat Application for Durable, Glossy Motorcycle Fairings
- Ensuring Safety and Eco-Friendly Practices During Preparation and Surface Treatment
Chapter 2: Mastering Primer, Base Color, and Clear Coat Application for Spray Can Motorcycle Fairings
- Essential Primer Techniques for a Smooth, Durable Motorcycle Fairing Finish
- Expert Strategies for Achieving Flawless Base Color Coverage on Motorcycle Fairings
- Mastering Clear Coat Techniques for a Glossy, Durable Finish on Motorcycle Fairings
- Essential Techniques and Insider Tips for Flawless Primer, Base Color, and Clear Coat Finishes on Motorcycle Fairings
Chapter 3: Techniques and Safety Measures for How to Paint Motorcycle Fairings with Spray Can
- Mastering Surface Preparation and Safety for Spray Can Motorcycle Fairing Painting
- Mastering Priming and Base Coat Application: Techniques and Safety for Durable, Flawless Motorcycle Fairing Paint
- Mastering Clear Coat Application: Achieving Lasting Gloss and Protection on Motorcycle Fairings with Spray Cans
- Mastering Safety: Respiratory Protection, Ventilation, and Hazard Prevention in Motorcycle Fairing Spray Painting
Chapter 1: Preparation and Surface Treatment in How to Paint Motorcycle Fairings with Spray Can
1. Essential Cleaning and Surface Preparation for Spraying Motorcycle Fairings
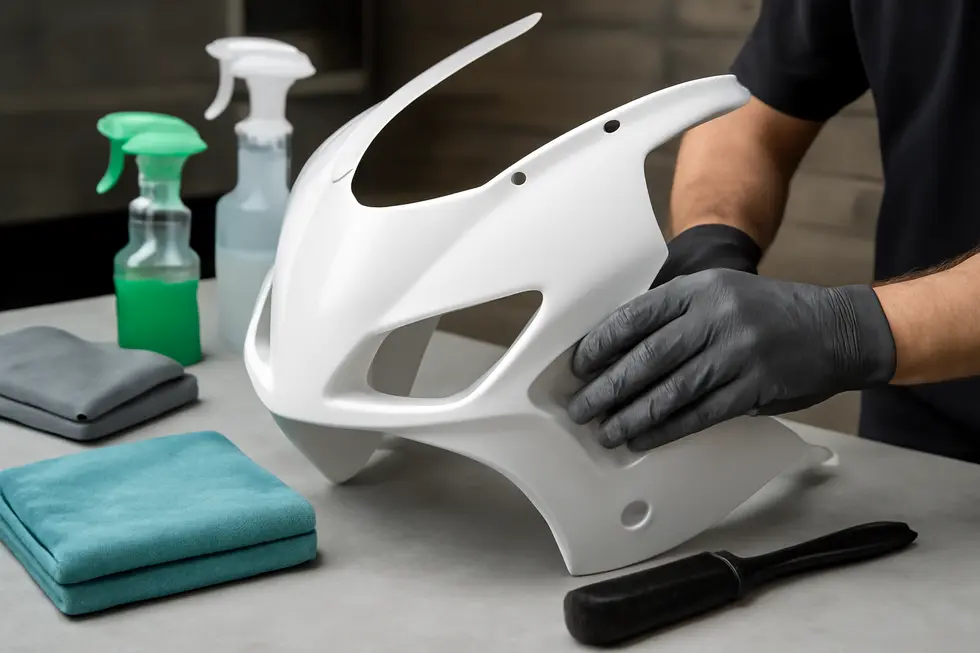
Achieving a professional finish when spray painting motorcycle fairings starts with meticulous cleaning and surface preparation. The process begins with thoroughly washing the fairings to eliminate dirt, grease, oils, and any contaminants. Using a mild detergent or a cleaner specially formulated for plastics is vital to avoid damaging the surface. After washing, stubborn residues like wax or silicone must be removed with solvents such as acetone or isopropyl alcohol, ensuring the surface is completely free of any substances that might disrupt paint adhesion.
Following cleaning, the surface needs to be lightly abraded to promote primer and paint bonding. This is best done using a fine abrasive material, like a maroon scuff pad or fine-grit sandpaper (around 600 grit), which creates a subtle roughness without damaging the plastic. After scuffing, removing dust and sanding residue is crucial; wiping the surface with a tack cloth or microfiber towel dampened with solvent ensures no particles remain that could cause imperfections.
Applying a plastic-compatible primer in thin, even layers seals the surface and creates an ideal base for paint. It is important to avoid heavy coats to prevent runs and uneven texture. Each primer layer should be allowed sufficient drying time as recommended by the manufacturer before the next application. Throughout this preparation phase, working in a well-ventilated area and wearing appropriate respiratory protection safeguard health when dealing with chemical sprays.
Masking off areas that should remain paint-free before starting preparation protects from accidental overspray. These careful preparation steps are foundational to obtaining durable adhesion, preventing paint defects, and delivering a smooth, vibrant finish with spray cans. For more detailed insights on prepping plastic motorcycle parts, visiting a comprehensive motorcycle fairings guide can provide useful resources.
A helpful visual walkthrough of these techniques can be found in tutorials that demonstrate scuffing, priming, and layering base coats through to clear coats, illustrating the transformation of plastic fairings into striking, professional-looking components.
2. Essential Sanding and Priming Techniques for Flawless Motorcycle Fairing Finishes
Achieving a smooth and durable finish on motorcycle fairings begins with meticulous sanding and priming. Initially, sanding removes old paint layers, surface imperfections, and creates the ideal texture for primer adhesion. Start with coarser sandpaper, typically between 320 and 600 grit, and gradually move to finer grits to refine the surface. Wet sanding is preferred as it reduces dust and heat buildup, providing a cleaner, near-flawless base.
Once the surface is sanded, apply a primer suited for plastics or automotive materials in thin, even layers using spray cans. Epoxy primers are commonly favored for their strong adhesion and resistance to corrosion. Typically, two to three coats spaced with appropriate drying intervals will build a solid foundation. Following this, a contrasting colored guide coat is lightly sprayed over the primer. This layer is invaluable during block sanding, as it highlights uneven areas by remaining in low spots while sanding off high points, ensuring an impeccably smooth surface.
Block sanding the primer with fine wet/dry sandpaper (around 400 to 600 grit) refines the surface without breaching the primer layer. Should sanding reveal bare plastic or bare spots, clean the affected areas thoroughly with a wax and grease remover, then apply additional primer coats as needed. Finally, a thorough cleaning before applying the base color coats removes all contaminants, maximizing paint adhesion and finish quality.
Following these sanding and priming procedures rigorously enhances the adhesion, appearance, and durability of spray can paint on motorcycle fairings, enabling a professional-level finish without specialized equipment. For more insights on motorcycle fairing preparation and options, explore this detailed guide on the best motorcycle fairings at Summit Fairings.
External reference: https://blog.summitfairings.com/explore-the-best-motorcycle-fairings-at-summit-fairings/
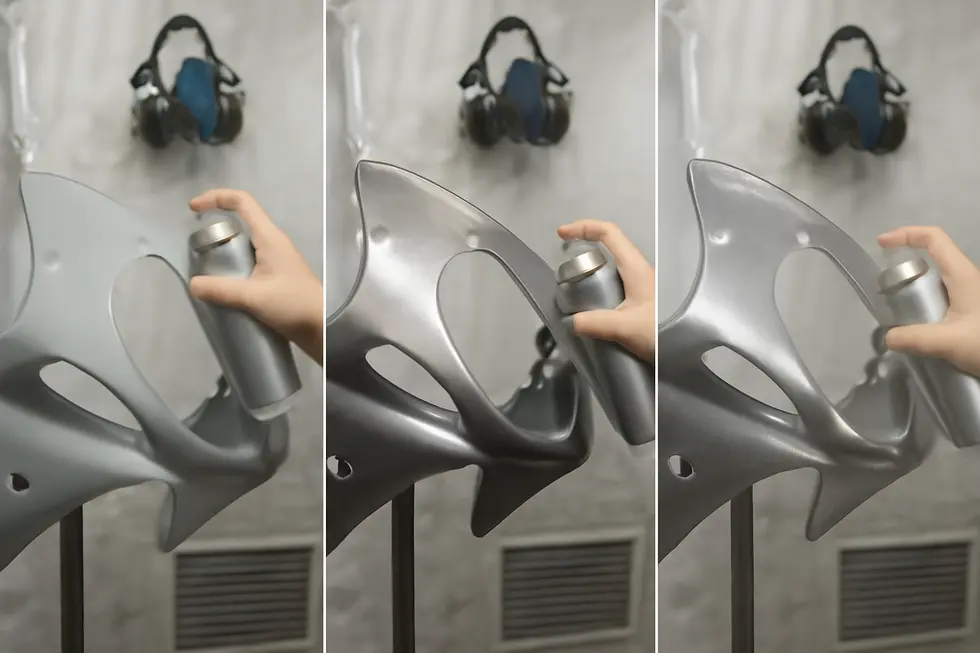
3. Mastering Paint and Clear Coat Application for Durable, Glossy Motorcycle Fairings
Applying paint and clear coat on motorcycle fairings with spray cans demands careful technique to achieve a smooth, resilient finish. After thorough cleaning and sanding, the painting process begins with multiple thin coats of base color rather than one heavy application. Starting with a light mist coat helps seal the surface, improving adhesion and preventing runs or uneven texture. Each coat should be allowed about 5 minutes to dry before applying the next, ensuring proper bonding and reducing the risk of drips or sagging. Consistent spray distance and fluid back-and-forth motions are essential to avoid blotches or orange peel, which can mar the surface appearance.
Following base color application, the clear coat provides crucial protection and shine. A two-component (2K) clear coat spray, mixed with its hardener, offers superior durability and chemical resistance compared to single-component options. Applying at least four thin coats with roughly 10 minutes of drying time between layers prevents solvent entrapment that can cause bubbling or peeling. Overlapping passes by more than half ensures even coverage without texture irregularities. After the final clear coat, overnight curing produces a hard protective layer that resists UV damage, weathering, and minor scratches.
To work safely and effectively, painting should be performed in a well-ventilated area with appropriate protective gear, including respirators. This systematic application method not only enhances the visual appeal with brilliant gloss but also significantly extends the life of your motorcycle fairings. For additional guidance, detailed tutorials and product instructions offer valuable insights into spray can painting and 2K clear coat usage.
For comprehensive advice and support on motorcycle fairings, refer to your ultimate source for affordable motorcycle fairings.
External reference: Maston Spray Paint Instructions: https://www.maston.fi/en/repairing-plastic-parts-with-a-fiberglass-repair-kit/
4. Ensuring Safety and Eco-Friendly Practices During Preparation and Surface Treatment
Ensuring safety and environmental responsibility is crucial when preparing and painting motorcycle fairings with spray cans. Personal protective equipment (PPE) is indispensable: a respirator mask filters harmful VOCs, gloves shield the skin from solvents, and eye protection guards against irritants. Painting should be conducted in a well-ventilated area or outdoors to prevent accumulation of toxic fumes, which pose health risks. Additionally, fire safety is critical since spray paints are highly flammable; avoid any sparks or open flames nearby.
Meticulous surface cleaning is equally important—not only does it remove dirt, grease, and old paint residues to enable optimal paint adhesion, but it also reduces the risk of imperfections during application. Using pH-neutral, environmentally friendly cleaners and collecting runoff from sanding or washing procedures helps limit harmful substances entering waterways, protecting local ecosystems.
Selecting paints with low volatile organic compound content or water-based options further reduces environmental impact. Applying paint with controlled bursts and the correct distance from the surface helps minimize overspray, curbing paint waste and airborne particles. After painting, properly disposing of empty cans and contaminated materials according to hazardous waste guidelines prevents soil and water contamination.
Adhering to these precautions safeguards the painter’s health and promotes environmental stewardship throughout the preparation and surface treatment process. These mindful practices complement the technical steps of priming and coating, ensuring both a quality finish and responsible painting. For a deeper dive into optimizing your materials and methods to achieve professional fairing results, visit Explore the Best Motorcycle Fairings at Summit Fairings.
[1] Proper spraying techniques to minimize overspray.
Chapter 2: Mastering Primer, Base Color, and Clear Coat Application for Spray Can Motorcycle Fairings
1. Essential Primer Techniques for a Smooth, Durable Motorcycle Fairing Finish
Achieving a professional finish on motorcycle fairings using spray cans begins with meticulous primer application. The initial step involves thorough cleaning to remove all dirt, grease, and residues that could compromise adhesion. Next, lightly scuff the surface with fine-grit sandpaper—usually between 600 and 800 grit—to create a slightly roughened texture. This ensures the primer bonds effectively to the plastic or painted surface.
When applying primer, choose one formulated for automotive plastics to prevent peeling or flaking. Use light, even passes from about 6 to 12 inches away, applying multiple thin coats instead of a single heavy one. Each coat should be allowed to flash off, drying to the touch before the next application. This prevents runs, drips, and uneven layering, establishing an even foundational barrier.
Once the primer is fully cured, wet sanding the surface smooths out any imperfections and produces a uniform base. This step enhances the base color’s adhesion and guarantees a flawless look. Skipping or rushing the sanding process can result in surface irregularities that show through the paint layers.
Proper primer application sets the stage for the subsequent base color and clear coat, both critical for durability and finish quality. Consistency in spray distance, coat thickness, and drying times directly impacts the final outcome, elevating the appearance and lifespan of spray can-painted fairings.
For a detailed visual guide on using automotive primers and clear coats effectively, explore this comprehensive DIY paint guide.
2. Expert Strategies for Achieving Flawless Base Color Coverage on Motorcycle Fairings
Applying the base color on motorcycle fairings with spray cans requires precision and patience to secure a smooth, even finish. Starting with a uniform primer coat, typically gray, is crucial for enhancing color consistency and adhesion. This primer serves as a stable canvas, especially when working with OEMatch or other factory-matched colors.
When moving to the base color, it’s important to avoid heavy coats that can cause runs or uneven textures. Instead, multiple thin layers should be sprayed from roughly 6 to 8 inches away, using overlapping passes—at least 50% overlap—to ensure full coverage without visible stripes. Each thin layer should have that ideal “flash time” of around 15 minutes (or as specified by the spray can manufacturer) to dry just enough; this prevents the new layer from disturbing the previous one while maintaining a slight tackiness to bond the coats seamlessly.
Handling different types of base paints demands subtle adjustments in technique. Solid colors typically require straightforward application of these thin coats, while pearl or metallic finishes may need extra care. Often, these special effect paints are either mixed into the base or applied as a separate midcoat, adding depth and dimensional shine unique to motorcycle aesthetics.
After achieving full, even color coverage, moving on to a clear coat will seal the work, protecting the paint and enhancing gloss. Like the primer and base, clear coats should be applied in several light layers with proper drying intervals. This layered approach guards against defects and extends the life of the finish, making spray can painting a viable option for professional results.
For more guidance and options regarding fairings suited for painting projects, exploring trusted sources such as your ultimate source for affordable motorcycle fairings can provide valuable insights.
Further technical details and product-specific recommendations are available at the related spray can resource.
3. Mastering Clear Coat Techniques for a Glossy, Durable Finish on Motorcycle Fairings
Achieving a high-quality finish on motorcycle fairings with spray cans hinges on the clear coat application. The clear coat not only enriches the depth and gloss of the base color but also guards against environmental hazards like UV rays, chemicals, and scratches. To optimize adhesion and smoothness, the clear coat should be applied within about 30 minutes after the last base color coat is sprayed while the surface is slightly tacky. Typically, 4 to 5 thin, even coats are ideal. Between each coat, a drying time of roughly 10 minutes helps prevent runs, sags, or thick patches, preserving the clarity of the surface.
Before starting clear coat application, verify the primer and base layers are fully dry. Avoid sanding the base color at this stage, as sanding marks could mar the final gloss. When spraying, beginning with the edges and progressing to the flat or top surfaces ensures even coverage and reduces buildup on edges. Maintaining a steady, consistent distance during spraying is crucial—too close results in runs, while too far causes a rough, uneven texture. Applying light passes rather than heavy coats is essential to achieve a flawless finish.
Once all clear coats are applied, allow ample curing time, generally several hours, for the layers to fully harden. For imperfections like dust nibs or minor orange peel texture, wet sanding with very fine grit sandpaper (around 2000 grit) can smooth the surface. Following sanding, progressively polishing with cutting and finishing compounds will restore a mirror-like shine and maximize gloss.
This methodical clear coat process enables enthusiasts to produce motorcycle fairings with a resilient, professional factory-like appearance using just spray cans and proper technique. It offers impressive durability and brilliance without requiring costly equipment or a professional shop. For more on quality fairings to perfect your project, explore this comprehensive source on motorcycle fairings.
Reference: Polishing and wet sanding methods for clear coats.
4. Essential Techniques and Insider Tips for Flawless Primer, Base Color, and Clear Coat Finishes on Motorcycle Fairings
Achieving a professional-quality finish when painting motorcycle fairings with spray cans depends heavily on the techniques used during primer, base color, and clear coat application. Start by ensuring the fairings are impeccably clean and lightly sanded with fine-grit paper to promote optimal paint adhesion without damaging the plastic surface. Primer is a critical foundation—apply it in several thin, even coats rather than thick layers to avoid runs and achieve uniform coverage. Use a primer formulated for plastic to enhance durability and corrosion resistance, and always allow appropriate drying time between coats as per the product instructions. When applying the base color, shake the spray can thoroughly and hold it about 6 to 8 inches from the fairing. Begin spraying just off the edge and move steadily across the surface with smooth, overlapping passes. This edge-first technique helps prevent paint buildup and dripping. Multiple thin coats spaced with drying intervals produce an even, vibrant finish, and spraying edges before flat surfaces provides consistent coverage across contours. For the clear coat, allow the base color to set for about 30 minutes but avoid sanding between coats to prevent visible imperfections. Applying 4 to 5 thin layers of clear coat with short drying intervals between each will safeguard the paint while delivering that rich, glossy finish prominently seen in professional paint jobs. Holding the clear coat can slightly closer controls texture, reducing orange peel for a smoother appearance. Consistency in spraying speed and distance is paramount; erratic motions cause uneven coatings and defects. Using slow-drying clear coats extends wet time, enabling flawless blending on larger parts. Once fully cured, gently wet sanding and polishing can refine the finish further by removing minor flaws and boosting shine. Following these practices carefully turns spray can painting of motorcycle fairings into a manageable process that yields impressive, durable results much like those from a body shop. For deeper visual guidance on clear coat techniques, the video “2k Clear in a Can. How to Spray Paint like a Pro” is highly recommended. For additional insights into selecting and prepping quality motorcycle fairings, visit Summit Fairings’ comprehensive blog.
Chapter 3: Techniques and Safety Measures for How to Paint Motorcycle Fairings with Spray Can

1. Mastering Surface Preparation and Safety for Spray Can Motorcycle Fairing Painting
Proper surface preparation is essential when painting motorcycle fairings with spray cans, ensuring durable adhesion and a flawless finish. Begin by thoroughly cleaning the fairings to remove all dirt, grease, and old residues that can hinder paint bonding. Use a strong degreaser or automotive plastic cleaner, followed by wiping with a tack cloth or microfiber towel to eliminate dust and particles. Once clean, sanding the surface creates the necessary texture for better primer and paint adherence. Employ medium-grit sandpaper (around 400-600 grit) or a maroon scuff pad suited for plastics, working evenly across the entire fairing until the glossy sheen disappears, revealing a smooth, matte finish. This step also removes residual clear coats and smooths minor imperfections, setting the stage for optimal coating. Masking is the next vital step to protect areas that should not be painted—such as logos, vents, or mounting points—from overspray. Apply quality masking tape with paper or plastic sheeting, carefully covering and sealing edges to produce crisp paint lines. For plastic surfaces, consider using an adhesion promoter before priming to strengthen the bond, and on any metal parts, an epoxy primer provides corrosion resistance and an excellent foundation. Throughout preparation, safety cannot be overstated. Always work in a well-ventilated space and wear a respirator designed for chemical vapors, as spray paints and primers release harmful fumes. Gloves and eye protection shield your skin and eyes from contact with chemicals. Taking these deliberate steps—cleaning, sanding, masking, and practicing safety—ensures your motorcycle fairings are perfectly primed for spray can painting, resulting in a professional, long-lasting finish. For further insights on supplies and spray techniques, visit paintformotorcycles.com and explore more about motorcycle fairings at Summit Fairings.
2. Mastering Priming and Base Coat Application: Techniques and Safety for Durable, Flawless Motorcycle Fairing Paint
Achieving a durable and visually smooth paint finish on motorcycle fairings begins with expertly applying primers and base coats while adhering to safety protocols. Selecting a primer designed specifically for your fairings’ material—plastic or metal—is critical for optimal adhesion. Applying multiple thin coats rather than one heavy layer prevents drips and ensures a uniform surface, allowing each coat to fully air dry before the next. For plastic and aluminum components, primers formulated to bond with these substrates offer better etching and durability, especially epoxy types suited for metal.
When transitioning to base color application, the goal is to build consistent coverage without heavy spots or overspray. Starting by spraying the edges helps maintain evenness, followed by smooth, overlapping passes over flat areas. Maintaining a steady 6 to 8-inch distance from the surface while using light, controlled motions prevents textures like orange peel. Applying one to two light layers with about ten minutes of drying time in between allows the color to develop gradually and uniformly. It’s important not to sand base coats before clear coating, as this can cause surface imperfections, though sanding after full curing may be done for polishing.
Throughout these steps, prioritizing safety protects your health and work environment. Always paint in a well-ventilated space or outdoors, and wear a respirator suitable for paint fumes alongside gloves and eye protection to prevent harmful exposure. Keep spray cans away from open flames, as they are highly flammable, and observe manufacturer recommendations on temperature and humidity—ideally 70 to 85°F with low moisture—to promote smooth drying and paint flow. For larger panels like fairings, incorporating slow reducers extends drying times, helping achieve flawless coverage without blemishes.
By combining precise techniques with mindful safety precautions, you lay a solid foundation for a professional-grade paint job that lasts and shines.
For further insights on selecting compatible parts and materials, explore affordable motorcycle fairings at Summit Fairings.
(Reference: https://www.autobodynews.com/news.php?item=2801)
3. Mastering Clear Coat Application: Achieving Lasting Gloss and Protection on Motorcycle Fairings with Spray Cans
Achieving a durable and high-gloss finish on motorcycle fairings using spray cans hinges significantly on proper clear coat application and finishing techniques combined with essential safety practices. After applying and fully drying the base color—typically about 30 minutes—begin clear coating with a two-component (2K) clear coat spray. This type of clear coat excels in resistance against chemicals, gasoline, and weather, ensuring the paint job withstands daily use and environmental exposure while delivering a rich, glossy appearance.
Apply the clear coat in four to five thin, even layers, allowing around 10 minutes between coats to prevent runs and maintain a smooth finish. To ensure even coverage, spray edges first and flat surfaces last, maintaining consistent distance and smooth passes without lingering too long in one area. Avoid sanding the base coat before clear coating, as this can cause imperfections visible through the clear layer. However, if minor orange peel or texture issues arise after curing, careful wet sanding and polishing can restore smoothness and shine.
For those seeking enhanced longevity and scratch resistance, applying a ceramic coating after the clear coat cures can provide an additional semi-permanent protective layer. This advanced treatment shields against UV rays, chemicals, and weather, while simplifying maintenance.
Safety remains paramount: always paint in a well-ventilated space or outdoors and wear PPE, such as a respirator rated for paint fumes, gloves, and eye protection. Two-component clear coats contain isocyanates that can pose health risks without proper precautions. Follow manufacturer instructions for curing and disposal to ensure optimal results and safe handling.
Incorporating these clear coat strategies results in a resilient and stunning finish that elevates your motorcycle fairings’ appearance and durability. For a detailed visual walkthrough on spray can clear coating techniques, refer to the specialized tutorial on “2K Clear in a Can” by Custom Spray Mods.
For more insights on high-quality parts preparation, visit Explore the Best Motorcycle Fairings at Summit Fairings.
4. Mastering Safety: Respiratory Protection, Ventilation, and Hazard Prevention in Motorcycle Fairing Spray Painting
When painting motorcycle fairings with spray cans, safety must be as precise as the technique itself. Spray paints release volatile organic compounds (VOCs) and fine particulates that can be hazardous when inhaled. Using a properly rated respirator mask equipped with organic vapor cartridges is critical. This safeguards your respiratory system against toxic fumes often overlooked during casual spray painting.
Equally important is ensuring the painting area has excellent ventilation. Whether working outdoors or within a space enhanced by open windows and strategically placed fans, good airflow helps disperse harmful vapors quickly. This reduces their concentration in the air, lowering inhalation risk and creating a safer environment for extended painting sessions.
Protecting your skin and eyes from paint and solvent exposure is another vital measure. Wearing gloves, goggles, and appropriate clothing prevents irritation and chemical burns. Moreover, paint fumes are highly flammable, so it’s essential to avoid all ignition sources such as open flames, sparks, or hot equipment nearby. Painting should never be done near heat sources or inside confined spaces lacking proper airflow.
Careful adherence to all product guidelines for handling, application, and disposal also ensures safety and environmental responsibility. These precautions align with established automotive spray painting protocols, emphasizing respiratory and dermal protection while maintaining a well-ventilated workspace.
Incorporating these safety measures guarantees a risk-minimized painting process, allowing you to focus confidently on refining your motorcycle fairings. For those seeking more insights on enhancing motorcycle fairings, exploring a wide selection of motorcycle fairings can provide design inspiration and material guidance.
Additional detailed guidance on respirator use and hazardous chemical handling can be found at reputable occupational health sources.
Final thoughts
Achieving a professional-quality finish on motorcycle fairings with spray cans is entirely feasible when following a structured approach. Proper preparation and surface treatment lay the foundation for paint durability and adhesion, while precise layering of primers, base colors, and clear coats builds a resilient, attractive surface. Coupling these with effective spraying techniques and rigorous safety measures ensures that the process is both efficient and safe. For business owners, mastering these steps not only elevates service offerings but can also reduce costs and turnaround times, enhancing overall customer satisfaction and competitive advantage in the motorcycle customization and repair market.
Ready to elevate your ride? Summit Fairings delivers premium, custom-fit fairings that blend style and durability. Whether you’re chasing speed or turning heads, we’ve got your bike covered. Don’t wait—transform your machine today. Click, customize, and ride with confidence. Your perfect fairing is just a few clicks away. Act now!
About us
undefined