Introduction
Painting motorcycle fairings requires precision and expertise to ensure a flawless finish that both protects and elevates the bike’s appearance. For business owners in the motorcycle customization and repair industry, understanding the nuances of painting processes is paramount in delivering high-quality results that satisfy customers and build brand reputation. This guide delves into three critical stages: Preparation and Surface Treatment, Application Techniques and Paint Types, and Repair and Finishing Methods. Each chapter outlines essential knowledge and actionable practices that empower business owners to optimize workflow, uphold durability, and offer standout craftsmanship in motorcycle fairing painting services.
Tables of Contents
Chapter 1: Preparation and Surface Treatment in Painting Motorcycle Fairings
- Mastering Disassembly and Cleaning for Flawless Motorcycle Fairing Prep
- Mastering Sanding and Surface Refinement for Smooth, Durable Motorcycle Fairings
- Ensuring Lasting Adhesion: The Crucial Role of Primer and Adhesion Promoters in Motorcycle Fairing Preparation
- Mastering Paint Application and Layering Techniques for Durable Motorcycle Fairings
- Ensuring Lasting Beauty: Post-Paint Protection and Maintenance for Motorcycle Fairings
Chapter 2: Mastering Application Techniques and Choosing the Right Paint for Motorcycle Fairings
- Crucial Surface Preparation Steps: The Foundation for Lasting Paint and Flawless Application on Motorcycle Fairings
- Mastering Primer Selection and Application: The Foundation for Durable and Flawless Motorcycle Fairing Paints
- Mastering Acrylic Polyurethane Enamel: Durable Paint Solutions for Motorcycle Fairings
- Perfecting Clear Coat Application and Curing for Durable, Glossy Motorcycle Fairings
- Essential Tools, Materials, and Safety Practices for Painting Motorcycle Fairings
Chapter 3: Repair and Finishing Methods in Painting Motorcycle Fairings
- Restoring Strength and Appearance: Effective Structural Repair Techniques for Motorcycle Fairings
- Mastering Surface Preparation for Durable and Flawless Motorcycle Fairing Finishes
- Mastering Primer and Paint Application for Durable, Flawless Motorcycle Fairings
- Mastering Clear Coat Application and Finishing Techniques for Durable, Glossy Motorcycle Fairings
- Mastering Paint Correction and Restoration for Motorcycle Fairings
Chapter 1: Preparation and Surface Treatment in Painting Motorcycle Fairings
1. Mastering Disassembly and Cleaning for Flawless Motorcycle Fairing Prep
Effective painting of motorcycle fairings begins long before the first coat of primer is applied. The initial disassembly and cleaning phase is essential to create a pristine surface, ensuring paint adheres properly and results in a long-lasting finish. To facilitate safe removal, it is wise to warm the motorcycle briefly, softening plastic panels and loosening fasteners. This reduces the risk of cracks or breakage during disassembly, especially around delicate areas such as headlights or lower fairing sections where screws may be hidden or require specific tools.
Systematically removing all bolts, clips, and screws while documenting their placements is crucial; this attention to detail prevents obstacles during reassembly and preserves the integrity of attachment points. In some cases, partial draining of fluids might be necessary when fairings obstruct access, so cautious handling of any oil or coolant is advised to avoid spills.
Once removed, fairings must be thoroughly cleaned to eliminate dirt, grease, and residues that can compromise adhesion. Selecting cleaning agents suited to the fairing material preserves the surface—plastic-safe detergents for polymer panels and solvent-based degreasers for metal parts. Detailed cleaning extends to painting equipment as well, where removing contaminants from spray gun nozzles and passages supports a flawless paint application.
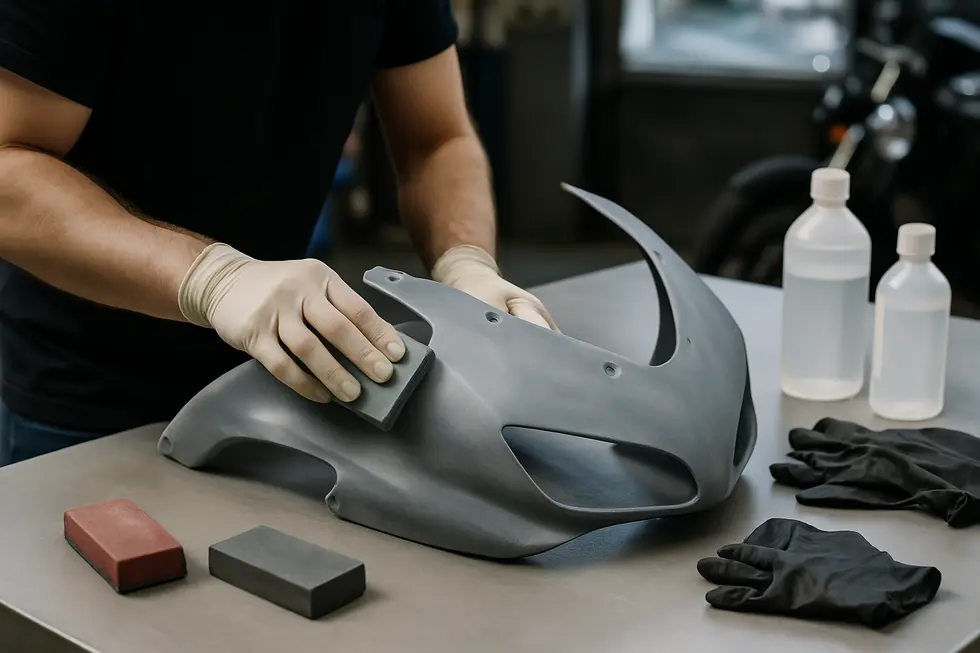
After cleaning, inspecting each panel for damage helps identify cracks or worn mounts, allowing for timely repair or reinforcement prior to painting. Light surface scuffing using appropriate grit prepares the surface further, and subsequent use of tack cloths or solvent wipes removes any remaining dust. Applying adhesion promoters and primers follows these steps, establishing a reliable foundation for the paint layers.
Thorough and careful execution of disassembly and cleaning directly impacts the quality and longevity of the painted fairings. For a detailed walkthrough of fairing removal techniques and bolt locations, consult this practical guide on fairing disassembly. For more about acquiring quality replacement parts and preparing them, visit this resource on affordable motorcycle fairings.
2. Mastering Sanding and Surface Refinement for Smooth, Durable Motorcycle Fairings
Achieving a flawless paint job on motorcycle fairings begins with expert sanding and surface smoothing techniques. The process starts after the fairings have been meticulously cleaned and degreased to remove any oils, dirt, or residues that could interfere with paint adherence. Initial sanding uses coarser grits to strip imperfections, old paint layers, and scratches, creating an even foundation. Gradually, the sanding progresses to finer grits—typically between 600 and 800—often performed wet. This wet sanding reduces dust and refines the surface texture, preparing the panel for primer.
Plastic fairings require special attention with an adhesion promoter after sanding. This step is crucial to ensure primers bond effectively to plastic substrates, preventing future peeling or flaking. Once the adhesion promoter has set, multiple thin coats of two-component or high-build primers are sprayed on, each allowed proper drying time. When the primer cures, wet sanding using fine grit sandpaper smooths out any texture left behind, establishing an ideal base for paint application.
Applying the paint itself demands thin, even coats with adequate drying between layers to avoid runs and ensure uniform coverage. After painting, clear coats protect the surface while providing a glossy finish, usually applied in two or three layers. Optionally, polishing and compounding after the clear coat cures can correct minor imperfections and elevate the shine for a professional-level result.
This detailed sanding and surface preparation routine not only improves paint durability but also significantly enhances aesthetic quality. Proper tools including quality sanding blocks, respirators, and polishing pads are essential for success. For those seeking further insight into these techniques and more, the comprehensive tutorial “Can I Paint My Fairing? – Ride or Die Motorcycles” offers step-by-step visual guidance.
For further information on quality motorcycle fairings and enhancements, explore Summit Fairings’ insights.
Source reference: https://www.youtube.com/watch?v=yk3ANq82BWM
3. Ensuring Lasting Adhesion: The Crucial Role of Primer and Adhesion Promoters in Motorcycle Fairing Preparation
Achieving a durable and flawless paint finish on motorcycle fairings hinges on meticulous surface preparation, with primer and adhesion promoters playing indispensable roles. Motorcycle fairings comprise various substrates, including metal and plastic components, each demanding tailored treatment to guarantee paint longevity and resistance to peeling or cracking.
Primers serve as foundational coats, especially vital when metal surfaces are exposed due to repairs or wear. They create a smooth, sandable base that promotes strong adhesion of subsequent paint layers while offering corrosion protection. Typically, primers are applied and sanded to a fine grit, ensuring an even layer that facilitates the flawless application of basecoat paints.
Plastics, which are common in many fairings, require specialized adhesion promoters before painting. These chemicals act as a bridge, enhancing the bonding between inherently non-porous, flexible plastic surfaces and the paint layers that follow. Adhesion promoters not only improve paint attachment but also contribute elasticity, minimizing the risk of paint cracking as the fairing flexes during use. This step is particularly crucial for plastics like polypropylene, helping maintain consistent color and finish quality across the entire fairing.
The typical preparation workflow begins with thorough cleaning to eliminate oils and contaminants, followed by light sanding to roughen glossy surfaces. Primer application addresses bare metal areas or damage repairs, while adhesion promoters are selectively applied to plastic parts. Adherence to recommended flash times between coats ensures each layer properly sets, setting the stage for even basecoat application.
This layered approach, combining primer and adhesion promoter use, ensures a resilient, visually appealing surface that withstands the rigors of riding and weather. For more insights on sourcing quality parts and enhancing your painting projects, explore resources like Explore the Best Motorcycle Fairings at Summit Fairings.
Learn more about specialized primer and adhesion techniques in professional applications here.
4. Mastering Paint Application and Layering Techniques for Durable Motorcycle Fairings
Achieving a professional, long-lasting finish on motorcycle fairings hinges on a carefully executed paint application and layering strategy. The process begins with meticulous surface preparation, where sanding transforms the fairing’s exterior into a smooth, uniform canvas essential for solid paint adhesion. For fairings made from plastic, an adhesion promoter is indispensable; it creates a chemical bridge between the plastic substrate and the primer, preventing paint failure due to peeling or flaking over time.
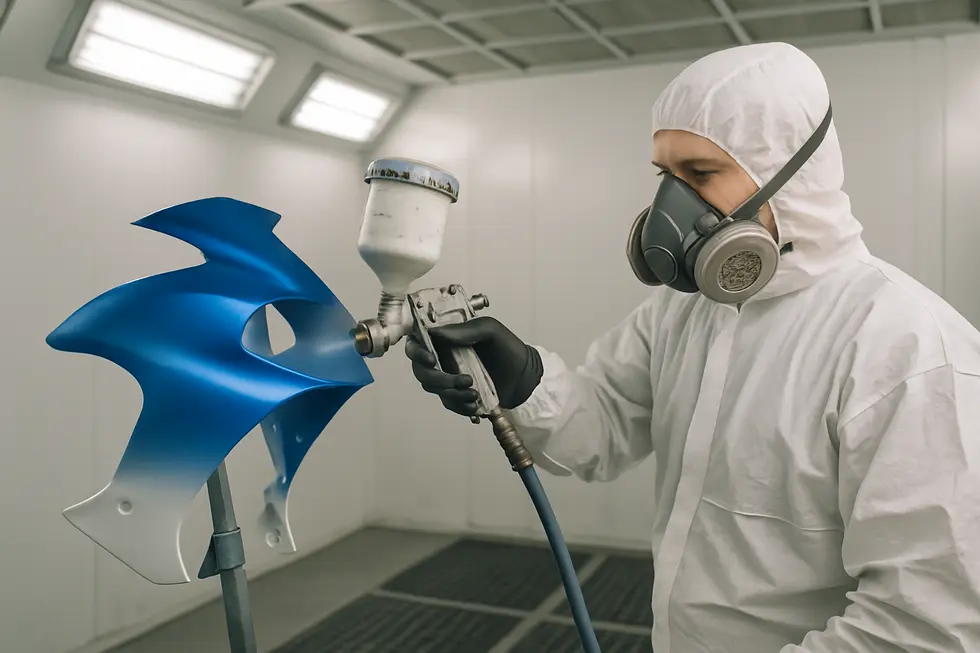
Once the surface is primed with a two-component primer—a critical foundation that enhances durability and bonding strength—it’s essential to allow this layer to dry completely. The paint itself must then be properly mixed, typically in a 1:1 ratio with reducer, to ensure optimal viscosity for spraying. Applying paint in multiple thin coats rather than one thick layer is crucial. This technique prevents runs, encourages even color distribution, and reduces drying time between coats, resulting in a flawless finish.
Following the color layers, the application of 2 to 3 clear coats establishes a protective shield against environmental wear, UV damage, and physical abrasion, all while providing a rich gloss that elevates the fairing’s visual appeal. Consistent application using uniform, directional passes ensures texture uniformity without orange peel or runs. The clear coat requires not only surface drying but a thorough curing period, often spanning 12 to 24 hours, to attain maximum hardness and scratch resistance.
Proper safety measures during spraying, including the use of respirators and controlled spray guns, alongside preparation tools like sanding blocks and polishing pads, contribute to both quality and artist health. Taken together, these layered steps create a resilient and stunning finish tailored specifically to the demands of motorcycle fairings. For additional insights on selecting high-quality parts to complement your paintwork, explore the detailed guidance available through explore the best motorcycle fairings.
External resource: https://www.youtube.com/watch?v=yk3ANq82BWM
5. Ensuring Lasting Beauty: Post-Paint Protection and Maintenance for Motorcycle Fairings
After completing the complex painting process on motorcycle fairings, the focus shifts to preserving that fresh, vibrant finish through effective post-paint protection and maintenance. Central to this is the application of multiple clear coat layers, which act as a robust shield against environmental hazards such as scratches, dirt, and fading. However, the clear coat’s true strength depends on allowing it to cure fully—typically between 12 to 24 hours—before handling or reinstalling the fairings, ensuring maximum hardness and adhesion.
Maintaining the paint’s integrity requires care during cleaning. Use gentle soaps combined with soft microfiber cloths to avoid abrasive damage that dulls the surface’s glossy finish. Harsh chemicals or aggressive scrubbing should be avoided as they can break down the protective layers, accelerating wear. Periodic application of a motorcycle-safe wax adds a crucial protective barrier, enhancing gloss and deepening color while guarding against minor scratches and ultraviolet (UV) damage.
Minimizing prolonged exposure to sunlight is another essential practice. UV rays degrade paint pigments and clear coats over time, causing fading and chalking. Parking in shaded areas or covering the bike with UV-resistant covers when not in use helps extend the paint’s lifespan substantially. These maintenance steps complement the initial surface preparation—sanding, adhesion promotion, and priming—by preserving the paint’s adherence and appearance through continual protection.
Ultimately, the well-executed post-painting care enhances durability and keeps motorcycle fairings looking showroom-fresh, while protecting the investment made during the painting process. For those seeking more detailed guidance on selecting and installing quality fairings to complement your paintwork, exploring specialized motorcycle fairing resources can provide helpful insights.
More tips about choosing and maintaining painted fairings can be found at Explore the Best Motorcycle Fairings at Summit Fairings.
For further information on the curing and protection process, this video offers excellent visual guidance: https://www.youtube.com/watch?v=yk3ANq82BWM
Chapter 2: Mastering Application Techniques and Choosing the Right Paint for Motorcycle Fairings
1. Crucial Surface Preparation Steps: The Foundation for Lasting Paint and Flawless Application on Motorcycle Fairings
Surface preparation stands as the cornerstone for achieving a flawless and durable finish when painting motorcycle fairings. Thorough cleaning is the first essential step to eliminate all dirt, grease, and contaminants that could interfere with paint adhesion. Using specialized coating prep sprays formulated with gentle surfactants protects delicate plastic surfaces better than harsh solvents do, ensuring the base remains intact without damage.
Sanding is equally vital, acting to remove any lingering imperfections like scratches or old paint residues. It also generates a finely textured profile on the surface, which greatly enhances the primer and paint’s ability to bond firmly. Employing fine-grit sandpaper or sanding blocks allows for uniform abrasion, avoiding unevenness that could mar the final result.
Since many motorcycle fairings are crafted from ABS or similar plastics, applying an adhesion promoter after sanding becomes indispensable. This treatment chemically improves the connection between the plastic substrate and the subsequent primer coat, preventing peeling and flaking that commonly afflict untreated plastics.
Primer application follows, preferably with a high-quality two-component primer. This layer not only bolsters corrosion resistance and paint adhesion but also helps fill minor surface inconsistencies to produce an even canvas for paint. Allowing sufficient curing time ensures full primer effectiveness, a critical factor before proceeding to paint layers.
For painting, adherence to manufacturer guidelines on mixing ratios and layering technique is crucial. Multiple thin coats applied with consistent, even strokes help avoid runs and provide uniform coverage. Ending the process with two to three smooth clear coats shields the paint from UV damage, scratches, and environmental wear, while enhancing gloss or matte preferences. Full curing of the clear coat is mandatory before handling to achieve lasting durability.
Maintaining painted fairings afterward requires gentle washing and occasional waxing to prolong the finish’s vibrancy and protective qualities. Limiting direct sun exposure also helps to minimize fading and degradation.
For an in-depth walkthrough of techniques—from preparation to finishing—explore expert guidance at Summit Fairings blog.
This careful, step-by-step surface preparation directly supports successful application techniques and optimal paint selection, ensuring a professional, resilient finish every time.
[1] Surface prep and painting techniques for motorcycle fairings
2. Mastering Primer Selection and Application: The Foundation for Durable and Flawless Motorcycle Fairing Paints
Achieving a long-lasting, flawless finish on motorcycle fairings begins with selecting and applying the right primer—a step that directly influences paint adhesion, durability, and overall surface smoothness. Since most motorcycle fairings are made from ABS plastic or fiberglass, choosing a primer formulated specifically for these materials is essential. High-build primers designed for ABS plastic offer much-needed flexibility and ensure the primer bonds effectively without cracking or peeling under stress. Fiberglass components demand primers suited to bond with resin surfaces, which also help fill minor surface imperfections to produce a uniform base.
Before priming, thorough surface preparation is indispensable. This includes meticulous cleaning to remove fats or contaminants and careful hand sanding or scuffing to create the texture that promotes mechanical adhesion. Using isopropyl alcohol during cleaning enhances primer bonding by eliminating oils that could disrupt the paint layers. Primer application typically involves spraying multiple thin coats, allowing proper drying time between each to build a resilient base without runs or unevenness. Once fully dry, a light scuff sanding smooths out any irregularities, creating the ideal foundation for basecoat layers.
In professional and DIY settings alike, spray guns equipped with HVLP (High Volume Low Pressure) technology deliver the most consistent primer coverage, avoiding excessive overspray and buildup. This technique ensures even distribution, critical for preventing defects beneath the paintwork. The primer not only enhances adhesion but also plays an important role in protecting the fairing against environmental wear, providing a foundation that helps the subsequent acrylic polyurethane enamel basecoats resist UV damage and impacts.
Incorporating this tailored primer approach prior to color application leads to a quality finish that withstands the challenges of riding conditions. For expanded insights on fairings and surface treatment steps, detailed resources are available at Summit Fairings’ expert blog.
For a comprehensive guide to primer technologies and applications on various substrates in automotive and motorcycle coatings, refer to technical standards provided by the Society of Automotive Engineers (SAE).
3. Mastering Acrylic Polyurethane Enamel: Durable Paint Solutions for Motorcycle Fairings
Acrylic polyurethane enamel paints represent a premier choice for painting motorcycle fairings due to their blend of toughness, flexibility, and exceptional gloss retention. This paint type fuses the robust chemical resistance of enamel with the UV stability and elasticity of acrylic urethanes, making it particularly well-suited for the plastic and fiberglass materials typical of most fairings.
The key to successful application lies in thorough surface preparation followed by careful layering. After sanding and cleaning the fairing surfaces, applying a compatible primer is crucial to enhance adhesion and prevent eventual peeling. On metal components such as aluminum, self-etch primers are recommended to secure strong bonding with the acrylic polyurethane enamel paint. Multiple thin coats—generally three to four—should be sprayed evenly using a high-quality spray gun. This approach helps avoid runs and ensures consistent coverage while maintaining the paint’s resilient qualities.
Between coats, allowing sufficient drying time as specified by the paint manufacturer ensures each layer cures properly, which is vital for durability and appearance. Once the base color is complete, sealing the finish with two to three clear coats further protects against UV damage, road debris, and vibrations encountered during riding. The clear coat also enhances the finish with a deep, lasting gloss that accentuates the motorcycle’s custom look.
Wearing protective gear and utilizing correct tools during application will safeguard both the painter and the finished outcome. This paint system balances an attractive visual appeal with practical endurance, perfectly aligning with the demands of motorcycle fairings subjected to the rigors of the road.
For riders seeking a professional-grade repaint or custom finish, understanding the properties and application nuances of acrylic polyurethane enamel paints offers an effective path to lasting beauty and protection. For further insights on customizing and protecting fairings, exploring resources like Summit Fairings’ blog can provide valuable advice and options.
4. Perfecting Clear Coat Application and Curing for Durable, Glossy Motorcycle Fairings
Achieving a flawless, resilient finish on motorcycle fairings hinges significantly on the clear coat application and its subsequent curing process. After the base paint has been applied in multiple thin layers and dried thoroughly, the clear coat serves as the protective shield that enhances both durability and visual appeal. Typically, applying two to three thin coats of clear coat with steady, consistent spray patterns—often in a single direction—ensures even coverage without texture irregularities such as runs or orange peel effects. This layering not only locks in color vibrancy but also provides essential resistance against UV rays, weathering, and minor abrasions.
The key to a long-lasting finish lies in proper timing: each clear coat layer should be allowed to flash off before applying the next, building up protection methodically rather than rushing the process. Once the final clear coat is applied, a dedicated curing period is critical. Although the surface may feel dry to the touch within hours, full chemical curing often takes 12 to 24 hours, during which the coating hardens internally to form a robust, glossy barrier ready for handling and reinstallation.
Environmental factors such as temperature and humidity can influence drying and curing times, underscoring the need for controlled conditions throughout the process. In professional settings, multi-layer clear coats with advanced UV inhibitors extend finish longevity further, a technique that can also benefit enthusiasts working at home with appropriate tools and safety equipment like respirators and spray guns.
Maintaining clean surfaces before clear coating and using proper spraying techniques tied closely to correct reducer ratios maximize adhesion and gloss uniformity. For readers interested in deeper technical insights and practical demonstrations, professional tutorials and supplier guidelines offer valuable support.
For comprehensive resources on selecting quality motorcycle fairings and detailed painting advice, visit Explore the Best Motorcycle Fairings at Summit Fairings.
For more on advanced application practices and safety, see external professional tutorials available in motorcycle refinishing guides.
5. Essential Tools, Materials, and Safety Practices for Painting Motorcycle Fairings
Painting motorcycle fairings demands a precise combination of suitable tools, carefully selected materials, and strict adherence to safety measures. Most fairings are crafted from ABS plastic, which requires thorough sanding to create a smooth, receptive surface. To ensure the paint firmly adheres, applying a specialized adhesion promoter is critical; this step mitigates peeling and flaking issues common with plastic substrates. Once prepared, a two-component primer tailored for plastics forms a durable base, promoting long-lasting paint adhesion.
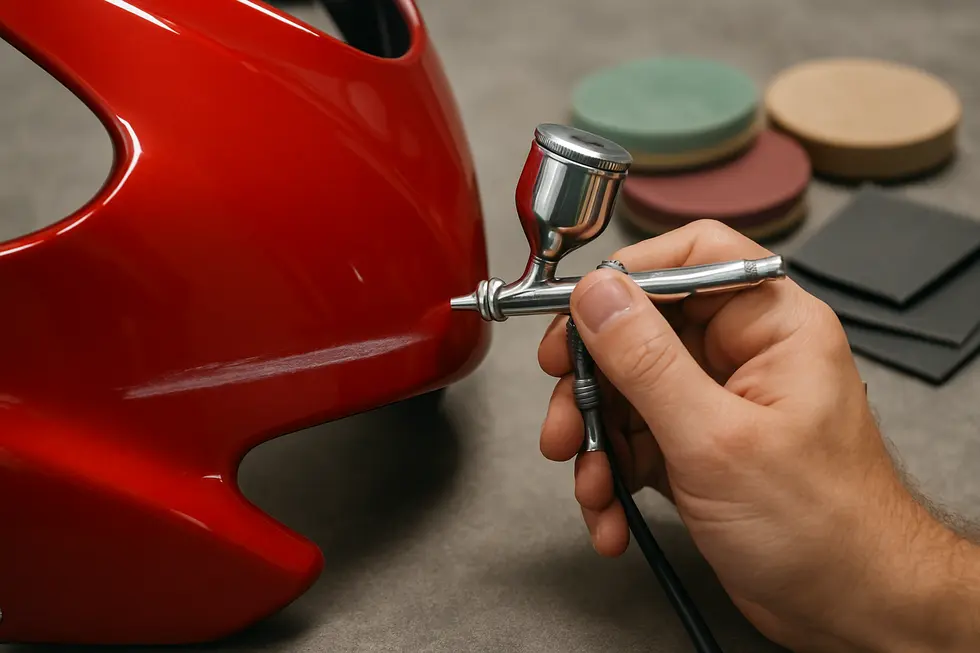
When selecting paints, acrylic polyurethane enamel is the preferred choice due to its flexibility, durability, and high-gloss finish. Professional results often come from a multi-layer system that includes a basecoat for color depth, optional mid-coats for specialized effects, and multiple clear coats that protect the underlying layers while imparting a glossy sheen. Application tools vary based on complexity: High Volume Low Pressure (HVLP) spray guns deliver precise, even coats for larger surfaces, while aerosol sprays offer a convenient option for smaller areas. For detailed repairs or custom touches, airbrushes provide unparalleled control.
Safety is paramount throughout the painting process. Wearing a respirator prevents inhalation of hazardous fumes, while gloves and eye protection shield the skin and eyes from chemical exposure. Painting should occur in well-ventilated spaces to reduce airborne contaminants. Beyond safety, the technique matters: applying several thin coats rather than thick layers avoids runs and sags, and allowing proper drying times between coats is essential for a flawless finish.
After painting, applying two to three clear coats in consistent strokes finalizes the process, securing both appearance and protection. For those seeking a mirror-like gloss, polishing with orbital polishers and suitable pads can enhance the surface further. Integrating these tools, materials, safety practices, and techniques results in a durable, professional-quality paint job that revives or customizes motorcycle fairings with confidence and style.
For a broad range of quality fairing options and surface preparation advice, explore the detailed motorcycle fairings resources available at Summit Fairings.
Source: Ride or Die Motorcycles, Automotive Painting Guide
Chapter 3: Repair and Finishing Methods in Painting Motorcycle Fairings
1. Restoring Strength and Appearance: Effective Structural Repair Techniques for Motorcycle Fairings
Restoring Strength and Appearance: Effective Structural Repair Techniques for Motorcycle Fairings
Efficient structural repairs are fundamental to ensuring motorcycle fairings not only look great but maintain their protective role. The process begins with a careful inspection to detect any cracks, stress fractures, or compromised mounting points that could impact safety and durability. Even minor damage must be addressed promptly, as these imperfections tend to worsen with vibration and road stress.
When it comes to repairing plastic fairings, plastic welding stands out as a highly reliable method due to its ability to fuse thermoplastic materials back into a solid structure. Techniques such as heat welding use controlled hot air or friction to melt the damaged areas, effectively bonding them once cooled. Ultrasonic welding involves high-frequency vibrations to generate localized heat, creating a strong bond suitable for complex or thick sections. Solvent welding relies on chemical solvents to soften and fuse pieces, particularly effective on acrylic and polycarbonate materials.
Following structural restoration, surface refinishing is essential to bring the fairing’s appearance back to life and shield it against environmental factors. Applying automotive-grade paint with pigments, binders, and UV-resistant additives reinforces durability while ensuring the finish remains flexible yet hard-wearing. For deeper damage, specialized paint chip repair systems fill imperfections and smooth transitions to blend seamlessly with the original surface.
This integrated approach—combining thorough damage assessment, precise plastic welding methods, and meticulous surface refinishing—delivers repaired fairings that retain their structural integrity and visual appeal. For those seeking a detailed roadmap on damage assessment and repair procedures, reference can be found in expert advice on comprehensive fairing damage handling, such as the guidance provided by Kings Motorcycle Fairings.
For more insight on quality motorcycle fairings, visit the ultimate destination for motorcycle fairings.
2. Mastering Surface Preparation for Durable and Flawless Motorcycle Fairing Finishes
Achieving a professional, long-lasting finish on motorcycle fairings hinges on meticulous surface preparation. This process begins with thorough cleaning to eliminate dirt, oils, and residues that can compromise paint adhesion. Using gentle, plastic-safe cleaners ensures the surface remains unscathed while removing contaminants that would otherwise cause flaws or peeling.
Once cleaned, sanding refines the fairing’s surface, smoothing imperfections and creating a subtle texture that promotes primer bonding. Starting with medium-grit sandpaper around 400 grit removes old paint or blemishes, followed by finer grits in the 800–1000 range to produce a smooth, consistent canvas. This gradual approach balances effective surface correction with preparation for the next coating steps.
On plastic fairings, which are particularly prone to paint adhesion challenges, applying an adhesion promoter is essential. This chemical intermediary enhances primer grip, preventing premature paint failure. The chosen primer—typically a two-component variety formulated for automotive plastics—is applied in multiple thin layers. Each coat must dry fully to build a uniform base that resists peeling and supports the color coats.
The painting phase demands precision in mixing paint with reducers, usually at a 1:1 ratio, achieving the ideal viscosity for spraying. Applying paint in successive thin coats avoids runs and uneven coverage while ensuring full color depth. After the color has dried, clear coats provide essential protection and a glossy finish, applied carefully in two to three even layers with consistent strokes. True durability is reached only after allowing the clear coat sufficient curing time, often 12 to 24 hours.
In some cases where minor scratches or oxidation are present, mechanical polishing with compounds can restore gloss without repainting entirely, preserving original paintwork. Although less common on plastic fairings, metal parts associated with motorcycles require separate rust removal and protection steps.
Following these surface preparation protocols results in a finish that combines durability, smoothness, and visual appeal. For further insights on selecting quality motorcycle fairings and finishing tips, visit Explore the Best Motorcycle Fairings at Summit Fairings.
Detailed techniques and demonstrations on surface preparation can also be found in this comprehensive video resource.
3. Mastering Primer and Paint Application for Durable, Flawless Motorcycle Fairings
Mastering Primer and Paint Application for Durable, Flawless Motorcycle Fairings
Achieving a professional finish on motorcycle fairings hinges on meticulous priming and painting procedures that ensure lasting durability and vivid aesthetics. The process begins by thoroughly cleaning the fairings to eradicate oils, grease, and any surface contaminants, commonly using solvents like isopropyl alcohol or acetone. Proper surface preparation naturally extends to sanding with medium grit paper around 400 grit, which smooths imperfections and offers optimal texture for primer adhesion. When working with plastic or ABS fairings, applying an adhesion promoter after sanding is essential to enhance primer bonding, preventing peeling or flaking under stress.
Minor defects such as pinholes, scratches, or cracks require filling with body fillers or spot putty, followed by fine sanding with 600 grit or finer sandpaper to restore a uniform surface. Once perfectly prepped, multiple thin coats of a two-component primer are applied. Spraying in thin layers rather than thick coats helps avoid runs, promotes even coverage, and provides a robust base that locks in paint and prevents chipping.
After primer cures fully, the paint is mixed with the appropriate reducer—typically at a 1:1 ratio—to achieve the correct spray consistency. Applying successive thin coats allows the color to build up smoothly without sagging, while intermediate drying times between layers ensure proper adhesion and depth. High-quality paints formulated for plastics are preferable to match the elasticity and texture of the fairing material.
To complete the protective and aesthetic finish, two to three consistent clear coat layers are sprayed, locking in color and creating a high-gloss surface resistant to environmental wear. The clear coat must cure undisturbed for 12 to 24 hours to fully harden beneath its dry surface. After curing, additional finishing steps like decal application or polishing can refine the fairing’s appearance, lending a customized, showroom-quality look.
Patience and precision during each phase—from cleaning and priming through painting and clear coating—are paramount. Essential tools such as respirators, quality spray guns, sanding blocks, and polishing pads support safety and finish quality throughout the process. For an in-depth step-by-step approach, refer to a comprehensive painting guide to deepen understanding and technique.
Explore more about professional painting techniques and fairing care at Explore the Best Motorcycle Fairings at Summit Fairings.
4. Mastering Clear Coat Application and Finishing Techniques for Durable, Glossy Motorcycle Fairings
Achieving a durable and glossy finish on motorcycle fairings relies heavily on the clear coating and meticulous finishing steps following painting. After applying multiple thin coats of base paint and allowing sufficient drying time, the clear coat is sprayed in two to three consistent, even layers. This protective barrier not only enhances gloss but safeguards the underlying paint from UV damage, scratches, and environmental wear. Applying the clear coat with steady, parallel strokes is essential to avoid uneven texture or runs, which could compromise the smooth finish.
Once the clear coat is laid down, it requires a thorough curing period typically spanning 12 to 24 hours. Although the surface may feel dry to the touch earlier, the clear coat beneath can remain soft and vulnerable. Patience during this phase prevents fingerprints, scratches, or any form of damage, preserving the integrity of the finish.
Following full curing, advanced finishing includes wet sanding with ultra-fine grit sandpaper to eliminate minor orange peel or surface imperfections. This step carefully removes microscopic unevenness without penetrating the clear coat too deeply. Polishing then refines the surface using abrasive compounds that shave off just a few microns, restoring optical clarity and depth while smoothing any residual flaws. These techniques elevate the appearance from factory-level to professional quality.
For riders seeking customization, decals or custom designs can be applied either before the final clear coats or after curing, depending on the chosen method. Proper surface preparation and sealing ensure these additions remain intact long-term. Throughout this entire process, attention to detail combined with correct equipment and materials transforms painted motorcycle fairings into striking, resilient works.
For deeper insights into the step-by-step clear coating and finishing process, refer to this detailed external guide: https://www.youtube.com/watch?v=yk3ANq82BWM. Additionally, exploring expert tips and quality fairing options can be found at the Summit Fairings blog.
5. Mastering Paint Correction and Restoration for Motorcycle Fairings
Achieving a flawless finish on motorcycle fairings requires meticulous paint correction and restoration, which go beyond basic painting steps to refine and protect the surface. The process begins with careful cleaning to eliminate dirt, grease, and contaminants without damaging delicate finishes. For fairings with matte paint, gentle cleaning agents specially formulated to avoid altering the surface sheen are essential, as harsh solvents can cause swelling or uneven gloss.
Once clean, paint correction improves the visual quality by removing fine scratches, swirl marks, oxidation, and fading. This is typically done through machine polishing, where the choice of polishing compound and pad depends on the severity of imperfections and the type of paint finish. Glossy surfaces can be restored to deep clarity and smoothness, while matte finishes require more subdued polishing to preserve their muted look.
For fairings exhibiting dents or cracks, specialized fillers and sanding are employed to recreate smooth contours before repainting. Priming the repaired areas ensures excellent paint adhesion while filling minor surface flaws. Applying paint in multi-layered systems—often including basecoat, mid-coat for depth, and clearcoat—creates a durable and visually rich finish.
Protective coatings form the final shield, enhancing longevity and resistance to environmental damage. Ceramic coatings impart a hard, hydrophobic surface that repels dirt and minor scratches, while paint protection films act as physical barriers to chips and abrasions. Proper surface prep before adding these layers is vital for lasting results.
Throughout restoration, delicate handling of matte finishes remains critical to prevent unwanted gloss changes. Using specialized preparation sprays designed for matte surfaces helps maintain their unique appearance.
For enthusiasts aiming to deepen their understanding, an in-depth video tutorial offers practical insights into paint correction and ceramic coating techniques tailored for motorcycle finishes, including matte varieties: https://www.youtube.com/watch?v=OpXwXk-Fh08. For sourcing quality replacement fairings to complement your refinishing efforts, explore comprehensive options available at Summit Fairings’ blog.
Final thoughts
Painting motorcycle fairings is a multifaceted process that demands a thorough approach from preparation through to finishing. Business owners who invest in understanding and implementing careful surface treatment, expert paint application, and precise repair techniques will distinguish their services in a highly competitive market. This holistic mastery leads to durable, visually striking results that foster customer trust and repeat business. Commitment to quality preparation, selecting suitable paint types, and applying thoughtful finishing methods builds the foundation of a reputable fairing painting operation capable of delivering lasting value and professional-grade results.
Ready to elevate your ride? Summit Fairings delivers premium, custom-fit fairings that blend style and durability. Whether you’re chasing speed or turning heads, we’ve got your bike covered. Don’t wait—transform your machine today. Click, customize, and ride with confidence. Your perfect fairing is just a few clicks away. Act now!
About us
We are one of the leading motorcycle fairing export sites, offering over 3,000 styles across almost all motorcycle models. Purchase from summitfairings.com and save 10-40% compared to other sites. Have questions? Our dedicated support team guarantees a response within six hours, ensuring you get the assistance you need promptly.