Introduction
Painting motorcycle fairings presents unique opportunities for customization and branding that can enhance the appeal of your business. Understanding the preparation, techniques, and maintenance involved in this process can lead to a finished product that not only looks fantastic but also stands the test of time. This guide will take you through the essential steps of preparation, explore the best practices and products for painting, compare the advantages of painting versus vinyl wrapping, and provide fundamental maintenance tips. By covering these topics systematically, we aim to empower you to achieve professional results and distinguish your offerings in a competitive market.
Tables of Contents
Chapter 1: Mastering the Art of Motorcycle Fairing Preparation: A Detailed Guide
- Essential Cleaning Techniques for Optimal Motorcycle Fairing Preparation
- Essential Scuffing and Sanding Techniques for Flawless Motorcycle Fairing Paint Jobs
Chapter 2: Mastering the Art of Motorcycle Fairing Painting: Techniques and Tips
- The Essential Seven Steps for Painting Motorcycle Fairings
- Essential Kits and Products for Achieving Professional-Grade Finishes on Motorcycle Fairings
Chapter 3: Mastering the Art of Motorcycle Fairing Customization: Painting Techniques for Long-Lasting Aesthetics
- Unlocking the True Potential of Motorcycle Fairings: Durability and Aesthetic Enhancements through Expert Painting
- Vinyl Wraps Unleashed: A Versatile Approach to Motorcycle Fairing Customization
Chapter 4: Effective Care and Maintenance Strategies for Enduring Motorcycle Fairings
- Essential Techniques for Cleaning and Protecting Painted Motorcycle Fairings
- Routine Checks and Proactive Preservation for Resilient Motorcycle Fairings
Chapter 1: Mastering the Art of Motorcycle Fairing Preparation: A Detailed Guide
1. Essential Cleaning Techniques for Optimal Motorcycle Fairing Preparation
Preparing motorcycle fairings for a fresh paint job is a critical step that directly impacts the final result. Among the various preparation processes, initial cleaning stands out as the foundation upon which a durable and visually appealing finish is built. This meticulous phase focuses on removing contaminants, old paint, grease, and rust from the surface of the fairings to ensure a strong bond between the paint and the underlying material. Here, we explore the essential cleaning techniques that every motorcycle enthusiast should employ to achieve professional-quality results.
Thorough Washing and Degreasing
The first step in the cleaning process is a thorough wash, which serves to eliminate surface debris and any oils or greases that may have accumulated over time. Utilize a high-quality degreaser or a pre-painting prep cleaner designed for automotive surfaces. This initial cleaning is crucial for ensuring that dirt, road grime, and waxes are removed, facilitating maximum paint adhesion. For fairings that have been previously painted or are glossy, consider using an acid-free iron remover. This specialized product is effective in dissolving ferrous particles, such as brake dust, while being gentle enough to avoid damaging existing clear coats. As with any surface treatment, testing the product on a small, inconspicuous area is advisable to ensure compatibility with the material of the fairing.
Mechanical Removal of Old Paint or Corrosion
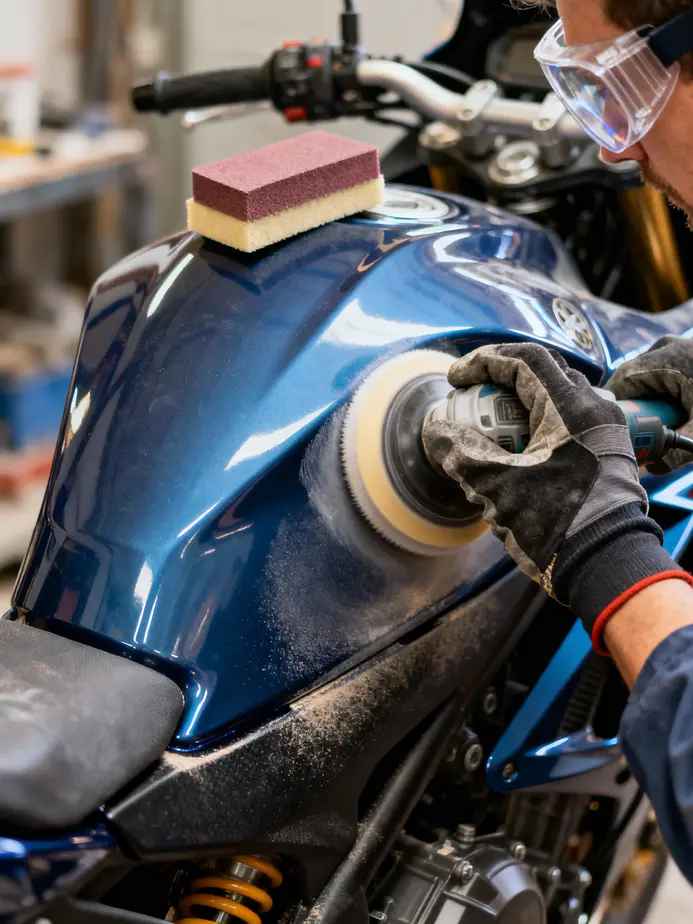
In scenarios where the fairings exhibit worn or chipped paint, it is essential to mechanically remove the old layer to create a smooth substrate for new paint. This can be efficiently achieved using a drill brush or scuffing pads. These tools aid in stripping the existing paint down to the fairings’ bare surface, which is particularly important for motorcycle components that experience high wear, such as tanks and engines. Abrasive methods not only prepare the surface effectively but also enhance the substrate’s profile, which is pivotal for primer adhesion. After using these mechanical tools, ensure that the surface is adequately cleaned to eliminate any residue created during the stripping process. This step is vital as any leftover particles can lead to imperfections in the final paint application.
Media Blasting and Sanding Techniques
For those wanting an even deeper clean, media blasting offers a powerful method to prepare metal surfaces. This involves using various blasting media to remove rust and contaminants efficiently, especially from bare metal surfaces. Alternatively, sanding can also be pursued to achieve a similar clean state, preparing the surface for further treatment. When sanding, it’s essential to use the correct grit—starting with a coarser grit to remove the majority of material before finishing with finer grits for a smooth finish. Remember to use tack cloths immediately after sanding to collect any dust that could compromise the quality of subsequent layers.
Once you’ve completed the initial cleaning and abrasive steps, it’s crucial to apply a post-cleaning treatment to protect the surface from flash rust, especially after media blasting or sanding. Products like specialized after-blast solutions degrease and etch the surface while leaving a protective layer, making subsequent steps safer and more effective. Apply this treatment according to the manufacturer’s instructions, ensuring that any residue is neutralized with a solvent pre-painting prep cleaner before moving forward. This will not only prepare the fairing for painting but also help in minimizing potential rust issues, which are particularly concerning in metal-based fairings.
Safety and Additional Precautions
During the entire cleaning and preparation process, remember to prioritize safety. Working in a well-ventilated area is critical, particularly when using chemicals like degreasers or paint preps. Wearing personal protective equipment such as gloves, goggles, and a mask can prevent exposure to potentially harmful substances, ensuring a safe working environment.
Understanding Material Compatibility
The techniques discussed apply predominantly to plastic or fiberglass motorcycle fairings, common in the industry. However, every fairing material has its unique characteristics, which necessitate testing of any cleaning products on a small area first. The last thing you want is to apply a cleaner that could potentially crack or damage the fairing. For instance, some plastics require gentle treatments that won’t etch or degrade their surface, while metal fairings might stand up to more aggressive cleaning methods.
In conclusion, the initial cleaning phase is integral to the overall preparation of motorcycle fairings for painting. By employing thorough washing, effective mechanical removal, sanding, and using proper protective treatments, you set the stage for superior paint adhesion and a stunning final appearance. Following these techniques not only results in a long-lasting finish but also enhances your motorcycle’s aesthetic appeal, giving it that custom look that stands out on the road. For a deeper dive into each stage of motorcycle painting, including the intricacies of scuffing and sanding best practices, be sure to continue to the next section on best practices for refining and correcting surfaces prior to painting. If you’re looking for additional insights or tips, check out our extensive blog on motorcycle fairing preparation and painting strategies.
2. Essential Scuffing and Sanding Techniques for Flawless Motorcycle Fairing Paint Jobs
In the meticulous world of painting motorcycle fairings, preparation is often the unsung hero that determines the success of the project. Among the crucial steps in this process are scuffing and sanding, techniques that not only enhance the aesthetic appeal of the fairings but also ensure a robust bond between the surface and the paint. This subchapter delves into best practices for scuffing and sanding, laying the groundwork for achieving a professional finish that stands the test of time.
Starting with the concept of scuffing, this technique serves to create a mechanical bond that primes the surface for paint application. The factory gelcoat or any existing paint, often glossy and slick, must be lightly abraded to establish a ‘tooth’—a term that describes the minute imperfections and roughness on the surface that paint can latch onto. To achieve this, sandpaper with a grit between 400 and 600, or a Scotch-Brite pad can be employed. The key here is to avoid aggressive sanding; the objective is to degloss the surface rather than remove the existing material excessively.
Once scuffing has been completed, the next phase is sanding, which involves using progressive grits of sandpaper to refine and smooth the surface further. This process typically commences with 320 to 400 grit sandpaper to tackle any notable imperfections or uneven areas. Following this initial pass, it’s wise to transition through finer grits—600 and then 800—to achieve a silky smooth surface. Employing wet sanding techniques can significantly reduce the amount of dust created during this process, thereby preventing particles from contaminating the surface and hindering paint adhesion.
Before diving into the sanding process, it’s paramount to ensure that the fairings are thoroughly cleaned. A mixture of soap, water, and a degreaser, like acetone or a special prep solvent, is effective in removing grease and residues accumulated from previous use or factory coatings. Once cleaned, allow the surfaces to dry completely before proceeding. After cleaning, it’s crucial to inspect the fairings for any cracks or significant damages. If found, employing a body filler to repair these imperfections prior to sanding is essential for achieving a smooth, uniform surface.
When it comes to scuffing, the technique should invariably adopt a circular motion to ensure an even application across the fairing. Care should be taken not to over-sand, as this can unnecessarily thin the plastic, leading to potential vulnerabilities in the fairings structure under the vibrations and stresses they experience while riding. Maintaining a consistent approach during the scuffing phase aids in achieving uniformity that will facilitate a flawless paint application.
As one moves through the different sandpaper grits, it’s beneficial to continuously clean the sanding surfaces to prevent dust from settling back on them. Using a tack cloth to wipe away debris and dust between grit changes ensures that each stage of sanding contributes positively to the preparation process. This meticulous approach not only improves final surface quality but also significantly reduces the likelihood of issues such as fisheyes or bubbling in the paint.
After concluding the sanding stages, it is wise to apply primer immediately. This step is integral; starting the process without delay allows the primer to form a solid base that adheres well to the prepared surface. It’s advisable to opt for a high-quality primer designed for plastic surfaces, applying it in multiple thin coats, which will foster a smoother finish and enhance durability once the paint layers are added.
However, preparation is a delicate art, and there are several common pitfalls that enthusiasts should steer clear of during the scuffing and sanding process. One significant error is skipping the scuffing step outright. A gloss surface that lacks proper preparation can lead to paint that peels away prematurely. Moreover, using sandpaper that is too coarse, particularly anything above a grit of 220, raises concerns; it can result in gouges and thin areas in the plastic, increasing the risk of cracks under the normal vibrations encountered by motorcycle fairings.
Another problematic area arises from inadequate cleaning after sanding. Neglecting to remove sanding dust can trap contaminants that ruin the quality of the paint job, leading invariably to defects in the final appearance. Therefore, incorporating masking techniques to cover non-paint areas is essential during the entire preparation stage to prevent unintentional imperfections.
Choosing the right finish to apply after all these meticulous preparation steps is the final part of the equation. For those aiming for maximum durability and minimum maintenance headaches, gloss and metallic finishes are highly recommended. They offer superior protection and a vibrant appearance that can withstand the rigors of motorcycle riding. Conversely, while matte and pearl finishes convey a sleek look, they require careful handling to avoid scratches and deterioration over time.
In summary, the practices of scuffing and sanding are indispensable steps that lay the groundwork for a successful fairing paint job. Adhering to these best practices not only allows for an aesthetically pleasing result but also enhances the longevity and vibrancy of the paint. For additional insights, resources such as the King’s Motorcycle Fairings blog provide comprehensive guides on these preparation techniques, ensuring that enthusiasts can achieve the paint job of their dreams. Explore more about prepping fairings at this link to further refine your skills in this rewarding DIY endeavor.
Chapter 2: Mastering the Art of Motorcycle Fairing Painting: Techniques and Tips

1. The Essential Seven Steps for Painting Motorcycle Fairings
Painting motorcycle fairings is not merely a task; it’s an art form that requires precision, patience, and attention to detail. A successful paint job enhances the bike’s aesthetics while also providing important protection against the elements. To achieve a professional finish, you should adhere to a comprehensive seven-step process that combines meticulous preparation with skilled application techniques. This approach not only improves the appearance of your motorcycle but also boosts the durability of the fairings in the long run.
Step 1: Proper Prepping and Sanding
Before any paint hits the fairings, the motorcycle surface must be meticulously prepped. This preparatory stage is crucial as it ensures that the paint adheres properly and creates a smooth foundation. Start by thoroughly cleaning the fairings to remove dirt, dust, oil, and any previous wax coatings. This can be accomplished using a degreaser or soap and water. Once cleaned, inspect the surface for any imperfections like scratches or dings that might interrupt the smoothness of the finish. Use sandpaper (preferably 400 to 600 grit) to sand down these blemishes as well as any existing paint layers. Sanding should be done in circular motions to avoid creating flat spots. After sanding, clean the surface again to remove any dust created during this process and prepare it for primer.
Step 2: Primer Application
A layer of high-quality primer is paramount in establishing a solid base that enhances paint adhesion and provides uniform coverage. Select a primer designed specifically for plastics, as it will help the paint bond effectively. Apply the primer using a spray gun or aerosol can, starting with light coats to avoid drips. Two to three coats of primer are typically recommended, allowing sufficient drying time between each layer. After the final coat, inspect the surface for any imperfections and sand lightly if necessary, ensuring an impeccably smooth base for the color coat.
Step 3: Multiple Coats of High-Quality Paint
The beauty of a paint job lies in the colors and finishes chosen. High-quality paint options are essential after the primer has dried, as they will ultimately affect the aesthetic and durability of the fairings. When selecting your paint, consider options tailored for automotive use, which often have superior color retention and UV protection. Using a spray gun or an aerosol can, apply multiple thin coats of paint, ensuring each layer dries completely before adding more. The number of layers necessary will depend on the color and finish; lighter colors might require more coats than darker shades. For a striking look, you may want to experiment with different finishes, such as glossy, metallic, or even a unique chameleon effect. Each finish contributes its own character and feel to the motorcycle.
Step 4: Detailed Sticker and Decal Placement
Once the base paint is dry, the fun part begins: customizing your motorcycle fairings with stickers, decals, or graphics. This is where personal flair can shine through. Measure and lay out your designs before adhering anything. Using a soft cloth, carefully position and smooth out the stickers to avoid air bubbles. If you’re applying transparent decals, pay special attention to their placement as they should seamlessly flow with the painted surfaces beneath. This step not only personalizes the motorcycle but can also enhance its visual appeal, ensuring it stands out on the road or at any bike show.
Step 5: Clear Coat Application
A protective clear coat is a vital component of the painting process. This top layer will safeguard the paint and graphics from UV damage, scratches, and environmental wear. Apply at least three layers of a high-quality clear coat, allowing adequate drying time between coats. Be cautious with matte and pearl finishes, as they often need additional care during the clear coating phase to avoid glossy patches. A clear coat will ensure longevity in both appearance and durability, thereby enhancing the overall investment you’ve made in your motorcycle’s custom look.
Step 6: Quality Assurance
Once everything has been applied and dried, it’s essential to conduct a comprehensive quality check. Inspect the fairings for color consistency, adhesion of decals, and any imperfections in the paint. Addressing any found issues at this stage is critical, as it’s much easier to correct flaws now rather than after the fairings have been attached to the motorcycle. If any areas need touch-up work, it’s best to handle them promptly to achieve a perfect finish.
Step 7: Final Curing
Finally, allow the painted fairings to cure properly. This curing process is integral to ensure that all layers bond effectively and gain maximum strength. Depending on the type of paint and clear coat used, this may take anywhere from a few days to a couple of weeks. During this period, avoid exposing the fairings to moisture and harsh environments to ensure that the finish remains intact. Once fully cured, the newly painted fairings will be ready to adorn your motorcycle, providing both style and protection.
The choice of paint finish—be it glossy, matte, metallic, or pearl—impacts not only the aesthetic quality but also the maintenance requirements post-job completion. Gloss and metallic finishes are often preferred for their durability and ease of maintenance, whereas matte and pearl finishes necessitate finesse and extra care to avoid wear and tear.
As you embark on your fairing painting project, remember that preparation is the key to success. By following this rigorous seven-step process, you can transform your motorcycle’s appearance and ensure that it withstands the trials of time. For a deeper dive into the intricacies of painting motorcycle fairings, it might be beneficial to explore resources that cover essential preparations, such as sanding and scuffing techniques, to further enrich your knowledge and skills. For such insights, refer to the detailed article on how to prep motorcycle fairings for paint here.
2. Essential Kits and Products for Achieving Professional-Grade Finishes on Motorcycle Fairings
Painting motorcycle fairings is more than just a hobby; it’s an art that requires the right tools, products, and techniques. As riders increasingly seek to custom-tailor their bikes, understanding which products yield the best results becomes crucial for achieving that polished, professional look. When selecting your painting kit, consider high-quality finishes and proven brands that support a comprehensive painting process.
High-Quality Fairing Kits
One standout option is Kings Motorcycle Fairings, well-known for its pre-painted fairing kits. These kits leverage a professional 7-step process that includes meticulous primer application, multiple layers of paint, strategic decal placement, and at least three coats of clear coat for enhanced durability. Such thoroughness ensures that the finished fairing can withstand the rigors of the open road while appearing vibrant and fresh. With over 50,000 designs available, riders can choose finishes that range from gloss—a classic high-gloss, reflective look—to metallic, which adds a touch of shiny sophistication, and even matte and pearl finishes, each requiring specific care and maintenance to retain their quality.
For pure customization, candy finishes provide a unique depth of color achieved through a multi-layer application process. Ravens and vibrant hues take on a captivating shimmer, demanding proper application to maximize their effects. Whether opting for sleek black, eye-catching red, or custom blends, the variety of colors available caters to any rider’s preference, allowing for complete artistic expression.
Painting Your Own Fairings
For those adventurous enough to paint their fairings, using a high-quality kit designed for ABS plastic or fiberglass provides an excellent foundation. The base materials need to be prepared meticulously, starting with sanding to remove any imperfections followed by the careful application of primer. The primer selected should be of high caliber—preferably from trusted brands known for durable finishes—to create an optimal base layer that encourages paint adhesion.
When selecting paints for DIY projects, gloss and metallic options shine in terms of longevity and maintenance. However, achieving an optimal finish involves patience, as multiple thin layers are preferable over single heavy applications. This method allows each layer to dry thoroughly, ensuring a smooth application that minimizes imperfections. Once the base color is applied and dried, detailing with stickers or decals adds the personal touch that makes each bike unique.
Top Brands for Quality and Affordability
Several brands stand out for their quality motorcycle fairing kits. For instance, Puig and GPR are renowned for their precise measurements, ensuring an exact fit for various models such as CBRs, GSX-Rs, and Ninjas. Alternatively, brands like MotoWaves offer budget-friendly full kits suitable for 600-1000cc bikes without compromising quality. If your focus is on lighting integration, DDM Tuning offers fairings with embedded LEDs for added visibility and aesthetic appeal.
The price range varies widely, with aftermarket ABS kits costing approximately $180–$350, fiberglass kits ranging from $200–$600, and lightweight options made of carbon fiber being priced from $600 to over $2,000. Each option provides different benefits, primarily revolving around durability and customization potential. For most riders, aftermarket ABS kits strike a balance between cost and longevity, lasting between 4 to 6 years under normal riding conditions. On the other hand, carbon fiber kits, while pricier, can endure for more than 8 years, making them ideal for racing or high-performance motorcycles.
Gripping Details on Finishing
Once the color and any graphics are in place, applying a clear coat becomes essential for preserving the finish. Ideally, at least three layers of clear coat should be applied to provide robust UV protection against sun exposure while offering a barrier to protect against scratches. Riders should especially consider this step vital for matte and pearl finishes, which can be more prone to wear from the kinds of day-to-day mishaps all riders experience. The clear coat not only enhances durability but also amplifies the underlying color, allowing the full vibrancy to shine.
For more specific guides on the entire painting process, including tips on prepping motorcycle fairings and ensuring the application of paint attains the expected quality, referring to related resources provides invaluable information. Checking [this guide on painting motorcycle fairings] offers step-by-step instructions that can help both beginners and seasoned DIYers alike achieve the desired results.
Must-Have Supplies
In addition to fairings and paint, having the right supplies is equally crucial. Essential tools include:
- Sandpaper (various grits) for prepping surfaces
o Contributing to smooth, even coats. - High-quality paint sprayers that minimize overspray and application errors
o Electric or pneumatic options can offer consistent finishes. - Masking tape and paper to protect areas that should remain paint-free
o A precise mask job can make or break the overall aesthetic finish. - Tack cloths to eliminate leftover dust and debris before painting, enhancing adhesion and ensuring a flawless finish.
Navigating the painting process with a thoughtful selection of products not only leads to successful outcomes but also enhances one’s riding experience. By marrying skill with the right materials and an understanding of the painting process, anyone can transform their motorcycle’s appearance dramatically, securing a customized look that stands out on every open road.
Chapter 3: Mastering the Art of Motorcycle Fairing Customization: Painting Techniques for Long-Lasting Aesthetics
1. Unlocking the True Potential of Motorcycle Fairings: Durability and Aesthetic Enhancements through Expert Painting
Painting motorcycle fairings is not merely a practical necessity; it’s an art form that allows motorcycle enthusiasts to express their individuality while simultaneously enhancing the durability of their vehicles. When undertaken properly, the painting process yields not only striking aesthetics but also robust protection against the wear and tear of the road. In this exploration of the benefits of painting motorcycle fairings, we dive into the intricacies of durability and aesthetic customization that set this approach apart from other methods such as vinyl wrapping.
The journey begins with understanding the durability that a multi-layered paint application creates. Professional-grade painting involves a meticulous process that includes preparation, priming, base coating, detailing, and clear coating. Each layer plays a critical role in building a resilient finish capable of withstanding the elements. The initial preparation phase is vital; the fairings are cleaned thoroughly, which allows for proper adhesion of paint. Sanding existing paint or imperfections smooths out the surface, providing a flawless base for subsequent layers. Masking off non-paint areas protects these sections from accidental over-spray, ensuring a clean finish.
Once primed, the real transformation begins with the application of the chosen base color. Various options like gloss, metallic, or even vibrant candy colors allow for a high degree of customization. Multiple layers are typically required to achieve an even, rich finish, with drying times in between to prevent imperfections. The use of quality paints significantly enhances the UV resistance of the fairings, which is crucial in preserving color vibrancy over years of exposure to sunlight.
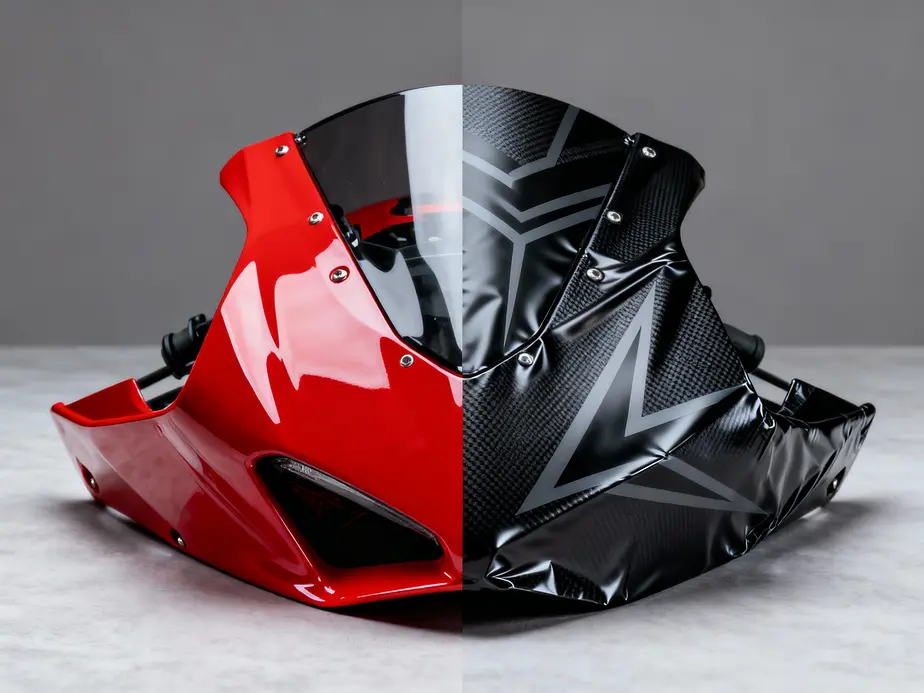
But durability isn’t the only benefit that painting offers; it also unlocks aesthetic potential that is unmatched by vinyl wrapping. Paint adheres directly to the material of the fairings, whether they are ABS plastic or carbon fiber, offering a seamless finish. The depth and richness of colors achieved with paint can create a sophisticated appearance that vinyl simply cannot replicate. Furthermore, the ability to incorporate intricate designs, such as striping or custom graphics, allows for a level of personal expression that remains consistent and visually striking.
When considering the various finishes available, gloss and metallic options stand out due to their vibrant appearances and excellent durability. A gloss finish not only looks stunning but is also easier to clean, while metallic surfaces can catch light at different angles, creating a dynamic visual effect as the bike moves. On the flip side, matte and pearl options require more careful maintenance; they are more susceptible to scratches, which, if not addressed, can mar their finish over time. Thus, choosing the right finish is pivotal depending on how often the motorcycle will be used and the environment in which it will primarily be ridden.
One of the most significant advantages of painting over vinyl wraps is the longevity of the paint job. A well-executed paint application can last between four to ten years, with proper care and maintenance. This often includes using mild soap for cleaning, avoiding abrasive materials, and applying protective wax or sealants as a barrier against the elements. In contrast, vinyl wraps, while less expensive, generally last only a few years before they start to show signs of wear, such as peeling or fading. Their surface-level nature makes them more vulnerable to the perils that come with being on the road, leading to shorter lifespans and, ultimately, an inferior appearance.
As we compare painting against vinyl wraps in terms of durability, aesthetics, and maintenance, we see clear advantages for a quality paint job. Painted fairings offer high resistance to scratches and sun damage, maintaining their sophisticated look far longer than wraps. While both methods allow for customization, painted fairings present an integrated look that doesn’t interfere with the motorcycle’s original aerodynamic design. This adherence to the surface ensures the fairing maintains its shape and functionality, thereby contributing positively to performance aspects such as wind resistance.
With motorcycle riding being a uniquely exhilarating experience, the innovation behind painting techniques enables riders not only to take pride in their machines but also to feel confident in their durability. The art of painting fairings parallels the passion found within the motorcycle community—each job tells a story, reflects the owner’s style, and stands as a testament to how creativity can enhance functionality.
For those contemplating the financial aspect, the upfront cost of quality paint jobs might seem daunting, typically ranging from $2,500 to $8,000, depending on the complexity of the work. However, when viewed through the lens of longevity and the robustness of the finish, painting emerges as a long-term investment that pays dividends in both use and resale value. Comparatively, while vinyl wraps can be an attractive short-term option, they often require replacement and do not offer the same return on investment in terms of maintaining both visual and operational integrity over time.
In conclusion, choosing to paint motorcycle fairings transcends mere cosmetic changes, contributing to an overall enhanced riding experience. With superior durability and aesthetic appeal, painted fairings not only protect but elevate the motorcycle’s identity. The balance between the technical aspects of the painting process and the artistic output makes it a valuable consideration for anyone looking to customize their ride effectively. As you embark on your customizing journey, remember that when it comes to enhancing your motorcycle’s fairings, paint opens up a world of possibilities that reflect your personal style while ensuring lasting protection and beauty. For detailed techniques and guidance on the painting process, refer to resources that provide steps and tips on how to successfully paint motorcycle fairings.
2. Vinyl Wraps Unleashed: A Versatile Approach to Motorcycle Fairing Customization
When it comes to customizing motorcycle fairings, vinyl wraps offer a dynamic alternative to traditional paint. While both methods provide a means to express individuality and enhance style, vinyl wraps present unique advantages that cater to riders looking for flexibility, cost-effectiveness, and simplicity.
Understanding the evolution of vinyl wraps helps clarify their rising popularity in the motorcycle community. These wraps utilize high-quality materials, like premium cast vinyl from reputable brands, engineered for outdoor endurance and vibrant aesthetics. Unlike paint, which often requires meticulous preparation and several stages to achieve an optimal finish, vinyl wraps can adhere to the fairing surfaces with significantly less prep work. This convenience alone underscores why many motorcycle enthusiasts, whether casual riders or serious racers, are gravitating towards this customization method.
Key Advantages of Vinyl Wraps
Vinyl wraps come with a host of benefits that make them an attractive choice for customizing motorcycle fairings. One immediate advantage is the variety of finishes available. Riders can select from gloss, matte, satin, chrome, and even specialty textures, each offering unique visual appeal. The ability to apply high-resolution graphics and vibrant colors enhances personalization dramatically. Furthermore, vinyl wraps act as a protective layer, safeguarding the underlying paintwork from scratches, UV rays, and environmental elements without permanently altering the bike’s original appearance.
Unlike traditional painting, which is usually a permanent transformation, vinyl wraps offer a reversible option. Riders can easily change their fairing’s look without the hassle of sanding, priming, or extensive curing time required for paint jobs. This ability appeals particularly to enthusiasts who wish to experiment with various aesthetics over time, making wraps a wise investment for those who enjoy switching up their style regularly. Furthermore, if the desire arises to revert to the factory look or alter the design significantly, wraps can be removed cleanly and efficiently, leaving no residue or damage to the original paint.
Cost Considerations
From a fiscal perspective, vinyl wraps generally present a more budget-friendly option than painting motorcycle fairings. The labor-intensive nature of painting—a process that may involve multiple coats, extensive surface preparation, and specialized clear coatings—often leads to higher costs, frequently ranging in thousands of dollars based on the complexity of the design and the intricacies of the job. On the other hand, vinyl wrap installations can be done relatively quickly and often come at a lesser expense, commonly ranging from $500 to $3000, depending on the extent of coverage and design complexity.
The faster installation translates into reduced labor costs and shorter downtime, allowing riders a quicker turnaround to enjoy their custom bike without prolonged waiting periods. For example, whether covering an entire bike or focusing on select fairings, the ability to manage costs more effectively can mean the difference between a simple refresh and a complete transformation.
Wrap Application and Durability
In terms of application, vinyl wraps can be approached as a DIY project or entrusted to a professional, which adds to their appeal. With proper instruction, riders can tackle simple applications, like accents or partial coverage, without quite as many risks involved as with paint. However, intricate designs that require seamless application across complex curves typically benefit from professional input to ensure an immaculate finish.
Beyond aesthetics, durability emerges as a significant factor when considering wraps versus paint. Premium vinyl wraps are designed to resist wear and tear, with a typical lifespan of five to seven years when applied correctly. This durability extends to resisting heat, UV rays, and scratches, keeping the motorcycle looking sharp over time. In contrast, while paint—especially jobs done with clear coat enhancements—can be exceptionally durable, it often requires more frequent maintenance, especially if it’s a matte or specialty finish, which is more susceptible to wear.
Aesthetic Versatility
The customizability of vinyl wraps goes beyond just color changes; they are a canvas for creativity. Riders can configure wraps to include images, patterns, and text, creating a unique motorcycle that reflects personal tastes. Many opt for vibrant graphics, racing stripes, or company logos, which can promote branding for commercial motorcycle riders. With endless possibilities, creativity knows no bounds. Moreover, as trends shift, wraps can be updated effortlessly without the need for significant investment or long-term commitment.
Although some might argue that painted finishes are superior in terms of long-term durability and value, the reality is that wraps provide a competitive edge through flexibility for dynamic riders. Given their nature, vinyl wraps are also a preferred choice for teams wanting to display sponsor logos temporarily during race seasons.
Navigating The Choice
Choosing between vinyl wraps and paint typically comes down to personal preference and practical considerations regarding the motorcycle’s intended use. For daily riders needing a permanent and protective aesthetic, paint might still be the frontrunner. However, for those looking to make bold statements or who frequently change their minds about their bike’s look, wraps can deliver significant advantages. As vinyl technology continues to advance, the market only expands, with new innovations constantly changing how customization is perceived.
In summary, vinyl wraps provide a compelling option for motorcycle fairing customization, standing firmly as an approachable and attractive alternative to traditional painting techniques. They embody the spirit of personalization, protection, and innovation, making them an appealing choice for many contemporary motorcyclists. As the landscape of motorcycle customization continues to evolve, wraps will undoubtedly play a vital role in shaping the aesthetics of rides across the globe. For those interested in learning more about the painting process and techniques, additional insights can be found here.
Chapter 4: Effective Care and Maintenance Strategies for Enduring Motorcycle Fairings
1. Essential Techniques for Cleaning and Protecting Painted Motorcycle Fairings
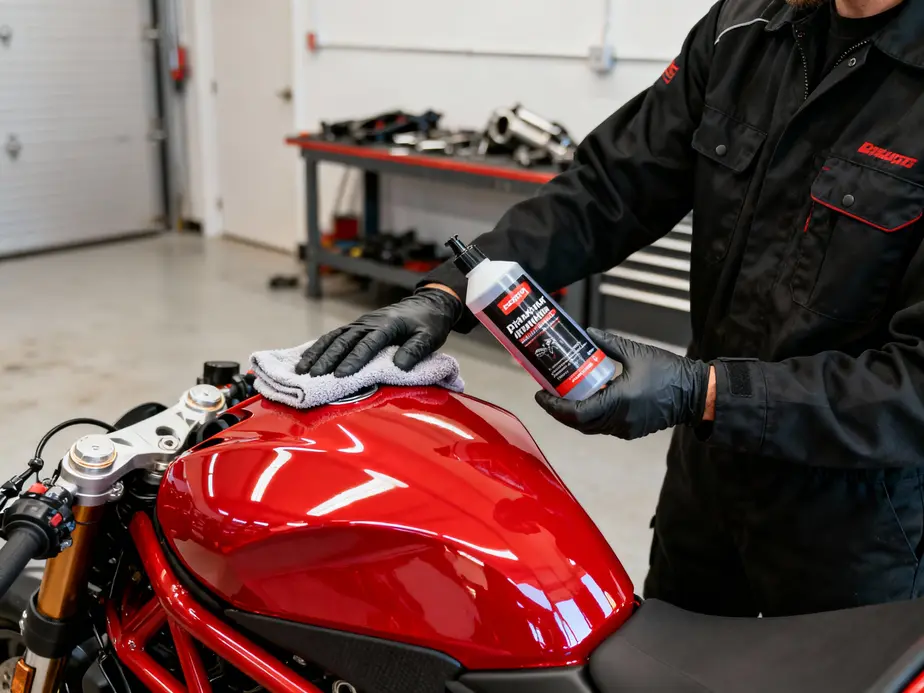
Maintaining the pristine condition of painted motorcycle fairings is an essential part of motorcycle ownership that extends beyond mere aesthetics. A well-cared-for fairing not only enhances the bike’s appearance but also contributes to its longevity and performance. This subchapter outlines a meticulous cleaning and protective care routine that will ensure your fairings remain in top shape.
To begin with effective fairing maintenance, cleaning plays a crucial role. This process involves removing dirt, grime, and other contaminants that can degrade the paint finish over time. It’s advisable to start with a thorough initial cleaning using a gentle degreaser or a soap solution formulated specifically for motorcycle surfaces. For heavy contamination accumulated from long rides or adverse weather, a more vigorous method is required to restore the fairing’s gleam.
- Start the cleaning process by using a jet wash to remove loose dirt and debris. This introduces a layer of protection by not rubbing dirt into the paint.
- For particularly stubborn dirt, apply a traffic film remover (TFR) on the affected areas. Allow it to sit briefly before agitating with a soft brush, ensuring not to use excessive force that might harm the surface.
- Rinse thoroughly with the jet wash to ensure all TFR residues are eliminated, preventing potential damage to the paint.
- Follow up with a degreaser on any remaining stubborn spots. After agitation with the brush, rinse again using the jet wash to clear away any residual degreaser.
- A layer of snow foam can now be applied over the entire fairing. Using a sponge, gently scrub the foam into the surface to lift dirt before rinsing once more, ensuring a deep, thorough clean.
- The final step in this sequence involves drying the fairings completely, which is best achieved through a combination of air blowing and towel drying using microfiber cloths. This step is crucial as it helps prevent water spots and potential mineral build-up that could mar the painted surface.
Upon successfully cleaning the fairings, the next step is protective care, which strengthens the finish and provides an added layer against the elements.
-
Polishing the Paintwork: Employing a high-quality wax polish is fundamental in this process. Not only does it provide a protective barrier against scratches and contaminants, but it also significantly enhances the shine of the painted surface. The application of polish requires a soft applicator pad, working in small sections and using circular motions to ensure even coverage. Allow the polish to haze over before buffing it off with a clean microfiber cloth, revealing a glossy layer that reflects light beautifully.
-
Maintaining Plastic Trim: If your motorcycle fairings include black plastic trim, specialized dressings are essential for keeping the trim looking fresh and preventing UV degradation. Apply the dressing using a dedicated applicator or soft cloth, ensuring even coverage to preserve the trim appearance while preventing fading and cracking.
Important Considerations
While executing these cleaning and maintenance processes, it’s vital to keep certain precautions in mind. Motorcycle fairings are often made from thinner plastics, which makes them more susceptible to cracking or breaking under pressure. When handling, ensure to distribute pressure evenly across larger areas instead of applying force in concentrated spots. This practice not only helps in preventing unwanted damage but also facilitates more effective cleaning.
Moreover, maintain vigilance regarding the tools and materials used during the cleaning process. Avoid abrasive brushes or harsh chemicals that may strip the intricate paint layers or cause scratches. By using the right tools, you not only preserve the beauty of the fairings but also save on costly repainting or repairs in the future.
An additional tip is to establish a regular cleaning schedule that takes into consideration both the time of year and your riding frequency. For instance, more frequent cleanings may be justified during peak riding months or after particularly long rides, while in the off-season, a light maintenance routine may suffice. This ensures that you stay ahead of build-up that could lead to more extensive cleaning efforts later on.
In conclusion, effective maintenance of painted motorcycle fairings requires commitment to regular cleaning and protective care. Following the outlined steps will not only keep your motorcycle looking fantastic but will also significantly extend the life of its fairings. With proper care, your motorcycle can maintain its vibrant appearance and performance, ensuring that every ride remains as thrilling as the first. For more insights on ways to further enhance your fairing’s longevity, you can visit here.
2. Routine Checks and Proactive Preservation for Resilient Motorcycle Fairings
Maintaining the aesthetic and functional integrity of painted motorcycle fairings is essential for both ride enjoyment and safety. Established practices in routine check-ups and damage prevention can notably extend the life of your fairings, ensuring that they look great and perform well over time.
Regular inspection is key to identifying potential issues that could compromise the appearance or performance of your motorcycle’s bodywork. As with any maintenance regime, setting specific times for fairing checks—ideally after rides or washes—ensures that issues are caught early. Pay particular attention to edges, seals, and any delicate areas where paint may be thinner or more prone to damage. For instance, inspect the edges where adhesive tape may begin to lift or where the paint can bubble; these are common failure points on painted surfaces, often caused by exposure to environmental elements or wear.
Take a close look at the integrity of the seals around your fairings. Lifting or peeling here can lead to water ingress, which may contribute to further issues like rust or mold developing underneath the paint. Cracks are another concern, especially on fiberglass fairings where stress from vibrations or impacts may create small fissures that can widen over time. During your inspection, look for dirt buildup or old paint that could indicate a need for touch-up work. Where necessary, using sandpaper to smooth areas before repair can help prepare the surface for paint adhesion.
After performing any maintenance or repair work, it’s vital to ensure that the fairings are correctly aligned and securely fastened. Misalignments can not only disturb the aerodynamics of your bike but can also lead to paint wear as components rub against each other. Taking a moment to check the fitment of fairings after adjustments is a simple yet necessary step to affirm that everything remains cohesive and stable.
Proactive Preservation Strategies
To complement regular inspections, adopting proactive preservation techniques is equally important. This includes establishing a thorough cleaning routine that not only removes dirt and grime but also prepares the painted surfaces for any future touch-ups or adjustments. Use soft cleaning tools and non-abrasive cleaning agents to avoid scratching the paint. Avoid strong chemicals that could strip the finish or damage the paint.
Additionally, when cleaning, it’s essential to address oils and waxes that may have built up on the surface. If you notice that your fairings have a glossy finish, lightly scuffing the areas that will be painted or where decals will be applied enhances adhesion, but these surfaces must remain clean and dry. Post-inspection, always ensure to smooth over any potential rough spots or areas that have been repaired to maintain a sleek appearance.
Securing the fairings is another foundational aspect of damage prevention. Using the correct fasteners and ensuring all mounting points are tightened can help prevent unnecessary vibrations during rides, which can lead to fretting and paint degradation. It’s prudent not to overlook the possibility of thermal expansion when choosing your fasteners, as materials may behave differently under temperature fluctuations.
Preventive measures should also focus on protecting your fairings from environmental stressors. Choose flexible materials when applying clear coats to provide a cushion against UV exposure and moisture. The harsh sun can fade colors, while humidity and temperature swings can introduce an array of issues, from warping to blistering of the paint. Moreover, road grime—including sand and debris—can create fine scratches that gradually dull the finish, making a protective coating essential.
For painted surfaces, particularly those with modern matte or pearl finishes, careful handling is vital. These surfaces can be more susceptible to chips and scratches, signaling the need for an even more vigilant maintenance approach. A proactive strategy includes shielding your bike from excessive outdoor exposure, and when parked, utilizing motorcycle covers can be a simple yet effective shield against dust, rain, and sun.
Final Best Practices
Implementing the established steps with an eye for detail can make an essential difference in how painted motorcycle fairings hold up over time. The need for timely interventions, particularly for custom decals or specialized finishes, cannot be underestimated. Using adhesion promoters when applying decals over glossy finishes can significantly reduce risks like edge lifting, particularly if work is conducted in moderate temperatures where expansion or contraction of materials is minimized.
When you’ve undertaken any maintenance, always perform a final check for secure fit and smooth finishes. Attention to these finishing touches ensures that all your hard work pays off, resulting in a polished, well-maintained motorcycle that not only attracts attention but provides reliable performance.
For deeper insights into the process of preserving painted fairings and maintaining their durability, interested readers can explore additional resources like detailed painting techniques. Ultimately, knowing how to effectively inspect and maintain motorcycle fairings can lead to a long-term, visually appealing ride that stands the test of time.
Final thoughts
Incorporating a well-structured process for painting motorcycle fairings not only enhances the visual appeal of the bikes but also elevates your brand image in the marketplace. By investing the time in proper preparation, choosing the right techniques and products, weighing the benefits of painting against vinyl wrapping, and adopting maintenance best practices, your business can deliver superior results that resonate with customers. Riders are drawn to customized motorcycles, and ensuring that you provide exceptional fairing options will set you apart in the competitive space of motorcycle accessories.
Ready to elevate your ride? Summit Fairings delivers premium, custom-fit fairings that blend style and durability. Whether you’re chasing speed or turning heads, we’ve got your bike covered. Don’t wait—transform your machine today. Click, customize, and ride with confidence. Your perfect fairing is just a few clicks away. Act now!
About us
We are one of the leading motorcycle fairing export sites, with over 3,000 styles across almost all motorcycle models. Buy from summitfairings.com, and pay 10-40% less than the prices on other sites. If you have any questions, we promise we will have your answer within six hours.