Introduction
Understanding how to properly remove motorcycle fairings is crucial for service centers, customization shops, and parts resellers looking to enhance efficiency and customer satisfaction. Motorcycle fairings not only protect vital components but also add to a bike’s aesthetic appeal, making their careful removal essential to avoid costly damage. This guide breaks down the process into three comprehensive chapters: preparing with the right tools and safety measures, executing step-by-step disassembly with attention to handling, and managing model-specific nuances including electrical connectors. Together, these chapters provide business owners with the insights needed to streamline operations, reduce risk, and uphold quality standards during fairing removal.
Tables of Contents
Chapter 1: How to Remove Motorcycle Fairings: Essential Tools and Preparation Steps
- Must-Have Tools and Safety Measures for Removing Motorcycle Fairings
- Preparing Your Motorcycle and Workspace for Safe Fairing Removal
- Mastering the Fairing Removal Process: Tools, Safety, and Step-by-Step Guidance
- Navigating Model-Specific Fairing Removal: Tailored Tools and Techniques for Your Motorcycle
- Mastering Safety and Preparation for Motorcycle Fairing Removal
Chapter 2: How to Remove Motorcycle Fairings: Step-by-Step Disassembly and Handling Techniques
- Mastering Preparation and Safety for Smooth Motorcycle Fairing Removal
- Mastering Documentation and Organization for Flawless Motorcycle Fairing Removal
- Mastering the Art of Panel Removal: A Careful, Step-by-Step Approach to Motorcycle Fairings
- Mastering Careful Handling and Storage to Preserve Motorcycle Fairings During Removal
- Mastering the Reassembly Process: Ensuring Precision and Care When Reinstalling Motorcycle Fairings
Chapter 3: How to Remove Motorcycle Fairings: Model-Specific Considerations and Electrical Connector Management
- Navigating Unique Fairing Designs and Electrical Systems Across Motorcycle Models
- Mastering the Right Tools and Techniques for Safe Fairing Removal and Electrical Handling
- Ensuring Safety and Effective Battery Disconnection Before Managing Electrical Connectors
- Mastering Electrical Connector Care for Safe and Efficient Motorcycle Fairing Removal
- Organizing Parts and Wiring for Smooth Motorcycle Fairing Reassembly
Chapter 1: How to Remove Motorcycle Fairings: Essential Tools and Preparation Steps
1. Must-Have Tools and Safety Measures for Removing Motorcycle Fairings
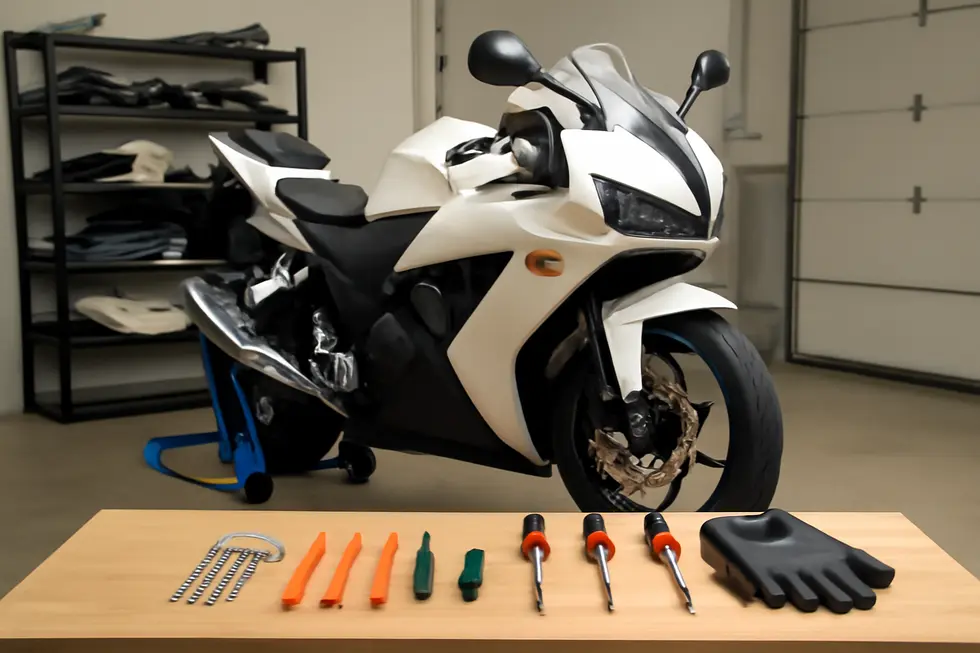
Removing motorcycle fairings requires a specific set of tools and careful preparation to ensure the process is smooth and damage-free. At the foundation, a Phillips screwdriver is essential for tackling the majority of screws holding the panels in place, while a flat-head screwdriver proves invaluable for gently prying clips without causing cracks or scratches. Allen wrenches (hex keys) are frequently needed since many motorcycles secure their fairings with hex bolts. Additionally, a basic wrench or socket set may be necessary for bolts and nuts depending on the model.
Before you start, securing a stable workspace is vital. Park the motorcycle on a flat, level surface to prevent tipping or movement during disassembly. Disconnecting the battery’s negative terminal is a crucial safety step that prevents electrical shorts, especially when disconnecting wiring harnesses hidden behind panels. Wearing protective gloves and eyewear guards you from accidental cuts or debris while working closely with fasteners and plastic components.
Documenting the removal by taking photos of each step offers a visual reference that greatly simplifies reassembly. Handle clips and fasteners gently—never force them, since fairings tend to be delicate and pricey to replace. Optional but beneficial is using a motorcycle stand or lift to enhance stability and accessibility.
These tools and preparatory actions comprise a reliable foundation applicable to most motorcycles, though individual models may have unique fasteners or wiring configurations. For tailored insights and step-by-step guidance, consulting your specific bike’s service manual along with referenced tutorials can be a great supplement. For additional focus on quality fairings and maintenance tips, consider exploring resources like the Explore the Best Motorcycle Fairings at Summit Fairings.
2. Preparing Your Motorcycle and Workspace for Safe Fairing Removal
Proper preparation is crucial when removing motorcycle fairings to avoid damage and ensure safety throughout the process. Begin by parking the motorcycle on a stable, level surface and securely supporting it with a stand, preventing any unexpected movement. Next, disconnect the battery—at minimum, remove the negative terminal—to safeguard the bike’s electrical system against shorts during disassembly. Equipping yourself with the right tools is equally important: Phillips and flat-head screwdrivers, Allen wrenches (hex keys), and possibly Torx drivers or socket wrenches depending on your model, will cover most fasteners. A set of plastic pry tools or gently used flat tools helps prevent scratches or broken clips while prying panels apart.
Before loosening any fasteners, document the current state by taking clear photos at each step; this visual record simplifies reassembly and identifies any clips or wiring that require care. Fairing clips can be fragile, so always use gentle prying motions rather than forceful pulls. If some panels obstruct access to others, removing components such as seats, saddlebags, or gas tanks may be necessary to reach hidden screws or bolts. Carefully disconnect any electrical connectors attached to lights or indicators by handling the wiring harnesses at the connectors—not by pulling wires—to avoid damaging circuitry.
Organizing screws and bolts systematically in labeled containers prevents loss and confusion later. These thorough preparation steps minimize risk and smooth the path for repairs, modifications, or maintenance beneath the fairings. For motorcycles like the Yamaha YZF-R6 or Indian Challenger, following this disciplined approach helps maintain pristine panels and protects underlying components. For more detailed guidance and visual demonstrations, refer to this video tutorial that walks through these foundational steps.
To explore further insights on motorcycle fairings and maintenance tips, visit our blog on Summit Fairings.
3. Mastering the Fairing Removal Process: Tools, Safety, and Step-by-Step Guidance
Successfully removing motorcycle fairings requires a blend of careful preparation, the right tools, and a patient, methodical approach. Begin by parking your bike securely on a level surface and stabilizing it on a stand to prevent movement. Disconnecting the battery or at least the negative terminal is crucial to avoid electrical shorts, especially since many fairings hide wiring for lights and indicators. Protective gear such as gloves and eye protection reduces risk during disassembly. Document the original layout with photos to streamline reassembly later.
Essential tools range from Phillips and flat-head screwdrivers to Allen wrenches, tailored to your bike’s hardware. Having plastic pry tools handy protects the delicate panels when clips need gentle coaxing free, preventing scratches or cracks. The removal process generally flows from upper fairings—like windshields—down through side and underbelly panels. At each step, carefully remove all screws, bolts, and fasteners, ensuring nothing remains that could hinder the next panel’s removal.
When encountering electrical connectors, gently unplug them without tugging on wires to preserve harness integrity. Organize your hardware as you go, using labeled containers or photographed records to avoid confusion. After removal, store fairings in a safe space where surfaces won’t be scuffed or bent. Throughout this process, patience is essential—rushing risks broken clips or damage that can be costly to fix.
Following these guidelines ensures you protect both your motorcycle and yourself, paving the way for smooth inspections, repairs, or upgrades. For visual guidance on this process, explore detailed tutorials that align with popular sport and touring models to gain deeper insight into each step.
For more information on fairing options and care, visit Explore the Best Motorcycle Fairings at Summit Fairings.
A practical example of this process in action can be found in this detailed walk-through: https://www.youtube.com/watch?v=0tyCFuoKJJE
4. Navigating Model-Specific Fairing Removal: Tailored Tools and Techniques for Your Motorcycle
Removing motorcycle fairings safely and efficiently requires a tailored approach that respects each model’s unique design and assembly. Different motorcycles feature varied fairing layouts, fastening methods, and wiring connections, making a one-size-fits-all method impractical. Understanding these distinctions ensures you avoid damage and streamline the disassembly process.
For example, the removal of the left-side fairings on a Yamaha YZF-R6 (2008–2016) illustrates the need for precision. Here, panels are arranged in an order—upper, mid, then lower—that must be followed while cautiously disconnecting integrated electrical connectors tied to lighting and indicators. Using the correct tools such as Allen wrenches and screwdrivers prevents stripping screws or snapping delicate clips. Similarly, on models like the Venom X18/X18R, unique clips and bolts secure the upseat fairing, demanding a careful, model-specific approach to prying and bolt removal.
Before beginning, ensure you have the essential tools: Phillips and flat-head screwdrivers, various sizes of Allen wrenches, Torx drivers if applicable, and plastic pry tools to protect paint and plastic edges. Preparation steps include parking the motorcycle on a stable, level surface and disconnecting the battery’s negative terminal to prevent electrical shorts when unplugging wiring harnesses. Documenting each step with photos is highly recommended for smooth reassembly.
Removing fairings generally takes between 20 and 60 minutes, depending on model complexity and your experience. Always consult your motorcycle’s service manual or model-specific tutorials to understand the exact panel sequence, fastener types, and wiring locations before beginning. This practice minimizes errors and safeguards your bike’s appearance and function.
For a deeper dive into tailored removal techniques for various models, explore comprehensive guides and resources at this helpful motorcycle fairings blog.
5. Mastering Safety and Preparation for Motorcycle Fairing Removal
Ensuring safety and proper preparation is fundamental when removing motorcycle fairings to protect both yourself and your bike. Begin by parking your motorcycle on a level, stable surface and securing it with a maintenance or center stand to prevent any movement. This stable setup is crucial to avoid accidents while working. Before handling any fairing components, disconnect the battery’s negative terminal to eliminate risks of electrical shorts or unintentional starts. Equipping yourself with personal protective equipment such as safety glasses and gloves helps safeguard against injury and prevents scratching delicate paint or plastics.
The removal process demands the right tools—typically a range of Phillips and flat-head screwdrivers, Allen wrenches in various sizes, and sometimes Torx drivers—to address different fasteners. Complementing these with plastic pry tools ensures clips and connectors can be disengaged gently without damage. Depending on your motorcycle’s complexity, additional tools may be necessary to access hidden fasteners, often requiring removal of obstructing parts like seats or fuel tanks. Always approach panel removal methodically, avoiding force, and carefully disconnect any electrical connectors attached to the fairings to prevent wire damage.
Working deliberately and documenting each step with photos can greatly ease reassembly and reduce errors. Organize all removed hardware and panels securely to avoid loss or scratches. Adopting these safety and preparation practices not only protects your motorcycle but also streamlines the removal process. For those interested in detailed guidance aligned with these best practices, the Yamaha YZF-R6 fairing removal tutorial offers a clear, practical example.
For additional tips and resources on fairing care and replacement, explore comprehensive motorcycle fairings guides and selections.
Chapter 2: How to Remove Motorcycle Fairings: Step-by-Step Disassembly and Handling Techniques
1. Mastering Preparation and Safety for Smooth Motorcycle Fairing Removal
Successful motorcycle fairing removal hinges on thorough preparation and strict safety measures. Start by parking your bike on a stable, level surface to minimize the risk of tipping or accidental damage while working. One of the most critical safety steps is disconnecting the battery, ideally by removing the negative terminal, to prevent any electrical shorts when unplugging wiring harnesses integrated into the fairings. Wearing protective gloves and eye protection not only safeguards you but also helps prevent scratches or stains on the bike’s surface during handling.
Gathering the right tools before beginning saves time and reduces frustration. Essentials include Phillips and flat-head screwdrivers and a set of Allen wrenches, alongside any model-specific implements. During disassembly, patience is key—avoid forcing clips or fasteners, and instead use gentle prying techniques to minimize the risk of snapping delicate plastic tabs or cracking panels. Electrical connectors attached to indicators or lights often require careful unplugging; handling these gently preserves wiring integrity.
Documenting your progress with photos helps ensure an easier and more accurate reassembly process. Store removed parts and fasteners in a clean, organized manner to prevent loss or damage. Taking the time to clean any small scratches or damaged fairing areas before repair also contributes to a professional finish and longer-lasting results.
By observing these preparation and safety protocols, as exemplified in thorough video tutorials for popular models, you set the foundation for a smooth, damage-free removal process. For tailored advice specific to your motorcycle, consult the manufacturer’s service manual in conjunction with these general principles to protect both rider and bike.
For a visual guide, see this recommended tutorial: https://www.youtube.com/watch?v=0tyCFuoKJJE
Explore more tips and expert advice on motorcycle fairings at Summit Fairings blog.
2. Mastering Documentation and Organization for Flawless Motorcycle Fairing Removal
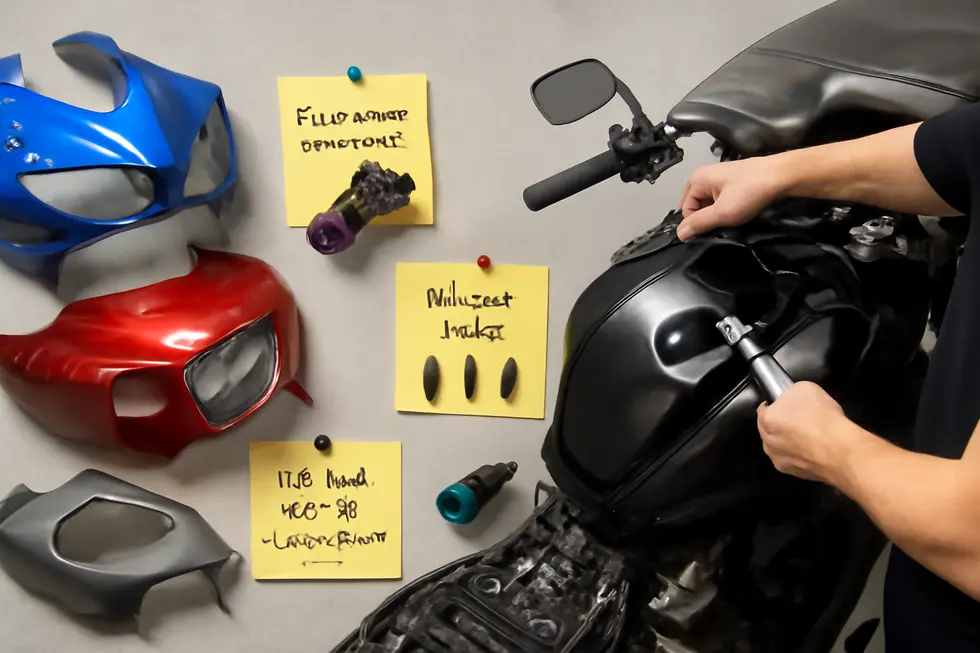
Effective removal of motorcycle fairings depends heavily on thorough documentation, meticulous organization, and careful planning. Before loosening any fasteners, capturing detailed photographs of the fairings and their attachment points is invaluable. These images act as visual reference guides during reassembly, ensuring that each screw, clip, and electrical connector returns exactly where it belongs. Alongside photos, jotting down notes about the sequence of removal or particular fastening locations can prevent confusion, especially when dealing with complex multi-panel assemblies.
As fairings are detached, systematically organizing removed parts is essential. Group screws, bolts, and clips by type and size into separate containers or magnetic trays to minimize the risk of losing critical hardware. Labeling these containers or placing parts on clean, flat surfaces helps maintain clarity throughout the process. Such organization not only speeds up reassembly but also safeguards delicate components from scratches or damage.
Planning precedes the physical work and involves ensuring all necessary tools are ready and that the workspace is well-lit and free of clutter. Anticipating the order of panel removal—often starting with upper fairings and progressing downward—avoids forcing stubborn parts and reduces stress on plastic edges. It also includes identifying electrical harnesses and gently disconnecting them before complete panel removal to protect the wiring.
By combining careful documentation with strategic organization and a thoughtful plan, the risk of damage to fairings and underlying components dramatically decreases. This approach streamlines the removal and reinstallation processes, preserving both functionality and appearance. For additional insight into bracket alignment and fastening techniques that prevent stress cracks, refer to this detailed video walkthrough: https://www.youtube.com/watch?v=3YTuEWH770U. For more on motorcycle fairing options and maintenance, explore this resource on affordable motorcycle fairings.
3. Mastering the Art of Panel Removal: A Careful, Step-by-Step Approach to Motorcycle Fairings
Removing motorcycle fairings requires a steady, systematic approach to protect both the panels and the bike’s underlying components. Start by stabilizing the motorcycle on a level stand and ensuring it has cooled. Identify all fasteners—screws, bolts, and clips—that secure the panels, noting that some may be hidden beneath rubber covers or inside tight recesses. Carefully unscrew or unclip these fasteners in a logical sequence, typically beginning with the outermost upper panels like windshields and then progressing down through side and lower panels. This order minimizes unnecessary strain or damage.
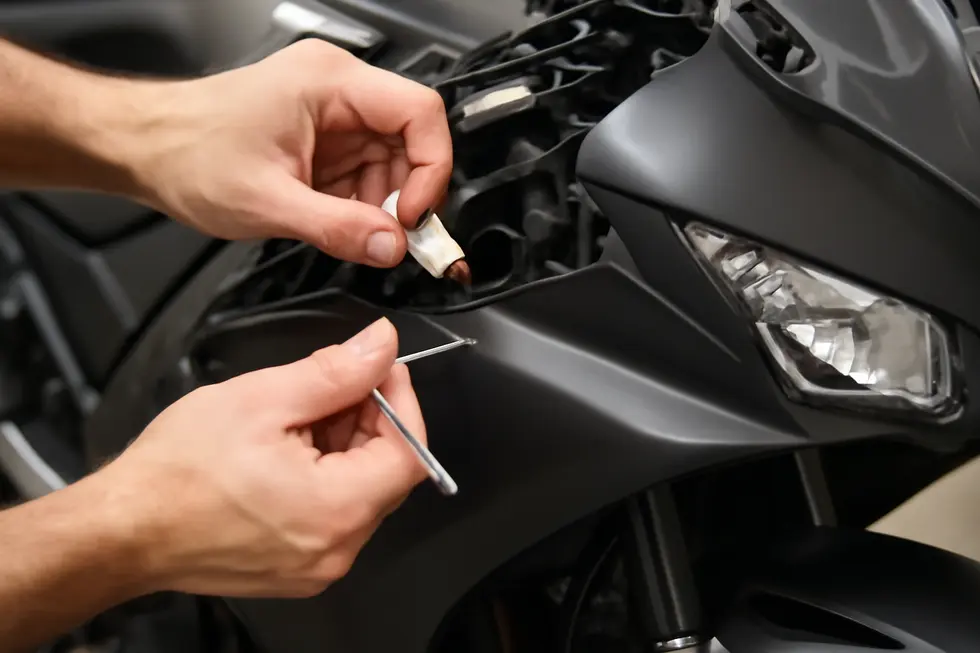
As panels loosen, gentle prying may be necessary, but it is crucial to avoid forceful techniques that could crack plastic or damage paint. Many panels have integrated electrical components such as lights or indicators; these must be disconnected delicately before fully detaching any piece to preserve wiring integrity. Labeling parts or taking photos during removal helps ensure smooth reassembly later.
Keeping fasteners organized and storing removed panels safely will prevent loss and scratches. While this method applies broadly, some motorcycles may have unique fastener placements or require removing additional parts—like handlebars or tanks—for access. For tailored guidance, consulting a service manual or trusted repair guide is recommended.
For an in-depth exploration of options tailored to various motorcycles, consider reviewing detailed resources on discovering affordable motorcycle fairings and their maintenance.
4. Mastering Careful Handling and Storage to Preserve Motorcycle Fairings During Removal
Successfully removing motorcycle fairings hinges not only on correct disassembly but also on meticulous handling and storage. From the moment a panel is unfastened, it demands gentle treatment to avoid cracks, scratches, or warped surfaces that can compromise its fit and finish later. Proper tools such as small pry bars or plastic trim removers minimize stress on delicate clips and plastic edges. Approaching removal slowly reduces the risk of unintentional damage.
Organizing all screws, bolts, and fasteners is equally important. Labeling these components by their exact locations streamlines reassembly, eliminating guesswork and preventing mismatched hardware. After removal, a thorough cleaning of fairings helps remove accumulated dirt, grease, or road grime, which is especially vital if the panels will be repaired or repainted.
Storage conditions play a crucial role in maintaining fairing integrity. Placing panels in a clean, dry environment protected from direct sunlight guards against fading and warping. Using soft cloths or foam padding between stacked pieces prevents scratches and pressure marks. Always avoid placing heavy objects atop removed parts, and handle panels by reinforced areas or edges to reduce stress on thin sections.
Taking photos during disassembly supports careful handling by documenting clip positions and wiring connections. Such records assist in recognizing stressed points and fragile zones. Embracing these careful handling and storage habits ensures fairings remain pristine and fit perfectly when reinstalled, whether after maintenance or upgrades.
For hands-on examples demonstrating these techniques, refer to practical tutorials such as those available for various models showing step-by-step fairing removal and care.
For further insights on maintaining and upgrading your bike’s aesthetics after removal, explore comprehensive resources at Explore the Best Motorcycle Fairings at Summit Fairings.
5. Mastering the Reassembly Process: Ensuring Precision and Care When Reinstalling Motorcycle Fairings
Reassembling motorcycle fairings after removal demands a meticulous approach to preserve both aesthetics and structural integrity. A fundamental practice is to reinstall components in the precise reverse order of removal, which ensures that every panel and fastener returns to its original position. Early in reassembly, bolts and screws should be hand-tightened to allow slight adjustments—this flexibility helps avoid misalignment before final tightening. Transferring mounting blocks or brackets, such as rubber blocks used in saddlebag guards, must be done carefully to guarantee secure fitting on new parts.
Using a torque wrench calibrated to the manufacturer’s specifications is critical in preventing damage caused by over-tightening or the risk of fasteners loosening during operation. Labels or photos taken during disassembly prove invaluable at this stage, serving as guides to correctly place clips, bolts, and electrical connectors. Working in a clean and well-lit environment makes it easier to locate small parts and reduces the chance of scratches or cracks on delicate plastic surfaces.
Accessories such as saddlebags or seats should be reinstalled last to confirm the smooth fit of all preceding panels. Applying appropriate tools further safeguards fasteners from stripping, and gentle handling minimizes stress on fragile fairing plastics. Overall, attentive reassembly not only restores a motorcycle’s stylish appearance but also secures all components for safe riding.
For more detailed insights on managing fairing and guard installations, the Law Abiding Biker tutorial on fairing and saddlebag guard removal and installation offers practical guidance.
Chapter 3: How to Remove Motorcycle Fairings: Model-Specific Considerations and Electrical Connector Management
1. Navigating Unique Fairing Designs and Electrical Systems Across Motorcycle Models
Understanding the unique panel arrangements and electrical integrations specific to each motorcycle model is crucial when removing fairings. Unlike a one-size-fits-all approach, fairing layouts differ widely, influenced by design, manufacturer, and year. For instance, the placement of mounting points, clips, and brackets varies, requiring careful identification before attempting removal to avoid damage.
Electrical connectors embedded within the panels further complicate the process. Turn signals, indicator lights, sensors, and other wiring harnesses are often routed inside fairing panels, demanding meticulous unplugging to prevent wire strain or connector breakage. Disconnecting these connectors before panel detachment is imperative, as pulling panels without first releasing wiring can cause costly electrical faults.
The removal sequence often must adapt to the model’s specifics. Some motorcycles include trim covers or hidden brackets that secure side panels, while others might require detaching adjacent components for access — as seen on particular models where gas tanks or handlebars come into play. Using model-specific tools or replacement parts designed for your bike reduces the risk of damaging delicate mounting hardware.
Labeling connectors and fasteners during disassembly offers a reliable roadmap for reassembly, especially when complex wiring configurations exist. This practice ensures each connection returns to its correct location, maintaining electrical system integrity.
By thoroughly understanding your motorcycle’s particular fairing structure and electrical layout, you guarantee a safer, more efficient removal process that protects both the plastic panels and vital electrical systems. More detailed guides tailored to specific models can be found in resources like this comprehensive motorcycle fairings blog.
2. Mastering the Right Tools and Techniques for Safe Fairing Removal and Electrical Handling
Selecting proper tools and carefully managing electrical connectors form the backbone of effective motorcycle fairing removal. Understanding the exact types of fasteners your model uses is essential before beginning. Common tools include Phillips and flat-head screwdrivers alongside Allen wrenches, which cover most screws and bolts securing fairings. Some models may require specialty tools such as Torx drivers or fastener removers tailored to their unique designs. Using plastic pry tools is strongly recommended to gently disengage panels without damaging clips or scratching paint. A torque wrench is invaluable during reassembly, ensuring bolts are tightened precisely to manufacturer specifications and preventing damage or rattling.
Each bike’s fairing removal sequence varies. For example, Yamaha YZF-R6 models rely on a combination of screwdrivers and Allen wrenches, paired with gentle prying tools to avoid breaking delicate clips. Identifying hidden clips or bolts and understanding where electrical connectors nest behind panels is crucial. Before detaching any fairing, always disconnect the battery or at least its negative terminal to eliminate risks of electrical shorts.
Many fairings contain wiring for lights and sensors. These connectors require gentle handling—never pull on wires directly. Instead, use terminal release tools designed for safe depinning to prevent damage. Inspect each connector for signs of wear or corrosion during disassembly; applying dielectric grease or heat shrink tubing can protect these connections from moisture and vibration-related deterioration when reassembled.
Documenting your disassembly with photos helps track clip and connector locations, making reassembly smoother. When reconnecting wiring, ensure firm, full engagement to preserve electrical integrity and test functions before finalizing panel installation. This combination of model-specific tool selection and cautious electrical management avoids costly mistakes and preserves your motorcycle’s appearance and function.
For a practical example on proper tool use and electrical connector care, reference the Yamaha YZF-R6 fairing removal guide here: Yamaha YZF-R6 Fairing Removal Tutorial. Additionally, explore explore the best motorcycle fairings at Summit Fairings for insights on compatible parts relating to your bike’s fairings.
3. Ensuring Safety and Effective Battery Disconnection Before Managing Electrical Connectors
Ensuring safety is paramount when removing motorcycle fairings, especially given the complexity of embedded electrical components. The first essential step is to disconnect the battery, typically by removing the negative terminal. This precaution prevents accidental electrical shorts or undesired activation of systems during the disassembly process. Handling live electrical parts without this step risks damaging sensitive wiring or igniting sparks, which can lead to injury or costly repairs.
Motorcycles feature varying fairing designs with different layouts of screws, clips, and electrical connectors, all specific to the make and model. For example, the Yamaha YZF-R6 (2008–2016) requires methodical removal of panels while carefully managing integrated wiring harnesses to avoid breaking fragile connectors. Consulting the exact service manual or manufacturer guidelines is critical for understanding these nuances and safely navigating the panel removal.
When disconnecting wiring, it’s vital to pull on connector bodies—not on the wires themselves—to prevent wire breakage. Use the appropriate screwdriver or Allen wrench to loosen fasteners without forcing clips or plastic tabs, minimizing damage risk. Metal tools should avoid contact with any exposed terminals to reduce the chance of short circuits.
Additional safety considerations include working on a level surface to keep the motorcycle stable and wearing protective gloves and eyewear to shield from sharp edges or debris. Capturing photos throughout the process supports accurate reassembly by keeping track of fastener locations and cable routing.
By prioritizing battery disconnection and methodical electrical connector management, you reduce risks and protect both yourself and the motorcycle. For a detailed demonstration of these essential safety practices during fairing removal, the Yamaha YZF-R6 tutorial provides an excellent visual reference: https://www.youtube.com/watch?v=0tyCFuoKJJE. This approach aligns closely with best practices to ensure a smooth and secure disassembly experience.
For further insights on fairing designs and electrical considerations, explore helpful resources at Summit Fairings blog.
4. Mastering Electrical Connector Care for Safe and Efficient Motorcycle Fairing Removal
Managing electrical connectors during motorcycle fairing removal requires precision and care to maintain electrical system integrity. Begin by clearly labeling each wiring harness and connector with tags or color-coded tape as you disconnect them. This method eliminates confusion and expedites reassembly, especially in complex setups featuring integrated lights or sensors. Using the correct terminal release tools is vital to gently unpin connectors without damaging terminals or their housings, which preserves connector functionality and eases future handling.
Protective measures such as applying dielectric grease on connector contacts shield against moisture and corrosive elements typical in motorcycle environments. Likewise, heat shrink tubing offers added insulation and vibration resistance. It is crucial to inspect connectors for signs of corrosion or loosening before reassembly, as motorcycles endure significant vibrations that can degrade electrical contacts over time. Ensuring connectors snap fully into place and lock securely prevents intermittent faults that can be difficult to diagnose once the fairings are reinstalled.
Organizing wires neatly using cable ties or sleeves reduces the risk of tangling and mechanical stress, improving access during maintenance and harboring a professional finish. Confirm that terminals match wire gauge specifications to avoid loose electrical contacts; replace worn terminals promptly to maintain reliability. Selecting connectors rated for harsh environments—ideally those compliant with IP67 or IP68 standards—further ensures durability against water and dust ingress.
By integrating these best practices, you safeguard sensitive wiring, streamline reassembly, and maintain long-term electrical performance regardless of your motorcycle’s specific model. For additional practical advice on complex wiring harness management during such procedures, detailed external guides like those at Automotive Wiring Harness offer comprehensive insights. For replacement fairing parts compatible with various setups, visit resources such as Summit Fairings for an extensive selection tailored to diverse models.
5. Organizing Parts and Wiring for Smooth Motorcycle Fairing Reassembly
Proper organization and handling of parts and electrical connectors set the foundation for a seamless motorcycle fairing reassembly. Each motorcycle model features unique fairing designs and attachment points, making it crucial to group and label all fasteners, clips, and panels by their exact origin on the bike. Using clearly marked bags or containers for screws and bolts collected from specific sections reduces confusion and the risk of mistakes during reinstallation.
Electrical connectors integrated into fairings—such as those linked to headlights, indicators, or instrument clusters—demand special attention. Carefully disconnecting each harness and labeling connectors with color-coded or written tags prevents wiring errors later. Documenting connections through photos or wiring diagrams enhances clarity, especially for complex systems. Inspecting connectors for corrosion or damage during removal allows for timely repairs, ensuring reliable function after reassembly. Neatly bundling wires with cable ties or sleeves minimizes tangling and stress on cables.
Once removed, fairings should be cleaned and stored thoughtfully to preserve their finish. Soft cloths or padded containers shield panels from scratches, while storing them in a dry, dust-free, and climate-controlled environment prevents deterioration caused by moisture or temperature extremes.
By maintaining organized, labeled parts and wiring, inspecting connectors, and protecting fairings during storage, one prepares for a straightforward, damage-free reassembly. This approach respects the specific requirements of different motorcycle models and the complexity of their electrical systems, making restoration efficient and reliable.
For insights on managing wiring harnesses effectively during disassembly and reassembly, refer to detailed processing guides available. Additional information on protecting fairings during storage can be found in comprehensive motorcycle storage best practices. More about careful fairing handling and organization can also be explored at Explore the Best Motorcycle Fairings at Summit Fairings.
Final thoughts
Removing motorcycle fairings correctly is a vital skill that minimizes damage, speeds up repair or customization work, and maintains the bike’s integrity. For business owners, mastering this process can directly improve customer satisfaction and operational efficiency. By preparing with the right tools and safety steps, following systematic disassembly methods, and adapting techniques for specific models and electrical systems, your shop can handle fairing removal confidently and reliably. This knowledge fosters trust, reduces costly mistakes, and ensures that each motorcycle serviced preserves its functionality and visual appeal.
Ready to elevate your ride? Summit Fairings delivers premium, custom-fit fairings that blend style and durability. Whether you’re chasing speed or turning heads, we’ve got your bike covered. Don’t wait—transform your machine today. Click, customize, and ride with confidence. Your perfect fairing is just a few clicks away. Act now!
About us
undefined