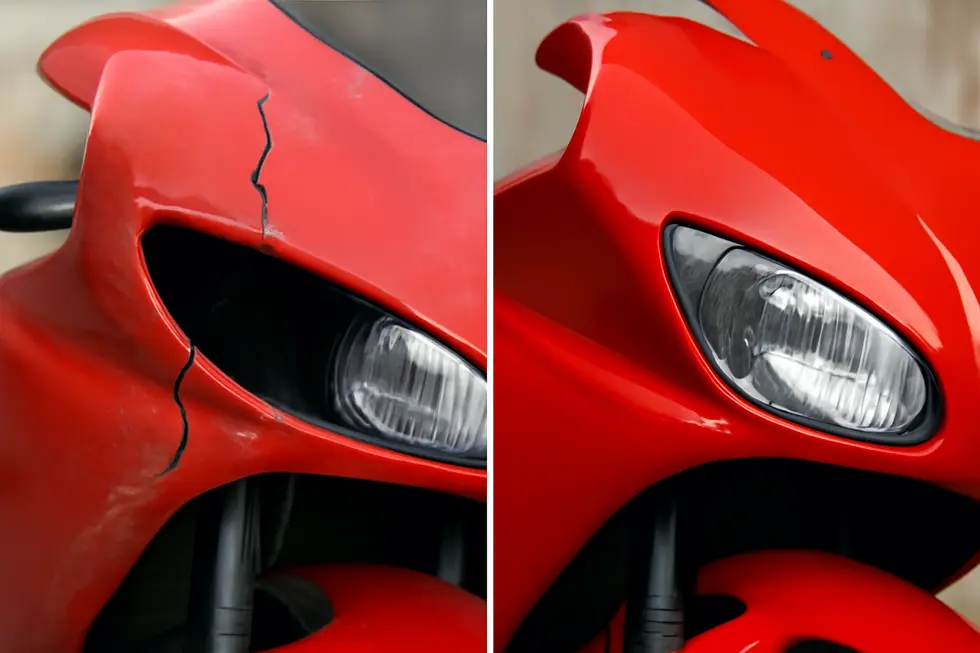
Introduction
Maintaining the integrity and appearance of a motorcycle’s fiberglass fairing is essential not only for rider safety but also for sustaining the vehicle’s value and customer satisfaction in repair businesses. For business owners, mastering the repair process of fiberglass motorcycle fairings ensures reliable service offerings that combine structural strength with impeccable finishes. This guide breaks down the repair workflow into key segments—starting with surface preparation, advancing through fiberglass application, and culminating in sanding and finishing techniques. Along the way, safety practices crucial to professional environments are emphasized, plus recommendations for leveraging visual tutorials to speed training. Finally, the focus shifts to restoring both structural robustness and aesthetic quality, allowing your business to deliver repairs that exceed expectations. Each chapter builds on the previous one, delivering an in-depth, actionable roadmap tailored to business operations specializing in motorcycle fairing repairs.
Tables of Contents
Chapter 1: Essential Cleaning and Degreasing Steps for Surface Preparation in How to Repair Fiberglass Motorcycle Fairing
- Mastering Cleaning and Degreasing: The Crucial Foundation for Fiberglass Fairing Repairs
- Mastering Sanding Techniques to Ensure Durable and Smooth Fiberglass Fairing Repairs
- Ensuring a Contaminant-Free Base: Dust and Debris Removal Techniques for Fiberglass Fairing Surface Preparation
- Mastering Surface Readiness: The Essential Steps for Optimal Adhesion in Fiberglass Fairing Repairs
Chapter 2: Mastering Fiberglass Application Techniques in Motorcycle Fairing Repair
- Essential Surface Preparation for Durable Fiberglass Motorcycle Fairing Repairs
- Precision Techniques for Applying Fiberglass Cloth and Resin in Motorcycle Fairing Restoration
- Ensuring Strength and Smoothness: Curing and Finishing Steps in Fiberglass Motorcycle Fairing Repairs
- Prioritizing Safety and Step-by-Step Guidance in Fiberglass Application for Durable Motorcycle Fairing Repairs
Chapter 3: Mastering Sanding and Surface Preparation for Fiberglass Motorcycle Fairing Repairs
- Essential Cleaning and Sanding Techniques to Prepare Fiberglass Motorcycle Fairings for Repair
- The Art of Progressive Grit Sanding and Edge Feathering for Seamless Fiberglass Fairing Repairs
- Mastering Imperfection Repair and Dust Management in Fiberglass Fairing Finishing
- Achieving a Flawless Final Finish: Expert Priming and Painting Techniques for Fiberglass Motorcycle Fairings
Chapter 4: Essential Safety Practices for Repairing Fiberglass Motorcycle Fairings
- The Critical Role of Personal Protective Equipment in Fiberglass Fairing Repairs
- Optimizing Ventilation and Protective Gear for Safe Fiberglass Fairing Repair
- The Crucial Role of Proper Surface Preparation for Safe Fiberglass Fairing Repairs
- Mastering Chemical Safety and Skin Protection for Fiberglass Fairing Repairs
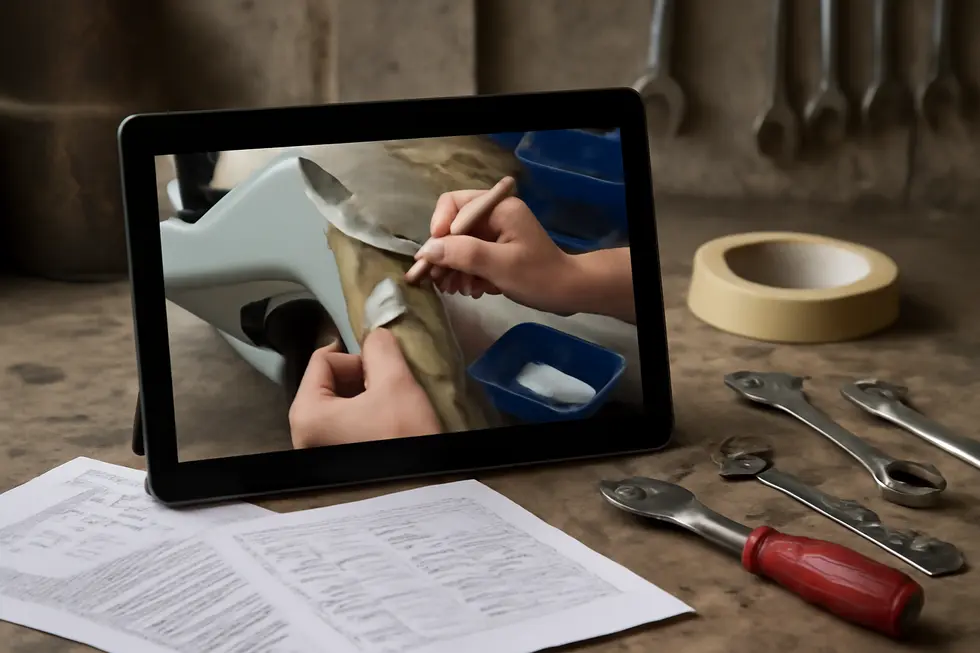
Chapter 5: Visual and Tutorial Resources for How to Repair Fiberglass Motorcycle Fairing
- Mastering Fiberglass Motorcycle Fairing Repairs: Comprehensive Video and Illustrated Tutorials
- Mastering Surface Preparation and Material Handling: Visual Guides for Durable Fiberglass Fairing Repairs
- Mastering Advanced Repair and Finishing Techniques Through Comprehensive Guides and Tutorials
- Essential Visual Guides and Expert Insights for Safe Repair and Reinstallation of Fiberglass Motorcycle Fairings
Chapter 6: Restoring Structural and Aesthetic Integrity in How to Repair Fiberglass Motorcycle Fairing
- Mastering Structural Reinforcement: Key Techniques to Strengthen Fiberglass Motorcycle Fairings
- Critical Surface Refinement and Damage Inspection for Lasting Fiberglass Fairing Repairs
- Mastering Sanding and Finishing Techniques to Seamlessly Restore Fiberglass Motorcycle Fairings
- Essential Safety and Eco-Friendly Practices for Durable Fiberglass Fairing Repairs
Chapter 1: Essential Cleaning and Degreasing Steps for Surface Preparation in How to Repair Fiberglass Motorcycle Fairing
1. Mastering Cleaning and Degreasing: The Crucial Foundation for Fiberglass Fairing Repairs
Thorough cleaning and degreasing form the foundation of successful fiberglass motorcycle fairing repairs. Removing dirt, oil, grease, and old paint residue is essential to ensure repair materials properly adhere to the surface. Using a mild, pH-neutral shampoo or a plastic-safe cleaner helps dissolve contaminants while preserving the fiberglass integrity. After washing, wiping the area with isopropyl alcohol or a similar solvent removes residual oils without damaging the substrate. It’s vital to dry the surface completely before any further work. Following cleaning, lightly sanding removes the glossy gelcoat, creating a microscopically rough texture that improves mechanical bonding of resins and fillers. Eliminating all dust and debris through vacuuming or compressed air reduces the risk of weak adhesion or visible imperfections beneath the paint. Throughout this process, proper safety precautions, including respirators and gloves, protect against harmful dust and fumes. By mastering these cleaning and degreasing steps, you set the stage for a durable, smooth, and professional finish on your repaired fiberglass fairing. For an in-depth approach, explore an authoritative resource on surface preparation in motorcycle fairing repairs.
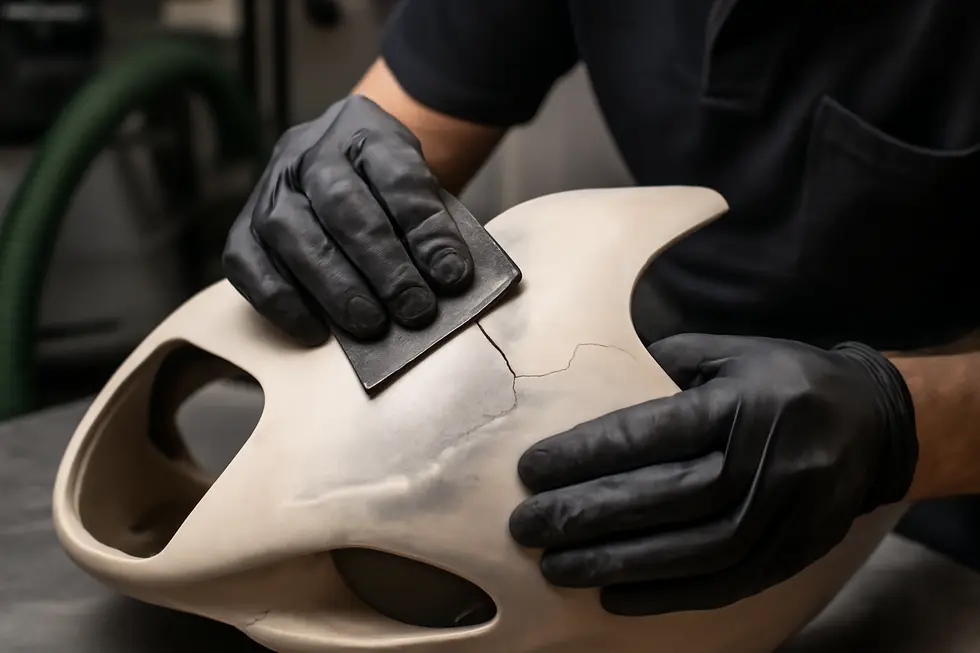
2. Mastering Sanding Techniques to Ensure Durable and Smooth Fiberglass Fairing Repairs
Sanding plays a pivotal role in preparing a fiberglass motorcycle fairing for repair, directly impacting the adhesion and finish quality. Begin with coarse grit (around 32) to remove old resin or damaged layers and to shape the repair area, establishing a firm foundation. This step creates the rough texture necessary for resin to bond strongly. Progress to medium grit (80-120) to feather the edges of cracks or filler, enabling a seamless transition between the repair and the existing fairing surface. This careful blending removes uneven ridges that would otherwise show after painting. The final stage involves fine grit sanding (320-600), often wet sanding, to smooth the surface while reducing dust. Wet sanding lubricates the surface and helps maintain the fairing’s curves by minimizing flat spots. Using sanding blocks or flexible pads during this process ensures uniform pressure and preserves the fairing’s shape. Between each step, removing dust thoroughly is vital to prevent contamination that might weaken resin adhesion. Safety precautions such as wearing masks and gloves protect against hazardous dust and fumes. Adhering to this sanding progression guarantees a durable, visually flawless repair, essential for restoring both strength and aesthetics. For more tips on motorcycle fairing maintenance, see the detailed guides on explore summit fairings your go to destination for motorcycle fairings.
3. Ensuring a Contaminant-Free Base: Dust and Debris Removal Techniques for Fiberglass Fairing Surface Preparation
Achieving a durable repair on a fiberglass motorcycle fairing starts with eliminating every trace of dust and debris after sanding. Once the glossy gelcoat and weakened fibers are sanded away, microscopic particles and residual dust cling to the surface, posing a significant risk to resin adhesion. Cleaning this effectively involves a multi-step approach. Initially, washing with a pH-neutral motorcycle shampoo using a soft microfiber cloth removes oils and dirt without residual chemicals. After drying completely to prevent moisture interference, sanding creates the essential rough texture but generates fiberglass dust that must not remain. Thorough removal of this dust through vacuuming followed by compressed air blowing clears crevices and porous areas, ensuring a pristine repair zone. Wearing a respirator during sanding and dust clearing safeguards health by filtering hazardous fiberglass particles. This meticulous strategy guarantees a clean, prepared surface foundation, directly influencing the strength and longevity of the fiberglass resin bond and preventing flaws in the final finish. For further insights into meticulous surface preparation, visit the summit fairings blog on mastering cleaning and preparation for fiberglass motorcycle fairings.
4. Mastering Surface Readiness: The Essential Steps for Optimal Adhesion in Fiberglass Fairing Repairs
Mastering Surface Readiness: The Essential Steps for Optimal Adhesion in Fiberglass Fairing Repairs
Achieving a durable repair on a fiberglass motorcycle fairing depends heavily on preparing the surface to maximize adhesion. This process begins with meticulous cleaning, removing all traces of grease, dirt, and oils using mild detergents or specialized solvents. Any residue left behind can compromise how well the resin bonds to the fairing. Following cleaning, sanding is crucial—starting with coarse grit to dull the glossy surface and eliminate damaged or loose fiberglass strands. Exposing fresh fibers ensures the resin can lock in effectively with the underlying material, forming a strong mechanical bond.
It’s vital to remove all weakened fragments since they weaken the patch’s foundation. After sanding, thorough removal of dust and particles using a vacuum or tack cloth guarantees no contamination remains beneath the repair layers. Finally, ensuring the surface is completely dry prevents moisture from hindering resin curing. Neglecting any of these steps can result in poor adhesion, leading to weak or brittle repairs. For further details on surface preparation and comprehensive repair techniques, consider resources such as the knowledgeable guides available on the ultimate source for affordable motorcycle fairings.
Chapter 2: Mastering Fiberglass Application Techniques in Motorcycle Fairing Repair
1. Essential Surface Preparation for Durable Fiberglass Motorcycle Fairing Repairs
Successful fiberglass repair starts with meticulous surface preparation to ensure optimal adhesion and long-lasting results. Begin by thoroughly cleaning the damaged area with mild detergent to remove dirt, grease, and oils that could compromise the bond between resin and fiberglass. After cleaning, allow the surface to dry completely, as moisture weakens resin adhesion and the integrity of the repair. Sanding is critical: initially dull the glossy finish with coarse grit sandpaper to create a rough texture for mechanical adhesion, carefully extending beyond the damaged edges without enlarging damage. This sanding also helps feather the cracked edges, blending the repair with the surrounding surface. After sanding, remove all dust using a vacuum or tack cloth to prevent contamination, which can introduce weak spots under the fiberglass layers. Finally, mask adjacent areas to protect intact sections from resin spills and dust during repair. These precise steps lay the foundation for applying fiberglass cloth and resin layers that restore structural strength while providing a smooth finish ready for painting. For a detailed understanding of motorcycle fairing repairs and surface prep techniques, exploring expert guides such as those found at Summit Fairings offers invaluable insight.
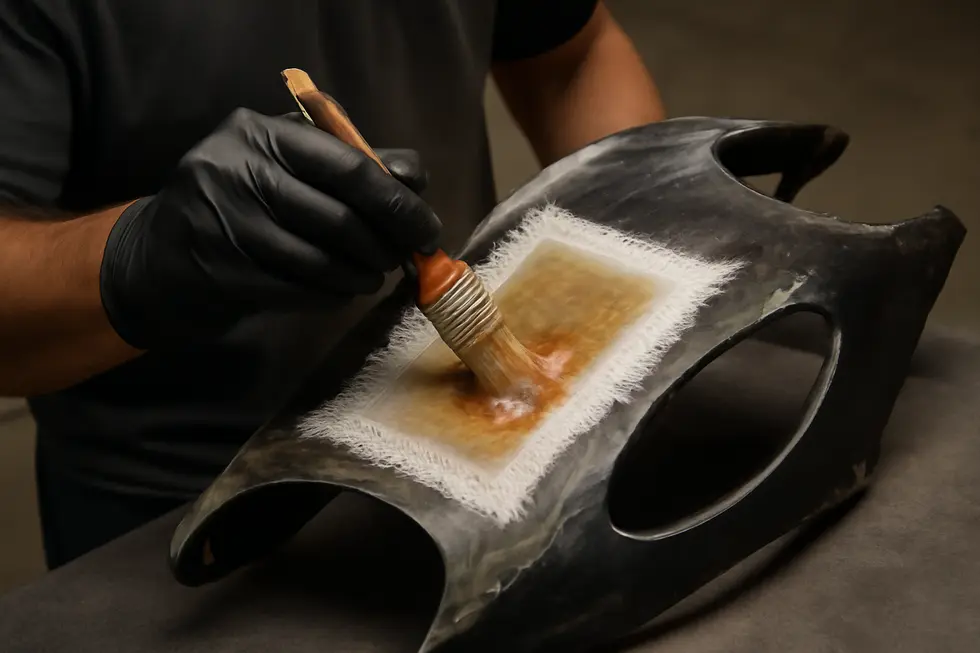
2. Precision Techniques for Applying Fiberglass Cloth and Resin in Motorcycle Fairing Restoration
Achieving a durable repair on a fiberglass motorcycle fairing hinges on the precise application of fiberglass cloth and resin. Begin by carefully cutting the cloth to extend slightly beyond the damaged area, ensuring full coverage and structural reinforcement. After preparing the surface, a layer of resin is applied to promote strong adhesion. While the resin is still wet, position the fiberglass cloth over the area and saturate it thoroughly with more resin using a brush or roller. This step eliminates air bubbles and dry spots that could weaken the repair. Depending on the severity of the damage, multiple layers may be necessary, each fully saturated and allowed to cure properly. Proper curing time is vital, as rushing this stage compromises strength. Once cured, smoothing the surface with progressive sanding blends the repair seamlessly into the existing fairing. This methodical layering and resin saturation not only restore the fairing’s integrity but also prepare it for finishing. Maintaining safety by wearing protective gear throughout the process is essential. For additional guidance, exploring expert tutorials and comprehensive resources can deepen understanding of these essential application techniques. To learn more about selecting quality parts to enhance your repair, visit the insightful post about motorcycle fairings.
3. Ensuring Strength and Smoothness: Curing and Finishing Steps in Fiberglass Motorcycle Fairing Repairs
Once the fiberglass resin and cloth have been applied, allowing proper curing time is critical to achieve a strong, long-lasting repair. The resin must harden fully, typically over several hours to overnight, depending on the type of resin and ambient conditions. This step ensures the repair withstands structural stresses encountered during riding. After curing, the repaired section undergoes progressive sanding with increasingly fine grit paper, smoothing the surface and feathering edges to seamlessly blend with the surrounding fairing. This careful sanding removes excess resin and prepares the area for finishing. Applying body filler or primer may follow to perfect surface contours before repainting. Painting not only restores original appearance but also seals the repair against moisture and environmental damage. Throughout sanding and finishing, wearing protective gear is essential to avoid inhaling fiberglass dust or resin fumes. These meticulous curing and finishing techniques complete the repair process by combining durability and an aesthetic finish. For detailed guidance, exploring dedicated resources on motorcycle fairings offers valuable practical insights.
4. Prioritizing Safety and Step-by-Step Guidance in Fiberglass Application for Durable Motorcycle Fairing Repairs
Ensuring a safe workspace and following detailed procedural guidance are critical when applying fiberglass for motorcycle fairing repairs. Protective measures like wearing a respirator mask and gloves shield you from harmful fiberglass dust and resin fumes. Working in a well-ventilated area further reduces inhalation risks and helps resin cure properly. Begin by thoroughly cleaning the damaged surface with a pH-neutral shampoo to eliminate grease and contaminants that can jeopardize adhesion. After drying, carefully sand the area to remove damaged fibers and create a roughened texture, progressing from coarse to finer grit for a smooth transition. Cut fiberglass cloth to extend beyond the damaged section and mix resin and hardener precisely. Apply resin to the surface, lay the cloth carefully, and saturate it fully, avoiding air bubbles by employing a roller or brush with controlled strokes. Multiple layers strengthen the repair, but each must cure completely before adding the next. Finally, sand the cured surface smooth and finish with primer and paint to restore appearance. Visual tutorials like those offered in expert guides complement these steps, reinforcing safe practices and effective techniques. This disciplined approach ensures not only a strong, lasting repair but also protects your health throughout the process. For a full detailed walkthrough and additional safety tips, consult the comprehensive resources provided by summit fairings.
Chapter 3: Mastering Sanding and Surface Preparation for Fiberglass Motorcycle Fairing Repairs
1. Essential Cleaning and Sanding Techniques to Prepare Fiberglass Motorcycle Fairings for Repair
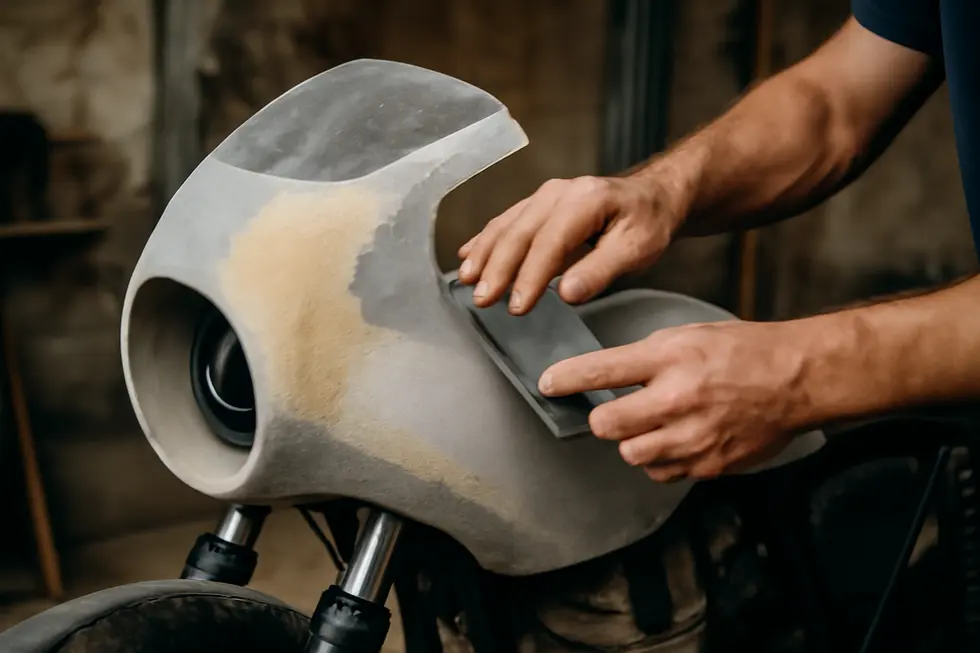
Repairing a fiberglass motorcycle fairing starts with meticulous cleaning and sanding to ensure durable resin adhesion and a flawless finish. Begin by thoroughly washing the damaged area using a pH-neutral motorcycle shampoo and a soft microfiber cloth, which effectively removes dirt, grease, and oils without leaving residues that could compromise bonding. Once completely dry, the next crucial step is sanding. Start with coarse sandpaper (around 32-grit) to strip away the glossy gelcoat and any weakened or damaged fiberglass fibers. This roughens the surface, providing the necessary “key” for resin to bond strongly. Gradually progress to finer grits to feather the edges of cracks and blend repair zones seamlessly into the surrounding fairing. Avoid over-sanding, as uneven surfaces can weaken the repair or complicate finishing. After sanding, thoroughly remove all dust using vacuuming or compressed air to prevent contamination that might interfere with resin adhesion or mar the final finish. Wearing a respirator is essential during sanding to protect against harmful fiberglass dust. This foundational approach to cleaning and sanding ensures the repair is both structurally sound and visually cohesive. For an in-depth guide on surface preparation techniques, exploring resources like the articles on Summit Fairings’ blog can provide valuable insights.
2. The Art of Progressive Grit Sanding and Edge Feathering for Seamless Fiberglass Fairing Repairs
Progressive grit sanding coupled with precise edge feathering is essential to achieve a smooth, durable surface on repaired fiberglass motorcycle fairings. Starting with coarse sandpaper around 32 grit helps remove excess resin and shapes the repair by addressing uneven spots. This stage requires care to avoid damaging the underlying fairing structure. Moving on to medium grits—typically 80 to 120—focuses on blending repair edges into the existing fiberglass. This feathering softens transition lines, preventing visible ridges once painted. The final stage uses fine grit sandpapers from 320 to 600, often employing wet sanding. Wet sanding reduces dust and creates a smooth finish ideal for primer application. Tools such as sanding blocks help maintain even pressure, conforming to curved contours without creating flat patches. After each sanding step, thorough dust removal is crucial to ensure proper adhesion of primer or filler. Feather sanding body filler edges, if used, further refines the repair to an invisible finish. This meticulous sanding sequence prepares the fairing perfectly for professional-quality finishing, restoring both appearance and strength. For more insights, explore detailed guides on motorcycle fairings from Summit Fairings.
3. Mastering Imperfection Repair and Dust Management in Fiberglass Fairing Finishing
Achieving a flawless finish on a repaired fiberglass motorcycle fairing hinges on expertly filling imperfections and rigorously controlling dust during sanding. Begin with progressively finer sanding grits, starting around 32-grit and moving through medium (80-120 grit) to fine levels (320-600 grit), often employing wet sanding at the final stages to reduce dust and refine the surface smoothness. This gradual process shapes the repair and blends edges seamlessly with the original fairing. Managing dust is equally crucial—after each sanding phase, thoroughly remove fiberglass particles using tack cloths or compressed air to prevent adhesion issues and ensure a pristine base for primers and fillers. When addressing surface imperfections, apply thin layers of specialized fillers, feathering edges carefully to eliminate visible transitions. Allow each layer to cure fully before sanding smooth, then repeat dust removal to maintain cleanliness. This meticulous cycle restores both structural integrity and aesthetic continuity, preparing the fairing for a durable, visually seamless finish. For further insight into advanced finishing methods, consult this detailed resource on exploring Summit Fairings’ motorcycle fairings.
4. Achieving a Flawless Final Finish: Expert Priming and Painting Techniques for Fiberglass Motorcycle Fairings
Achieving a smooth, durable finish on a repaired fiberglass motorcycle fairing hinges on careful priming and painting. After sanding the repair to a seamless blend with the surrounding surface, applying an adhesion promoter prepares the fairing for primer, ensuring strong bonding. A high-quality two-component primer then fills minor imperfections and lays a uniform base to enhance paint adhesion. Rather than a single thick coat, multiple thin layers of paint—thinned with a reducer for optimal flow—are applied, allowing each coat to dry fully before the next. This layering builds depth and consistency in color. For extra protection and shine, two to three clear coats follow, each needing proper curing to prevent peeling and extend longevity. Final sanding with fine blocks and polishing achieves a professional gloss and texture that restores the fairing’s original aesthetic. Throughout, using respirators and maintaining a clean workspace are essential for safety and achieving a pristine finish. For detailed techniques and visual guidance, consult an expert resource offering comprehensive tutorials on priming and painting motorcycle fairings, such as the detailed content found in the Summit Fairings blog.
Chapter 4: Essential Safety Practices for Repairing Fiberglass Motorcycle Fairings
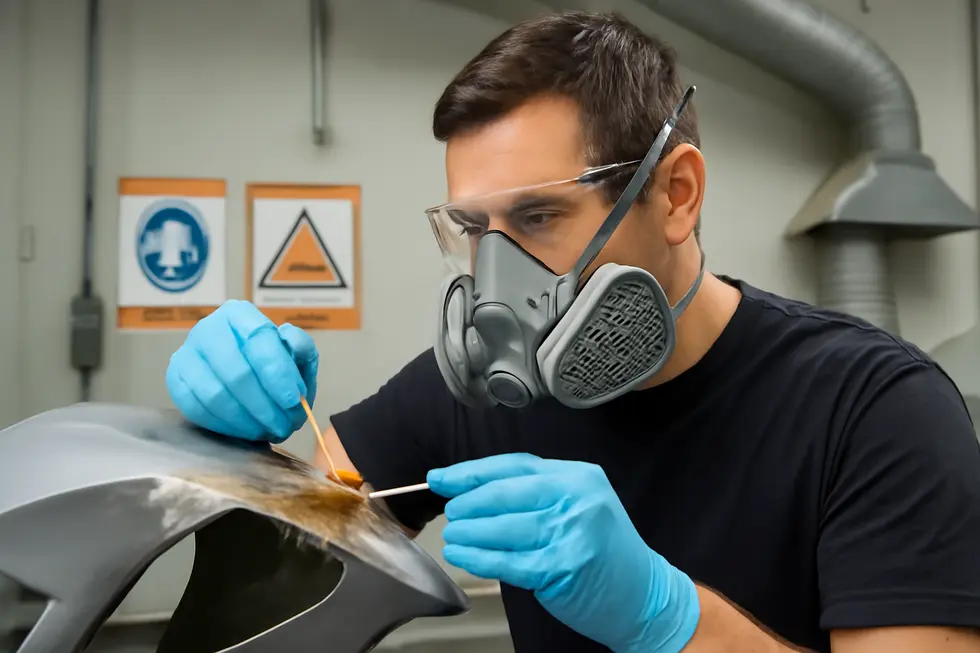
1. The Critical Role of Personal Protective Equipment in Fiberglass Fairing Repairs
Personal Protective Equipment (PPE) is vital for safeguarding health during fiberglass motorcycle fairing repairs. The process generates fine fiberglass dust and exposes the skin and eyes to chemical resins, solvents, and sanding debris that can cause irritation or injury. To minimize these risks, wearing a high-quality respirator or dust mask prevents inhalation of harmful particles. Chemical-resistant gloves shield skin from resin components that often cause irritation or allergic reactions. Safety goggles protect the eyes from airborne dust and accidental splashes of resin or solvents. Ensuring adequate ventilation further limits exposure to toxic fumes commonly released during cleaning and curing stages. Beyond protecting against chemical hazards, PPE also guards against physical injuries like cuts or abrasions from sharp tools or rough surfaces. Incorporating proper PPE not only promotes safety but also enhances focus and efficiency throughout the repair. Following recognized guidelines for protective gear fosters a responsible, health-conscious approach essential for successfully restoring a motorcycle’s fairing without compromising well-being. For more insights on motorcycle fairing safety and repair materials, consult expert resources such as the comprehensive motorcycle fairing blog.
2. Optimizing Ventilation and Protective Gear for Safe Fiberglass Fairing Repair
Ensuring a safe workspace is essential when repairing fiberglass motorcycle fairings. Work in a well-ventilated area—ideally outdoors or in a space with strong airflow—to disperse harmful fumes from resins, solvents, and fiberglass dust. If indoors, enhance ventilation with fans or air filtration systems to reduce respiratory exposure. Wearing proper personal protective equipment is equally important: a respirator with a P100 filter blocks fine particles and chemical vapors, while chemical-resistant gloves protect your skin from irritating resins. Safety goggles shield your eyes from dust and splashes, and covering exposed skin with long sleeves or disposable coveralls prevents irritation from fiberglass fibers. Use controlled sanding techniques with appropriate grit to minimize airborne dust, and clean the workspace thoroughly afterward using a HEPA-filter vacuum instead of compressed air to avoid dispersing fibers into the air. Avoid enclosed, poorly ventilated spaces to reduce chemical and dust inhalation risks. Together, these precautions protect your respiratory system, skin, and eyes, promoting an effective, long-lasting repair. For more insight on safe and professional fiberglass repair techniques, visit the comprehensive tutorial on mastering motorcycle fairing repairs with fiberglass.
3. The Crucial Role of Proper Surface Preparation for Safe Fiberglass Fairing Repairs
Effective surface preparation is foundational to both the durability and safety of fiberglass motorcycle fairing repairs. Cleaning the damaged area with mild soap or specialized solvents removes oils, dirt, and contaminants that would hinder resin adhesion. Sanding beyond just the visible damage—often with 400-600 grit sandpaper—exposes sound fiberglass fibers and creates the textured surface needed for strong mechanical bonding with resin. This step also reveals hidden cracks requiring attention before repair. Removing all dust after sanding is critical to prevent weak spots.
Safety depends heavily on these preparation steps, as any compromise in adhesion risks delamination or cracking under road vibrations and impacts. In turn, this threatens structural integrity, potentially jeopardizing rider protection and aerodynamics. Working in a ventilated space and wearing gloves and masks during sanding and chemical application reduces health risks from inhaled dust and resin fumes. Using protective tape around the repair area also safeguards undamaged surfaces from accidental damage.
Meticulous preparation not only secures long-lasting repairs but ensures the motorcycle fairing retains its function and safety. For detailed guidance on preparation and finishing, consult comprehensive repair tutorials available on Summit Fairings’ blog, a trusted resource on motorcycle fairings.
4. Mastering Chemical Safety and Skin Protection for Fiberglass Fairing Repairs
Handling chemicals and protecting your skin are paramount during fiberglass motorcycle fairing repairs. Fiberglass dust and resins contain irritants that can cause skin burns, respiratory issues, and eye damage. Wearing a high-quality respirator with a P100 filter blocks fine dust and fumes, safeguarding your lungs throughout sanding and resin application. Protective gloves, ideally nitrile, prevent direct contact with resins, hardeners, and solvents that may trigger chemical burns or irritation. Dressing in long sleeves, pants, closed-toe shoes, or disposable coveralls limits skin exposure to fiberglass fibers known for causing itching and inflammation. Safety goggles shield against airborne particles and accidental splashes. Additionally, working in well-ventilated spaces or outdoors helps disperse toxic fumes, while proper chemical handling—following manufacturer guidelines—reduces risk. Always clean work areas with HEPA-filter vacuums and shower promptly after work to remove fibers and residues. These integrated safety measures create a secure environment, allowing you to focus on restoring your fairing’s integrity effectively. For further comprehensive guidance on fiberglass motorcycle fairings, explore expert resources like those found on Summit Fairings’ blog.
Chapter 5: Visual and Tutorial Resources for How to Repair Fiberglass Motorcycle Fairing
1. Mastering Fiberglass Motorcycle Fairing Repairs: Comprehensive Video and Illustrated Tutorials
High-quality visual and written tutorials offer valuable guidance for repairing fiberglass motorcycle fairings, blending clear demonstrations with practical advice. Numerous video resources walk through every stage—from thorough cleaning and precise sanding to resin and fiberglass cloth application—showing how to layer materials effectively for structural strength. These step-by-step videos range from beginner-friendly crack repairs to advanced reinforcement techniques, providing close-up views of each process to enhance understanding. Complementing these are in-depth written guides that include detailed photos illustrating surface preparation, resin mixing, cloth placement, curing, and finishing. These resources emphasize essential safety practices, like using respirators during sanding to avoid inhaling dust. Together, the combination of visual demonstrations and photo-rich instructions enables riders and DIY enthusiasts to confidently restore both the integrity and appearance of their fairings. For those seeking the latest professional insights and structured approaches, expert blog tutorials offer comprehensive advice paired with direct video links, forming an ideal learning path for effective repairs. Explore these methods in detail at the Summit Fairings blog to elevate your repair skills and maintain your motorcycle’s aesthetic and aerodynamic qualities.
2. Mastering Surface Preparation and Material Handling: Visual Guides for Durable Fiberglass Fairing Repairs
Successful fiberglass motorcycle fairing repair hinges on meticulous surface preparation and skilled material handling, both detailed extensively in visual and written guides. Effective cleaning with mild soap ensures the surface is free from oils and dirt, while sanding with fine-grit paper (400-600 grit) properly roughens the damaged area, feathering edges beyond the crack to prime for resin adhesion. Videos like “10 Easy Steps to Fix your Fiberglass Race Fairings on your Bike” demonstrate how to layer fiberglass cloth or mat, emphasizing cloth’s flexibility on curves and mat’s strength in bulk repairs. Proper mixing of resin and hardener is crucial to guarantee a solid cure. Visual tutorials highlight key steps such as saturating fiberglass cloth and applying multiple layers for strength. After curing, sanding smooths the surface for primer and paint application, restoring both durability and aesthetics. Protective gear is vital throughout to guard against dust and fumes. For a deeper understanding of these techniques, the comprehensive written tutorials on Summit Fairings’ blog can supplement visual learning, making this phase the foundation of a lasting fiberglass fairing repair.
3. Mastering Advanced Repair and Finishing Techniques Through Comprehensive Guides and Tutorials
Extensive written guides and detailed video tutorials provide essential, advanced-level support for repairing fiberglass motorcycle fairings. These resources cover the full repair process—from meticulous surface preparation through careful application of fiberglass cloth and resin, to expert sanding and finishing. Thorough cleaning with pH-neutral detergents and degreasers ensures optimal resin adhesion, while progressive sanding refines the repair edges, feathering onto unaffected areas for seamless blending. Application techniques emphasize layering fiberglass cloth soaked in polyester resin, paying close attention to curing times for durable strength. Protective gear is consistently advised to safeguard health during dust-generating steps. Beyond repair, these materials offer advice on stress prevention and proper reinstallation methods to maintain the fairing’s integrity. For visual learners, curated YouTube tutorials demonstrate crack repairs and reinforcement, enhancing comprehension. Additionally, downloadable PDF instructions and specialized repair kits support structured, professional results. Together, these resources compose an advanced toolkit that elevates the repair process, enabling enthusiasts and professionals to restore both strength and aesthetics effectively. Explore more expert insights and guidance at Summit Fairings’ blog dedicated to superior motorcycle fairings.
4. Essential Visual Guides and Expert Insights for Safe Repair and Reinstallation of Fiberglass Motorcycle Fairings
Visual resources for repairing fiberglass motorcycle fairings offer a practical foundation, guiding enthusiasts in executing durable and safe repairs. Step-by-step video tutorials clearly demonstrate crucial phases, including surface preparation, resin application, fiberglass layering, and sanding techniques. These visuals emphasize the importance of safety—wearing respirators and gloves—and working in ventilated areas to prevent inhalation of harmful dust and fumes. Beyond repair, detailed guides reveal best practices for reinstallation, showing how to clean mounting points thoroughly and align fairings precisely to avoid stress that may cause future cracks or loosened fasteners from vibrations. Professional considerations include selecting suitable fiberglass cloth and resin types and inspecting repairs meticulously to ensure structural integrity. Complementary written tutorials deepen understanding with safety reminders and specialized tips to achieve a seamless finish. For a comprehensive resource on these repair phases and expert advice, the blog at summitfairings.com provides invaluable, detailed guidance supporting both amateur and experienced repairers in restoring their motorcycle fairings effectively and safely.
Chapter 6: Restoring Structural and Aesthetic Integrity in How to Repair Fiberglass Motorcycle Fairing
1. Mastering Structural Reinforcement: Key Techniques to Strengthen Fiberglass Motorcycle Fairings
Structural reinforcement forms the backbone of effectively repairing a fiberglass motorcycle fairing, combining durability with visual harmony. The process begins with meticulous surface preparation: cleaning the damaged section with a pH-neutral shampoo eliminates contaminants, while sanding removes weakened fiberglass fibers and the glossy gelcoat. This creates a roughened profile essential for optimal resin adhesion and feathered edges ensure seamless blending with the surrounding fairing.
Next, layers of fiberglass cloth saturated with resin are methodically applied to rebuild the fairing’s strength. Employing multiple thin layers instead of a single thick coat prevents warping during curing, maintaining structural integrity. Adequate curing time is crucial for the resin to bond firmly.
Once hardened, the repair is gently sanded to restore smooth contours. Minor surface imperfections can be concealed with body filler before final sanding. The final steps of priming and painting not only revive the fairing’s appearance but also shield the repair from environmental damage.
Throughout, safety precautions such as ventilation and protective gear safeguard against resin fumes and fiberglass dust. These reinforcement techniques ensure the fairing withstands riding stresses while preserving the motorcycle’s sleek profile. For detailed procedural guidance, check this comprehensive resource on motorcycle fairings.
2. Critical Surface Refinement and Damage Inspection for Lasting Fiberglass Fairing Repairs
Achieving a durable and visually seamless repair on a fiberglass motorcycle fairing begins with precise surface refinement and thorough damage inspection. After carefully cleaning the area to eliminate dirt, grease, and residues—without harming existing finishes—the next step is sanding the damaged zone. Sanding removes weakened fibers and glossy gelcoat, creating a textured surface that optimizes resin adhesion. It is important to feather the edges of cracks gently to blend the repair smoothly without compromising the fairing’s thickness or strength. A detailed inspection follows, identifying any concealed cracks or fragile sections. Removing all loose or compromised fiberglass ensures a stable foundation for patching. Applying resin and fiberglass cloth slightly larger than the damaged area enhances structural reinforcement, restoring rigidity from the inside if accessible. This meticulous preparation directly impacts the bonding quality of fillers and topcoats, preventing future peeling or cracking and enabling a flawless finish. For additional insight into this essential stage, visit the Summit Fairings blog to explore expert advice on motorcycle fairing maintenance and repair.
3. Mastering Sanding and Finishing Techniques to Seamlessly Restore Fiberglass Motorcycle Fairings
Sanding and finishing are essential for transforming a repaired fiberglass motorcycle fairing from a rough patch into a smooth, durable surface that blends seamlessly with the original. After the fiberglass resin cures, the repair area requires careful shaping and smoothing through progressive sanding—starting with coarser grits to remove excess resin and level the surface, then advancing to finer grits to feather edges and achieve a flawless transition. This gradual refinement prevents unevenness and maintains the structural integrity while preparing the surface for finishing.
The final cosmetic finish is achieved through meticulous buffing and polishing, which eliminates micro-scratches and restores the fairing’s glossy appearance. Applying flexible primers and matching paints or gelcoats ensures the repair is visually integrated and protected against UV damage and environmental wear. These steps uphold both aesthetic appeal and durability, sustaining the fairing’s aerodynamic function and road resilience.
This careful balance of sanding, shaping, and finishing completes the restoration, yielding a professional-grade result. For an in-depth overview of these techniques, explore resources like Summit Fairings’ detailed guides on repairing fiberglass motorcycle fairings, which offer valuable insights and tips for achieving a perfect finish.
4. Essential Safety and Eco-Friendly Practices for Durable Fiberglass Fairing Repairs
Repairing fiberglass motorcycle fairings demands careful attention to safety and environmental responsibility to ensure a lasting restoration. Wearing a proper respirator and chemical-resistant gloves protects against inhaling harmful fiberglass dust and exposure to resin irritants. Safety goggles shield eyes from airborne particles during sanding and resin application. Working in a well-ventilated space, ideally outdoors, minimizes fumes emitted by cleaning agents, resins, and paints, reducing health risks and environmental impact. Managing dust by using appropriate grit sandpapers limits airborne particles, lowering respiratory hazards. Handling resins and solvents carefully, following manufacturer instructions, protects skin from burns and irritation. Environmentally, disposing of used fiberglass scraps, resin containers, and contaminated materials responsibly prevents soil and water contamination. This integrated approach supports structural reinforcement through clean surface preparation, layered fiberglass application, and smooth finishing, preserving the fairing’s appearance and strength without compromising safety or ecology. For comprehensive guidance on these techniques and safe restoration, refer to detailed professional resources like the Summit Fairings blog to uphold both your health and the fairing’s durability.
Final thoughts
Effective repair of fiberglass motorcycle fairings is a vital skill for business owners aiming to provide durable, visually appealing restorations that satisfy discerning customers. Through thorough surface preparation, precise fiberglass application, and diligent sanding and finishing, repairs can return fairings to their original strength and beauty. Equally important are the safety protocols that protect your workforce and maintain a compliant workspace. Utilizing educational resources such as tutorials enhances skill acquisition and quality outcomes. These combined elements empower your business to confidently deliver repairs that preserve the motorcycle’s functionality and aesthetic appeal, enabling growth and reputation enhancement in a competitive market.
Ready to elevate your ride? Summit Fairings delivers premium, custom-fit fairings that blend style and durability. Whether you’re chasing speed or turning heads, we’ve got your bike covered. Don’t wait—transform your machine today. Click, customize, and ride with confidence. Your perfect fairing is just a few clicks away. Act now!
About us
undefined