Introduction
Motorcycle fairings are essential not only for aerodynamics but also for protecting mechanical components and enhancing bike aesthetics. For business owners in the motorcycle repair and customization industry, mastering fairing repair techniques is vital to deliver durable, high-quality results that satisfy customers and reduce repeat fixes. This guide explores critical facets of repairing motorcycle fairings, beginning with effective reinforcement and structural repair methods that restore strength to cracked or broken plastic parts. It further delves into the importance of meticulous surface preparation and cosmetic repair practices that ensure seamless finishes. Understanding safe removal and reinstallation procedures preserves fairing integrity during service, while precise painting and finishing methods bring the restored fairing back to its original glory. Together, these chapters equip business owners with a holistic framework to elevate their motorcycle fairing repair capabilities, ensuring resilient and visually impeccable outcomes.
Tables of Contents
Chapter 1: Reinforcement and Structural Techniques for Repair Motorcycle Fairing Cracks and Breaks
- Advanced Structural Bonding and Plastic Welding Methods to Restore Motorcycle Fairing Strength
- Mastering Fiberglass Patch Reinforcement: Structural Strength and Seamless Finishes in Motorcycle Fairing Repairs
Chapter 2: Surface Preparation and Cosmetic Repair Techniques in Repair Motorcycle Fairing
- Mastering Surface Preparation: The Essential Foundation for Cosmetic Fairing Repairs
- Elevating Finish and Durability: Advanced Surface Treatments and Cosmetic Repair Methods for Motorcycle Fairings
Chapter 3: Removal and Reinstallation Procedures in Repair Motorcycle Fairing
- Mastering the Precision and Safety of Motorcycle Fairing Removal and Reinstallation
- Mastering Safe and Secure Fairing Removal and Reinstallation: Techniques to Preserve Structural Integrity and Fastening Reliability
Chapter 4: Refined Painting and Finishing Techniques for Motorcycle Fairing Restoration
- Mastering the Technical Process of Painting and Finishing to Revive Motorcycle Fairings
- Balancing Cost and Quality: The Economic Influence of Painting and Finishing in Motorcycle Fairing Restoration
Chapter 1: Reinforcement and Structural Techniques for Repair Motorcycle Fairing Cracks and Breaks
1. Advanced Structural Bonding and Plastic Welding Methods to Restore Motorcycle Fairing Strength
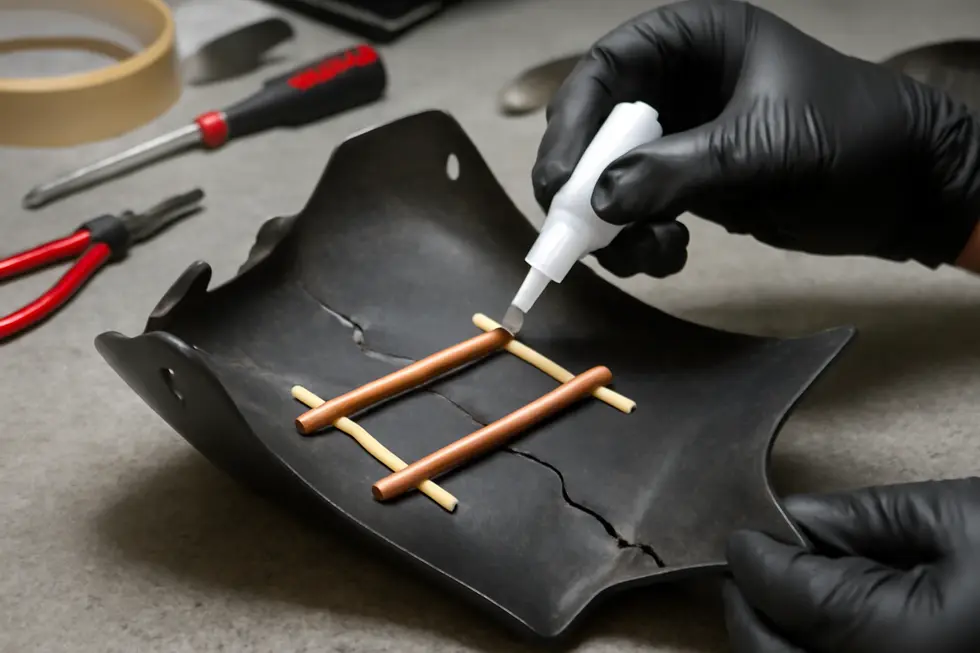
Repairing cracks and breaks in motorcycle fairings requires a blend of precise bonding techniques and robust reinforcement strategies to restore both strength and durability. Structural bonding combined with plastic welding stands out as a comprehensive approach, allowing the fairing to regain its integrity without compromising its shape or functionality. At the core of this method is plastic welding, a process that melts the damaged plastic edges together, producing a fused bond that often proves stronger than the original material. Using a specialized plastic welding kit or hot stapler, technicians carefully align the broken parts before applying heat. This controlled melting process fills gaps and bonds fractured sections seamlessly, creating a virtually continuous surface that resists everyday stress and vibrations encountered during riding.
To complement the plastic weld, internal reinforcement is critical. One widely adopted technique is affixing metal inserts—typically flattened strips or small flattened copper pipe sections—to the inside of the broken areas. These metal splints are secured with strong adhesives formulated for plastics such as super glue or epoxy. Acting much like internal braces, these inserts distribute load around the repair site and minimize movement between joined sections. This dual approach of welding followed by mechanical reinforcement ensures the repair withstands torque and flexing forces that otherwise risk reopening cracks.
For extensive damage or locations subjected to repeated strain, an extra layer of protection is achieved through composite reinforcement. Although this leans into fiberglass applications covered in upcoming sections, it’s important here to note that layering fiberglass cloth with resin on the exterior amplifies strength and longevity. The combination of plastic welding internally, metal bracing, and external composite layers creates a formidable triad that addresses both micro and macro stresses acting upon the fairing.
An indispensable foundation for effective bonding and welding is meticulous surface preparation. Cleaning away all dirt, oils, and residues from the repair area ensures that adhesives and plastic welds achieve maximum grip. Following cleaning, light sanding with fine-grit paper opens the plastic surface, improving adhesion and allowing resin or filler to anchor firmly. Without this step, the repair risks poor bonding and early failure.
Selecting appropriate adhesives designed for plastic is also essential. While plastic welding primarily fuses the material, secondary bonding with super glue or epoxy strengthens the joint and helps affix metal inserts securely. Careful application prevents excess adhesive from marring the visible surface and aids smooth finishing later. Additionally, polished surfaces around the repair benefit from final treatments like polishing compounds or touch-up paints to restore aesthetics when only minor scratches exist rather than structural breaks.
This multi-technique approach for structural bonding and plastic welding excels because it addresses both the microscopic bonding of polymer chains and the macroscopic mechanical demands on the fairing. It provides durable repairs that don’t merely mask damage but rebuild resilience. Riders and technicians benefit from improved repair longevity, minimizing the chance of repeated cracks or catastrophic failures during use.
For visual guidance and deeper insights tailored to specific motorcycle models, resources showcasing step-by-step plastic welding and bonding techniques can be invaluable. These help ensure precise alignment and optimal curing conditions for superior results.
For more on enhancing repair strength with matched fairing components and detailed methods, visit this detailed article on exploring the best motorcycle fairings and leverage its comprehensive resources.
An excellent external resource outlining fundamentals and safety considerations for plastic welding applications in repair work can be found at the Plastic Fabricators Association website: https://www.plasticfabricators.org/plasticwelding-basics.
2. Mastering Fiberglass Patch Reinforcement: Structural Strength and Seamless Finishes in Motorcycle Fairing Repairs
When repairing motorcycle fairings that suffer from cracks and breaks, fiberglass patch reinforcement stands out as a highly effective technique blending durability with aesthetic restoration. This method is particularly advantageous for plastic or composite fairings where maintaining structural integrity is critical but the visible surface must also retain a smooth, factory-like finish.
The process begins with meticulous surface preparation. Cleaning the damaged area is essential to remove all dirt, grease, and loose fragments that could weaken adhesion. After cleaning, sanding the surrounding surface creates the necessary texture that enhances resin bonding with the fiberglass patch. The sanding is generally done with a fine grit paper, refined enough to allow the resin to grip firmly without roughening the entire panel unnecessarily.
Selecting and applying the fiberglass patch involves cutting cloth or mat pieces slightly larger than the damaged zone to ensure complete coverage and reinforcement around the edges. The type of resin—most often an epoxy tailored for plastics or polyester resin compatible with fiberglass—plays a vital role in the repair’s strength and flexibility. Epoxy resin is preferred for its superior adhesion and resistance to impact, making it ideal for motorcycle fairings exposed to vibration and occasional knocks.
Applying the patch requires laying down a thin resin layer over the sanded and cleaned area, then placing the fiberglass cloth saturated with more resin onto the surface while still wet. This wet layup ensures the fibers are fully embedded and bonded, forming a rigid structure once cured. Multiple layers can be applied to build strength gradually. These layers may be oriented in different directions—such as bi-directional (BID) cloth patterns—to optimize tensile strength across various forces impacting the fairing, reducing the likelihood of future cracking.
Once the patch fully cures, the hardened surface often presents excess thickness and rough fiberglass edges. Careful sanding with progressively finer grits smooths these irregularities and integrates the repair into the fairing’s original contour. This stage is critical because the repaired section remains visible, and a seamless blend is necessary to return the fairing to its original high-quality appearance.
For refinishing, a light application of body filler can be used to hide any minor imperfections or unevenness after fiberglass sanding. After the filler dries, sanding again yields a perfectly smooth canvas ready for priming and painting. The primer seals and prepares the surface for the final paint layers, which should match the fairing’s original color precisely. Adding a clear coat not only protects the paint but enhances gloss and durability, maintaining the fairing’s fresh appearance under environmental exposure.
This fiberglass reinforcement technique requires proper workspace ventilation due to resin fumes, careful layer buildup to avoid warping or cracking, and patience during curing times. Applying too thick a layer at once or insufficient curing can compromise the repair’s strength and longevity.
Beyond structural benefits, this balanced approach addresses the visible characteristics of motorcycle fairings, which are often major aesthetic features. By combining structural fiberglass layers with expert finishing, repairs yield resilient, visually appealing results that extend the service life of the fairings and uphold the motorcycle’s style.
Such advanced composite repair methods closely mirror practices used in aerospace and automotive industries where component strength and flawless appearance are paramount. For enthusiasts and professionals alike, mastering fiberglass patch reinforcement offers a reliable solution when faced with cracked or broken fairings, harmonizing robust restoration with precise cosmetic care.
For further insights and practical advice on motorcycle fairings, visit our comprehensive resource on Explore the Best Motorcycle Fairings at Summit Fairings.
Chapter 2: Surface Preparation and Cosmetic Repair Techniques in Repair Motorcycle Fairing

1. Mastering Surface Preparation: The Essential Foundation for Cosmetic Fairing Repairs
Effective surface preparation is the cornerstone of any successful cosmetic repair on motorcycle fairings. This phase not only dictates the longevity of the restoration but also determines the smoothness and vibrancy of the final finish. Before any filler or paint touches the fairing, meticulous attention must be given to cleaning, sanding, and priming to establish an optimal surface.
The initial step involves comprehensive cleaning to remove contaminants like dirt, grease, oils, and any leftover coatings. Using gentle surface preparation sprays formulated with mild solvents and lubricants is crucial, especially when working on delicate matte finishes or aged paint. Harsh chemicals such as alcohols can quickly degrade the existing surface, leading to unsightly damage and compromised adhesion. This careful surface cleansing ensures that subsequent materials adhere firmly and uniformly.
Following cleaning, sanding plays a vital role in both aesthetic and functional repair quality. Sanding is not merely about smoothing; it also creates a microscopic texture enabling primers and paints to bond effectively. Selecting the right grit sandpaper—often between 1500 and 2000 grit—prevents damage to the fairing’s substrate while tackling minor imperfections and blending edges from crack repairs. Precision in sanding technique guards against over-thinning plastic sections or creating uneven surfaces that lead to poor paint application.
Once the surface is refined, the application of primer acts as a critical sealing and bonding agent. The choice of primer depends on the fairing’s material and the nature of the repair. For plastic or composite panels, high-build primers are preferred as they can fill subtle surface irregularities while ensuring paint adhesion. In cases where metal reinforcements or bolts are involved, etch primers offer corrosion protection and a superior adhesive base. The primer layer must be meticulously applied and dried under controlled conditions to avoid trapping moisture or introducing contaminants.
Environmental factors also impact surface preparation success. Applying coatings over a clean, cool, and thoroughly dry surface prevents common paint defects such as bubbling, runs, or premature peeling. Humidity and excessive heat disrupt solvent evaporation and paint curing, leading to uneven finishes. For polymer or composite fairings, additional adhesion promoters may be used to chemically modify the surface, improving durability and cohesion with topcoats. Advanced techniques like plasma treatment are increasingly adopted in specialized repairs to alter surface energy, maximizing primer and paint effectiveness.
After priming, careful layering of paint is essential to achieve both the correct color match and a flawless finish. Applying several thin coats—allowing sufficient drying time between each—helps avoid runs or pooling paint. The gradual buildup enhances depth and gloss, restoring the fairing’s original aesthetic while reinforcing the protective barrier against UV exposure and environmental wear.
Incorporating these surface preparation fundamentals significantly improves repair outcomes by reinforcing both protective and cosmetic qualities. Proper cleaning, sanding, priming, and environmental controls combine to produce durable, high-quality finishes that withstand the stresses and elements encountered by motorcycle fairings.
For enthusiasts seeking detailed insights into surface prep sprays and environmental application tips—especially for matte and delicate finishes—consulting specialized instructional content such as McKee’s 37 on ceramic coating is highly recommended. To explore more about the variety and quality of fairings available for repair or custom use, see this exploration of the best motorcycle fairings at Summit Fairings.
2. Elevating Finish and Durability: Advanced Surface Treatments and Cosmetic Repair Methods for Motorcycle Fairings
Achieving a flawless and resilient finish on motorcycle fairings hinges on meticulous surface preparation combined with sophisticated cosmetic repair techniques. The integrity and appearance of repaired fairings depend on a seamless integration of these processes, which must address both the underlying materials and the visible finish to withstand environmental and mechanical stress without compromising aesthetics.
Surface preparation is pivotal in promoting adhesion and longevity of repair materials. Beyond conventional cleaning and sanding, advanced polymer surface treatments have revolutionized the preparatory phase. Techniques such as plasma treatment, corona discharge, and chemical etching actively modify the fairing’s polymer surface by increasing its surface energy and chemically activating the material. This enhancement significantly improves the bonding capacity between the polymer composite and repair fillers or coatings by removing residual contaminants that standard cleaning cannot address. Especially for fiber-reinforced plastics, these treatments facilitate a durable union essential for structural resilience and paint adherence.
Once the surface is optimally prepared, cosmetic repair techniques tailor restoration according to the nature of the damage. Minor surface imperfections, like dents commonly incurred during riding or servicing, may be rectified using paintless dent repair (PDR). This method manipulates the plastic from behind or within the fairing structure to restore original contours without disturbing the factory paint finish, preserving the authentic look and eliminating repainting needs.
For cracks or larger imperfections, specialized fillers engineered for polymer composites are employed. Their compatibility ensures mechanical flexibility and adhesion akin to the original material. Applied after preparation, fillers are carefully spread and cured, then sanded smooth with precision tools that range from fine grit sandpapers to electric sanding blocks, aiming for a consistently flush surface that blends seamlessly. Concurrently, UV-cured coatings may be used to accelerate drying times and enhance surface hardness, allowing faster turnaround while attaining a glossy, uniform finish.
Paint refinishing complements the cosmetic repair by employing multi-stage painting processes designed to recreate the exact factory color and finish. Layering base coats, mid-coats, and clear coats with careful spray techniques ensures a finish that matches original tones and texture. The final clear coat protects against UV damage, abrasion, and environmental contaminants. Polishing and waxing further enrich the gloss and add a protective sheen, contributing to both aesthetics and durability.
For fairings constructed from advanced fiber-reinforced composites such as fiberglass or carbon fiber, cosmetic restoration must also preserve mechanical integrity. Here, composite patching and resin infusion techniques are utilized to rebuild damaged layers. These methods apply new fabric layers impregnated with resin resinous materials over the affected area, restoring tensile strength and preventing further crack propagation while maintaining the fairing’s flexible properties. This fusion of cosmetic and structural repair demands exacting skill to replicate factory standards.
By combining such cutting-edge surface treatments with nuanced cosmetic techniques, repairs achieve both a superior aesthetic and resilient performance. This approach ensures the motorcycle fairing not only looks pristine but also endures the rigors of daily riding.
For enthusiasts interested in exploring the nuances of fairing restoration, insightful guidance can be found in dedicated resources such as the explore the best motorcycle fairings at Summit Fairings, which offers comprehensive information on high-quality materials and repair insights.
Further reading on polymer treatments and composite repair techniques is available through specialized literature on advanced polymer surface treatment methods enhancing composite repairs.
Chapter 3: Removal and Reinstallation Procedures in Repair Motorcycle Fairing
1. Mastering the Precision and Safety of Motorcycle Fairing Removal and Reinstallation
The process of removing and reinstalling motorcycle fairings transcends mere mechanical detachment and refitting. It demands a comprehensive approach that integrates technological precision with practical considerations to preserve the fairing’s structural integrity, functional performance, and visual appeal after repair. Following the manufacture’s service manuals is the cornerstone of this approach. These manuals delineate the precise disassembly order, including delicate tasks like carefully removing the windscreen and outer panels, detaching electrical connectors such as those for headlights or stereo systems, and correctly handling mounting plates. Adherence to these detailed instructions is crucial to avoid inadvertent damage, especially since fairings, often made from plastic, fiberglass, or carbon fiber composites, can be fragile and sensitive to stress or improper handling.
During disassembly, attention must be given to accessories such as mirrors and lenses. Removing or securely taping over these components prevents accidental damage that could complicate repairs or reinstallation. Equally critical is the proper management of electrical components; disconnecting power sources before detachment and cautiously handling connectors help avoid costly electrical issues while ensuring safety throughout the procedure.
Reinstallation focuses heavily on achieving exact alignment and fitment. Fairings are not decorative add-ons but integral aerodynamic elements designed to optimize airflow, rider comfort, and cooling efficiency. Precise placement is required to avoid undue stress that could cause cracking, vibrations, or misalignments affecting the motorcycle’s handling or aesthetic. For example, certain models demand fine adjustment of fairing positioning relative to forks or bodywork to balance these functional parameters. This stage involves more than just securing fasteners—it often includes adjusting component clearances to ensure adequate ventilation behind the panels, fostering proper engine cooling and preventing overheating.
Secure mounting is essential; the use of appropriate, manufacturer-specified hardware is mandatory. Temporary fixes such as zip-ties or tape not only compromise safety but also increase the risk of fairing damage over time. Bolts and fasteners must be placed at several strategic points—usually a minimum of three—to evenly distribute stress. Where possible, incorporating protective measures like rubber grommets in bolt holes further safeguards against cracking from overtightening.
Throughout removal and reinstallation, the balance between technical steps and practical judgment underlines the success of the procedure. The technician must consider functional elements such as airflow and rider visibility alongside mechanical precision. This holistic approach ensures the repaired fairing restores the motorcycle’s original design intent, both visually and functionally.
For those seeking further insight into professionally executed fairing repairs and installation techniques, resources like this comprehensive motorcycle fairings guide provide valuable, model-specific instructions and tips, reinforcing effective practices for enthusiasts and technicians alike.
2. Mastering Safe and Secure Fairing Removal and Reinstallation: Techniques to Preserve Structural Integrity and Fastening Reliability
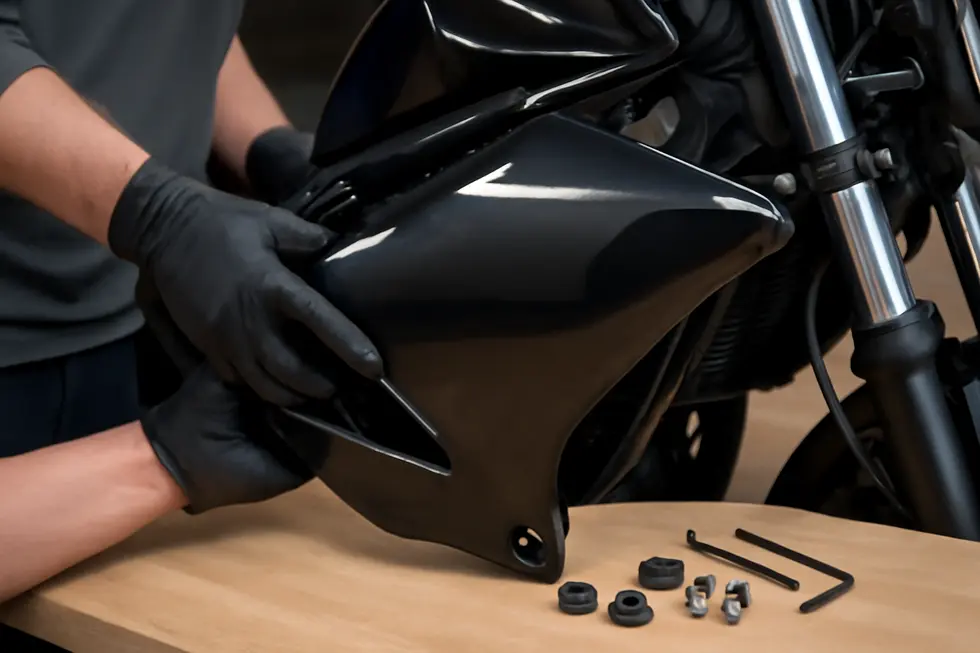
Successful repair of motorcycle fairings depends heavily on the meticulous removal and careful reinstallation of the panels, ensuring safety, preserving structural integrity, and achieving reliable fastening. Before beginning the removal, organizing fasteners such as bolts, clips, and brackets in labeled containers is crucial. This prevents loss or confusion during reassembly and saves time by ensuring every component is accounted for and correctly repositioned.
Once panels are removed, cleaning the mounting areas with gentle detergents and soft cloths is essential to eliminate dirt, grease, or corrosion. Clean surfaces allow for proper fitment and help avoid damage or weakening around mounting points, which are critical for the fairing’s attachment stability. At this stage, a thorough inspection of all mounting tabs, bolt holes, and brackets identifies any cracks, fractures, or deformation that could reduce the fairing’s performance or cause future failure under stress and vibration. Addressing minor damage early helps maintain the panel’s original structural resilience.
When reinstalling, begin by loosely fitting larger panels. This approach permits careful alignment adjustments before tightening fasteners, preventing misalignments that can stress the fairing during use. Employing the correct tools—such as screwdrivers, hex keys, and socket sets—facilitates smooth installation and reduces the risk of stripping screws or damaging threads. Where appropriate, thread lockers can be applied to bolts to avert loosening due to road vibration, a common cause of recurring rattles or panel detachment.
Incorporating washers or rubber grommets at bolt holes significantly enhances fastening reliability. These components distribute stress more evenly across the fairing’s material, reducing the chance of cracks forming from overtightening. Careful alignment using specific grooves or slots designed for the panels ensures the fairing fits snugly against the motorcycle frame without interfering with cables, controls, or suspension movements. Ensuring these clearances prevents mechanical binding or damage during riding.
Fastening should be methodical—once correct alignment is confirmed, tighten all bolts evenly, checking again that no components obstruct steering or suspension functionality. Using manufacturer-specific or high-quality replacement fasteners ensures durability, maintaining firmness and integrity over time. After installation, a complete inspection should verify the assembly’s stability, ensuring mirrors, ducts, and other attached elements are securely positioned and fully operational.
This diligent process minimizes the risk of sudden panel detachment, preserves the bike’s aerodynamic design, and protects internal components effectively. Such attention to detail during removal and reinstallation is a vital counterpart to internal structural repairs, forming a cohesive repair strategy. For those seeking detailed model-specific procedures and tools lists, some guides such as installation walkthroughs for sportbike fairings offer valuable visual and step-based instructions that complement these best practices.
For more detailed tips on avoiding cracking through proper washer and grommet use, consider exploring practical video tutorials that emphasize the importance of balanced stress distribution during fastening.[3]
Chapter 4: Refined Painting and Finishing Techniques for Motorcycle Fairing Restoration
1. Mastering the Technical Process of Painting and Finishing to Revive Motorcycle Fairings
Restoring a motorcycle fairing’s appearance through painting and finishing requires a precise blend of preparation, application, and protective measures. The process begins with thorough surface preparation, as a smooth, contaminant-free base is essential for a quality finish. Damaged or scratched fairings need careful sanding using fine grit sandpaper, typically ranging from 1500 to 2000 grit. Employing wet sanding techniques minimizes dust and prevents further surface damage while producing an evenly abraded surface that enables paint adhesion. This initial step also strips away residual paint layers and imperfections, which lays the groundwork for a flawless restoration.
Once sanding is complete, the fairing must be cleansed using degreasers to eliminate oils and remaining dirt. This meticulous cleaning is vital to ensure that no contaminants compromise the bonding of subsequent repair compounds and paint layers. For fairings with structural damage such as cracks or breaks, bonding agents or strong epoxies help reestablish the plastic’s integrity. After securing the repair, fillers are used to rebuild the fairing’s contours, restoring a seamless surface. These fillers are carefully sanded to blend with the surrounding material, creating a uniform canvas that disguises previous imperfections.
Applying a primer coats the repaired area with a uniform base that enhances paint adhesion and durability. Priming is a critical step that not only improves the paint’s lifespan but also prevents uneven coloration or peeling. When ready to paint, professionals or enthusiasts use color-matched paint to restore the fairing’s original tones. This paint is applied in thin, consistent layers, allowing each coat to dry adequately before the next application. For minor scratches, a precise touch-up followed by wet sanding with ultra-fine sandpaper (2000 grit or finer) helps blend the newly applied paint seamlessly with the old.
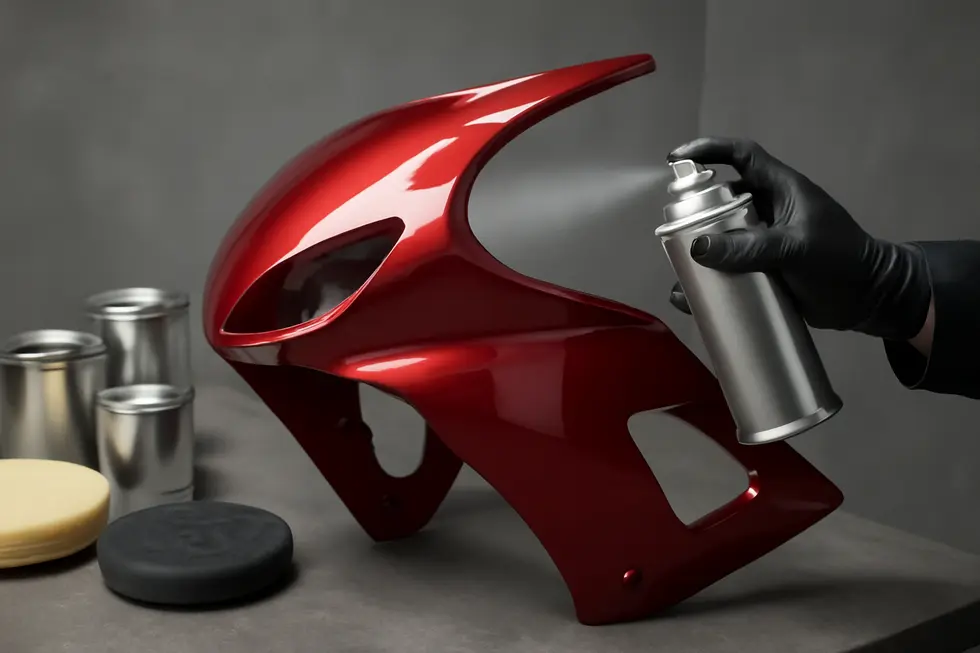
The final paint layer is protected with a clear coat that rejuvenates the fairing’s gloss and guards against environmental stressors like UV exposure, moisture, and abrasion. After the clear coat has cured sufficiently, polishing with fine compounds smooths the surface to a mirror-like shine, elevating the visual quality and enhancing durability. The finishing touch involves applying wax or a sealant, which locks in protection against dirt and oxidation while amplifying the depth and clarity of the finish.
Practical tips during this workflow include masking adjacent areas to prevent overspray and closely following product instructions to ensure optimal results. Although some household remedies like toothpaste offer quick scratch removal, they generally lack the permanence and professionalism needed for thorough restoration.
This integrated approach—combining careful repair, diligent surface preparation, accurate painting, and protective finishing—ensures motorcycle fairings regain both their structural soundness and showroom appearance. For those seeking an in-depth walkthrough of sanding, painting, clear coating, and polishing, the video “How To Repair Scratches In Motorcycle Paint?” offers valuable step-by-step guidance and visual context. To explore more about selecting the best replacement or repair components, the resource on affordable motorcycle fairings provides insights into high-quality options that complement these repair techniques.
2. Balancing Cost and Quality: The Economic Influence of Painting and Finishing in Motorcycle Fairing Restoration
Restoring a motorcycle fairing through painting and finishing methods involves more than just enhancing its visual appeal. It represents a critical economic decision that balances material costs, labor investments, and the long-term durability of the repair. For many motorcycle owners, particularly those preserving vintage or rare models, a high-quality paint and finish restoration is a cost-efficient alternative compared to completely replacing damaged fairings—often an expensive and time-consuming process due to part availability and shipping constraints.
The initial expenditure in quality paints, primers, and clear coats, combined with skilled workmanship, can seem significant. However, these costs pay dividends over time by extending the fairing’s service life and minimizing the need for frequent touch-ups or total replacements. Cheaper finishes, while saving money upfront, often compromise durability and can lead to accelerated fading, cracking, or peeling—especially as the motorcycle endures exposure to weather, vibrations, and UV radiation. In this sense, investing in premium finishing materials or advanced surface treatments like ceramic coatings offers enhanced protection. These coatings not only maintain the aesthetic integrity of the fairing but also add a robust layer against scratches and environmental damage, particularly important for composites like carbon fiber.
The choice between restoration and replacement hinges on both financial considerations and the owner’s priorities. Restoration preserves originality and can significantly boost the motorcycle’s resale value by maintaining an authentic and professionally refurbished appearance. For collectors and enthusiasts, this intangible value is crucial. Conversely, necessity may dictate replacement where damage exceeds economical repair limits or when a fairing’s material is extensively compromised. Yet, many riders find that a carefully executed paint and finish restoration strikes an optimal balance, satisfying aesthetic demands while conserving resources.
Another often overlooked economic aspect concerns the reinstallation phase. Proper reassembly using protective elements like rubber grommets can prevent stress-induced cracks, safeguarding the investment made in painting and reinforcing the fairing. This preventive measure reduces future repair costs and prolongs the effectiveness of the finishing work.
In summary, the economic impact of painting and finishing methods on motorcycle fairing repairs integrates multiple factors: upfront costs, durability, protection levels, preservation of originality, and long-term maintenance. Well-applied finishing techniques not only revitalize a fairing’s look but also contribute to practical savings and value retention. Riders seeking to optimize this balance may consider consulting professional restoration specialists or exploring specialized resources that detail paint quality and finishing options tailored for motorcycle parts.
For riders interested in exploring quality replacement and restoration options, explore the best motorcycle fairings available.
For more detailed pricing and specific method comparisons, consulting specialized restoration shops is advisable, as they can tailor solutions to unique motorcycle models and individual needs.
Final thoughts
Repairing motorcycle fairings effectively requires a strategic balance between restoring structural strength and reviving cosmetic appeal. By incorporating robust reinforcement methods such as copper pipe braces, business owners can provide repairs that resist stress and vibrations unique to motorcycle use. Precise surface preparation and filler application create a flawless canvas for high-quality finishes that maintain customer satisfaction and enhance resale value. Safe removal and reinstallation protocols protect fairing integrity during servicing, preventing new damage and ensuring long-lasting results. Lastly, professional painting and finishing techniques complete the restoration, preserving both aesthetics and durability. Embracing these comprehensive repair practices empowers motorcycle repair businesses to deliver superior service, stand out in a competitive market, and forge lasting customer trust.
Ready to elevate your ride? Summit Fairings delivers premium, custom-fit fairings that blend style and durability. Whether you’re chasing speed or turning heads, we’ve got your bike covered. Don’t wait—transform your machine today. Click, customize, and ride with confidence. Your perfect fairing is just a few clicks away. Act now!
About us
undefined