Introduction
Motorcycle plastic fairings not only shape the bike’s aerodynamic profile but also protect critical components. For business owners in repair shops or customization studios, mastering the art of fairing repair is essential to deliver value and quality. Effective repair enhances structural integrity, extends fairing lifespan, and preserves the bike’s aesthetic appeal. This guide details key techniques: plastic welding to fix aligned cracks, fiberglass reinforcement for extensive damage, and preparation and finishing methods to ensure a seamless restoration. Each chapter builds practical knowledge tailored to motorcycle fairing repair, empowering businesses to optimize their repair workflows and elevate customer satisfaction.
Tables of Contents
Chapter 1: How to Repair Plastic Fairings on a Motorcycle: Plastic Welding Techniques and Tools
- Mastering Surface Preparation for Durable Plastic Welding Repairs on Motorcycle Fairings
- Mastering Hot Staple Welding for Durable Plastic Fairing Repairs
- Maximizing Repair Strength: How to Use Plastic Welding Kits for Durable Motorcycle Fairings
- Mastering the Finishing Touch: Seamless Restoration After Plastic Welding Motorcycle Fairings
Chapter 2: How to Repair Plastic Fairings on a Motorcycle: Fiberglass Reinforcement and Resin Application
- Essential Cleaning and Surface Preparation for Effective Fiberglass Repairs on Motorcycle Fairings
- Mastering Fiberglass Cloth Application for Durable Motorcycle Fairing Repairs
- Precision Resin Mixing and Layered Fiberglass Application for Durable Fairing Repairs
- Mastering the Final Touches: Sanding, Priming, and Painting for Fiberglass-Repaired Motorcycle Fairings
Chapter 3: How to Repair Plastic Fairings on a Motorcycle: Preparation, Finishing, and Reinstallation Procedures
- Essential Surface Preparation for Durable Motorcycle Fairing Repairs: Cleaning, Sanding, and Reinforcement
- Achieving a Flawless Finish: Expert Smoothing, Filling, Priming, and Painting Techniques for Plastic Motorcycle Fairings
- Mastering Motorcycle Fairing Reinstallation: Precise Alignment and Secure Fastening for a Flawless Fit
- Essential Tools and Materials for Durable Plastic Fairing Repairs: From Welding to Fiberglass Reinforcement
Chapter 1: How to Repair Plastic Fairings on a Motorcycle: Plastic Welding Techniques and Tools
1. Mastering Surface Preparation for Durable Plastic Welding Repairs on Motorcycle Fairings
Proper surface preparation is fundamental when repairing plastic motorcycle fairings using plastic welding techniques. Achieving a long-lasting, seamless bond starts with thoroughly cleaning the damaged area. Dirt, grease, and contaminants can severely hinder adhesion, so using a solvent like paint thinner or a specialized plastic cleaner is essential to remove any oils or residues. This step ensures that the welding rods fuse correctly with the fairing material, promoting structural integrity during repair.
When addressing cracks or breaks, avoid aggressive sanding especially if the damaged edges fit together precisely like interlocking puzzle pieces. Preserving these original mating surfaces allows for better alignment and stronger bonding during welding. Sanding may only be needed post-welding to smooth the surface before finishing. In situations where holes or weakened areas are present, a compatible plastic welding rod melts into the clean surface, filling gaps and reinforcing the repair from within.
In some repairs, fiberglass resin serves as an optional reinforcement to augment strength. When used, it is critical to apply resin and fiberglass cloth over a clean, well-prepared surface and allow ample curing time for optimal durability. Though not always necessary, this added layer can enhance the fairing’s resilience against future stress.
Before reassembling the fairing, meticulous alignment checks ensure all parts fit properly without strain. Heat guns can gently reshape plastic panels for a snug fit without overtightening bolts, which might otherwise cause new cracks. These subtle adjustments complete the preparation phase, laying the groundwork for a professional finish.
For those looking to explore more about selecting and maintaining motorcycle fairings beyond repair techniques, discover affordable and quality options at Summit Fairings.
By focusing on meticulous cleaning, preserving original edges, and careful post-repair alignment, this approach guarantees durable, clean plastic welding repairs that maintain both the structural and aesthetic quality of your motorcycle fairings.
2. Mastering Hot Staple Welding for Durable Plastic Fairing Repairs
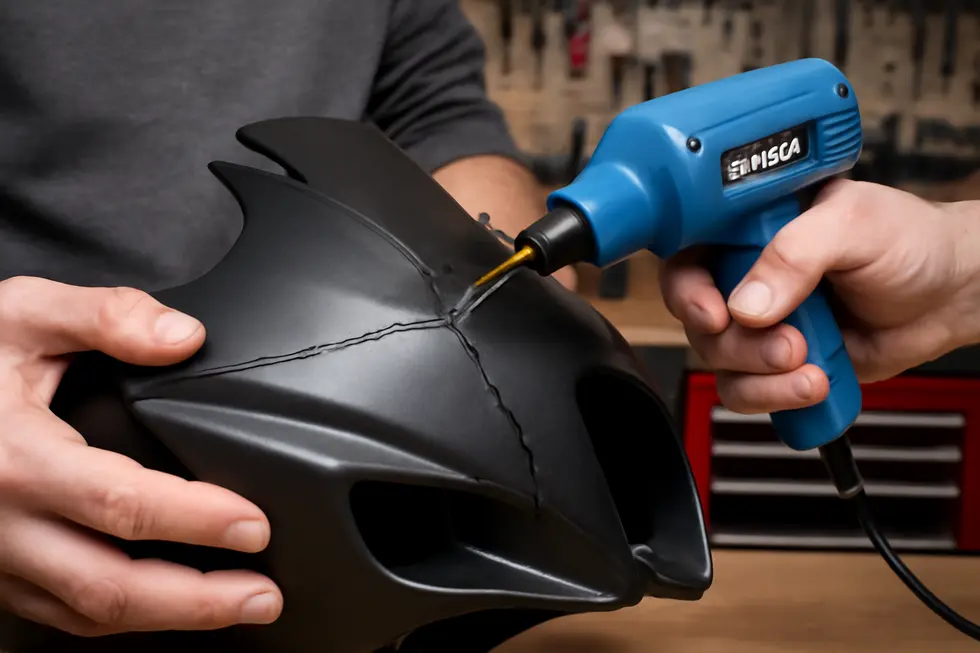
Hot staple welding stands out as a highly effective method to restore cracked motorcycle fairings by mechanically reinforcing damaged plastic from within. This technique involves heating specialized metal staples to around 1,380°F (750°C) using a dedicated hot staple gun designed for plastic repairs. When pressed into the cracked area, these heated staples penetrate the plastic, bonding it together internally and preventing further spreading of cracks.
The process begins by heating the tool to the optimal temperature, ensuring the staple is hot enough to embed smoothly without burning through the plastic. Each staple is aligned carefully across the crack and pressed evenly into the material. When plastic melts up both legs of the staple, it indicates a strong bond beneath the surface. Multiple staples are applied at regular intervals along the crack, providing balanced reinforcement and preserving the fairing’s structural integrity.
After embedding staples, melted plastic rods compatible with the fairing material are used to cover and fill the repair area. This overlay conceals the staples and restores a smooth surface ready for finishing. Sanding the area after curing helps refine the texture, while applying matching paint ensures the repair is visually discreet.
Advantages of hot staple welding include rapid heating and repair time, the ability to handle hard plastics common in motorcycle fairings, and the combination of mechanical strength with an appealing finish. Additionally, features like built-in LED lights can enhance precision in tight spaces, while overload protection safeguards the tool during extended use.
However, mastering staple placement and temperature control is crucial to prevent overheating or damaging the plastic. Practicing these steps enhances repair durability and aesthetic quality. When performed carefully, hot staple welding delivers a strong, long-lasting fix that both reinforces and cosmetically restores your motorcycle’s fairings.
For those seeking further tutorials on plastic welding techniques, exploring reputable motorcycle fairing resources can provide comprehensive guidance to complement these methods.
3. Maximizing Repair Strength: How to Use Plastic Welding Kits for Durable Motorcycle Fairings
Effective plastic welding is vital when repairing motorcycle fairings, combining careful preparation, the right tools, and skilled technique to achieve a long-lasting fix. Start by thoroughly cleaning the damaged area to remove grease, dirt, and debris; this step ensures the weld material adheres firmly to the plastic. Light sanding helps create a slightly rough surface, improving the bond, though some repairers prefer to keep original textures depending on the repair’s nature.
Selecting a plastic welding kit designed specifically for automotive plastics is crucial. Look for welders with ceramic-core heating elements and compatible welding rods that accommodate common fairing materials like ABS plastic. Specialized welding rods can often be used without needing to identify the exact plastic type, simplifying the process.
When repairing cracks or holes, reinforcing the damaged area from underneath with stainless steel wire mesh enhances durability—often resulting in a repair stronger than the original fairing. The welding technique involves heating both the plastic surface and the welding rod until molten, then applying melted material to fuse damaged edges smoothly. A well-designed welding tip shapes the plastic weld cleanly, minimizing excess buildup and creating a uniform finish.
After welding, allow the repair to cool completely before sanding the area to remove any unevenness and prepare it for paint or further finishing. Routine maintenance, including gentle cleaning with non-abrasive soap and immediate attention to any new cracks, will prolong the integrity of the repair.
Plastic welding offers an adaptable and resilient alternative to adhesives or fiberglass, delivering repairs that flex and hold up over time. For more detailed repair tutorials and tips, explore established motorcycle fairing resources like the insightful guides available at Summit Fairings, which can deepen your understanding and technique refinement.
4. Mastering the Finishing Touch: Seamless Restoration After Plastic Welding Motorcycle Fairings
Once plastic welding has successfully bonded the damaged motorcycle fairing, the finishing process transforms a functional repair into a visually seamless restoration. The initial step involves carefully sanding the welded area to smooth out any uneven surfaces or excess melted plastic. This creates a consistent texture that blends with the surrounding fairing and prepares the surface for subsequent treatments.
If gaps or minor imperfections persist, applying a plastic-compatible body filler helps fill these areas. The filler must be applied sparingly and evenly, then sanded to maintain a uniform profile that mimics the original contours of the fairing. Achieving this level of precision is essential for both structural integrity and an aesthetically pleasing end result.
Following surface preparation, the repaired section requires coating with a primer designed for use on plastic. This ensures proper adhesion and durability of the topcoat while preventing issues such as peeling or chipping over time. Selecting paint matched to the fairing’s original color is critical to restoring the bike’s cohesive look. Applying multiple thin layers of paint allows for even coverage without runs or drips, and each layer should be allowed to dry thoroughly before the next is applied.
To protect the fresh paint and enhance the finish, a clear coat seals the surface, delivering a glossy, showroom-quality shine. This top layer also guards against environmental elements like UV exposure and minor abrasions. After the clear coat cures properly, wet sanding followed by polishing eliminates minor imperfections, unlocking a mirror-like smoothness. This final refinement merges the repaired spot with the factory finish.
Throughout this stage, patience and attention to detail ensure the durability and appearance of the repair. For those looking to deepen their understanding of fairing repairs and finishing techniques, exploring expert guides on the best motorcycle fairings can provide valuable insight. Ultimately, the meticulous combination of sanding, filling, painting, and sealing guarantees that plastic welding repairs on motorcycle fairings are both robust and visually impeccable.
Chapter 2: How to Repair Plastic Fairings on a Motorcycle: Fiberglass Reinforcement and Resin Application
1. Essential Cleaning and Surface Preparation for Effective Fiberglass Repairs on Motorcycle Fairings
Achieving a durable and seamless fiberglass repair on plastic motorcycle fairings begins with meticulous cleaning and surface preparation. The integrity of resin adhesion largely depends on the removal of any contaminants such as grease, oil, dirt, or loose debris. Using a strong degreaser or paint thinner ensures the surface is perfectly clean, eliminating residues that could interfere with bonding.
Once cleaned, the fairing’s damaged section must be sanded carefully with fine to medium grit sandpaper. This sanding creates a slightly roughened texture, which is critical for the fiberglass resin and cloth to adhere firmly. It’s important to sand evenly without overdoing it, avoiding damage to surrounding areas or thinning the plastic excessively. Old or weak fiberglass remnants from previous repairs should be entirely cleared away to guarantee a solid foundation for new reinforcement layers.
For cracks or holes, beveling or V-grooving the edges can improve resin flow and bonding by allowing the fiberglass mat to nestle and fill the damage more securely. Although not always necessary, this step can enhance the overall strength and longevity of the repair.
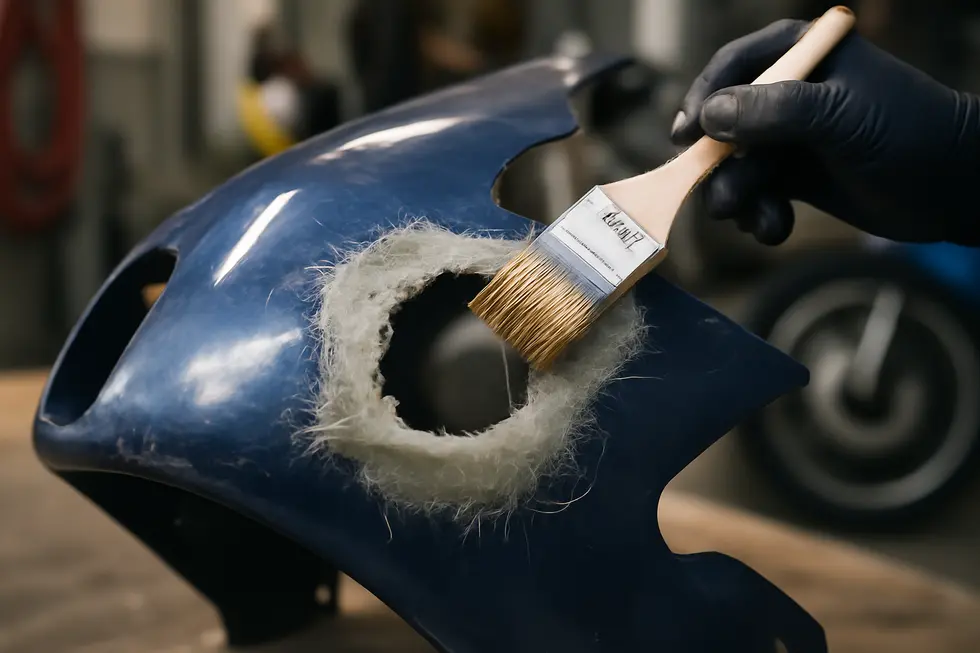
After these preparatory steps, the application of resin commences. The resin—polyester or epoxy—should be brushed onto the prepared area before laying fiberglass cloth or mat that extends slightly beyond the damaged boundary. Resaturating the fiberglass layer with additional resin ensures full impregnation, eliminating air pockets and reinforcing the repair. Once cured, this composite layer is strong enough to be sanded smooth, readying the surface for body filler and paint to restore the fairing’s appearance.
Understanding the nuances of cleaning and preparation maximizes repair effectiveness and longevity. For further resources on motorcycle fairings and detailed repair advice, exploring comprehensive guides and tutorials can provide valuable visual and practical support, such as those available from reputable fairings providers.
2. Mastering Fiberglass Cloth Application for Durable Motorcycle Fairing Repairs
Fiberglass cloth application is a critical step when reinforcing plastic motorcycle fairings damaged by cracks or holes. This process begins with thorough surface preparation—cleaning and sanding the damaged area to remove dirt, grease, and any loose fragments. Creating a slightly roughened texture ensures that resin adhesion is optimal, which is essential for a lasting repair. After preparing the surface, cut the fiberglass cloth to a size just larger than the damaged area to fully reinforce and overlap its edges, preventing weak spots.
Next, carefully mix the chosen resin with the appropriate hardener according to the manufacturer’s instructions. This resin, typically polyester or epoxy, acts as the bonding agent. Begin by applying a thin, even coat of resin directly on the prepared surface to create a tacky base layer. Immediately place the cut fiberglass cloth onto this resin coating and saturate it thoroughly with additional resin using a brush. Ensuring complete saturation is vital; it eliminates air pockets and dry fibers that could compromise strength. For areas requiring enhanced durability, additional layers of cloth and resin can be applied sequentially. Each layer should be allowed to partially cure before applying the next, building a strong composite structure.
Once fully layered, the repair must cure undisturbed, typically for several hours depending on environmental conditions and resin type. After curing, the surface is sanded smooth, eliminating any unevenness or excess resin. The repaired area is then primed and painted to seamlessly blend with the motorcycle’s original finish, restoring both function and appearance.
This method produces a reliable composite patch that reinforces the original plastic fairing, bringing back structural integrity while maintaining flexibility to withstand riding vibrations. Fiberglass cloth is preferred over matting for this reason, as its woven fibers provide superior strength and flexibility.
For comprehensive guidance and recommended kits tailored for motorcycle fairing repairs, exploring resources like the Explore the Best Motorcycle Fairings at Summit Fairings blog can provide practical insights and materials.
3. Precision Resin Mixing and Layered Fiberglass Application for Durable Fairing Repairs
Successfully repairing plastic motorcycle fairings with fiberglass reinforcement hinges on meticulous resin preparation and application. The process begins by accurately mixing a two-part resin, typically polyester or epoxy, adhering strictly to the manufacturer’s specified ratio. This precision is essential; improper blending can compromise the resin’s curing process, resulting in weaker repairs and potential delamination over time. Stirring should be thorough and continuous to achieve a uniform consistency that will bond effectively.
Once mixed, the resin is immediately applied over carefully cut patches of fiberglass cloth that conform to the damaged area’s contours. Rather than saturating the entire surface at once, fiberglass patches are layered in stages, beginning with smaller pieces to fill voids or holes. Subsequent larger patches feather out the repair edges, recreating the fairing’s original thickness and providing a seamless transition from the repaired section to undamaged plastic.
Applying resin calls for careful brush strokes or an applicator, ensuring the fiberglass is saturated without trapping unwanted air bubbles. Employing specialized tools, such as a fiberglass bubble roller, helps press the resin evenly into the cloth while expelling air pockets, which strengthens the bond and smooths the surface.
Allowing the resin to cure fully is critical before proceeding with finishing steps. Curing times vary depending on resin type, ambient temperature, and humidity—conditions that must be monitored to avoid rushed or incomplete hardening. A completely cured repair restores structural integrity, preparing the surface for sanding, body filler application if needed, priming, and painting to restore the fairing’s visual appeal.
For those seeking further tips and nuanced techniques on applying resin and fiberglass, exploring expert video tutorials can provide valuable practical insights. Additionally, more on acquiring quality and affordable motorcycle fairings to complement repairs can be found at Summit Fairings.
This detailed approach guarantees the repaired fairing is both durable and aesthetically consistent with the motorcycle’s design.
4. Mastering the Final Touches: Sanding, Priming, and Painting for Fiberglass-Repaired Motorcycle Fairings
Achieving a seamless finish after fiberglass reinforcement and resin application is crucial to restore the fairing’s strength and aesthetics. The finishing process begins with careful sanding to smooth the repaired surface and prepare it for primer. Initially, rough sanding helps remove any uneven resin spots and loose glass fibers, promoting better adhesion in subsequent steps. Once the resin has fully cured, finer sanding gradates the texture to a smooth, even finish, addressing imperfections without compromising the repair’s integrity. It’s important to clean the surface thoroughly before sanding, often using paint thinner to eliminate grease and contaminants without harming the material beneath.
Following sanding, priming the surface provides a uniform base that enhances paint adhesion and durability. Applying an automotive-grade primer designed for both plastic and fiberglass effectively seals the repair area, protecting it from moisture and environmental damage. This step not only unifies the texture but also ensures the paint bonds securely, preventing peeling or chipping over time.
The final step is painting, where multiple thin layers of automotive-grade urethane paint are applied to achieve a smooth, factory-quality finish. Each coat should dry completely before applying the next to build a durable, glossy surface that resists weathering and wear. Special care during painting allows for color matching to the original fairing palette or the opportunity to customize with unique designs.
Throughout these stages, meticulous surface preparation is essential. Skipping or rushing any phase can compromise both the look and longevity of the repair. By following careful sanding, priming, and painting protocols, the repaired motorcycle fairing regains structural integrity and a flawless appearance, ensuring it complements the bike’s overall style and protects against future damage.
For further insights and detailed guides on restoring motorcycle fairings, exploring resources like the collection of expert advice and tutorials at Summit Fairings offers valuable support.
Chapter 3: How to Repair Plastic Fairings on a Motorcycle: Preparation, Finishing, and Reinstallation Procedures
1. Essential Surface Preparation for Durable Motorcycle Fairing Repairs: Cleaning, Sanding, and Reinforcement
Effective repair of plastic motorcycle fairings begins with meticulous surface preparation to ensure adhesion, strength, and a clean finish. The first critical step is thorough cleaning of the damaged area. Removing dirt, grease, and loose debris with suitable cleaners—such as paint thinner or a mild soap and water solution—eliminates contaminants that can compromise bonding. This careful cleansing sets the foundation for any repair work.
Once clean, the surface requires light sanding around the damage using fine-grit sandpaper. This sanding creates a rough texture that enhances the grip of adhesives or resin. However, if the damaged edges fit together perfectly like a puzzle, sanding can be minimized to preserve the original contour for a tighter bond. Any weak or brittle plastic fragments must be clipped away to avoid ineffective patches and ensure a solid base to build upon.
For more significant damage zones, especially involving fiberglass or composite plastics, structural reinforcement becomes necessary. This involves applying a resin—such as polyester or epoxy—over the prepared area, then layering fiberglass cloth or mat onto the resin while it is still wet. Cutting the fiberglass slightly larger than the damaged spot helps cover and strengthen the surrounding region. Working from the inside of the fairing outward maximizes support and durability of the repair. Allowing sufficient curing time, often overnight, guarantees the repair hardens properly before any finishing steps.
These preparation stages not only restore structural integrity but also set the stage for seamless finishing and paint work, preserving the fairing’s original appearance and performance. For riders seeking detailed guidance on fairing maintenance and selection alongside repair tutorials, Explore the Best Motorcycle Fairings at Summit Fairings offers valuable insights.
2. Achieving a Flawless Finish: Expert Smoothing, Filling, Priming, and Painting Techniques for Plastic Motorcycle Fairings
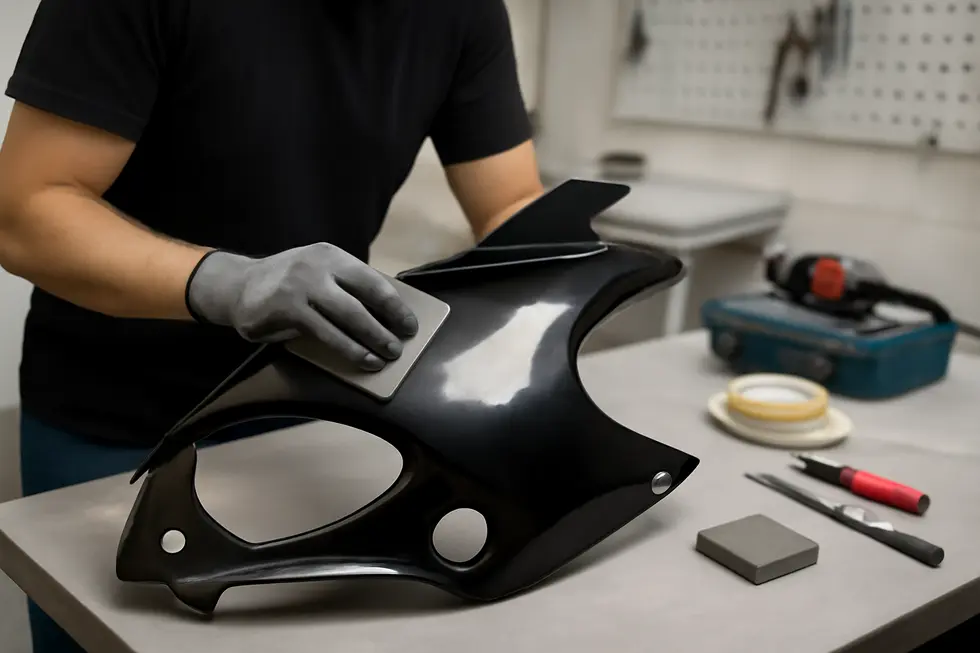
Repairing plastic motorcycle fairings demands precise finishing techniques to ensure a durable, seamless, and visually pleasing outcome. Once the structural repairs—such as fiberglass reinforcement or plastic welding—are complete, the focus shifts to refining the surface. The first step is smoothing the repaired area, which starts by sanding with a coarse grit (around 240) to level uneven patches and contours. Gradually working through finer grits up to 800 with wet sanding helps eliminate scratches and prepares the surface for filling. Hand sanding tools, such as fine sanding sponges or Scotch pads, ensure attention to tight curves and details that power tools might miss, yielding a uniform texture essential for subsequent steps.
Next, any remaining imperfections like pinholes or minor cracks are addressed through filling. Using fillings designed for plastic surfaces, these materials bridge defects, creating a perfectly smooth finish crucial for a flawless paint job. Once the filler dries, it is carefully sanded to blend seamlessly with the surrounding fairing, leaving no visible ridges or texture variation.
Priming is perhaps the most critical stage for long-term adhesion and durability. Applying a primer formulated specifically as a plastic adhesion promoter forms a strong bonding interface between the non-porous surface and paint layers. For fiberglass repairs, an additional gel coat layer before primer can improve finish resilience and ease painting. Priming also evens out color and texture differences, providing a consistent canvas for painting.
When painting, careful application of multiple thin coats rather than a single heavy layer prevents defects such as runs or orange peel textures. This process involves color-matching paint, usually applied by spray or airbrush, with adequate drying intervals between coats to build depth and uniformity. A final clear coat seals the paint, enhancing gloss and protecting against UV damage and scratches.
Throughout these steps, meticulous cleaning and adequate curing times are key to ensuring each layer bonds perfectly without contamination. Avoiding harsh chemicals prevents damage to delicate plastic surfaces. Following this comprehensive finishing process fully restores your motorcycle’s fairings, delivering both structural integrity and a professional-looking, durable finish.
For detailed guides on finishing procedures tailored to motorcycle plastics, explore comprehensive resources available at Summit Fairings’ blog for expert tips and product recommendations.
3. Mastering Motorcycle Fairing Reinstallation: Precise Alignment and Secure Fastening for a Flawless Fit
Reinstalling plastic fairings on a motorcycle demands patience and precision to restore both function and aesthetics. Before beginning, thoroughly clean all mounting surfaces on the bike and fairing panels. Removing dirt, grease, and old adhesive residue enhances the fit and prevents potential shifting during rides. Starting with the larger fairing sections, such as the front or headlight assembly, provides a stable foundation for the entire reassembly process. Align these pieces carefully with their designated mounting points, including fork tubes and upper mounts. Proper alignment avoids undue stress on the plastic, which can lead to cracking or warping, while preserving the streamlined look crucial to the motorcycle’s aerodynamic performance.
As you proceed, ensure each panel aligns precisely with its mounting points. Small misalignments may appear minor but can cause vibration or premature wear. Securing the fairings involves using the appropriate fasteners—screws, bolts, or plastic clips—specific to your motorcycle’s model. Tighten them firmly but avoid overtightening, which risks damaging delicate mounting holes or the plastic panels themselves. Some riders prefer replacing plastic push pins with bolts to improve durability and ease future maintenance, especially in heavily used or custom setups.
Once the main panels are in place, carefully reinstall any additional components removed earlier, such as mirrors, turn signals, and windscreens. Check that all are aligned and fastened securely to maintain safety and appearance. A final, comprehensive visual inspection ensures no gaps exist between panels and that all fasteners remain tight. This step confirms the motorcycle is restored to its intended form, providing both protection and style.
For detailed guides and tips on achieving a professional installation, riders can explore expert resources on high-quality motorcycle fairings that offer insights into model-specific nuances and fastening techniques.
4. Essential Tools and Materials for Durable Plastic Fairing Repairs: From Welding to Fiberglass Reinforcement
Repairing plastic motorcycle fairings demands precise application of the right tools and materials to restore both function and appearance. Plastic welding equipment plays a pivotal role in mending cracks or breaks in thermoplastic fairings by heating and fusing the damaged edges. This process often involves a specialized welding gun or soldering iron paired with plastic rods that match the original fairing material, reinforcing the joint internally without adding bulk. Achieving a strong bond requires a clean, sanded surface to ensure optimal adhesion.
For fairings with more extensive damage or those composed of composite materials, fiberglass repair is a go-to technique. The approach involves sanding and thoroughly cleaning the damaged area before layering fiberglass cloth or mat over it. The application of resin—either polyester or epoxy—saturates the cloth, which then cures into a hard, durable shell. This method not only restores structural integrity but also supports a smooth surface for finishing. After curing, sanding the repair flush with the surrounding surface prepares it for refinishing and paint.
Additionally, specialized plastic repair kits offer an alternative for repairs where welding or fiberglass might be impractical. They typically contain methacrylate-based adhesives and fillers designed to bond rigid plastics strongly without heat. These kits include all essentials from primers to surface preparation materials, helping achieve a clean, durable repair with minimal tools.
Beyond repair-specific supplies, general materials like sandpaper, paint thinner, clamps, and cleaning agents are indispensable. Sandpaper enables surface roughening and smoothing, while clamps hold parts securely during curing stages, ensuring precise alignment.
Choosing the appropriate repair method depends on the fairing’s material composition and damage severity. Thermoplastic cracks suit plastic welding; composite layers respond best to fiberglass reinforcement, and repair kits provide convenient fixes for rigid plastics. Leveraging video tutorials and detailed guides enhances proficiency with each tool and technique. For those interested in exploring comprehensive solutions for motorcycle fairings and restoration, visiting resources such as the Discover Affordable Motorcycle Fairings blog can be invaluable.
Final thoughts
Repairing plastic motorcycle fairings is a valuable skill that combines precise techniques and careful preparation to restore both form and function. Plastic welding offers a reliable solution for aligned cracks, while fiberglass reinforcement addresses more extensive damage with durable strength. Proper surface preparation, meticulous sanding, and precise finishing ensure that repairs blend seamlessly, maintaining the motorcycle’s original aesthetics and performance. For business owners, mastering these processes translates into higher-quality repairs, reduced turnaround times, and increased customer satisfaction. Investing in the right tools and understanding each step empowers repair shops and customizers to confidently revive damaged fairings and build lasting client trust.
Ready to elevate your ride? Summit Fairings delivers premium, custom-fit fairings that blend style and durability. Whether you’re chasing speed or turning heads, we’ve got your bike covered. Don’t wait—transform your machine today. Click, customize, and ride with confidence. Your perfect fairing is just a few clicks away. Act now!
About us
undefined