Introduction
Plastic motorcycle fairings serve as both protective shields and aesthetic statements, making their maintenance essential for any business catering to riders. Understanding how to repair plastic motorcycle fairings efficiently not only saves costs but also enhances customer satisfaction and brand reputation. This guide walks business owners through the foundational steps of damage assessment and surface preparation, explores proven repair techniques including plastic welding and fiberglass reinforcement, and details finishing processes that restore both function and appearance. Each chapter builds a comprehensive framework that ensures repairs delivered are durable, visually appealing, and cost-effective for sustained business success.
Tables of Contents
Chapter 1: Understanding How to Repair Plastic Motorcycle Fairing: Assessing Damage and Preparing the Surface
- Mastering Damage Assessment: The Crucial First Step in Plastic Motorcycle Fairing Repair
- Essential Surface Preparation Steps to Ensure Durable Plastic Fairing Repairs
- Choosing the Right Repair Techniques and Materials for Durable Plastic Motorcycle Fairing Restoration
Chapter 2: Techniques on How to Repair Plastic Motorcycle Fairing: Plastic Welding and Fiberglass Reinforcement Methods
- Mastering Plastic Welding for Motorcycle Fairing Repair: Essential Tools, Materials, and Procedures
- Mastering Fiberglass Reinforcement: Strengthening Plastic Motorcycle Fairings for Lasting Durability
- Balancing Strength and Flexibility: Evaluating Plastic Welding Versus Fiberglass Reinforcement for Fairing Repairs
Chapter 3: Finishing and Restoring Appearance: Sanding, Filling, and Painting for How to Repair Plastic Motorcycle Fairing
- Mastering Sanding and Filling Techniques to Seamlessly Restore Plastic Motorcycle Fairings
- Sculpting a Flawless Finish: Expert Techniques for Filling Imperfections and Restoring Motorcycle Fairing Appearance
- Mastering the Art of Painting and Priming: Bringing Your Plastic Motorcycle Fairing Back to Life
Chapter 1: Understanding How to Repair Plastic Motorcycle Fairing: Assessing Damage and Preparing the Surface
1. Mastering Damage Assessment: The Crucial First Step in Plastic Motorcycle Fairing Repair
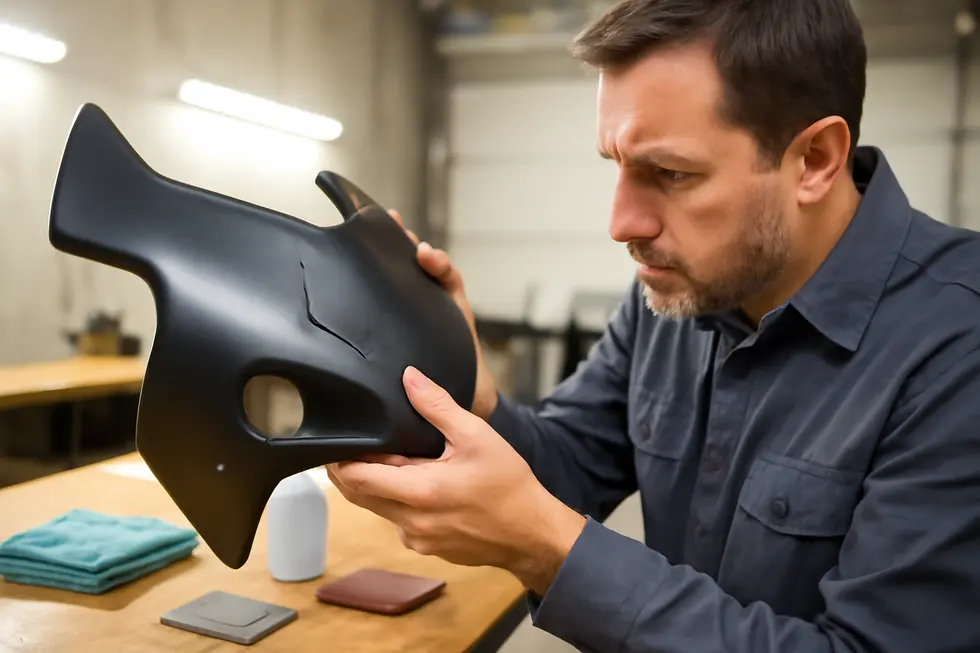
Evaluating the extent of damage is fundamental to any successful plastic motorcycle fairing repair. Begin with a careful visual and tactile inspection to identify cracks, scratches, dents, or any missing sections. This initial assessment determines whether the fairing can be effectively restored or requires replacement. Minor surface blemishes like scratches often respond well to plastic polishing, while deeper cracks and lost fragments demand more involved procedures such as plastic welding or patching.
Once the damage is clearly identified, thorough cleaning follows. Dirt, grease, and contaminants must be removed to ensure a clean working surface. Use a mild detergent or a cleaner formulated for plastics and allow the area to dry completely before proceeding. This step is essential for maximizing the adhesion of repair materials.
Surface preparation then involves gentle sanding of the damaged region with fine-grit sandpaper. This process smooths any jagged edges and creates a subtly roughened texture, which improves bonding when applying fillers, welding materials, or resin. Removing any loose plastic fragments prevents further deterioration during the repair process and promotes structural stability.
For cracks or holes, assess the suitability of plastic welding techniques, where heated staples or rods fuse the damaged edges, or consider plastic fillers designed to restore contour and strength. Preparing the surface meticulously ensures these materials adhere properly and deliver a long-lasting repair.
After restoring the structural integrity, priming the repaired region is often necessary. Priming ensures that painting or polishing yields an even, durable finish, blending the repair seamlessly with the surrounding fairing.
Lastly, verify that fasteners and mounting points remain intact and secure. A well-repaired fairing must fit precisely and safely on the motorcycle, preserving both function and appearance.
Careful damage assessment and meticulous surface preparation set the foundation for effective restoration. For more insights into plastic fairing care, explore detailed discussions on motorcycle fairings and repair techniques.
2. Essential Surface Preparation Steps to Ensure Durable Plastic Fairing Repairs
Effective repair of plastic motorcycle fairings depends heavily on meticulous surface preparation, which lays the foundation for both strong adhesion and lasting durability. This process begins with thorough damage assessment to identify cracks, holes, or areas weakened by loose fragments. Removing any unstable plastic pieces creates a stable base for repairs and prevents further material degradation. Following this, cleaning the damaged area is critical—dirt, grease, and debris must be completely eliminated using suitable cleaning agents like mild soap or specialized solvents. This step ensures that any resin, adhesive, or welding technique will bond securely without interference.
Once cleaned, gently sanding around the damage roughens the surface, increasing mechanical adhesion without compromising the intact parts of the fairing. This lightly textured area significantly improves the grip between the plastic and the applied repair material. For more severe cracks or holes, V-grooving the damaged line creates a larger surface area to which adhesives or resin can bond, enhancing structural stability. When working with more complex repairs involving fiberglass reinforcement, this prepared surface allows resin and fiberglass cloth to integrate seamlessly, often from the inside of the fairing, restoring strength and continuity.
These preparatory steps ensure that the subsequent repair techniques are effective, resulting in a restoration that is not only functional but also visually consistent. Keeping the repair site dry and contaminant-free throughout the process maximizes the durability of both adhesive and welding methods. For additional guidance and practical demonstrations on these essential steps, you may want to explore detailed repair tutorials highlighting the integration of surface preparation with advanced plastic fairing repairs.
For insights on selecting quality replacement fairings and ongoing maintenance tips, visit the Explore the Best Motorcycle Fairings at Summit Fairings blog.
3. Choosing the Right Repair Techniques and Materials for Durable Plastic Motorcycle Fairing Restoration
Effectively repairing a plastic motorcycle fairing begins with understanding the damage severity and selecting a method suited to the fairing’s material. The process involves more than fixing visible cracks—it means restoring structural integrity and appearance through proper material choice and technique.
Initially, careful inspection identifies cracks, holes, and surface imperfections to gauge whether simple filler application suffices or if reinforcement is needed. For thermoplastic fairings, plastic welding stands out as an ideal solution. This method uses heat to melt and fuse the plastic along cracks, restoring strength close to the original. Recognizing the plastic type—often ABS—is critical, as compatible welding rods and precise technique ensure a lasting bond.
When damage involves fiberglass or composite fairings, or requires added reinforcement, fiberglass repair becomes the solution. This technique applies resin and fiberglass cloth over the damaged area, reestablishing both toughness and smoothness. The cloth is cut larger than the defect, layered with resin, and cured to provide a solid, resilient patch.
Surface preparation supports these methods by thoroughly cleaning grease, dirt, and loose debris using solvents that do not harm the plastic. Sanding with progressively finer grit—from 240 to 800 wet/dry paper—creates an optimal texture for adhesion and a smooth finish. Harder-to-reach areas benefit from manual sanding with scotch pads or flexible tools to ensure uniformity.
Following structural repair, fillers smooth minor imperfections, and final sanding readies the surface for primer and paint. This attention to detail in preparation guarantees that repair compounds bond securely and the finish seamlessly matches the original.
That precise match of technique to material, paired with meticulous preparation, forms the foundation of durable, high-quality plastic motorcycle fairing repair. For more detailed insights on techniques and materials, exploring specialized resources can deepen your repair expertise, such as this comprehensive guide to motorcycle fairings at Summit Fairings.
Chapter 2: Techniques on How to Repair Plastic Motorcycle Fairing: Plastic Welding and Fiberglass Reinforcement Methods
1. Mastering Plastic Welding for Motorcycle Fairing Repair: Essential Tools, Materials, and Procedures
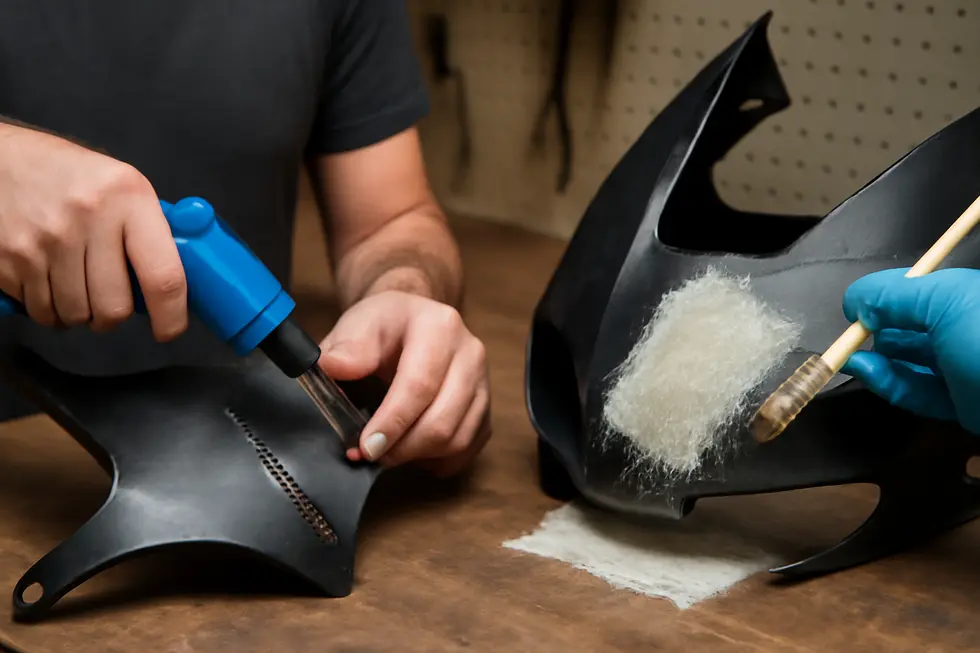
Plastic welding is a highly effective method for restoring cracked or broken motorcycle fairings, especially those made from ABS plastic, a material prized for its durability and UV resistance. This technique relies on heating the damaged edges until they soften and then fusing them together, often with the support of specialized welding rods or metal staples. The process begins with thoroughly cleaning the repair area using mild soap and warm water to remove dirt and grease without harming UV-protective coatings. Clean surfaces ensure the welding material adheres firmly, promoting long-lasting repairs.
Aligning the crack edges accurately is crucial before applying heat. The most common tools incorporate hot staple kits, which heat small metal staples and embed them across the crack, melting the plastic on contact to create a strong bond that restores structural integrity close to the original strength. Modern kits often feature adjustable temperature controls and LED lighting, enabling precise work and reducing the risk of overheating or damaging the fairing. After welding, any excess material is carefully trimmed, and the surface is prepped for finishing steps like sanding and painting.
Key to a successful repair is selecting welding rods or staples compatible with the base plastic to ensure proper fusion. Overheating or exposing the repaired area to extreme temperatures can cause warping, so maintaining temperature control during and after the process is essential. Regular inspection after repairs helps detect any emerging weaknesses early. In some cases, vacuum forming techniques may complement repairs when replacing or reinforcing sections of ABS or polycarbonate fairings with built-in UV stabilizers.
This plastic welding approach combines precision tools and compatible materials to effectively restore both the strength and appearance of motorcycle fairings. For those seeking more insights into motorcycle fairing options and maintenance, exploring comprehensive resources like the Summit Fairings blog provides valuable guidance.
2. Mastering Fiberglass Reinforcement: Strengthening Plastic Motorcycle Fairings for Lasting Durability
Fiberglass reinforcement is a trusted method for restoring the strength and durability of damaged plastic motorcycle fairings. This technique involves applying fiberglass cloth saturated with resin onto the prepared area, forming a rigid, impact-resistant patch that bonds securely with the plastic substrate. The process begins with thorough cleaning and sanding to remove contaminants and create a roughened surface. This texture promotes optimal adhesion between the fairing and the fiberglass composite, ensuring a strong, long-lasting repair.
Carefully cut the fiberglass cloth to extend slightly beyond the damaged area, allowing sufficient overlap for reinforcement. The cloth is then saturated with a polyester or epoxy resin, which acts as a binder that hardens to form a lightweight yet robust composite layer. Several layers may be applied, each one fully cured before the next is added. This layering adds incremental strength and impact resistance, essential for withstanding the stresses typical of motorcycling.
Once the composite cures, sanding smooths out any roughness, and the repair can be painted to match the original fairing, providing a seamless finish. Fiberglass-reinforced repairs offer superior durability, resisting cracking, deformation, and environmental damage such as UV exposure and vibration. This not only restores the fairing’s structural integrity but often enhances it beyond the original condition, extending its service life.
The balance of mechanical strength, lightweight construction, and ease of application makes fiberglass reinforcement especially valuable. It is widely used among enthusiasts and professionals for plastic motorcycle fairing repairs where maintaining both aesthetics and resilience is critical. For additional insights into motorcycle fairing materials and repair considerations, exploring resources on your ultimate source for affordable motorcycle fairings can provide useful guidance.
3. Balancing Strength and Flexibility: Evaluating Plastic Welding Versus Fiberglass Reinforcement for Fairing Repairs
When repairing plastic motorcycle fairings, choosing between plastic welding and fiberglass reinforcement hinges on several key factors including cost, material compatibility, and intended use of the repair. Plastic welding offers a cost-effective solution for thermoplastic fairings by fusing damaged edges through controlled heat. This method excels in maintaining the original flexibility and appearance of the fairing, making it ideal for small to medium cracks where parts can be precisely aligned. It demands careful temperature management and skilled technique to avoid warping or brittle joints, but results in repairs that are often seamless and lightweight, preserving the fairing’s vibration resistance.
Fiberglass reinforcement, on the other hand, involves layering resin-soaked fiberglass cloth over the damaged area. Though this approach incurs higher material costs and requires longer curing times, it delivers superior structural reinforcement, particularly for larger breaks or when plastics are incompatible with welding. The rigidity added by fiberglass enhances durability but can alter the fairing’s original flexibility and add weight. Additionally, working with resin necessitates proper ventilation and safety precautions due to fumes.
Technologically, plastic welding demands precision with heat sources such as hot staple kits or soldering irons, fusing plastic at a molecular level. Fiberglass repair focuses on mastering resin mixing, layering, and curing to create a strong composite patch bonded to the fairing. Economically, welding tools represent a one-time investment with low recurring costs in filler materials, while fiberglass repairs require ongoing expense for consumables and protective gear.
In practice, welding suits repairs where maintaining the fairing’s form and feel is crucial, whereas fiberglass is preferable when structural integrity is paramount and the damage is extensive. Often, professional repairs blend these methods with filler and paint to regain both strength and appearance.
For further insight into material selection and repair methods, exploring expert motorcycle fairing resources can deepen understanding of how repair techniques align with fairing types and damage severity.
Chapter 3: Finishing and Restoring Appearance: Sanding, Filling, and Painting for How to Repair Plastic Motorcycle Fairing
1. Mastering Sanding and Filling Techniques to Seamlessly Restore Plastic Motorcycle Fairings
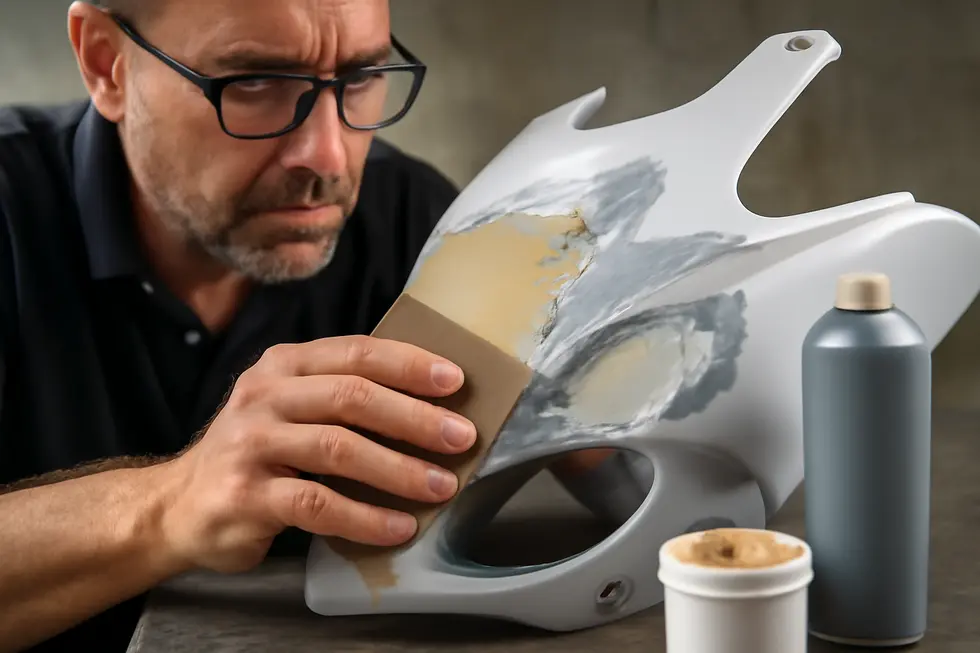
Achieving a flawless finish on a repaired plastic motorcycle fairing hinges on the careful execution of sanding, filling, and painting techniques that blend the repair with the original surface. Once the structural repair—whether plastic welding or fiberglass reinforcement—is fully cured, the next step is to carefully sand the area. Starting with a coarser grit sandpaper helps level the repair, removing any excess material and smoothing out rough edges. It’s essential to progressively use finer grit sandpaper, as this gradual refinement eliminates scratches and inconsistencies, resulting in a polished, even surface that seamlessly transitions into the surrounding fairing.
Small imperfections or pinholes often remain visible after initial sanding. These voids can compromise both aesthetics and the durability of the paint finish. Applying a thin layer of body filler or glazing putty addresses these flaws by filling gaps and creating a perfectly smooth canvas. After the filler has hardened, it should be sanded down to a level that matches the original contour of the fairing, ensuring no noticeable ridges or dips remain.
Before painting, priming the repaired area is a critical step. A quality primer facilitates better paint adhesion and helps highlight any subtle imperfections that might need further attention. This base layer also provides an even tone, which is especially important when matching the new paint to the motorcycle’s original color and finish. Once primed and smooth, repainting can restore the fairing’s appearance to its near-original condition.
Throughout this finishing process, care must be taken to avoid abrasive cleaners or chemicals that could damage the plastic’s surface. Additionally, confirming that every repair phase is fully cured before proceeding will maximize adhesion and longevity. The proper alignment of the fairing during reassembly also plays a role in maintaining both the repair’s integrity and its visual appeal.
For those seeking practical demonstrations of these fundamental finishing techniques, detailed guides and video tutorials on fiberglass motorcycle repair offer valuable step-by-step approaches. These resources cover sanding from coarse to fine grit, filling imperfections, priming, and painting—key skills for anyone looking to restore their motorcycle fairing professionally and cost-effectively.
Explore more about quality motorcycle fairings and repair tips at Summit Fairings’ insightful blog for enthusiasts and professionals alike.
2. Sculpting a Flawless Finish: Expert Techniques for Filling Imperfections and Restoring Motorcycle Fairing Appearance
Achieving a smooth, visually appealing plastic motorcycle fairing after repair hinges on a careful progression through sanding, filling, and painting. The process begins with thorough cleaning to remove dirt, grease, and any loose debris that could interfere with adhesion. Light sanding with fine-grit paper, such as 220 grit, is essential to texture the surface, allowing fillers and paints to bond securely. For broader surfaces, a dual-action sander equipped with 240 grit paper speeds this step, while hand sanding with a red scotch pad helps smooth hard-to-reach or delicate areas.
After this preparation, imperfections like cracks, holes, or surface unevenness require filling. Plastic-specific fillers are ideal for minor flaws, while more complex structural repairs may call for fiberglass resin combined with cloth patches. The filler must be allowed to cure completely before sanding it back to a smooth finish. Patience during this phase prevents damage to the repair and ensures lasting durability.
With a seamless surface established, applying a high-build primer specially formulated for plastics is critical. This primer fills remaining micro-imperfections and builds a perfect base for paint. Wet sanding with fine-grit sandpaper around 800 grit follows, eliminating any residual texture or dust nibs and ensuring a flawless final coat.
Painting can then restore the original color and gloss, transforming the repaired section into an indistinguishable part of the whole fairing. For fiberglass fairings, reinforcing cracks from the inside with resin and cloth boosts strength before finishing. Cleaning with appropriate solvents before priming enhances adhesion, while avoiding premature or excessive sanding safeguards repair integrity. For minor surface scratches, plastic polish is a practical alternative before proceeding to filling and painting.
This layered, attentive approach not only reinstates the fairing’s structural soundness but also restores its aesthetic appeal, preserving the motorcycle’s sleek, factory finish. For further detailed methods on prepping and finishing motorcycle plastics, exploring guides focused on fairing preparation and painting techniques can be invaluable.
3. Mastering the Art of Painting and Priming: Bringing Your Plastic Motorcycle Fairing Back to Life
Achieving a flawless finish on a repaired plastic motorcycle fairing hinges on a carefully executed sequence of sanding, filling, priming, and painting. Initially, sanding removes rough edges, old paint, and surface imperfections, while also exposing hidden damage. Starting with coarser grit sandpaper and progressing to finer grits, this step ensures the surface is smooth and ready for filler.
Applying a plastic-specific filler is essential to bridge cracks, gouges, or holes left from previous damage. This material can be shaped and sanded to seamlessly match the surrounding area. Multiple applications with intermediate sanding are often necessary to build up a perfectly even surface.
Priming follows once the filler is flawlessly smooth. Plastic surfaces are notoriously difficult for paint to adhere to because of their porous nature. Using an adhesion-promoting primer creates a uniform base color and bonds securely with both the plastic and the paint layers, preventing future peeling or flaking.
The painting stage involves applying thin, even coats of color-matched paint, typically with a spray can or airbrush for control and consistency. Allowing each coat to dry fully before proceeding prevents runs or uneven texture. Once satisfied with the color depth, a clear coat seals and protects the finish, imparting a glossy appearance.
For best results, ensure the fairing is thoroughly cleaned before any finishing steps to eliminate dirt, grease, or residue that could undermine adhesion. Also, taking time for proper curing under suitable environmental conditions maximizes durability and gloss.
Incorporating plastic welding or adhesive bonding before filling can improve structural integrity, making the repaired area as strong as it looks. To explore more about sourcing and maintaining your fairings, visit this comprehensive resource on affordable motorcycle fairings.
This integrated method of sanding, filling, priming, and painting restores the fairing’s pristine look and lasting protection, bringing it back close to its original factory condition.
Final thoughts
Successfully repairing plastic motorcycle fairings combines accurate damage assessment, skilled application of plastic welding and fiberglass reinforcement, and meticulous finishing to restore both durability and aesthetic quality. For business owners, mastering this process minimizes costly replacements and maximizes customer satisfaction by delivering lasting results. Each step directly contributes to preserving the integrity and appearance of motorcycle fairings, reinforcing your enterprise’s reputation for quality workmanship. Embracing these comprehensive repair techniques positions your business as a trusted provider of expert motorcycle bodywork solutions.
Ready to elevate your ride? Summit Fairings delivers premium, custom-fit fairings that blend style and durability. Whether you’re chasing speed or turning heads, we’ve got your bike covered. Don’t wait—transform your machine today. Click, customize, and ride with confidence. Your perfect fairing is just a few clicks away. Act now!
About us
undefined