Introduction
Spray painting motorcycle fairings is a critical service that can significantly enhance a motorcycle owner’s satisfaction and your business reputation. For business owners operating in the motorcycle customization or repair industry, understanding the intricate process behind achieving a flawless and durable finish is vital. Every stage—from surface preparation to final protection—impacts not only aesthetic appeal but also longevity and customer satisfaction. This guide walks through essential components: first, the meticulous preparation and surface treatment techniques that ensure paint adhesion; next, the priming methods tailored specifically for plastic fairings; followed by precise spray painting application tactics that prevent common flaws; and finally, finishing, protection, and repair strategies that complete the process and extend the life of painted surfaces. By integrating these expert approaches, your business can deliver results that stand out in quality and durability, driving customer trust and repeat business.
Tables of Contents
Chapter 1: Preparation and Surface Treatment in Spray Painting Motorcycle Fairings
- Mastering Surface Cleaning and Sanding for Flawless Motorcycle Fairings
- Mastering Priming, Base Coating, and Clear Coating for Flawless Motorcycle Fairings
Chapter 2: Mastering Priming Techniques for Flawless Spray Painting of Motorcycle Fairings
- Essential Surface Preparation: Advanced Cleaning and Sanding for Optimal Primer Adhesion on Motorcycle Fairings
- Mastering Primer Application and Drying for Flawless Motorcycle Fairing Finishes
Chapter 3: Mastering Spray Painting Application Methods for Motorcycle Fairings
- Enhancing Motorcycle Fairings with Precision Airbrushing Techniques for Unique Custom Finishes
- The Critical Role of Surface Preparation and Primer Application in Ensuring Durable Motorcycle Fairing Finishes
Chapter 4: Finishing, Protection, and Repair Strategies in Spray Painting Motorcycle Fairings
- Mastering Finishing and Protective Measures for Motorcycle Fairings: Longevity and Visual Excellence
- Mastering Repair and Creative Customization Techniques for Durable, Distinctive Motorcycle Fairings
Chapter 1: Preparation and Surface Treatment in Spray Painting Motorcycle Fairings
1. Mastering Surface Cleaning and Sanding for Flawless Motorcycle Fairings
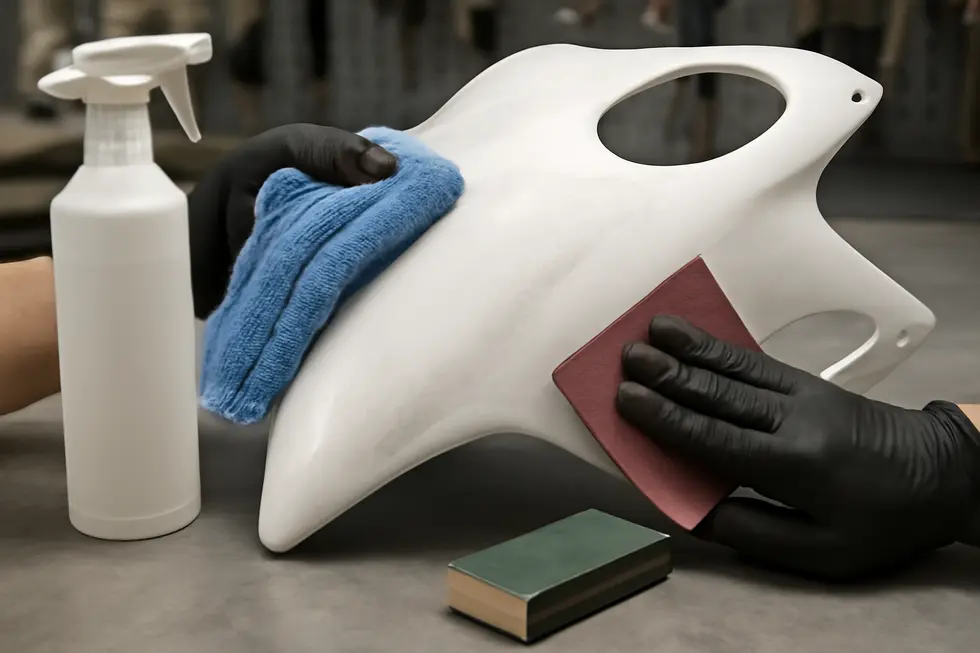
Achieving a durable and visually appealing spray paint finish on motorcycle fairings depends fundamentally on meticulous surface cleaning and sanding. These preparatory steps are indispensable as they establish the ideal conditions for paint adhesion and prevent common finish problems like peeling, uneven texture, or bubbling.
The process begins by thoroughly cleaning the fairings to remove every trace of dirt, grease, oils, and contaminants. Such residues compromise paint bonding and can cause imperfections that mar the finish. It is essential to avoid harsh solvents like pure alcohol since they may damage the plastic’s surface by causing swelling or uneven effects during wiping. Instead, specialized automotive prep sprays or gentle cleaners designed for plastic surfaces are preferred. Performing this task on cool, shaded surfaces reduces quick evaporation of the cleaning agents, allowing them to dissolve and lift grime efficiently without leaving residue.
Once cleaned, sanding the fairings refines the surface texture, enhancing its receptiveness to subsequent layers of primer and paint. For plastic components, using sandpaper specifically suited to plastic avoids damage such as premature wear or chemical reactions. The sanding typically starts with coarser grits—around 80 grit—to expose any imperfections like low spots or scratches. This first step may also reveal areas needing body filler or more detailed repair before painting. After initial shaping, progressive sanding with increasingly fine grits—working up through 400, 800, and often reaching 2000 grit for wet sanding—smooths the surface to near perfection. Wet sanding between coats of primer or paint smooths out sanding marks and prevents a rough final finish.
Throughout sanding, even pressure is crucial to avoid gouging or uneven abrasion. After each sanding phase, all dust must be thoroughly removed using tack cloths or microfiber towels. Dust left on the surface acts as a weak point for primer and paint layers. Following sanding, the fairings should be cleaned again with a compatible prep spray to eliminate microscopic residues, ensuring no particles remain to interfere with adhesion.
This careful sequence—cleaning, coarse sanding, fine sanding, dust removal, and re-cleaning—builds a perfectly prepared substrate that allows primers and paints to form strong, even bonds with the plastic. The smooth texture also supports flawless paint coverage free from orange peel or uneven gloss.
Taking time with cleaning and sanding pays off in the longevity and appearance of the finish. These fundamentals are often the difference between cosmetic success and costly repaints. For those new to working with plastic motorcycle fairings, watching tutorials on proper surface prep techniques can greatly help, as visual guidance clarifies pressure application, sanding motions, and cleaning steps. For further insights into motorcycle fairings and preparation techniques, exploring resources on affordable motorcycle fairings at Summit Fairings provides valuable context tailored to enthusiasts and pros alike.
For a practical demonstration of detailed cleaning methods applicable before painting, the McKee’s 37 channel offers a helpful video tutorial on ceramic coating prep that parallels many important principles in preparing motorcycle fairings for spray painting[1].
[1] https://www.youtube.com/watch?v=I-YioSvfEVs
2. Mastering Priming, Base Coating, and Clear Coating for Flawless Motorcycle Fairings
Achieving a long-lasting, visually striking finish on motorcycle fairings hinges on the meticulous execution of priming, base coating, and clear coating. These stages work together to ensure that paint bonds firmly to the plastic surface, withstands harsh environmental conditions, and offers a glossy, professional appearance.
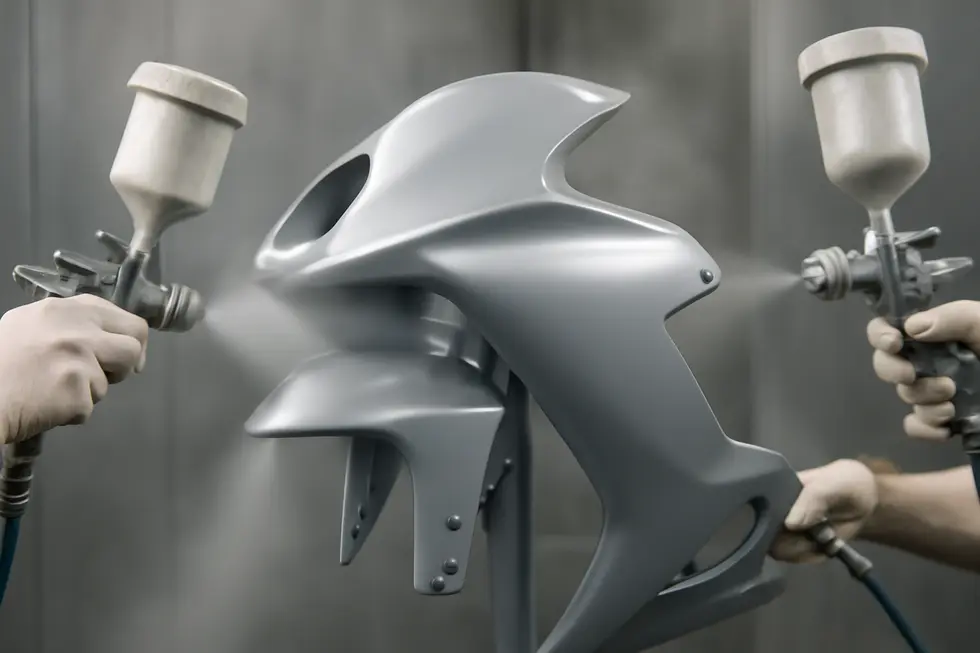
Priming begins after the fairings have been thoroughly cleaned and sanded to a smooth texture. This crucial step involves applying a specialized primer designed for plastic materials, typically an epoxy or high-build formula. The primer’s purpose is twofold: it acts as a protective barrier and it lays down an even foundation that hides minor surface imperfections. When sprayed evenly, the primer fills tiny scratches and irregularities, preventing them from showing through the final paint layers. Once the primer has dried, it must be sanded lightly with fine-grit sandpaper, creating a smooth canvas that maximizes adhesion of the forthcoming base coat.
The base coat applies the visible color and defines the fairing’s aesthetic character. Using equipment like an HVLP (High Volume Low Pressure) spray gun or an airbrush allows for precise control, helping to deliver thin, uniform layers that avoid drips and uneven coverage. Painting in multiple light coats instead of heavy applications is key; each layer should be given adequate time to flash off—meaning it becomes tacky but not fully dry—before the next is added. This technique preserves the smoothness and depth of the finish. Depending on the desired look, base coats can range from solid hues to intricate metallic or airbrushed designs, accommodating custom styles. The integrity of this layer depends heavily on the quality of the primer beneath it and the care taken during application.
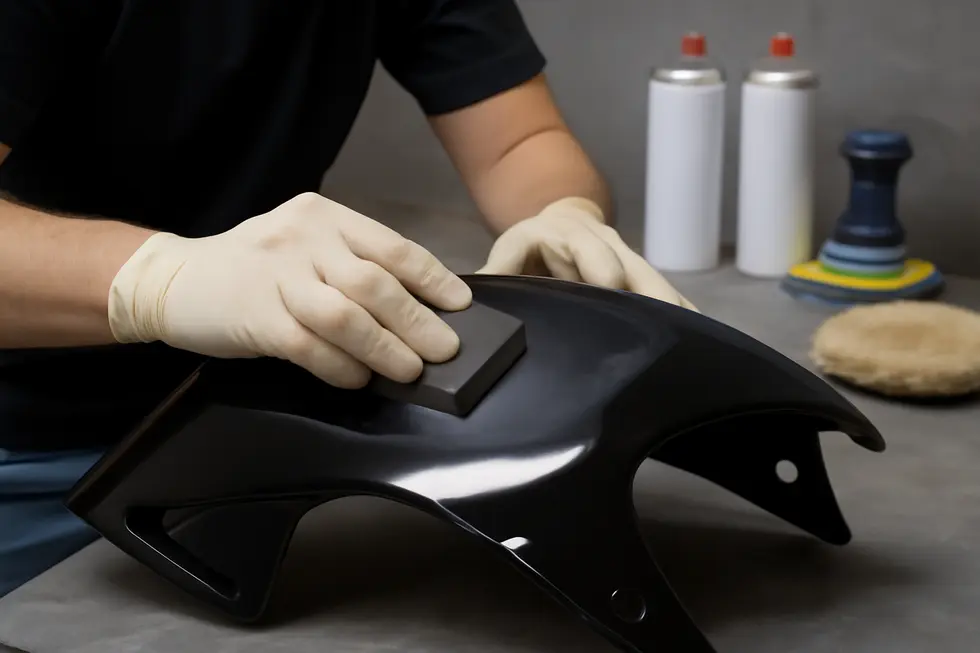
Following the base coat, the clear coat acts as both shield and enhancer. Typically made from polyurethane or acrylic formulations, the clear coat seals the color, imparts gloss, and protects the fairings against scratches, UV rays, moisture, and general wear. Several light layers of clear coat are sprayed onto the dried base to build a durable surface that resists cracking and fading over time. After curing, this layer can be carefully wet sanded with ultra-fine grit sandpaper (commonly 2500 grit) and polished to eliminate any minor surface blemishes and elevate the high-gloss finish. This final polishing phase is what transforms the paint job from good to professional-grade.
Throughout the entire process, maintaining proper spray distance, angle, and motion is essential to prevent runs and ensure even application. Masking off areas not to be painted preserves clean edges and protects hardware or vents from overspray. Additionally, working in a well-ventilated space and wearing protective gear are critical for safety.
For riders and enthusiasts aiming to enhance their motorcycle’s look, mastering these steps offers a reliable path to a custom-painted fairing with lasting beauty and resilience. For deeper technical guidance, including tool recommendations and detailed procedures, the Eastwood DIY auto paint guide provides an invaluable resource.
To explore quality materials and options for your project’s fairings, consider reviewing detailed selections at Summit Fairings, a comprehensive source tailored to motorcycle customization needs.
Chapter 2: Mastering Priming Techniques for Flawless Spray Painting of Motorcycle Fairings
1. Essential Surface Preparation: Advanced Cleaning and Sanding for Optimal Primer Adhesion on Motorcycle Fairings
Achieving a flawless finish when spray painting motorcycle fairings begins long before the primer touches the surface. The foundation for durable adhesion, longevity, and an even paint job lies in meticulous surface preparation, particularly through cleaning and sanding processes tailored for plastic fairings. These steps eliminate contaminants, create mechanical grip, and ensure the primer and subsequent paint layers bond securely without peeling or bubbling.
Cleaning motorcycle fairings involves more than a simple wipe down. Initial rinsing with soap and water removes loose dirt and environmental residues, setting the stage for deeper cleaning. Using specialized automotive surface cleaners is critical; these formulations balance mild alcohol content, surfactants, and lubricants to dissolve oils and stubborn grime without harming or swelling the plastic substrate. Harsh solvents such as pure alcohol or acetone must be avoided as they can damage the fairings’ surface integrity. Application with a fresh microfiber towel distributes the cleaner evenly without scratching. Cleaning on cool surfaces, away from direct sunlight or heat sources, prevents premature drying that can cause streaks or residue buildup, which interfere with primer adhesion.
Once the surface is impeccably clean, sanding crafts the ideal bonding texture. Motorcycle fairings are commonly made of ABS or similar plastics, which respond well to wet sanding techniques. Wet sanding reduces dust generation and heat buildup, protecting the fairing’s delicate surface. The process starts with medium grit sandpaper (typically 320 to 400 grit) to uniformly scuff the existing surface. This step is crucial to break up smooth gloss or any remnants of old coatings, creating microscopic roughness that the primer can mechanically lock onto.
After initial scuffing, progressively finer grits—ranging from 600 to 800—smooth the surface further. This two-tiered sanding not only improves adhesion but also minimizes imperfections, which directly influence the evenness and visual quality of the paint finish. Between sanding stages, thorough removal of dust is mandatory. Using tack cloths or repeating the mild surface cleaning with cleaning sprays ensures all particles that could mar the finish are eliminated before priming.
This regimented approach to surface preparation—systematic cleaning followed by graduated wet sanding—forms the backbone of successful spray painting projects on motorcycle fairings. It ensures the primer fully adheres without faults and sets the scene for smooth, consistent paint application. This method is applicable across various motorcycle types, including those with matte finishes such as certain Harley Davidson models, and is especially important when dealing with dirt bike plastics which endure tougher conditions.
Adopting these detailed cleaning and sanding techniques addresses common challenges associated with painting plastics, bridging the gap between raw fairings and a beautifully primed canvas. Such careful preparation preserves the investment in custom paintwork and enhances the resilience and allure of the final finish.
For further insights into high-quality motorcycle fairings and preparation guidance, check out this resource on Summit Fairings’ blog.
External reference:
https://blog.summitfairings.com/explore-the-best-motorcycle-fairings-at-summit-fairings/
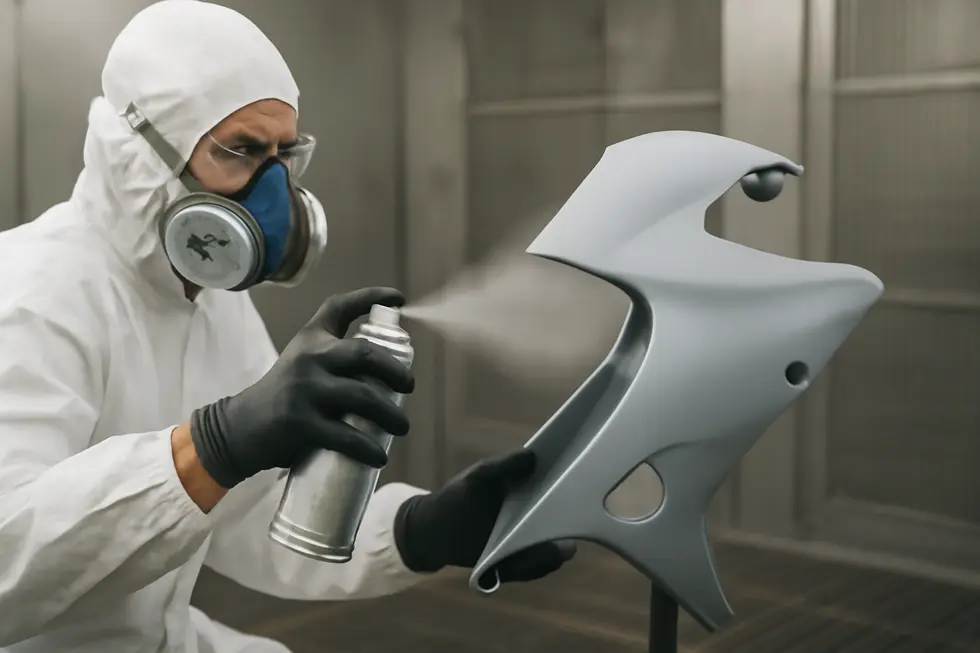
2. Mastering Primer Application and Drying for Flawless Motorcycle Fairing Finishes
Achieving a durable and visually striking finish on motorcycle fairings begins with mastering the primer application and drying protocols. This stage is particularly crucial when dealing with plastic fairings due to their unique surface properties. Unlike metals or fiberglass, plastics demand primers formulated specifically to bond securely while retaining flexibility to prevent cracking or peeling during normal flexing and vibrations.
The process begins only after meticulous surface preparation, which ensures that the primer adheres fully and evenly. Once the fairings are removed from the motorcycle and cleaned thoroughly to eliminate all dirt, oils, and residues, a light sanding step creates a fine roughness. This texture is not for aesthetic purposes but to enhance mechanical adhesion. Without this key step, primers may not grip the smooth plastic surface, compromising the longevity of the paintwork.
Applying the primer requires discipline and finesse. Instead of a single heavy coat, multiple thin layers are sprayed with precision. This approach avoids runs, drips, and uneven build-up. Typically, two to three very thin coats of a plastic-compatible primer ensure a uniform base. Each coat should be allowed to dry for 10 to 15 minutes—just enough time for the solvent to evaporate and the primer to tack up without fully curing. This interval makes each successive layer bond perfectly to the one beneath it, gradually building an optimal foundation for paint.
After the final primer coat, the drying protocol demands patience. Depending on environmental conditions such as temperature and humidity and the specific primer chemistry, a full curing time from 30 minutes to an hour is required before any further sanding or direct paint application. This complete drying ensures the primer hardens with ideal adhesion and flexibility, creating a resilient intermediary layer that prevents peeling and cracking once the painted layers undergo stress.
Layering continues beyond priming, as the base paint must also be applied in thin, consecutive coats. Rushing to apply thick paint disrupts the seamless surface, inviting drips and uneven color. Each paint layer benefits from the thorough priming underneath, rendering the final finish both smooth and vibrant. The primer’s compatibility with the chosen paint system—commonly acrylic or urethane-based formulations—is compulsory. Primers made for plastic substrates accommodate expansion and contraction, matching the plastic’s physical properties closely.
Inspecting the primed surface after drying is an often overlooked but vital step. Minor imperfections can be corrected with very light sanding and targeted primer touch-ups before moving forward. This attention to detail prevents flaws from becoming magnified under paint or clear coats, safeguarding the professional appearance of the completed fairing.
Throughout the process, working in a ventilated space and using protective gear is essential for safety and optimal results. As every layer dries, the fairing gradually transforms from a simple plastic panel into a canvas ready for its final, glossy transformation.
For those seeking detailed visual guidance and procedural nuances, practical demonstrations such as those found in tutorials on painting dirt bike plastics offer insightful, step-by-step direction. Their techniques reinforce the value of patience and precision during primer application, critical for any enthusiast aiming to enhance their motorcycle’s aesthetics with quality spray painting.
For more insights on motorcycle fairings and finishing techniques, exploring resources like Summit Fairings offers an extensive overview of parts and preparation tips.
(Reference: https://www.tiktok.com/discover/painting-my-dirt-bike-plastics)
Chapter 3: Mastering Spray Painting Application Methods for Motorcycle Fairings
1. Enhancing Motorcycle Fairings with Precision Airbrushing Techniques for Unique Custom Finishes
Achieving a truly personalized look on motorcycle fairings often calls for the nuanced control that airbrushing provides within spray painting methods. Airbrushing offers unparalleled precision by allowing painters to control the paint flow through a miniature spray gun, which is ideal for the curved and complex surfaces typical of motorcycle fairings. This fine control not only ensures smooth, even coverage but enables a wealth of detailed customization options that go beyond basic spray painting.
One of the most celebrated advantages of airbrushing is its ability to build subtle layering and gradients. Skilled artists apply multiple thin coats of paint, gradually transitioning colors to produce soft fades and shadow effects. This technique enhances depth and dimension, making design motifs like flames, metallic sheens, or abstract shading appear more realistic and visually captivating. Unlike flat paint applications, airbrushed gradients blend seamlessly, responding well to the contours of plastic fairings.
Additionally, airbrushing excels when paired with stencils or freehand artistry. Stencils enable the consistent replication of complex logos, geometric shapes, or detailed graphics, ensuring precision and uniformity across multiple fairings or sections. Conversely, freehand airbrushing unlocks expressive possibilities, where customized portraits, mascots, or intricate linework can flourish. This approach demands steady hands and experience but yields one-of-a-kind results that strongly resonate with the rider’s personality and style.
Special paint types elevate the artistic scope of airbrushing on fairings. Candy paints, for example, are translucent layers applied over metallic base coats to create glowing, jewel-like finishes. Their application requires finesse, as multiple airbrushed layers must be carefully built up and followed by a clear coat to protect and amplify the depth of color. The interplay between candy paints and clear coats creates a striking finish with remarkable gloss and visual complexity.
Surface preparation remains pivotal for airbrushing success. Before painting, fairings must be meticulously cleaned, sanded lightly with fine-grit paper, and primed with plastic-specific products. These steps ensure that the delicate, often thin airbrushed layers adhere properly and endure everyday wear. Selecting the right paint is equally critical; acrylic water-based paints and carefully thinned automotive-grade paints are preferred due to their smooth flow characteristics and compatibility with airbrush equipment.
Investing in quality airbrushing tools dramatically impacts the final artwork. A dependable air compressor paired with a finely calibrated airbrush minimizes common issues like paint spitting or uneven sprays. For enthusiasts beginning their airbrushing journey, acquiring reliable equipment not only improves results but accelerates learning, encouraging more ambitious designs.
The finishing phase solidifies the artwork’s durability and appearance. Multiple clear coats are sprayed after airbrushing to shield the paint against UV rays, moisture, and scratches while enhancing gloss. Between coats, wet sanding with ultra-fine grit can eliminate small imperfections, preparing the surface for polishing. This process yields the smooth, mirror-like finish expected in professional custom work.
Exploring airbrush customization offers riders and painters a path to transform ordinary fairings into vivid, personal statements. Starting with simpler graphics such as stripes or logos helps build confidence before advancing to complex designs and effects like candy paints. For detailed insights and inspiration, consider reviewing expert resources on airbrush paint types and techniques, which delve deeply into equipment choices and design strategies.
To complement the painting mastery, exploring affordable and quality motorcycle fairings can provide excellent canvases ready for customization, ensuring both performance and visual appeal are top-notch.
For comprehensive professional techniques and example showcases of airbrush artistry in motorcycle fairings, external resources from specialized custom painting services offer valuable perspectives on achieving show-quality finishes.
External resource: Psychotic Air – professional custom painting and finishing techniques
2. The Critical Role of Surface Preparation and Primer Application in Ensuring Durable Motorcycle Fairing Finishes
Achieving a flawless and long-lasting finish on motorcycle fairings begins well before any paint meets the surface. The foundation of any successful spray painting job lies in meticulous surface preparation and the correct application of primer. These initial steps are vital to ensure the paint not only adheres properly but also retains its appearance over time despite exposure to elements and mechanical stress.
The process begins with a thorough cleaning routine aimed at removing every trace of dirt, grease, and existing residue. Unlike pure alcohol, which can be harsh and risk damaging finishes—especially matte coatings—specialized preparatory sprays are favored. These sprays blend mild alcohol derivatives with surfactants and lubricants, designed to cleanse without causing swelling or deterioration of plastic fairings. This step guarantees that contaminants do not interfere with the adhesion properties of primer and subsequent paint layers.
After cleaning, the fairing surface needs to be skillfully sanded to create what experts call a mechanical “key.” This subtle texturing, achieved using fine-grit sandpaper, establishes an ideal grip for primer molecules. Sanding also helps smooth subtle imperfections that, if left untreated, would become apparent after painting. For metal fairings, preparatory treatments may extend to light abrasive blasting or bead blasting. These techniques refine the metal surface without damaging it, promoting superior primer bonding and leading to higher durability.
Primer application is a stage that demands attention to both material compatibility and technique. Plastic and metal fairings require primers formulated explicitly for their substrate to prevent peeling and ensure strong adhesion. The primer should be evenly sprayed in thin, progressive coats rather than a single heavy layer. Allowing each coat to dry thoroughly before applying the next builds a consistent, smooth base and minimizes risks of runs or uneven texture. This measured approach sets the stage for an impeccable paint finish, protecting against chipping and environmental damage.
Environmental factors play a significant role throughout surface preparation and priming. Working in a clean, dust-free environment is crucial to prevent airborne particles from settling onto the still-wet primer or paint. Similarly, the temperature of the workspace and the surfaces must be controlled; painting on freshly cleaned or warm fairings, or under direct sunlight, can cause premature drying or bubbling, undermining the finish quality.
Masking also factors into preparation, especially when creating distinct patterns or protecting sensitive areas. Precision masking with tape or custom stencils preserves edges and prevents overspray, giving the painter control over detail and overall aesthetics.
Ultimately, investing effort in surface preparation and primer application transforms the entire spray painting process. It ensures each following coating adheres as intended, contributing to both the paint’s durability and its professional appearance. For those looking to visualize the detailed methodology, a comprehensive video tutorial demonstrates cleaning with a specialized prep spray and the importance of cool working surfaces, offering practical insights into achieving superior results on matte motorcycle fairings.
For further exploration of quality motorcycle fairings and related techniques, consider visiting a well-curated source dedicated to affordable and diverse options that complement professional finishing processes.
Detailed tutorial on ceramic coating and surface preparation
Chapter 4: Finishing, Protection, and Repair Strategies in Spray Painting Motorcycle Fairings
1. Mastering Finishing and Protective Measures for Motorcycle Fairings: Longevity and Visual Excellence
Mastering Finishing and Protective Measures for Motorcycle Fairings: Longevity and Visual Excellence
The pursuit of a flawless finish on motorcycle fairings extends beyond the mere application of paint—it encompasses a blend of meticulous finishing techniques and proactive protection strategies that together define the longevity and visual appeal of the final coating. Achieving a finish with depth, gloss, and resistance to environmental wear demands rigorous attention to the entire finishing process, beginning with surface preparation and culminating in long-term maintenance.
Optimal finishing starts with ensuring that the fairings’ surfaces are impeccably clean and smooth. This foundation allows the layers of paint and clear coat to bond tightly and evenly, creating the base for a durable finish. Multiple, thin coats of paint applied with specialized plastic spray paints ensure uniform coverage, while preventing runs or drips that can mar the aesthetic. A key step follows: the application of a high-quality clear coat, which not only intensifies color vibrancy by adding an optical depth but also acts as a defensive shield against UV rays, scratches, and moisture intrusion. This clear layer preserves the integrity of the underlying paint, maintaining the fairings’ showroom luster through various weather and riding conditions.
Protection after painting is equally imperative. Exposure to sunlight demands particular caution, as ultraviolet radiation gradually fades colors and weakens paint binding. Strategically parking motorcycles in shaded areas or indoors reduces UV damage, keeping colors vibrant. Employing protective covers, preferably those with built-in UV blockers, acts as a barrier against dust, rain, and sun, minimizing surface degradation while the bike is stationary.
How the painted fairings are cleaned also greatly influences their sustained appearance. Gentle washing methods—using mild, non-abrasive soaps combined with soft cloths or sponges—are essential to avoid scratching or dulling the finish. Harsh detergents or rough scrubbing can disrupt the protective clear coat layer, leading to premature wear or an uneven sheen.
Regular application of motorcycle-safe waxes further fortifies the finish by creating an invisible, glossy protector that repels dirt and moisture. Waxes enhance surface smoothness and add a reflective shine, giving the paint a freshly polished look while extending its lifespan.
Occasionally, imperfections such as swirl marks or minor scratches appear despite careful handling. Addressing these blemishes through paint correction techniques—such as controlled polishing with specialized compounds—can revive dulled finishes and restore gloss. These maintenance practices complement the original finishing work, ensuring the paintwork remains crisp and visually striking over time.
Collectively, these finishing and protective measures transform spray-painted motorcycle fairings into resilient canvases that withstand the test of both time and environment. They maximize the vibrancy, gloss, and robustness of every painted surface, ultimately enhancing the motorcycle’s overall aesthetic and value. For further insights into maintaining and protecting painted surfaces, exploring dedicated resources like the Summit Fairings blog can provide tailored, practical guidance.
Adopting a comprehensive approach—where delicate finishing methods meet thoughtful maintenance and protection—ensures that motorcycle fairings not only look spectacular but continue to do so through miles of riding and diverse weather exposures.
2. Mastering Repair and Creative Customization Techniques for Durable, Distinctive Motorcycle Fairings
Restoring and customizing motorcycle fairings through spray painting blends practical repair methods with artistic expression. This process starts with thorough cleaning and sanding to remove old paint and surface imperfections, forming a crucial foundation for lasting paint adhesion. Repairing physical damage such as cracks or dents typically involves applying plastic fillers designed to bond with fairing substrates. After the filler cures, the area is sanded smooth and carefully blended into the surrounding surface, ensuring no visible transitions that could compromise both appearance and paint durability.
Priming plays a pivotal role in both restoration and customization. A high-quality plastic primer seals the substrate, providing uniform coverage while protecting against corrosion or underlying material degradation. Primers also enhance the paint’s ability to firmly adhere, reducing risks of peeling or chipping once the customized design is applied.
When it comes to personalizing motorcycle fairings, airbrushing stands out as an exceptional technique for detailed and sophisticated artwork. This method allows for precise control, enabling riders to incorporate intricate logos, vibrant flames, or unique stencil patterns that reflect their personality. Airbrush paints used are typically automotive-grade or acrylic-based formulations, offering durability while delivering vivid color depth and subtle shading impossible with conventional spray cans. Artistic skills coupled with an air compressor setup unlock limitless creative possibilities, transforming fairings into rolling canvases.
Alternative styling approaches like patina and weathered effects appeal to enthusiasts desiring a vintage or rugged aesthetic. Layered colors combined with selective sanding evoke the natural wear of time, adding character and storytelling to the bike’s overall design. Masking and stenciling techniques also empower precision in creating sharp lines, stripes, and elaborate repeats that would otherwise be challenging to freehand. Using quality masking tape or custom-cut stencils ensures crisp edges, vital for professional-looking graphic elements.
Selecting the right colors and finishes culminates the customization journey. Options range from classic mattes and glossy metallics to specialty effects such as pearlescent or chameleon paints that shift hues depending on lighting angles. This final layer of creative decision-making not only enhances individuality but also complements the protective clear coat, which guards against abrasion, UV damage, and moisture.
Combining these repair and customization steps requires patience and attention to detail. Allowing sufficient drying time between coats, working in well-ventilated areas with protective equipment, and using appropriate sanding grits to smooth layers ensures a flawless finish. Whether revitalizing worn fairings or crafting a one-of-a-kind design, this integrated approach balances resilience with style.
For enthusiasts seeking expert advice and inspirational ideas on airbrush customization and paint selection, resources such as Speedway Media provide valuable guidance. Additionally, exploring comprehensive preparation and masking techniques expands one’s capability to achieve professional results. To further complement these insights, discovering unmatched choices and specialized techniques for motorcycle fairings can be explored through dedicated motorcycle fairings resources.
Ultimately, mastering repair and creative customization in spray painting motorcycle fairings ensures that riders not only protect their investment but also amplify its visual impact, making their bike a truly personalized expression of performance and artistry.
Final thoughts
Delivering high-quality spray painting services for motorcycle fairings requires not only skilled labor but also a comprehensive understanding of each step—from surface preparation to final finishing. Proper cleaning and sanding optimize paint adhesion, while the correct use of plastic primers prevents peeling and promotes durability. Applying multiple thin coats of specialized plastic spray paint ensures a flawless finish, free from runs and uneven textures. The final steps of clear coating, meticulous block sanding, and polishing not only protect the paintwork but also enhance the visual depth and gloss, setting your business apart with professionalism. For business owners, mastering these processes sharpens your competitive edge by guaranteeing results that impress customers both visually and in longevity. Investing the time and care into these proven techniques can increase repeat business, build trusted client relationships, and elevate your shop’s reputation in a demanding industry.
Ready to elevate your ride? Summit Fairings delivers premium, custom-fit fairings that blend style and durability. Whether you’re chasing speed or turning heads, we’ve got your bike covered. Don’t wait—transform your machine today. Click, customize, and ride with confidence. Your perfect fairing is just a few clicks away. Act now!
About us
undefined